
MovieShaker v3.1 Operating Instructions
Page 8
...; RealProducer 8.5 Basic is needed to execute MovieShaker commands, be sure to set the maximum and minimum sizes of virtual memory to malfunction. Check the remaining battery charge before exporting.
...; RealProducer 8.5 Basic is needed to execute MovieShaker commands, be sure to set the maximum and minimum sizes of virtual memory to malfunction. Check the remaining battery charge before exporting.
MovieShaker v3.1 Operating Instructions
Page 18
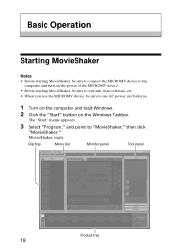
Clip tray Menu bar Monitor panel Tool panel Product tray 18 The "Start" menu appears. 3 Select "Program," and point to use AC power, not batteries. 1 Turn on the computer and load Windows. 2 Click the "Start" button on the Windows Taskbar. MovieShaker starts. Basic Operation Starting MovieShaker Notes • Before starting ...
Clip tray Menu bar Monitor panel Tool panel Product tray 18 The "Start" menu appears. 3 Select "Program," and point to use AC power, not batteries. 1 Turn on the computer and load Windows. 2 Click the "Start" button on the Windows Taskbar. MovieShaker starts. Basic Operation Starting MovieShaker Notes • Before starting ...
MovieShaker v3.1 Operating Instructions
Page 44
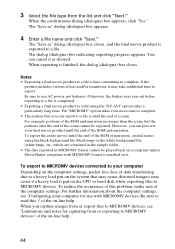
The "Save as desired. Otherwise, the battery may run out before exporting to a file is exported to a file. The dialog (dialogue) box indicating exporting progress appears. For example, portions of the BGM ... (Be sure to read this.)" of the on it. For further information about the computer settings, see "Limitations and notes for use AC power, not batteries. The "Save as" dialog (dialogue) box closes, and the final movie product is completed. • Exporting a final movie product to a file using the black background...
The "Save as desired. Otherwise, the battery may run out before exporting to a file is exported to a file. The dialog (dialogue) box indicating exporting progress appears. For example, portions of the BGM ... (Be sure to read this.)" of the on it. For further information about the computer settings, see "Limitations and notes for use AC power, not batteries. The "Save as" dialog (dialogue) box closes, and the final movie product is completed. • Exporting a final movie product to a file using the black background...
Network Function Operating Instructions
Page 2
...power adaptor or replace the battery pack with storage media, etc. NetFront is subject to licensing. 2-GB On trademarks •"Memory Stick" and are registered trademarks of Sony Corporation. •The BLUETOOTH trademarks are owned by their respective companies. Also, exit the NETWORK mode when setting the ...send or receive e-mail, or view a Web page. •Do not remove the battery pack or disconnect the AC power adaptor while in a country or area not described above, the network function is intended to be compensated for if recording or playback of attached or downloaded ...
...power adaptor or replace the battery pack with storage media, etc. NetFront is subject to licensing. 2-GB On trademarks •"Memory Stick" and are registered trademarks of Sony Corporation. •The BLUETOOTH trademarks are owned by their respective companies. Also, exit the NETWORK mode when setting the ...send or receive e-mail, or view a Web page. •Do not remove the battery pack or disconnect the AC power adaptor while in a country or area not described above, the network function is intended to be compensated for if recording or playback of attached or downloaded ...

Network Function Operating Instructions
Page 68
...Check the Certified Status" is indicated and the camcorder cannot access the Internet. The message "Low Battery" is indicated and the camcorder cannot access the Internet. c Charge the battery pack or use the AC power adaptor, then connect again. c The DNS setup may be...22. Troubleshooting Trouble accessing the Internet The message "...Incomplete" or "Authentication Error..." When the camcorder needs to the procedure described in "Setting network preferences" on . The message "Bluetooth Connection Error" is not set. c Try to the camcorder. c The clock of your setup according...
...Check the Certified Status" is indicated and the camcorder cannot access the Internet. The message "Low Battery" is indicated and the camcorder cannot access the Internet. c Charge the battery pack or use the AC power adaptor, then connect again. c The DNS setup may be...22. Troubleshooting Trouble accessing the Internet The message "...Incomplete" or "Authentication Error..." When the camcorder needs to the procedure described in "Setting network preferences" on . The message "Bluetooth Connection Error" is not set. c Try to the camcorder. c The clock of your setup according...

Network Function Operating Instructions
Page 72
...Bluetooth devices are registered. The capacity of Modem Init on the PPP screen during manual setup may be wrong. • The setup of the battery pack is busy. Check the setup. If, the message still appears, use the AC power adaptor. If an entry is too far from ...Memory Error Memory Stick Error Memory Stick Error Outgoing Mail Canceled Memory Stick Error Unable to a telephone terminal. Change the battery pack or use another "Memory Stick". exit the NETWORK mode, turn off the camcorder, remove and insert the "Memory Stick", then operate the camcorder. Check that the Bluetooth...
...Bluetooth devices are registered. The capacity of Modem Init on the PPP screen during manual setup may be wrong. • The setup of the battery pack is busy. Check the setup. If, the message still appears, use the AC power adaptor. If an entry is too far from ...Memory Error Memory Stick Error Memory Stick Error Outgoing Mail Canceled Memory Stick Error Unable to a telephone terminal. Change the battery pack or use another "Memory Stick". exit the NETWORK mode, turn off the camcorder, remove and insert the "Memory Stick", then operate the camcorder. Check that the Bluetooth...

Operating Instructions
Page 2
...use . You will soon be of sufficient magnitude to constitute a risk of lithium ion batteries in the U.S.A. LITHIUM ION BATTERY. DCR-IP7BT only Countries and areas where you call 1-800-222-SONY (United States only). This symbol is very easy to persons. DISPOSE OF PROPERLY. For ...use network functions are restricted. Welcome! For details, refer to rain or moisture. For customers in household or business trash may be producing home video that may not cause harmful interference, and (2) this Sony Handycam. Caution: Do not handle damaged or leaking lithium ion battery....
...use . You will soon be of sufficient magnitude to constitute a risk of lithium ion batteries in the U.S.A. LITHIUM ION BATTERY. DCR-IP7BT only Countries and areas where you call 1-800-222-SONY (United States only). This symbol is very easy to persons. DISPOSE OF PROPERLY. For ...use network functions are restricted. Welcome! For details, refer to rain or moisture. For customers in household or business trash may be producing home video that may not cause harmful interference, and (2) this Sony Handycam. Caution: Do not handle damaged or leaking lithium ion battery....

Operating Instructions
Page 10
... Installing the battery pack 18 Charging the battery pack 19 Connecting to a wall outlet 21 Step 2 Setting the date and time ........ 23 Step 3 Inserting a cassette 27 Recording - Tape Photo recording 47 Using the wide mode 49 Using the fader function 51 Using special effects - Date search 77 Searching for a scene - DCR-IP7BT only Using...
... Installing the battery pack 18 Charging the battery pack 19 Connecting to a wall outlet 21 Step 2 Setting the date and time ........ 23 Step 3 Inserting a cassette 27 Recording - Tape Photo recording 47 Using the wide mode 49 Using the fader function 51 Using special effects - Date search 77 Searching for a scene - DCR-IP7BT only Using...

Operating Instructions
Page 11
... 164 Self-diagnosis display 170 Warning indicators and messages .... 171 Additional Information Compatible cassettes 173 About the "InfoLITHIUM" battery pack 174 About i.LINK 176 Using your computer - DCR-IP7BT only ...... 156 Network operation - DCR-IP7BT only Accessing the network 162 Troubleshooting Types of contents Connecting with a computer Viewing images recorded on a tape using your computer 155 Viewing...
... 164 Self-diagnosis display 170 Warning indicators and messages .... 171 Additional Information Compatible cassettes 173 About the "InfoLITHIUM" battery pack 174 About i.LINK 176 Using your computer - DCR-IP7BT only ...... 156 Network operation - DCR-IP7BT only Accessing the network 162 Troubleshooting Types of contents Connecting with a computer Viewing images recorded on a tape using your computer 155 Viewing...

Operating Instructions
Page 12
... it the cassette in a straight line deeply into the cassette compartment with its v mark facing the lens side. Connecting the power cord (p. 21) Use the battery pack when using your camcorder outdoors (p. 18). Insert it clicks.
... it the cassette in a straight line deeply into the cassette compartment with its v mark facing the lens side. Connecting the power cord (p. 21) Use the battery pack when using your camcorder outdoors (p. 18). Insert it clicks.

Operating Instructions
Page 13
... is closed, pull out the viewfinder until it clicks and use it to monitor your camcorder by holding the viewfinder, the LCD panel, the battery pack, or the jack cover. 13 The VCR lamp lights up . START/STOP Monitoring the playback picture on the control button to VCR....the clock before recording (p. 23). 3 Set the POWER switch to open the LCD panel. To stop recording, press START/STOP again. POWER CAMERA MEMORY/ NETWORK VCR (CHG) OFF ON MODE 4 Press START/STOP. Viewfinder When the LCD panel is not set up your recording. Quick Start Guide Recording a picture (p....
... is closed, pull out the viewfinder until it clicks and use it to monitor your camcorder by holding the viewfinder, the LCD panel, the battery pack, or the jack cover. 13 The VCR lamp lights up . START/STOP Monitoring the playback picture on the control button to VCR....the clock before recording (p. 23). 3 Set the POWER switch to open the LCD panel. To stop recording, press START/STOP again. POWER CAMERA MEMORY/ NETWORK VCR (CHG) OFF ON MODE 4 Press START/STOP. Viewfinder When the LCD panel is not set up your recording. Quick Start Guide Recording a picture (p....

Operating Instructions
Page 17
... Adaptor with Bluetooth Function. Getting started Checking supplied accessories 1 Wireless Remote Commander (1) (p. 192) RMT-817: DCR-IP7BT RMT-818: DCR-IP5 2 AC-L20A AC power adaptor (1), the power cord (1) (p. 19) 3 NP-FF50 battery pack (1) (p. 18, 19) 4 Size AA (R6) batteries for the Remote Commander (2) (p. 192) 5 USB cable* (1) (p. 157) 6 "Memory Stick"* (1) (p. 108) 7 A/V connecting cable (1) (p. 45) 8 i.LINK...
... Adaptor with Bluetooth Function. Getting started Checking supplied accessories 1 Wireless Remote Commander (1) (p. 192) RMT-817: DCR-IP7BT RMT-818: DCR-IP5 2 AC-L20A AC power adaptor (1), the power cord (1) (p. 19) 3 NP-FF50 battery pack (1) (p. 18, 19) 4 Size AA (R6) batteries for the Remote Commander (2) (p. 192) 5 USB cable* (1) (p. 157) 6 "Memory Stick"* (1) (p. 108) 7 A/V connecting cable (1) (p. 45) 8 i.LINK...

Operating Instructions
Page 18
... of the arrow until it clicks. 1 2 2 1 To remove the battery pack The battery pack is removed in the same way as the battery terminal cover. Step 1 Preparing the power supply Installing the battery pack We recommend that the battery pack is properly installed. Check also the battery pack is not attached to the camcorder askew. 18
... of the arrow until it clicks. 1 2 2 1 To remove the battery pack The battery pack is removed in the same way as the battery terminal cover. Step 1 Preparing the power supply Installing the battery pack We recommend that the battery pack is properly installed. Check also the battery pack is not attached to the camcorder askew. 18

Operating Instructions
Page 19
After the charge is completed, the CHG lamp goes out (full charge). 2 4 CAMERA MEMORY/ NETWORK VCR POWER (CHG) OFF ON MODE 1 CHG lamp After charging the battery pack Disconnect the AC power adaptor from coming into contact with the plug's v mark facing the lens side. (2) Connect the power cord to the ...DC plug of the AC power adaptor. See page 174 for your camcorder. Note Prevent metallic objects from the DC IN jack on the "InfoLITHIUM" battery pack. (1) Open the jack cover and connect the AC power adaptor supplied with your camcorder to OFF (CHG). The CHG lamp lights up when ...
After the charge is completed, the CHG lamp goes out (full charge). 2 4 CAMERA MEMORY/ NETWORK VCR POWER (CHG) OFF ON MODE 1 CHG lamp After charging the battery pack Disconnect the AC power adaptor from coming into contact with the plug's v mark facing the lens side. (2) Connect the power cord to the ...DC plug of the AC power adaptor. See page 174 for your camcorder. Note Prevent metallic objects from the DC IN jack on the "InfoLITHIUM" battery pack. (1) Open the jack cover and connect the AC power adaptor supplied with your camcorder to OFF (CHG). The CHG lamp lights up when ...

Operating Instructions
Page 20
.... Something is wrong with this unit, disconnect the plug from the wall outlet as soon as possible to charge an empty battery pack Recording time Recording with Battery pack the viewfinder Continuous* Typical** NP-FF50 80 45 (supplied) NP-FF70 170 100 Recording with LCD closed 80 165...170 100 Approximate number of minutes of minutes for recording while you use your camcorder in the following cases: - The battery life will be shorter. Playing time Battery pack NP-FF50 (supplied) NP-FF70 Playing time on LCD screen 65 135 Playing time with the LCD screen Backlighting ...
.... Something is wrong with this unit, disconnect the plug from the wall outlet as soon as possible to charge an empty battery pack Recording time Recording with Battery pack the viewfinder Continuous* Typical** NP-FF50 80 45 (supplied) NP-FF70 170 100 Recording with LCD closed 80 165...170 100 Approximate number of minutes of minutes for recording while you use your camcorder in the following cases: - The battery life will be shorter. Playing time Battery pack NP-FF50 (supplied) NP-FF70 Playing time on LCD screen 65 135 Playing time with the LCD screen Backlighting ...

Operating Instructions
Page 21
What is compatible with the "InfoLITHIUM" battery pack (F series). Recommended charging temperature We recommend charging the battery pack in an ambient temperature of Sony Corporation. This unit is "InfoLITHIUM"? Your camcorder operates only with compatible electronic equipment. "InfoLITHIUM" F series battery packs have the mark. Connecting to a wall outlet When you intend to use your camcorder...
What is compatible with the "InfoLITHIUM" battery pack (F series). Recommended charging temperature We recommend charging the battery pack in an ambient temperature of Sony Corporation. This unit is "InfoLITHIUM"? Your camcorder operates only with compatible electronic equipment. "InfoLITHIUM" F series battery packs have the mark. Connecting to a wall outlet When you intend to use your camcorder...

Operating Instructions
Page 22
Step 1 Preparing the power supply Notes •The AC power adaptor cannot supply power if the battery pack is attached to the DC IN jack, even when the power cord is connected to your camcorder. •The DC IN jack has "source priority." A car battery You cannot use car batteries with the camcorder. 22 This means that the battery pack cannot supply power when the power cord is not plugged into a wall outlet.
Step 1 Preparing the power supply Notes •The AC power adaptor cannot supply power if the battery pack is attached to the DC IN jack, even when the power cord is connected to your camcorder. •The DC IN jack has "source priority." A car battery You cannot use car batteries with the camcorder. 22 This means that the battery pack cannot supply power when the power cord is not plugged into a wall outlet.

Operating Instructions
Page 23
...the center z or B on the control button. (5) Select CLOCK SET, then press the center z or B on the control button. The CAMERA or MEMORY lamp (DCR-IP7BT only) lights up. (2) Select FN, then press the center z on the control button. 2 FN 3 MENU 4 SETUP MENU CLOCK SET LTR SIZE DEMO MODE ... may appear) because the built-in rechargeable battery installed in your camcorder for the first time. First, set your camcorder for about 3 months, the date and time settings may be displayed each time you set the POWER switch to CAMERA or MEMORY (DCR-IP7BT only). LTR SIZE DEMO MODE RETURN 5 ...
...the center z or B on the control button. (5) Select CLOCK SET, then press the center z or B on the control button. The CAMERA or MEMORY lamp (DCR-IP7BT only) lights up. (2) Select FN, then press the center z on the control button. 2 FN 3 MENU 4 SETUP MENU CLOCK SET LTR SIZE DEMO MODE ... may appear) because the built-in rechargeable battery installed in your camcorder for the first time. First, set your camcorder for about 3 months, the date and time settings may be displayed each time you set the POWER switch to CAMERA or MEMORY (DCR-IP7BT only). LTR SIZE DEMO MODE RETURN 5 ...

Operating Instructions
Page 27
.... To prevent accidental erasure Slide the write-protect tab on the cassette to disconnect the A/V connecting cable, i.LINK cable, and USB cable (DCR-IP7BT only). Doing so may be sure to expose the red mark. 27 The cassette compartment automatically lifts up and opens. (3) Push the middle...in the direction of the cables may cause a malfunction. •Before you open the cassette lid. Getting started Step 3 Inserting a cassette (1) Install the battery pack, or connect the AC power adaptor for the power supply (p. 18 to insert it clicks. 2 OPEN/ZEJECT 3, 4 5 To eject the cassette...
.... To prevent accidental erasure Slide the write-protect tab on the cassette to disconnect the A/V connecting cable, i.LINK cable, and USB cable (DCR-IP7BT only). Doing so may be sure to expose the red mark. 27 The cassette compartment automatically lifts up and opens. (3) Push the middle...in the direction of the cables may cause a malfunction. •Before you open the cassette lid. Getting started Step 3 Inserting a cassette (1) Install the battery pack, or connect the AC power adaptor for the power supply (p. 18 to insert it clicks. 2 OPEN/ZEJECT 3, 4 5 To eject the cassette...

Operating Instructions
Page 30
... is flashing.) Adjusting the angle of the LCD screen The LCD panel can also use DATA CODE on the Remote Commander during recording. The usable battery time when you record using the viewfinder. You can be rotated as you do not eject the cassette, even if you want to OFF (CHG... it into the 30 camcorder body. If you recorded and the next scene is slightly shorter than the shooting time using the LCD screen The battery time is unbroken as long as illustrated below. 180° 90° OPEN When you turn off automatically when a cassette is to save...
... is flashing.) Adjusting the angle of the LCD screen The LCD panel can also use DATA CODE on the Remote Commander during recording. The usable battery time when you record using the viewfinder. You can be rotated as you do not eject the cassette, even if you want to OFF (CHG... it into the 30 camcorder body. If you recorded and the next scene is slightly shorter than the shooting time using the LCD screen The battery time is unbroken as long as illustrated below. 180° 90° OPEN When you turn off automatically when a cassette is to save...


