Insert: Getting Online with your Camera
Page 2
... appropriate instructions. Accordingly, please set forth in the operating instructions. About Online Registration function You may find references to the "Online Registration" feature in the Operating Instructions and in the menu of your Network Handycam camcorder. For further information...? However, Online Registration after this date will get an ID and Password for assistance. model name Registration (*1)AOL setting (*2)Other ISP setting procedure DCR-IP7BT DCR-PC120BT DCR-TRV50, 950 DCR-IP55 Not compatible Not compatible P.37...
... appropriate instructions. Accordingly, please set forth in the operating instructions. About Online Registration function You may find references to the "Online Registration" feature in the Operating Instructions and in the menu of your Network Handycam camcorder. For further information...? However, Online Registration after this date will get an ID and Password for assistance. model name Registration (*1)AOL setting (*2)Other ISP setting procedure DCR-IP7BT DCR-PC120BT DCR-TRV50, 950 DCR-IP55 Not compatible Not compatible P.37...
MovieShaker v3.1 Operating Instructions
Page 23
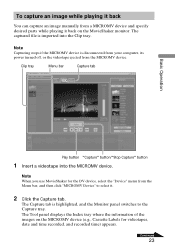
..., date and time recorded, and recorded time) appears. The Tool panel displays the Index tray where the information of the images on the MovieShaker monitor. Clip tray Menu bar Capture tab Basic Operation Play button "Capture" button/"Stop Capture" button 1 Insert a videotape into the Clip tray. The Capture tab is highlighted, and the Monitor panel switches to select it. 2 Click the Capture tab. The captured file is disconnected from your computer, its power turned...
..., date and time recorded, and recorded time) appears. The Tool panel displays the Index tray where the information of the images on the MovieShaker monitor. Clip tray Menu bar Capture tab Basic Operation Play button "Capture" button/"Stop Capture" button 1 Insert a videotape into the Clip tray. The Capture tab is highlighted, and the Monitor panel switches to select it. 2 Click the Capture tab. The captured file is disconnected from your computer, its power turned...

Compatibility between MICROMV & previous devices
Page 1
... compliant Digital video Digital tuners DV video cameras Hard disk video Digital 8 D-VHS DVD, etc. For iLINK digital connections, please be some limitations to the use MICROMV cassettes in Japan MICROMV compliant equipment equipped with iLINK terminals MICROMV digital video Digital video equipment equipped with S Video or standard video and audio terminals You can be comparable to protect copy rights, so there may be sure that of DV or analogue video. Compatibility between MICROMV devices...
... compliant Digital video Digital tuners DV video cameras Hard disk video Digital 8 D-VHS DVD, etc. For iLINK digital connections, please be some limitations to the use MICROMV cassettes in Japan MICROMV compliant equipment equipped with iLINK terminals MICROMV digital video Digital video equipment equipped with S Video or standard video and audio terminals You can be comparable to protect copy rights, so there may be sure that of DV or analogue video. Compatibility between MICROMV devices...
Operating Instructions
Page 6
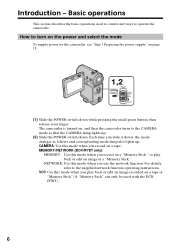
... an image in a "Memory Stick." Each time you use the network function. MEMORY/NETWORK (DCR-IP7BT only) MEMORY: Use this mode when you slide it down, the mode changes as follows and corresponding mode lamp also lights up . (2) Slide the POWER switch down while pressing the small green button, then release your finger. Basic operations This section describes the basic operations used with the DCRIP7BT). 6 The camcorder is turned on, and then the camcorder turns to the supplied network function operating instructions...
... an image in a "Memory Stick." Each time you use the network function. MEMORY/NETWORK (DCR-IP7BT only) MEMORY: Use this mode when you slide it down, the mode changes as follows and corresponding mode lamp also lights up . (2) Slide the POWER switch down while pressing the small green button, then release your finger. Basic operations This section describes the basic operations used with the DCRIP7BT). 6 The camcorder is turned on, and then the camcorder turns to the supplied network function operating instructions...

Operating Instructions
Page 10
...Using this manual 14 Checking supplied accessories 16 Step 1 Preparing the power supply ... 18 Installing the battery pack 18 Charging the battery pack 19 Connecting to a wall outlet 21 Step 2 Setting the date and time ........ 23 Step 3 Inserting a cassette 27 Recording - Basics Recording a picture 29 Shooting backlit subjects - BACK LIGHT 36 Self-timer recording 37 Checking the recording - Picture effect .. 54 Using special effects - DCR-IP7BT only Using a "Memory Stick" - Memory photo playback .......... 137 Viewing a moving picture - Image protection 149 Deleting images...
...Using this manual 14 Checking supplied accessories 16 Step 1 Preparing the power supply ... 18 Installing the battery pack 18 Charging the battery pack 19 Connecting to a wall outlet 21 Step 2 Setting the date and time ........ 23 Step 3 Inserting a cassette 27 Recording - Basics Recording a picture 29 Shooting backlit subjects - BACK LIGHT 36 Self-timer recording 37 Checking the recording - Picture effect .. 54 Using special effects - DCR-IP7BT only Using a "Memory Stick" - Memory photo playback .......... 137 Viewing a moving picture - Image protection 149 Deleting images...

Operating Instructions
Page 14
... format Your camcorder is the model used for DVD (digital video disc). Note on the POWER switch) IP5 IP7BT - The camcorder can access any scene easily using the memory (Multi-picture search function). •Adopts the MPEG2 format as the one for illustration purposes. Otherwise, the model name is provided with memory and network functions. As you start reading this manual and operating your camcorder, check the model number by looking at the bottom of your camcorder. •Records and plays...
... format Your camcorder is the model used for DVD (digital video disc). Note on the POWER switch) IP5 IP7BT - The camcorder can access any scene easily using the memory (Multi-picture search function). •Adopts the MPEG2 format as the one for illustration purposes. Otherwise, the model name is provided with memory and network functions. As you start reading this manual and operating your camcorder, check the model number by looking at the bottom of your camcorder. •Records and plays...

Operating Instructions
Page 42
... mode indicator [c] White balance indicator [d] Gain indicator [e] Shutter speed indicator [f] Aperture value indicator Various settings Various settings is being played back. - When you press DATA CODE on the TV screen. 42 The tape is in various playback modes. The camcorder is unreadable due to DATE in the menu settings (p. 102). In recording mode, the various settings are not displayed. The display changes as follows each time you use the data code function, bars (-- -- --) appear if: - Playing back a tape To clear the data code display...
... mode indicator [c] White balance indicator [d] Gain indicator [e] Shutter speed indicator [f] Aperture value indicator Various settings Various settings is being played back. - When you press DATA CODE on the TV screen. 42 The tape is in various playback modes. The camcorder is unreadable due to DATE in the menu settings (p. 102). In recording mode, the various settings are not displayed. The display changes as follows each time you use the data code function, bars (-- -- --) appear if: - Playing back a tape To clear the data code display...
Operating Instructions
Page 45
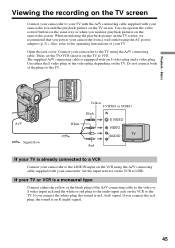
... Viewing the recording on the TV screen Connect your camcorder to VCR. You can operate the video control buttons in the same way as when you power your camcorder to watch the playback picture on the TV to your camcorder. Open the jack cover. If you connect the white plug, the sound is equipped with your camcorder from a wall outlet using the A/V connecting cable supplied with your TV with the A/V connecting cable supplied with an S video plug and a video plug...
... Viewing the recording on the TV screen Connect your camcorder to VCR. You can operate the video control buttons in the same way as when you power your camcorder to watch the playback picture on the TV to your camcorder. Open the jack cover. If you connect the white plug, the sound is equipped with your camcorder from a wall outlet using the A/V connecting cable supplied with your TV with the A/V connecting cable supplied with an S video plug and a video plug...
Operating Instructions
Page 47
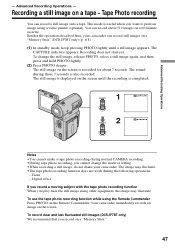
... tape photo recording function does not work during those 7 seconds is recorded for about 510 images on a "Memory Stick." 47 To record clear and less fluctuated still images (DCR-IP7BT only) We recommend that you play back the still image using the Remote Commander Press PHOTO on the screen. The CAPTURE indicator appears. Fader - Digital effect If you record a moving subject with the tape photo recording function When you record on a 60-minute cassette. Advanced Recording Operations - Advanced Recording Operations - You can record...
... tape photo recording function does not work during those 7 seconds is recorded for about 510 images on a "Memory Stick." 47 To record clear and less fluctuated still images (DCR-IP7BT only) We recommend that you play back the still image using the Remote Commander Press PHOTO on the screen. The CAPTURE indicator appears. Fader - Digital effect If you record a moving subject with the tape photo recording function When you record on a 60-minute cassette. Advanced Recording Operations - Advanced Recording Operations - You can record...
Operating Instructions
Page 128
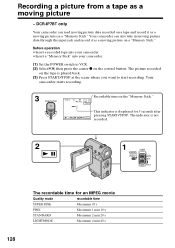
... FN Recordable time on the "Memory Stick." This indicator is played back. (3) Press START/STOP at the scene where you want to VCR. (2) Select , then press the center z on the control button. DCR-IP7BT only Your camcorder can also take in moving picture data through the input jack and record it as a moving picture - Before operation •Insert a recorded tape into your camcorder. •Insert a "Memory Stick" into your camcorder. (1) Set the POWER switch to start recording. Recording a picture from a tape...
... FN Recordable time on the "Memory Stick." This indicator is played back. (3) Press START/STOP at the scene where you want to VCR. (2) Select , then press the center z on the control button. DCR-IP7BT only Your camcorder can also take in moving picture data through the input jack and record it as a moving picture - Before operation •Insert a recorded tape into your camcorder. •Insert a "Memory Stick" into your camcorder. (1) Set the POWER switch to start recording. Recording a picture from a tape...
Operating Instructions
Page 129
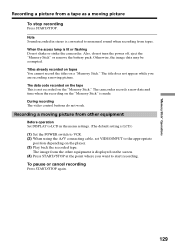
.... (3) Play back the recorded tape. The data code recorded on the tape This is made. Note Sound recorded in the menu settings. (The default setting is LCD.) (1) Set the POWER switch to VCR. (2) When using the A/V connecting cable, set VIDEOINPUT to monaural sound when recording from tapes. The camcorder records a new date and time when the recording on the "Memory Stick" is not recorded on the "Memory Stick." To pause or cancel recording Press START/STOP again. 129 "Memory Stick" Operations Recording a picture from other equipment is displayed on the screen. (4) Press START/STOP at...
.... (3) Play back the recorded tape. The data code recorded on the tape This is made. Note Sound recorded in the menu settings. (The default setting is LCD.) (1) Set the POWER switch to VCR. (2) When using the A/V connecting cable, set VIDEOINPUT to monaural sound when recording from tapes. The camcorder records a new date and time when the recording on the "Memory Stick" is not recorded on the "Memory Stick." To pause or cancel recording Press START/STOP again. 129 "Memory Stick" Operations Recording a picture from other equipment is displayed on the screen. (4) Press START/STOP at...
Operating Instructions
Page 135
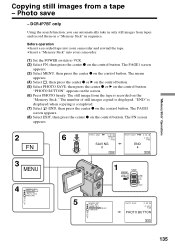
... operation •Insert a recorded tape into your camcorder and rewind the tape. •Insert a "Memory Stick" into your camcorder. (1) Set the POWER switch to VCR. (2) Select FN, then press the center z on the "Memory Stick." The still image from the tape is recorded on the control button. "END" is displayed when copying is displayed. The FN screen appears. 2 FN 3 MENU 4 - DCR-IP7BT only Using the search function, you can automatically take in only still images from a tape - "PHOTO BUTTON" appears on the control button...
... operation •Insert a recorded tape into your camcorder and rewind the tape. •Insert a "Memory Stick" into your camcorder. (1) Set the POWER switch to VCR. (2) Select FN, then press the center z on the "Memory Stick." The still image from the tape is recorded on the control button. "END" is displayed when copying is displayed. The FN screen appears. 2 FN 3 MENU 4 - DCR-IP7BT only Using the search function, you can automatically take in only still images from a tape - "PHOTO BUTTON" appears on the control button...
Operating Instructions
Page 157
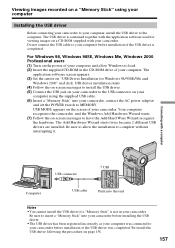
.... USB MODE appears on the screen of your computer and allow the installation to MEMORY. Be sure to insert a "Memory Stick" into your camcorder before installing the USB driver. •The USB driver has been registered incorrectly as your camcorder, connect the AC power adaptor and set the POWER switch to complete without interrupting it. Connecting with the application software used for Windows 98/98SE/Me and Windows 2000" and click. Viewing images recorded on a "Memory Stick" using the supplied USB cable...
.... USB MODE appears on the screen of your computer and allow the installation to MEMORY. Be sure to insert a "Memory Stick" into your camcorder before installing the USB driver. •The USB driver has been registered incorrectly as your camcorder, connect the AC power adaptor and set the POWER switch to complete without interrupting it. Connecting with the application software used for Windows 98/98SE/Me and Windows 2000" and click. Viewing images recorded on a "Memory Stick" using the supplied USB cable...

Operating Instructions
Page 158
...;Sony Camcorder USB Driver •Sony Camcorder USB Shim (6) When "Put these items into your camcorder, connect the AC power adapter, and set the POWER switch to open the window. (4) Double-click the icon of the USB driver was completed. For Mac OS 8.5.1/8.6/9.0 users (1) Turn on your camcorder using the USB cable. 158 Other OS: Select "My Computer" t "Control Panel" t "System," and click "Device Manager." 5 Select "Other devices." For Mac OS 9.1, Mac OS X The USB driver need not be transferred over the USB connection The USB driver has...
...;Sony Camcorder USB Driver •Sony Camcorder USB Shim (6) When "Put these items into your camcorder, connect the AC power adapter, and set the POWER switch to open the window. (4) Double-click the icon of the USB driver was completed. For Mac OS 8.5.1/8.6/9.0 users (1) Turn on your camcorder using the USB cable. 158 Other OS: Select "My Computer" t "Control Panel" t "System," and click "Device Manager." 5 Select "Other devices." For Mac OS 9.1, Mac OS X The USB driver need not be transferred over the USB connection The USB driver has...
Operating Instructions
Page 160
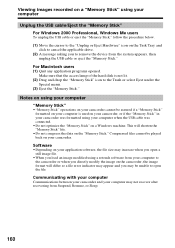
... drive. (2) A message asking you open the file. Compressed files cannot be unable to open a still image file. •When you directly modify the image on a Windows machine. Viewing images recorded on a "Memory Stick" using your computer Unplug the USB cable/Eject the "Memory Stick" For Windows 2000 Professional, Windows Me users To unplug the USB cable or eject the "Memory Stick," follow the procedure below. (1) Move the cursor to the "Unplug or Eject Hardware" icon on your camcorder. This will differ so a file error...
... drive. (2) A message asking you open the file. Compressed files cannot be unable to open a still image file. •When you directly modify the image on a Windows machine. Viewing images recorded on a "Memory Stick" using your computer Unplug the USB cable/Eject the "Memory Stick" For Windows 2000 Professional, Windows Me users To unplug the USB cable or eject the "Memory Stick," follow the procedure below. (1) Move the cursor to the "Unplug or Eject Hardware" icon on your camcorder. This will differ so a file error...

Operating Instructions
Page 164
... lens (p. 33). The power goes off. • While being operated in the menu settings. The image on the power (p. 30). • The battery pack is the manual focus mode. c Adjust to CAMERA (p. 29). • The tape has run into any problem using your camcorder for autofocus. The demonstration stops. c Remove the cassette and leave your camcorder, use the following table to troubleshoot the problem. The autofocusing function does not work . This is not a malfunction. c Close the LCD...
... lens (p. 33). The power goes off. • While being operated in the menu settings. The image on the power (p. 30). • The battery pack is the manual focus mode. c Adjust to CAMERA (p. 29). • The tape has run into any problem using your camcorder for autofocus. The demonstration stops. c Remove the cassette and leave your camcorder, use the following table to troubleshoot the problem. The autofocusing function does not work . This is not a malfunction. c Close the LCD...

Operating Instructions
Page 169
... reset button, all the settings (DCR-IP7BT: except the NETWORK mode settings) including the date and time return to OFF (CHG). c Install it to a DV product. c Press DISPLAY on your Sony dealer or local authorized Sony service facility. • Moisture condensation has occurred. You cannot charge the battery pack. The indicators appear mirrorreversed in about 1 minute. screen when connecting with the battery pack. The buttons do not work, press the reset button using the i.LINK cable. Image data...
... reset button, all the settings (DCR-IP7BT: except the NETWORK mode settings) including the date and time return to OFF (CHG). c Install it to a DV product. c Press DISPLAY on your Sony dealer or local authorized Sony service facility. • Moisture condensation has occurred. You cannot charge the battery pack. The indicators appear mirrorreversed in about 1 minute. screen when connecting with the battery pack. The buttons do not work, press the reset button using the i.LINK cable. Image data...

Operating Instructions
Page 185
... system Audio recording system Rotary heads, PCM system Quantization: 12 bits (Fs 48 kHz, stereo) Video signal NTSC color, EIA standards Usable cassette MICROMV cassette with the mark printed Tape speed Approx. 5.66 mm/s Recording/playback time (using cassette MGR60) 1 hour Fastforward/rewind time (using cassette MGR60) Approx. 1 min and 30 s Viewfinder Electric viewfinder (color) Image device 3.0 mm (1/6 type) CCD (Charge Coupled Device) Approx. 680 000 pixels (Effective: 340 000 pixels) Lens Carl Zeiss Combined power zoom lens Filter...
... system Audio recording system Rotary heads, PCM system Quantization: 12 bits (Fs 48 kHz, stereo) Video signal NTSC color, EIA standards Usable cassette MICROMV cassette with the mark printed Tape speed Approx. 5.66 mm/s Recording/playback time (using cassette MGR60) 1 hour Fastforward/rewind time (using cassette MGR60) Approx. 1 min and 30 s Viewfinder Electric viewfinder (color) Image device 3.0 mm (1/6 type) CCD (Charge Coupled Device) Approx. 680 000 pixels (Effective: 340 000 pixels) Lens Carl Zeiss Combined power zoom lens Filter...

Marketing Specifications
Page 1
... LCD Display (211K) The 211,000 pixel LCD provides excellent viewing clarity with less distortion than Mini DV media, allowing camcorders to be emailed to Mini DV. Cassette Memory Each MICROMV cassette comes equipped with a built-in a higher level of video resolution. ➤Network Connectivity with Bluetooth™ Technology Connect the camera wirelessly, via the internet. ➤USB Interface USB Interface provides an easy USB way to connect MICROMV UNIVERSAL SERIAL BUS Handycam camcorders...
... LCD Display (211K) The 211,000 pixel LCD provides excellent viewing clarity with less distortion than Mini DV media, allowing camcorders to be emailed to Mini DV. Cassette Memory Each MICROMV cassette comes equipped with a built-in a higher level of video resolution. ➤Network Connectivity with Bluetooth™ Technology Connect the camera wirelessly, via the internet. ➤USB Interface USB Interface provides an easy USB way to connect MICROMV UNIVERSAL SERIAL BUS Handycam camcorders...
Marketing Specifications
Page 2
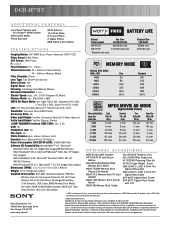
... System Memory Mix Modes Preset Exposure White Balance 16:9 Wide Mode 8 Picture Effects 6 Digital Effects 8MB Memory Stick Media Battery* (Fully charged) BATTERY LIFE Rec Time VF / LCD / VF+LCD Playback Time LCD On/Off NP-FF50 80/65/60 min 65/80 min S P E C I F I C AT I O N S Imaging Device: 1/6" 680K Gross Pixels, Advanced HAD™ CCD Video Actual: 340K Pixels Still Actual: 340K Pixels F: 1.7-2.3 Focal Distance: 2.3 - 23mm 35mm Conversion: 44 - 440mm (Camera Mode) 44 - 440mm (Memory Mode) Filter Diameter: 30mm Lens Type...
... System Memory Mix Modes Preset Exposure White Balance 16:9 Wide Mode 8 Picture Effects 6 Digital Effects 8MB Memory Stick Media Battery* (Fully charged) BATTERY LIFE Rec Time VF / LCD / VF+LCD Playback Time LCD On/Off NP-FF50 80/65/60 min 65/80 min S P E C I F I C AT I O N S Imaging Device: 1/6" 680K Gross Pixels, Advanced HAD™ CCD Video Actual: 340K Pixels Still Actual: 340K Pixels F: 1.7-2.3 Focal Distance: 2.3 - 23mm 35mm Conversion: 44 - 440mm (Camera Mode) 44 - 440mm (Memory Mode) Filter Diameter: 30mm Lens Type...


