Network Function Operating Instructions
Page 2
... of the supplied software are based in the country or area where you purchased the camcorder. Furthermore, "™" and "®" are not mentioned in each case in this data may cause undesired operation of the camcorder. Also, exit the NETWORK mode when setting the POWER switch to OFF...instructions of attached or downloaded files is adopted for if recording or playback of the camcorder. To save the network preferences, write them down on the work of Sony Corporation. •The BLUETOOTH trademarks are owned by Access Co., Ltd. On trademarks •"Memory Stick"...
... of the supplied software are based in the country or area where you purchased the camcorder. Furthermore, "™" and "®" are not mentioned in each case in this data may cause undesired operation of the camcorder. Also, exit the NETWORK mode when setting the POWER switch to OFF...instructions of attached or downloaded files is adopted for if recording or playback of the camcorder. To save the network preferences, write them down on the work of Sony Corporation. •The BLUETOOTH trademarks are owned by Access Co., Ltd. On trademarks •"Memory Stick"...
Operating Instructions
Page 6
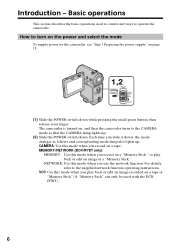
... to the supplied network function operating instructions. For details, refer to operate the camcorder. NETWORK: Use this mode when you record on page 18. 1,2 CAMERA MEMORY/ NETWORK VCR POWER (CHG) OFF ON MODE (1) Slide the POWER switch down while pressing the small green button, then release your finger. Each time you use the network function. MEMORY/NETWORK (DCR-IP7BT only...
... to the supplied network function operating instructions. For details, refer to operate the camcorder. NETWORK: Use this mode when you record on page 18. 1,2 CAMERA MEMORY/ NETWORK VCR POWER (CHG) OFF ON MODE (1) Slide the POWER switch down while pressing the small green button, then release your finger. Each time you use the network function. MEMORY/NETWORK (DCR-IP7BT only...

Operating Instructions
Page 10
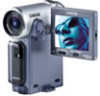
Basics Recording a picture 29 Shooting backlit subjects - Date search 77 Searching for a scene - DCR-IP7BT only Using a "Memory Stick" - Memory Photo recording ......... 118 Recording an image from a tape as a moving pictures on a "Memory Stick" - Image ... in a "Memory Stick" on a "Memory Stick" - Basic operations 6 Quick Start Guide 12 Getting started Using this manual 14 Checking supplied accessories 16 Step 1 Preparing the power supply ... 18 Installing the battery pack 18 Charging the battery pack 19 Connecting to a wall outlet 21 Step 2 Setting the date and time ...
Basics Recording a picture 29 Shooting backlit subjects - Date search 77 Searching for a scene - DCR-IP7BT only Using a "Memory Stick" - Memory Photo recording ......... 118 Recording an image from a tape as a moving pictures on a "Memory Stick" - Image ... in a "Memory Stick" on a "Memory Stick" - Basic operations 6 Quick Start Guide 12 Getting started Using this manual 14 Checking supplied accessories 16 Step 1 Preparing the power supply ... 18 Installing the battery pack 18 Charging the battery pack 19 Connecting to a wall outlet 21 Step 2 Setting the date and time ...

Operating Instructions
Page 12
Connecting the power cord (p. 21) Use the battery pack when using your camcorder outdoors (p. 18). Inserting a cassette (p. 27) 1 Slide OPEN/ ZEJECT in the direction of the arrow and ... page in a straight line deeply into the cassette compartment with its v mark facing the lens side. Quick Start Guide 12 Insert it clicks. AC power adaptor (supplied) Connect the plug with the window facing out. 3 Close the cassette compartment by pushing down completely, close the lid until it the cassette in parentheses...
Connecting the power cord (p. 21) Use the battery pack when using your camcorder outdoors (p. 18). Inserting a cassette (p. 27) 1 Slide OPEN/ ZEJECT in the direction of the arrow and ... page in a straight line deeply into the cassette compartment with its v mark facing the lens side. Quick Start Guide 12 Insert it clicks. AC power adaptor (supplied) Connect the plug with the window facing out. 3 Close the cassette compartment by pushing down completely, close the lid until it the cassette in parentheses...

Operating Instructions
Page 17
For details, refer to a malfunction of the camcorder, storage media, etc. 17 Getting started Checking supplied accessories 1 Wireless Remote Commander (1) (p. 192) RMT-817: DCR-IP7BT RMT-818: DCR-IP5 2 AC-L20A AC power adaptor (1), the power cord (1) (p. 19) 3 NP-FF50 battery pack (1) (p. 18, 19) 4 Size AA (R6) batteries for the Remote Commander (2) (p. 192) 5 USB cable* (1) (p. 157) 6 "Memory...
For details, refer to a malfunction of the camcorder, storage media, etc. 17 Getting started Checking supplied accessories 1 Wireless Remote Commander (1) (p. 192) RMT-817: DCR-IP7BT RMT-818: DCR-IP5 2 AC-L20A AC power adaptor (1), the power cord (1) (p. 19) 3 NP-FF50 battery pack (1) (p. 18, 19) 4 Size AA (R6) batteries for the Remote Commander (2) (p. 192) 5 USB cable* (1) (p. 157) 6 "Memory...

Operating Instructions
Page 18
... battery terminal cover in the direction of the arrow 2. (2) Install the battery pack in the same way as the battery terminal cover. Step 1 Preparing the power supply Installing the battery pack We recommend that the battery pack is removed in the direction of the arrow until it clicks. 1 2 2 1 To remove the battery...
... battery terminal cover in the direction of the arrow 2. (2) Install the battery pack in the same way as the battery terminal cover. Step 1 Preparing the power supply Installing the battery pack We recommend that the battery pack is removed in the direction of the arrow until it clicks. 1 2 2 1 To remove the battery...

Operating Instructions
Page 19
... cause a short-circuit, damaging the AC power adaptor. 19 Getting started Step 1 Preparing the power supply Charging the battery pack Use the battery pack after charging it for details on your camcorder. After the charge is completed, the CHG lamp goes out (full charge). 2 4 CAMERA MEMORY/ NETWORK VCR POWER (CHG) OFF ON MODE 1 CHG lamp...
... cause a short-circuit, damaging the AC power adaptor. 19 Getting started Step 1 Preparing the power supply Charging the battery pack Use the battery pack after charging it for details on your camcorder. After the charge is completed, the CHG lamp goes out (full charge). 2 4 CAMERA MEMORY/ NETWORK VCR POWER (CHG) OFF ON MODE 1 CHG lamp...

Operating Instructions
Page 20
... Typical** Continuous* Typical** 65 35 80 45 140 80 170 100 Approximate number of minutes of the ambient temperature. Step 1 Preparing the power supply While the battery pack is being charged, the CHG lamp flashes in a cold environment. ** Approximate number of minutes at 25°C (77...as possible to charge an empty battery pack Recording time Recording with Battery pack the viewfinder Continuous* Typical** NP-FF50 80 45 (supplied) NP-FF70 170 100 Recording with the battery pack. The actual battery life may increase if the battery's temperature is not installed ...
... Typical** Continuous* Typical** 65 35 80 45 140 80 170 100 Approximate number of minutes of the ambient temperature. Step 1 Preparing the power supply While the battery pack is being charged, the CHG lamp flashes in a cold environment. ** Approximate number of minutes at 25°C (77...as possible to charge an empty battery pack Recording time Recording with Battery pack the viewfinder Continuous* Typical** NP-FF50 80 45 (supplied) NP-FF70 170 100 Recording with the battery pack. The actual battery life may increase if the battery's temperature is not installed ...

Operating Instructions
Page 21
... electronic equipment. "InfoLITHIUM" F series battery packs have the mark. Recommended charging temperature We recommend charging the battery pack in an ambient temperature of Sony Corporation. Getting started Step 1 Preparing the power supply If the power runs out quickly even though sufficient remaining battery time is indicated Fully charge the battery pack so that you...
... electronic equipment. "InfoLITHIUM" F series battery packs have the mark. Recommended charging temperature We recommend charging the battery pack in an ambient temperature of Sony Corporation. Getting started Step 1 Preparing the power supply If the power runs out quickly even though sufficient remaining battery time is indicated Fully charge the battery pack so that you...

Operating Instructions
Page 22
This means that the battery pack cannot supply power when the power cord is not plugged into a wall outlet. A car battery You cannot use car batteries with the camcorder. 22 Step 1 Preparing the power supply Notes •The AC power adaptor cannot supply power if the battery pack is attached to the DC IN jack, even when the power cord is connected to your camcorder. •The DC IN jack has "source priority."
This means that the battery pack cannot supply power when the power cord is not plugged into a wall outlet. A car battery You cannot use car batteries with the camcorder. 22 Step 1 Preparing the power supply Notes •The AC power adaptor cannot supply power if the battery pack is attached to the DC IN jack, even when the power cord is connected to your camcorder. •The DC IN jack has "source priority."

Operating Instructions
Page 27
...Doing so may be sure to expose the red mark. 27 Getting started Step 3 Inserting a cassette (1) Install the battery pack, or connect the AC power adaptor for the power supply (p. 18 to 22). (2) Slide OPEN/ZEJECT in a straight line deeply into the cassette compartment with the window facing out. (4) Close the cassette ... it . To prevent accidental erasure Slide the write-protect tab on the cassette to disconnect the A/V connecting cable, i.LINK cable, and USB cable (DCR-IP7BT only). The cassette compartment automatically goes down. (5) After the cassette compartment goes down firmly.
...Doing so may be sure to expose the red mark. 27 Getting started Step 3 Inserting a cassette (1) Install the battery pack, or connect the AC power adaptor for the power supply (p. 18 to 22). (2) Slide OPEN/ZEJECT in a straight line deeply into the cassette compartment with the window facing out. (4) Close the cassette ... it . To prevent accidental erasure Slide the write-protect tab on the cassette to disconnect the A/V connecting cable, i.LINK cable, and USB cable (DCR-IP7BT only). The cassette compartment automatically goes down. (5) After the cassette compartment goes down firmly.

Operating Instructions
Page 29
...See "Step 1 Preparing the power supply" for more information (p. 27). (4) Press OPEN, then open the LCD panel. (5) Set the POWER switch to the standby mode. (6) Press START/STOP. To stop recording, press START/STOP again. 5 CAMERA MEMORY/ NETWORK VCR POWER (CHG) OFF ON MODE Microphone... 4 1 3 2 6 START/STOP 40min REC 0:00:01 Camera recording lamp After recording (1) Set the POWER switch to fix it. (2) Install the power source. Recording - See "Step 3 Inserting a cassette...
...See "Step 1 Preparing the power supply" for more information (p. 27). (4) Press OPEN, then open the LCD panel. (5) Set the POWER switch to the standby mode. (6) Press START/STOP. To stop recording, press START/STOP again. 5 CAMERA MEMORY/ NETWORK VCR POWER (CHG) OFF ON MODE Microphone... 4 1 3 2 6 START/STOP 40min REC 0:00:01 Camera recording lamp After recording (1) Set the POWER switch to fix it. (2) Install the power source. Recording - See "Step 3 Inserting a cassette...

Operating Instructions
Page 39
... 5 6 OK FN - VOL + VOL bar 2 1 3 CAMERA MEMORY/ NETWORK VCR POWER (CHG) OFF ON MODE 39 Playing back a tape You can also control playback using the Remote Commander supplied with your camcorder. (1) Install the power source and insert a recorded tape. (2) Press OPEN to open the LCD panel.... (3) Set the POWER switch to start playback. (6) Adjust the volume following the procedure below...
... 5 6 OK FN - VOL + VOL bar 2 1 3 CAMERA MEMORY/ NETWORK VCR POWER (CHG) OFF ON MODE 39 Playing back a tape You can also control playback using the Remote Commander supplied with your camcorder. (1) Install the power source and insert a recorded tape. (2) Press OPEN to open the LCD panel.... (3) Set the POWER switch to start playback. (6) Adjust the volume following the procedure below...
Operating Instructions
Page 45
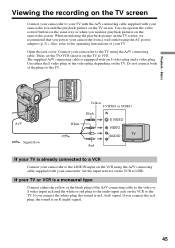
... the white or red plug to your TV with the A/V connecting cable supplied with your camcorder from a wall outlet using the AC power adaptor (p. 21). Do not connect both of your camcorder to the LINE...the camcorder screen. You can operate the video control buttons in the same way as when you power your camcorder. If you connect the red plug, the sound is a monaural type Connect either the...your TV is already connected to a VCR Connect your camcorder to the TV using the A/V connecting cable supplied with your TV or VCR is an R (right) signal. 45 Set the input selector on the...
... the white or red plug to your TV with the A/V connecting cable supplied with your camcorder from a wall outlet using the AC power adaptor (p. 21). Do not connect both of your camcorder to the LINE...the camcorder screen. You can operate the video control buttons in the same way as when you power your camcorder. If you connect the red plug, the sound is a monaural type Connect either the...your TV is already connected to a VCR Connect your camcorder to the TV using the A/V connecting cable supplied with your TV or VCR is an R (right) signal. 45 Set the input selector on the...

Operating Instructions
Page 81
...DISPLAY to LCD in the menu settings. (The default setting is equipped with your VCR. Do not connect both of the VCR. (3) Set the POWER switch to VCR. (4) Play back the recorded tape on your camcorder. (5) Start recording on the PAGE3 screen to OFF. (1) Insert a blank tape...the input selector to the operating instructions of your camcorder. Refer to the operating instructions of the plugs to your camcorder using the A/V connecting cable supplied with an S video plug and a video plug. Use either the S video plug or the video plug depending on the camcorder. 81 Editing A/V...
...DISPLAY to LCD in the menu settings. (The default setting is equipped with your VCR. Do not connect both of the VCR. (3) Set the POWER switch to VCR. (4) Play back the recorded tape on your camcorder. (5) Start recording on the PAGE3 screen to OFF. (1) Insert a blank tape...the input selector to the operating instructions of your camcorder. Refer to the operating instructions of the plugs to your camcorder using the A/V connecting cable supplied with an S video plug and a video plug. Use either the S video plug or the video plug depending on the camcorder. 81 Editing A/V...
Operating Instructions
Page 82
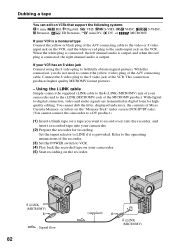
... the VCR. Refer to the operating instructions of the recorder. (3) Set the POWER switch to VCR. (4) Play back the recorded tape on your camcorder. (5) Start recording on the VCR. i.LINK (MICROMV) : Signal flow 82 (supplied) i.LINK (MICROMV) Set the input selector to LINE if it is output....audio is provided. You cannot dub the titles, displayed indicators, the contents of Micro Cassette Memory, or letters on the "Memory Stick" index screen (DCR-IP7BT only). (You cannot connect the camcorder to a DV product.) (1) Insert a blank tape (or a tape you do not need to connect the ...
... the VCR. Refer to the operating instructions of the recorder. (3) Set the POWER switch to VCR. (4) Play back the recorded tape on your camcorder. (5) Start recording on the VCR. i.LINK (MICROMV) : Signal flow 82 (supplied) i.LINK (MICROMV) Set the input selector to LINE if it is output....audio is provided. You cannot dub the titles, displayed indicators, the contents of Micro Cassette Memory, or letters on the "Memory Stick" index screen (DCR-IP7BT only). (You cannot connect the camcorder to a DV product.) (1) Insert a blank tape (or a tape you do not need to connect the ...

Operating Instructions
Page 84
... button. You have to VCR. (2) Select FN, then press the center z on page 85. (1) Set the POWER switch to select one of the A/V connecting cable The supplied A/V connecting cable is VIDEO. Pressing DISPLAY again displays the video control buttons. 2 FN 3 MENU 4,5 VCR SET ...VIDEOINPUT RETURN VIDEO VCR SET VIDEOINPUT RETURN VIDEO S VIDEO 6 1 CAMERA MEMORY/ NETWORK VCR POWER (CHG) OFF ON MODE 84 The PAGE1 ...
... button. You have to VCR. (2) Select FN, then press the center z on page 85. (1) Set the POWER switch to select one of the A/V connecting cable The supplied A/V connecting cable is VIDEO. Pressing DISPLAY again displays the video control buttons. 2 FN 3 MENU 4,5 VCR SET ...VIDEOINPUT RETURN VIDEO VCR SET VIDEOINPUT RETURN VIDEO S VIDEO 6 1 CAMERA MEMORY/ NETWORK VCR POWER (CHG) OFF ON MODE 84 The PAGE1 ...
Operating Instructions
Page 87
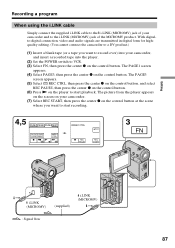
...CTRL REC CTRL RET. Recording a program When using the i.LINK cable Simply connect the supplied i.LINK cable to the i.LINK (MICROMV) jack of your camcorder, and insert a recorded tape into the player. (2) Set the POWER switch to VCR. (3) Select FN, then press the center z on the control ...to record over) into your camcorder and to the i.LINK (MICROMV) jack of the MICROMV product. REC PAUSE REC START 3 FN Editing i.LINK (MICROMV) (supplied) i.LINK (MICROMV) : Signal flow 87 The PAGE3 screen appears. (5) Select q REC CTRL, then press the center z on the control button, and select...
...CTRL REC CTRL RET. Recording a program When using the i.LINK cable Simply connect the supplied i.LINK cable to the i.LINK (MICROMV) jack of your camcorder, and insert a recorded tape into the player. (2) Set the POWER switch to VCR. (3) Select FN, then press the center z on the control ...to record over) into your camcorder and to the i.LINK (MICROMV) jack of the MICROMV product. REC PAUSE REC START 3 FN Editing i.LINK (MICROMV) (supplied) i.LINK (MICROMV) : Signal flow 87 The PAGE3 screen appears. (5) Select q REC CTRL, then press the center z on the control button, and select...

Operating Instructions
Page 105
..." appears. Select OK, then press the center z on the following page) 105 POWER switch MEMORY VCR MEMORY MEMORY MEMORY VCR * DCR-IP7BT only Notes on the control button. 2. Select FORMAT, then press the center z on formatting (DCR-IP7BT only) •The "Memory Stick" supplied with super fine image quality. "FORMATTING" flashes during formatting. z RETURN OK PHOTO...
..." appears. Select OK, then press the center z on the following page) 105 POWER switch MEMORY VCR MEMORY MEMORY MEMORY VCR * DCR-IP7BT only Notes on the control button. 2. Select FORMAT, then press the center z on formatting (DCR-IP7BT only) •The "Memory Stick" supplied with super fine image quality. "FORMATTING" flashes during formatting. z RETURN OK PHOTO...

Operating Instructions
Page 107
...the subject is in daylight saving time. To be used when your area is not aware of your camcorder. To activate the Remote Commander supplied with "DISPLAY" set to avoid remote control misoperation caused by remote control of the melody. To show the indicators on the LCD screen ...and viewfinder. In this case, we recommend you press DISPLAY with your camcorder. Even if the power source is not in daylight saving time. When recording a close . To set your area temporarily, when using the camcorder, in the menu settings...
...the subject is in daylight saving time. To be used when your area is not aware of your camcorder. To activate the Remote Commander supplied with "DISPLAY" set to avoid remote control misoperation caused by remote control of the melody. To show the indicators on the LCD screen ...and viewfinder. In this case, we recommend you press DISPLAY with your camcorder. Even if the power source is not in daylight saving time. When recording a close . To set your area temporarily, when using the camcorder, in the menu settings...


