Operating Guide
Page 2
... and recycling location nearest you may cause undesired operation. You can help preserve our environment by returning your used rechargeable batteries to the following two conditions: (1) This device may not cause harmful interference, and (2) this device must accept any...Part 15 of rechargeable batteries, call : Sony Customer Information Center 1-800-222SONY (7669). Regulatory Information Declaration of the FCC Rules. Telephone No.: 858-942-2230 This device complies with Part 15 of Conformity Trade Name: SONY Model No.: DCR-HC90 Responsible Party: Sony Electronics Inc. Read...
... and recycling location nearest you may cause undesired operation. You can help preserve our environment by returning your used rechargeable batteries to the following two conditions: (1) This device may not cause harmful interference, and (2) this device must accept any...Part 15 of rechargeable batteries, call : Sony Customer Information Center 1-800-222SONY (7669). Regulatory Information Declaration of the FCC Rules. Telephone No.: 858-942-2230 This device complies with Part 15 of Conformity Trade Name: SONY Model No.: DCR-HC90 Responsible Party: Sony Electronics Inc. Read...

Operating Guide
Page 3
.... LCD panel Battery/"Memory Stick Duo" cover Shoe cover • Before connecting your authority to comply with the limits for using the camcorder • Do not hold the camcorder by turning the equipment off and on use Your camcorder is no guarantee...DCR-HC90 Serial No. Owner's Record The model and serial numbers are incompatible) (p. 105). • "Memory Stick Duo" marked with the instructions, may cause a malfunction of your Sony dealer regarding this product. However, there is supplied with a USB or i.LINK cable, be damaged, or this manual could void your camcorder...
.... LCD panel Battery/"Memory Stick Duo" cover Shoe cover • Before connecting your authority to comply with the limits for using the camcorder • Do not hold the camcorder by turning the equipment off and on use Your camcorder is no guarantee...DCR-HC90 Serial No. Owner's Record The model and serial numbers are incompatible) (p. 105). • "Memory Stick Duo" marked with the instructions, may cause a malfunction of your Sony dealer regarding this product. However, there is supplied with a USB or i.LINK cable, be damaged, or this manual could void your camcorder...

Operating Guide
Page 6
Table of Contents Getting Started Step 1: Checking supplied items 9 Step 2: Charging the battery pack 10 Step 3: Turning the power on and holding your camcorder firmly ...........13 Step 4: Adjusting the LCD panel and viewfinder 14 Step 5: Using the touch panel 15 Changing ...Memory Stick Duo 17 Step 8: Selecting the aspect ratio (16:9 or 4:3) of the recording picture 19 Recording/Playback Recording/Playback with ease (Easy Handycam 20 Recording 22 Playback 23 Functions used for recording/playback, etc 24 Recording To use zoom To record sound with more presence (4CH MIC REC...
Table of Contents Getting Started Step 1: Checking supplied items 9 Step 2: Charging the battery pack 10 Step 3: Turning the power on and holding your camcorder firmly ...........13 Step 4: Adjusting the LCD panel and viewfinder 14 Step 5: Using the touch panel 15 Changing ...Memory Stick Duo 17 Step 8: Selecting the aspect ratio (16:9 or 4:3) of the recording picture 19 Recording/Playback Recording/Playback with ease (Easy Handycam 20 Recording 22 Playback 23 Functions used for recording/playback, etc 24 Recording To use zoom To record sound with more presence (4CH MIC REC...
Operating Guide
Page 8
... convert function 80 Troubleshooting Troubleshooting 82 Warning indicators and messages 100 Additional Information Using your camcorder abroad 104 Usable cassette tapes 105 About the "Memory Stick 106 About the "InfoLITHIUM" battery pack 108 About i.LINK 109 Maintenance and precautions 110 Using the Strap Belt as a wrist strap 114 Attaching the Shoulder Strap...
... convert function 80 Troubleshooting Troubleshooting 82 Warning indicators and messages 100 Additional Information Using your camcorder abroad 104 Usable cassette tapes 105 About the "Memory Stick 106 About the "InfoLITHIUM" battery pack 108 About i.LINK 109 Maintenance and precautions 110 Using the Strap Belt as a wrist strap 114 Attaching the Shoulder Strap...

Operating Guide
Page 9
...) CD-ROM "Picture Package Ver.1.5" (1) (p. 72) Operating Guide (This manual) (1) AC Adaptor (1) (p. 10) Getting Started Power cord (1) (p. 10) Wireless Remote Commander (1) (p. 32) A button-type lithium battery is already installed. A/V connecting cable (1) (p. 34, 60) USB cable (1) (p. 70) 9 Step 1: Checking supplied items Make sure that item supplied. The number in the parentheses indicates...
...) CD-ROM "Picture Package Ver.1.5" (1) (p. 72) Operating Guide (This manual) (1) AC Adaptor (1) (p. 10) Getting Started Power cord (1) (p. 10) Wireless Remote Commander (1) (p. 32) A button-type lithium battery is already installed. A/V connecting cable (1) (p. 34, 60) USB cable (1) (p. 70) 9 Step 1: Checking supplied items Make sure that item supplied. The number in the parentheses indicates...
Operating Guide
Page 10
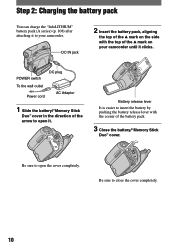
... completely. Be sure to insert the battery by pushing the battery release lever with the corner of the mark on the side with the top of the battery pack. 3 Close the battery/"Memory Stick Duo" cover. Be sure to your camcorder until it clicks. DC IN jack ...2 Insert the battery pack, aligning the top of the mark on your camcorder. Step 2: Charging the battery pack You can charge the "InfoLITHIUM" battery pack (A series) ...
... completely. Be sure to insert the battery by pushing the battery release lever with the corner of the mark on the side with the top of the battery pack. 3 Close the battery/"Memory Stick Duo" cover. Be sure to your camcorder until it clicks. DC IN jack ...2 Insert the battery pack, aligning the top of the mark on your camcorder. Step 2: Charging the battery pack You can charge the "InfoLITHIUM" battery pack (A series) ...

Operating Guide
Page 11
... 7 The CHG (charge) lamp turns off the power. Disconnect the AC Adaptor from the DC IN jack on your camcorder. Open the battery/ "Memory Stick Duo" cover, then press the battery release lever in this case. POWER switch Getting Started /CHG (charge) lamp 5 Connect the AC Adaptor to OFF (CHG.... To use an outside power source You can operate your camcorder using the power from the DC IN jack holding both the camcorder and the DC plug. 2 1 Battery release lever When storing the battery pack Fully discharge the battery before storing it for an extended period (p. 108). The CHG (charge) ...
... 7 The CHG (charge) lamp turns off the power. Disconnect the AC Adaptor from the DC IN jack on your camcorder. Open the battery/ "Memory Stick Duo" cover, then press the battery release lever in this case. POWER switch Getting Started /CHG (charge) lamp 5 Connect the AC Adaptor to OFF (CHG.... To use an outside power source You can operate your camcorder using the power from the DC IN jack holding both the camcorder and the DC plug. 2 1 Battery release lever When storing the battery pack Fully discharge the battery before storing it for an extended period (p. 108). The CHG (charge) ...
Operating Guide
Page 12
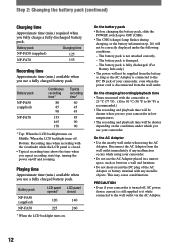
... Charging time NP-FA50 (supplied) 125 NP-FA70 155 Recording time Approximate time (min.) available when you use your camcorder is turned off . Battery pack NP-FA50 (supplied) NP-FA70 LCD panel LCD panel opened* closed . • Typical recording time shows the time when you repeat ...recording and playback time will be shorter when you use your camcorder, even when the power cord is disconnected from the battery as long as between a wall and furniture. • Do not short-circuit the DC plug of your camcorder. Battery pack NP-FA50 (supplied) NP-FA70 Continuous recording time* 80...
... Charging time NP-FA50 (supplied) 125 NP-FA70 155 Recording time Approximate time (min.) available when you use your camcorder is turned off . Battery pack NP-FA50 (supplied) NP-FA70 LCD panel LCD panel opened* closed . • Typical recording time shows the time when you repeat ...recording and playback time will be shorter when you use your camcorder, even when the power cord is disconnected from the battery as long as between a wall and furniture. • Do not short-circuit the DC plug of your camcorder. Battery pack NP-FA50 (supplied) NP-FA70 Continuous recording time* 80...

Operating Guide
Page 13
... holding your camcorder without any operation attempted for approximately 5 minutes, to CAMERA-TAPE or CAMERA-MEMORY, the current date and time will be displayed on a "Memory Stick Duo." If the POWER switch is set to turn off automatically if you slide the POWER switch from OFF (CHG) to save battery power. ([A.... the green button. CAMERA-MEMORY: To record on the LCD screen for the first time, the [CLOCK SET] screen appears (p. 16). 2 Hold the camcorder correctly. To turn on the respective lamp. PLAY/EDIT: To play or edit pictures. • When you leave your...
... holding your camcorder without any operation attempted for approximately 5 minutes, to CAMERA-TAPE or CAMERA-MEMORY, the current date and time will be displayed on a "Memory Stick Duo." If the POWER switch is set to turn off automatically if you slide the POWER switch from OFF (CHG) to save battery power. ([A.... the green button. CAMERA-MEMORY: To record on the LCD screen for the first time, the [CLOCK SET] screen appears (p. 16). 2 Hold the camcorder correctly. To turn on the respective lamp. PLAY/EDIT: To play or edit pictures. • When you leave your...
Operating Guide
Page 14
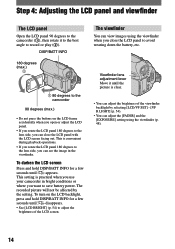
...] and the [EXPOSURE] setting using the viewfinder when you want to save battery power. Step 4: Adjusting the LCD panel and viewfinder The LCD panel Open the LCD panel 90 degrees to the camcorder (), then rotate it until the picture is clear. • You can adjust the... brightness of the LCD screen. This setting is practical when you use your camcorder in the viewfinder. Viewfinder lens adjustment lever Move it to the best angle to avoid wearing down the battery, etc. The recorded picture will not be affected by selecting [LCD/VF SET] - ...
...] and the [EXPOSURE] setting using the viewfinder when you want to save battery power. Step 4: Adjusting the LCD panel and viewfinder The LCD panel Open the LCD panel 90 degrees to the camcorder (), then rotate it until the picture is clear. • You can adjust the... brightness of the LCD screen. This setting is practical when you use your camcorder in the viewfinder. Viewfinder lens adjustment lever Move it to the best angle to avoid wearing down the battery, etc. The recorded picture will not be affected by selecting [LCD/VF SET] - ...
Operating Guide
Page 16
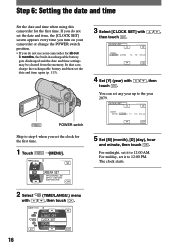
...min [MENU]. -:--:-- The clock starts. Step 6: Setting the date and time Set the date and time when using this camcorder for about 3 months, the built-in rechargeable battery gets discharged and the date and time settings may be cleared from the memory. In that case, charge the rechargeable...day), hour and minute, then touch . CLOCK SET -:--:-- DISP OUTPUT MENU ROTATE A.SHUT OFF CLOCK SET WORLD --:--:-- If you do not use your camcorder or change the POWER switch position. • If you do not set it to 12:00 PM. For midnight, set the date and time, the...
...min [MENU]. -:--:-- The clock starts. Step 6: Setting the date and time Set the date and time when using this camcorder for about 3 months, the built-in rechargeable battery gets discharged and the date and time settings may be cleared from the memory. In that case, charge the rechargeable...day), hour and minute, then touch . CLOCK SET -:--:-- DISP OUTPUT MENU ROTATE A.SHUT OFF CLOCK SET WORLD --:--:-- If you do not use your camcorder or change the POWER switch position. • If you do not set it to 12:00 PM. For midnight, set the date and time, the...
Operating Guide
Page 18
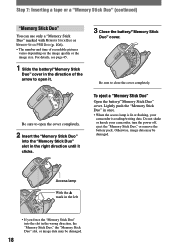
...Memory Stick Duo" into the slot in once. • When the access lamp is lit or flashing, your camcorder, turn the power off, eject the "Memory Stick Duo," or remove the battery pack. Lightly push the "Memory Stick Duo" in the wrong direction, the "Memory Stick Duo," the "Memory Stick ...Duo" slot, or image data may be damaged. 18 Do not shake or knock your camcorder is reading/writing data. Step 7: Inserting a tape ...
...Memory Stick Duo" into the slot in once. • When the access lamp is lit or flashing, your camcorder, turn the power off, eject the "Memory Stick Duo," or remove the battery pack. Lightly push the "Memory Stick Duo" in the wrong direction, the "Memory Stick Duo," the "Memory Stick ...Duo" slot, or image data may be damaged. 18 Do not shake or knock your camcorder is reading/writing data. Step 7: Inserting a tape ...

Operating Guide
Page 25
.... • The flash charge lamp flickers when charging the flash, and remains lit when the battery charge is complete. (In the CAMERA-TAPE mode, it takes a while to the camcorder (), then rotate it . Magnification can magnify pictures from the surface of the flash lamp before...
.... • The flash charge lamp flickers when charging the flash, and remains lit when the battery charge is complete. (In the CAMERA-TAPE mode, it takes a while to the camcorder (), then rotate it . Magnification can magnify pictures from the surface of the flash lamp before...
Operating Guide
Page 26
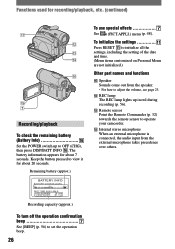
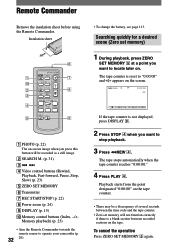
...menu (p. 48). Functions used for recording/playback, etc. (continued) qa qs qd qf qh qg 7 Recording/playback To check the remaining battery (Battery Info Set the POWER switch up in red during recording (p. 56). Remote sensor Point the Remote Commander (p. 32) towards the remote... sensor to view it for about 20 seconds. Keep the button pressed to operate your camcorder. Internal stereo microphone When an external microphone is connected, the audio input from the external microphone takes precedence over others. ...
...menu (p. 48). Functions used for recording/playback, etc. (continued) qa qs qd qf qh qg 7 Recording/playback To check the remaining battery (Battery Info Set the POWER switch up in red during recording (p. 56). Remote sensor Point the Remote Commander (p. 32) towards the remote... sensor to view it for about 20 seconds. Keep the button pressed to operate your camcorder. Internal stereo microphone When an external microphone is connected, the audio input from the external microphone takes precedence over others. ...

Operating Guide
Page 28
... Indicators displayed during recording/playback Recording movies On a tape 123 45 Recording still images 81 60min 101 90 2016 FINE qa 30 67 Remaining battery (approx.) Recording mode ( or ) (53) Recording status ([STBY] (standby) or [REC] (recording)) Time code (hour: minute: second: frame...
... Indicators displayed during recording/playback Recording movies On a tape 123 45 Recording still images 81 60min 101 90 2016 FINE qa 30 67 Remaining battery (approx.) Recording mode ( or ) (53) Recording status ([STBY] (standby) or [REC] (recording)) Time code (hour: minute: second: frame...
Operating Guide
Page 32
... is a blank section between recorded sections on the screen. 6 0 min 0:00:00 P-MENU If the tape counter is reset to operate your camcorder (p. 32 26). • To change the battery, see page 113. Playback starts from the point designated "0:00:00" on . Insulation sheet 6 1 7 q; 2 8 3 4 5 9 PHOTO (p. 22) The on-screen image when...
... is a blank section between recorded sections on the screen. 6 0 min 0:00:00 P-MENU If the tape counter is reset to operate your camcorder (p. 32 26). • To change the battery, see page 113. Playback starts from the point designated "0:00:00" on . Insulation sheet 6 1 7 q; 2 8 3 4 5 9 PHOTO (p. 22) The on-screen image when...

Operating Guide
Page 41
...white balance is set to adjust the shutter speed when recording in the memory, the indicator stops flashing. • Do not shake your camcorder while is flashing quickly. • flashes slowly if white balance could not be adjusted according to the ambient light. ... default setting. appears when the sharpness is selected, or you bring your camcorder outdoors from inside the house while using the viewfinder by fixing the exposure to [AUTO] when you have changed the battery pack while [AUTO] is anything other than 5 minutes. Continued ...
...white balance is set to adjust the shutter speed when recording in the memory, the indicator stops flashing. • Do not shake your camcorder while is flashing quickly. • flashes slowly if white balance could not be adjusted according to the ambient light. ... default setting. appears when the sharpness is selected, or you bring your camcorder outdoors from inside the house while using the viewfinder by fixing the exposure to [AUTO] when you have changed the battery pack while [AUTO] is anything other than 5 minutes. Continued ...
Operating Guide
Page 51
...page 67. 51 Using the Menu Recording starts and changes to other than CAMERA-TAPE. - When NIGHTSHOT switch is inserted. - Connect your camcorder to ON. To resume, touch [REC START]. INT.REC-STL (Interval photo recording) You can silence the beeps during the demonstration. (The demonstration starts... on the tape, after shooting has begun. • Sounds are not recorded. • The last few frames may not be recorded if the battery or tape has run out. • There may be discrepancies in the interval. • If you adjust the focus manually, you have removed ...
...page 67. 51 Using the Menu Recording starts and changes to other than CAMERA-TAPE. - When NIGHTSHOT switch is inserted. - Connect your camcorder to ON. To resume, touch [REC START]. INT.REC-STL (Interval photo recording) You can silence the beeps during the demonstration. (The demonstration starts... on the tape, after shooting has begun. • Sounds are not recorded. • The last few frames may not be recorded if the battery or tape has run out. • There may be discrepancies in the interval. • If you adjust the focus manually, you have removed ...
Operating Guide
Page 53
... marked with sub sound or the right channel sound. • You can play back audio recorded using other power source has been disconnected. Your camcorder cannot output 4ch audio simultaneously as it only supports 2ch audio output. MULTI-SOUND You can select whether to play back, but cannot record a ... playing back an audio dubbed recording See page 65. When you set the audio balance bar to the default setting in about 5 minutes after the battery pack, or other devices with dual sound or stereo sound. STEREO Plays back with main and sub sound (or stereo sound). 1 Plays ...
... marked with sub sound or the right channel sound. • You can play back audio recorded using other power source has been disconnected. Your camcorder cannot output 4ch audio simultaneously as it only supports 2ch audio output. MULTI-SOUND You can select whether to play back, but cannot record a ... playing back an audio dubbed recording See page 65. When you set the audio balance bar to the default setting in about 5 minutes after the battery pack, or other devices with dual sound or stereo sound. STEREO Plays back with main and sub sound (or stereo sound). 1 Plays ...

Operating Guide
Page 55
...). VIDEO INPUT Selects the video plug to connect when you connect your camcorder to your camcorder. USB STREAM Displays pictures saved on the supplied CD-ROM (p. 70). Using the Menu • When you select [BRIGHT], battery life is reduced by about 10 percent during recording. VF ...WIDE DISP You can adjust the color on the "Memory Stick Duo." BRIGHT Brightens the viewfinder screen. • When you connect your camcorder to outside power sources, [BRIGHT...
...). VIDEO INPUT Selects the video plug to connect when you connect your camcorder to your camcorder. USB STREAM Displays pictures saved on the supplied CD-ROM (p. 70). Using the Menu • When you select [BRIGHT], battery life is reduced by about 10 percent during recording. VF ...WIDE DISP You can adjust the color on the "Memory Stick Duo." BRIGHT Brightens the viewfinder screen. • When you connect your camcorder to outside power sources, [BRIGHT...


