Operating Guide
Page 3
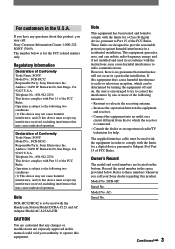
...San Diego, CA 92127 U.S.A. Operation is encouraged to try to Part 15 of the FCC Rules. Declaration of Conformity Trade Name: SONY Model No.: DCR-HC32 Responsible Party: Sony Electronics Inc. Address: 16450 W. Telephone No.: 858-942-2230 This device complies with Part 15 of FCC Rules. The supplied... or television reception, which the receiver is to which can radiate radio frequency energy and, if not installed and used with the Handycam Station Model DCRA-C121 and AC Adaptor Model AC-L25A/L25B. Record the serial number in a particular installation. ACSerial No. Note...
...San Diego, CA 92127 U.S.A. Operation is encouraged to try to Part 15 of the FCC Rules. Declaration of Conformity Trade Name: SONY Model No.: DCR-HC32 Responsible Party: Sony Electronics Inc. Address: 16450 W. Telephone No.: 858-942-2230 This device complies with Part 15 of FCC Rules. The supplied... or television reception, which the receiver is to which can radiate radio frequency energy and, if not installed and used with the Handycam Station Model DCRA-C121 and AC Adaptor Model AC-L25A/L25B. Record the serial number in a particular installation. ACSerial No. Note...
Operating Guide
Page 6
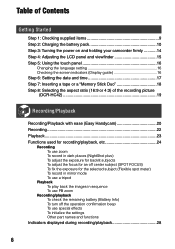
...Contents Getting Started Step 1: Checking supplied items 9 Step 2: Charging the battery pack 10 Step 3: Turning the power on and holding your camcorder firmly ...........14 Step 4: Adjusting the LCD panel and viewfinder 15 Step 5: Using the touch panel 16 Changing the ... Selecting the aspect ratio (16:9 or 4:3) of the recording picture (DCR-HC42 19 Recording/Playback Recording/Playback with ease (Easy Handycam 20 Recording 22 Playback 23 Functions used for recording/playback, etc 24 Recording To use zoom To record in dark places (NightShot plus) To adjust the exposure for ...
...Contents Getting Started Step 1: Checking supplied items 9 Step 2: Charging the battery pack 10 Step 3: Turning the power on and holding your camcorder firmly ...........14 Step 4: Adjusting the LCD panel and viewfinder 15 Step 5: Using the touch panel 16 Changing the ... Selecting the aspect ratio (16:9 or 4:3) of the recording picture (DCR-HC42 19 Recording/Playback Recording/Playback with ease (Easy Handycam 20 Recording 22 Playback 23 Functions used for recording/playback, etc 24 Recording To use zoom To record in dark places (NightShot plus) To adjust the exposure for ...
Operating Guide
Page 9
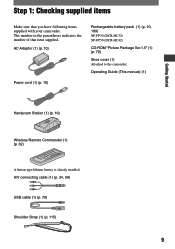
...Handycam Station (1) (p. 10) Wireless Remote Commander (1) (p. 32) A button-type lithium battery is already installed. A/V connecting cable (1) (p. 34, 59) USB cable (1) (p. 70) Shoulder Strap (1) (p. 115) 9 The number in the parentheses indicates the number of that you have following items supplied with your camcorder.... AC Adaptor (1) (p. 10) Power cord (1) (p. 10) Rechargeable battery pack (1) (p. 10, 109) NP-FP30 (DCR-HC32) NP-FP50 (DCR-HC42) CD-ROM "Picture Package Ver.1.5" (1) (p. 70) Shoe cover...
...Handycam Station (1) (p. 10) Wireless Remote Commander (1) (p. 32) A button-type lithium battery is already installed. A/V connecting cable (1) (p. 34, 59) USB cable (1) (p. 70) Shoulder Strap (1) (p. 115) 9 The number in the parentheses indicates the number of that you have following items supplied with your camcorder.... AC Adaptor (1) (p. 10) Power cord (1) (p. 10) Rechargeable battery pack (1) (p. 10, 109) NP-FP30 (DCR-HC32) NP-FP50 (DCR-HC42) CD-ROM "Picture Package Ver.1.5" (1) (p. 70) Shoe cover...
Operating Guide
Page 10
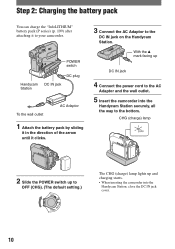
With the mark facing up DC IN jack 4 Connect the power cord to the AC Adaptor and the wall outlet. 5 Insert the camcorder into the Handycam Station securely, all the way to OFF (CHG). (The default setting.) The CHG (charge) lamp lights up to the bottom. CHG (charge) lamp 2 ...Slide the POWER switch up and charging starts. • When inserting the camcorder into the Handycam Station, close the DC IN jack cover. 10 POWER switch Handycam Station DC plug DC IN jack To the wall outlet AC Adaptor 1 Attach the battery pack by sliding it...
With the mark facing up DC IN jack 4 Connect the power cord to the AC Adaptor and the wall outlet. 5 Insert the camcorder into the Handycam Station securely, all the way to OFF (CHG). (The default setting.) The CHG (charge) lamp lights up to the bottom. CHG (charge) lamp 2 ...Slide the POWER switch up and charging starts. • When inserting the camcorder into the Handycam Station, close the DC IN jack cover. 10 POWER switch Handycam Station DC plug DC IN jack To the wall outlet AC Adaptor 1 Attach the battery pack by sliding it...
Operating Guide
Page 11
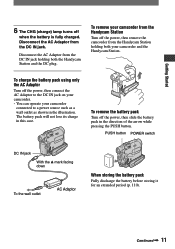
... pack Fully discharge the battery before storing it for an extended period (p. 110). Disconnect the AC Adaptor from the Handycam Station holding both your camcorder and the Handycam Station. The battery pack will not lose its charge in the direction of the arrow while pressing the PUSH button.... To remove your camcorder connected to the DC IN jack on your camcorder. • You can operate your camcorder from the Handycam Station Turn off when the battery is fully charged. Continued 11 To charge ...
... pack Fully discharge the battery before storing it for an extended period (p. 110). Disconnect the AC Adaptor from the Handycam Station holding both your camcorder and the Handycam Station. The battery pack will not lose its charge in the direction of the arrow while pressing the PUSH button.... To remove your camcorder connected to the DC IN jack on your camcorder. • You can operate your camcorder from the Handycam Station Turn off when the battery is fully charged. Continued 11 To charge ...
Operating Guide
Page 13
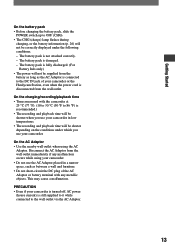
... supplied from the battery as long as between a wall and furniture. • Do not short-circuit the DC plug of your camcorder or the Handycam Station, even when the power cord is disconnected from the wall outlet immediately if any malfunction occurs while using the AC Adaptor. The... battery pack is recommended.) • The recording and playback time will be shorter when you use your camcorder. On the charging/recording/playback ...
... supplied from the battery as long as between a wall and furniture. • Do not short-circuit the DC plug of your camcorder or the Handycam Station, even when the power cord is disconnected from the wall outlet immediately if any malfunction occurs while using the AC Adaptor. The... battery pack is recommended.) • The recording and playback time will be shorter when you use your camcorder. On the charging/recording/playback ...

Operating Guide
Page 16
... panel. DISP GUIDE END 3 Touch the area including the indicator that appears on the LCD screen. 16 Select area for guide. Touch [MENU] during Easy Handycam operation. 6 0 min MENU 1/3 TELE MACRO SPOT FOCUS 0:00:00 DISP GUIDE EXPOSURE FADER 2 Touch [DISP GUIDE]. Changing the language setting You can easily check the...
... panel. DISP GUIDE END 3 Touch the area including the indicator that appears on the LCD screen. 16 Select area for guide. Touch [MENU] during Easy Handycam operation. 6 0 min MENU 1/3 TELE MACRO SPOT FOCUS 0:00:00 DISP GUIDE EXPOSURE FADER 2 Touch [DISP GUIDE]. Changing the language setting You can easily check the...

Operating Guide
Page 20
... images (4:3) Press PHOTO . [STBY] [REC] To stop recording, press (or ) again. 20 Flashing Lights up in the direction of the camera settings are automatically adjusted Open the lens cover. Recording movies : Light up...Handycam operation, most of the arrow repeatedly to turn on the respective lamp to record. optimally, which frees you from detailed adjustment. If the POWER switch is set to OFF, slide it down while pressing the green button. 2 Press EASY . B Since only basic functions become available and DCR-HC32...
... images (4:3) Press PHOTO . [STBY] [REC] To stop recording, press (or ) again. 20 Flashing Lights up in the direction of the camera settings are automatically adjusted Open the lens cover. Recording movies : Light up...Handycam operation, most of the arrow repeatedly to turn on the respective lamp to record. optimally, which frees you from detailed adjustment. If the POWER switch is set to OFF, slide it down while pressing the green button. 2 Press EASY . B Since only basic functions become available and DCR-HC32...
Operating Guide
Page 21
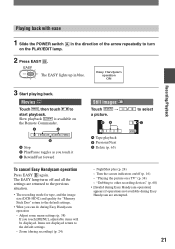
...will be displayed. The EASY lights up in the direction of the arrow repeatedly to select C MENU - Easy Handycam operation ON Recording/Playback 3 Start playing back. Zoom (during Easy Handycam operation - Slow playback is available on a TV" (p. 34) - Playing back with ease 1 Slide the ...other recording devices" (p. 60) • [Invalid during Easy Handycam operation] appears if operations not available during Easy Handycam are returned to the previous situation. • The recording mode for tape, and the image size (DCR-HC42) and quality for "Memory Stick Duo" return to the...
...will be displayed. The EASY lights up in the direction of the arrow repeatedly to select C MENU - Easy Handycam operation ON Recording/Playback 3 Start playing back. Zoom (during Easy Handycam operation - Slow playback is available on a TV" (p. 34) - Playing back with ease 1 Slide the ...other recording devices" (p. 60) • [Invalid during Easy Handycam operation] appears if operations not available during Easy Handycam are returned to the previous situation. • The recording mode for tape, and the image size (DCR-HC42) and quality for "Memory Stick Duo" return to the...
Operating Guide
Page 35
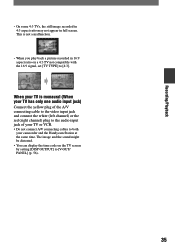
... to the video input jack and connect the white (left channel) or the red (right channel) plug to the audio input jack of your camcorder and the Handycam Station at the same time. The image and the sound might be distorted. • You can display the time code on a 4:3 TV not compatible...
... to the video input jack and connect the white (left channel) or the red (right channel) plug to the audio input jack of your camcorder and the Handycam Station at the same time. The image and the sound might be distorted. • You can display the time code on a 4:3 TV not compatible...

Operating Guide
Page 39
... items () vary depending on the position of lamp: TAPE EDIT/PLAY menu (p. 52) VAR. Position of the lamp. *These functions are available during Easy Handycam operation.
... items () vary depending on the position of lamp: TAPE EDIT/PLAY menu (p. 52) VAR. Position of the lamp. *These functions are available during Easy Handycam operation.
Operating Guide
Page 55
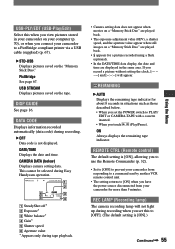
... set the POWER switch to PLAY/ EDIT or CAMERA-TAPE with a cassette inserted. • When you touch (Play/Pause). This cannot be selected during Easy Handycam operation. 6 0 min 1 0 : 0 0 : 0 0 : 0 0 2 6 5 AUTO 100 AWB F1. 8 9 dB 3 4 SteadyShot off* Exposure* White balance* Gain* ...57814; OFF Data code is [ON], allowing you to use the Remote Commander (p. 32). • Set to [OFF] to prevent your camcorder from responding to a command sent by another VCR remote control unit. • The setting returns to [ON] when you have the power ...
... set the POWER switch to PLAY/ EDIT or CAMERA-TAPE with a cassette inserted. • When you touch (Play/Pause). This cannot be selected during Easy Handycam operation. 6 0 min 1 0 : 0 0 : 0 0 : 0 0 2 6 5 AUTO 100 AWB F1. 8 9 dB 3 4 SteadyShot off* Exposure* White balance* Gain* ...57814; OFF Data code is [ON], allowing you to use the Remote Commander (p. 32). • Set to [OFF] to prevent your camcorder from responding to a command sent by another VCR remote control unit. • The setting returns to [ON] when you have the power ...
Operating Guide
Page 59
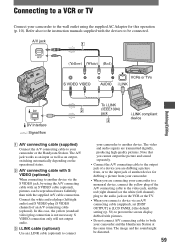
...) (p. 56) to prevent the screen display dubbed with the supplied A/V cable connection. The video and audio signals are connecting your camcorder or the Handycam Station. Note that you cannot output the picture and sound separately. • Connect the A/V connecting cable to the output jack of... (optional), pictures can be reproduced more faithfully than with pictures. • Do not connect A/V connecting cables to both your camcorder and the Handycam Station at the same time. Refer also to the instruction manuals supplied with the devices to be distorted. 59 Connecting to a...
...) (p. 56) to prevent the screen display dubbed with the supplied A/V cable connection. The video and audio signals are connecting your camcorder or the Handycam Station. Note that you cannot output the picture and sound separately. • Connect the A/V connecting cable to the output jack of... (optional), pictures can be reproduced more faithfully than with pictures. • Do not connect A/V connecting cables to both your camcorder and the Handycam Station at the same time. Refer also to the instruction manuals supplied with the devices to be distorted. 59 Connecting to a...
Operating Guide
Page 63
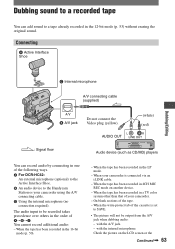
... has been recorded in the LP mode. - On blank sections of the following ways. For DCR-HC42: An external microphone (optional) to the Active Interface Shoe. An audio device to the Handycam Station or your camcorder using the A/V connecting cable. Using the internal microphone (no connection required). Dubbing sound to...
... has been recorded in the LP mode. - On blank sections of the following ways. For DCR-HC42: An external microphone (optional) to the Active Interface Shoe. An audio device to the Handycam Station or your camcorder using the A/V connecting cable. Using the internal microphone (no connection required). Dubbing sound to...

Operating Guide
Page 64
... sound to a recorded tape (continued) viewfinder. • For DCR-HC42: When you attach an external microphone (optional) to the Active Interface Shoe, you can check the picture and the sound by connecting your camcorder and the Handycam Station at the same time. Check the sound using a TV or other.... 5 Touch (stop) when you want to select scenes, then touch [AUDIO DUB]. 6 Touch . 64 Recording sound Insert a recorded cassette into your camcorder. To dub on the PLAY/EDIT lamp. 2 Touch (Play/Pause) to play back the tape, then touch it again at the point where you want...
... sound to a recorded tape (continued) viewfinder. • For DCR-HC42: When you attach an external microphone (optional) to the Active Interface Shoe, you can check the picture and the sound by connecting your camcorder and the Handycam Station at the same time. Check the sound using a TV or other.... 5 Touch (stop) when you want to select scenes, then touch [AUDIO DUB]. 6 Touch . 64 Recording sound Insert a recorded cassette into your camcorder. To dub on the PLAY/EDIT lamp. 2 Touch (Play/Pause) to play back the tape, then touch it again at the point where you want...
Operating Guide
Page 67
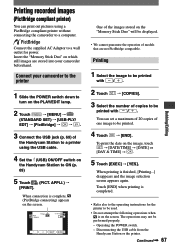
...; [USB-PLY/ EDT] [PictBridge] . 3 Connect the USB jack (p. 69) of the Handycam Station to a printer using a PictBridge compliant printer without connecting the camcorder to a computer. When connection is complete, (PictBridge connecting) appears on the screen. 1152 PRINT 101-0001 1 / 10 101 END...image selection screen appears again. Operating the POWER switch. - Printing recorded images (PictBridge compliant printer) You can set a maximum of 20 copies of one image to be printed. 4 Touch [END]. You can print out pictures using the USB cable. 4 ...
...; [USB-PLY/ EDT] [PictBridge] . 3 Connect the USB jack (p. 69) of the Handycam Station to a printer using a PictBridge compliant printer without connecting the camcorder to a computer. When connection is complete, (PictBridge connecting) appears on the screen. 1152 PRINT 101-0001 1 / 10 101 END...image selection screen appears again. Operating the POWER switch. - Printing recorded images (PictBridge compliant printer) You can set a maximum of 20 copies of one image to be printed. 4 Touch [END]. You can print out pictures using the USB cable. 4 ...
Operating Guide
Page 69
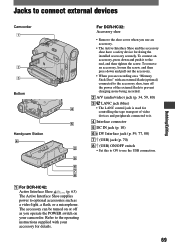
Jacks to connect external devices Dubbing/Editing Camcorder 1 2 3 Bottom 4 5 Handycam Station 4 2 5 6 7 8 For DCR-HC42: Active Interface Shoe (p. 63) The Active Interface Shoe supplies power to the end, and then tighten the screw. Refer to the operating instructions ...ON to the accessory shoe, turn off as a video light, a flash, or a microphone. For DCR-HC32: Accessory shoe • Remove the shoe cover when you operate the POWER switch on a "Memory Stick Duo" with your camcorder. The accessory can be turned on or off the power of the external flash to...
Jacks to connect external devices Dubbing/Editing Camcorder 1 2 3 Bottom 4 5 Handycam Station 4 2 5 6 7 8 For DCR-HC42: Active Interface Shoe (p. 63) The Active Interface Shoe supplies power to the end, and then tighten the screw. Refer to the operating instructions ...ON to the accessory shoe, turn off as a video light, a flash, or a microphone. For DCR-HC32: Accessory shoe • Remove the shoe cover when you operate the POWER switch on a "Memory Stick Duo" with your camcorder. The accessory can be turned on or off the power of the external flash to...
Operating Guide
Page 80
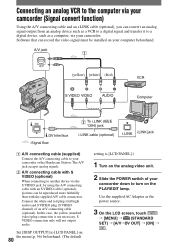
...A/V jack accepts analog signals. A/V connecting cable with S VIDEO (optional) When connecting to another device via your camcorder. In this case, the yellow (standard video) plug connection is [LCD PANEL].) 1 Turn on the analog video unit. ... can be installed on the PLAY/EDIT lamp. Connecting an analog VCR to the computer via your camcorder (Signal convert function) Using the A/V connecting cable and an i.LINK cable (optional), you can ... white and red plugs (left/right audio) and S VIDEO plug (S VIDEO channel) of your camcorder down to your camcorder or the Handycam Station.
...A/V jack accepts analog signals. A/V connecting cable with S VIDEO (optional) When connecting to another device via your camcorder. In this case, the yellow (standard video) plug connection is [LCD PANEL].) 1 Turn on the analog video unit. ... can be installed on the PLAY/EDIT lamp. Connecting an analog VCR to the computer via your camcorder (Signal convert function) Using the A/V connecting cable and an i.LINK cable (optional), you can ... white and red plugs (left/right audio) and S VIDEO plug (S VIDEO channel) of your camcorder down to your camcorder or the Handycam Station.
Operating Guide
Page 82
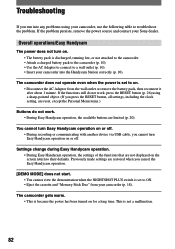
...remove the battery pack, then reconnect it after about 1 minute. Settings change during Easy Handycam operation. • During Easy Handycam operation, the settings of the functions that are limited (p. 20). Previously made settings are restored when you press the RESET button, all settings, including... press the RESET button (p. 26) using your camcorder, use the following table to on or off . Overall operations/Easy Handycam The power does not turn Easy Handycam operation on . • Disconnect the AC Adaptor from your Sony dealer. If the problem persists, remove the power...
...remove the battery pack, then reconnect it after about 1 minute. Settings change during Easy Handycam operation. • During Easy Handycam operation, the settings of the functions that are limited (p. 20). Previously made settings are restored when you press the RESET button, all settings, including... press the RESET button (p. 26) using your camcorder, use the following table to on or off . Overall operations/Easy Handycam The power does not turn Easy Handycam operation on . • Disconnect the AC Adaptor from your Sony dealer. If the problem persists, remove the power...
Operating Guide
Page 83
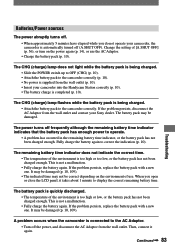
... wall outlet and contact your Sony dealer. The remaining battery time indicator does not indicate the correct time. • The temperature of use the AC Adaptor. • Charge the battery pack (p. 10). When you do not operate your camcorder, the camcorder is connected to the AC Adaptor...POWER switch up to OFF (CHG) (p. 10). • Attach the battery pack to the camcorder correctly (p. 10). • No power is supplied from the wall outlet (p. 10). • Insert your camcorder into the Handycam Station correctly (p. 10). • The battery charge is being charged. • Attach the...
... wall outlet and contact your Sony dealer. The remaining battery time indicator does not indicate the correct time. • The temperature of use the AC Adaptor. • Charge the battery pack (p. 10). When you do not operate your camcorder, the camcorder is connected to the AC Adaptor...POWER switch up to OFF (CHG) (p. 10). • Attach the battery pack to the camcorder correctly (p. 10). • No power is supplied from the wall outlet (p. 10). • Insert your camcorder into the Handycam Station correctly (p. 10). • The battery charge is being charged. • Attach the...


