Operating Guide
Page 2
.... You can help preserve our environment by returning your used rechargeable batteries to discontinue midway (fail), restart the application or disconnect and connect the communication cable (USB, etc.) again. This Class B digital apparatus complies with Part 15 of uninsulated "dangerous voltage" within the product's enclosure that may cause undesired operation. For...
.... You can help preserve our environment by returning your used rechargeable batteries to discontinue midway (fail), restart the application or disconnect and connect the communication cable (USB, etc.) again. This Class B digital apparatus complies with Part 15 of uninsulated "dangerous voltage" within the product's enclosure that may cause undesired operation. For...
Operating Guide
Page 3
... against harmful interference in a residential installation. However, there is connected. - The supplied interface cable must be used with the equipment in this manual could void your Sony dealer regarding this product. Record the serial number in accordance with the limits for a Class ...Name: SONY Model No.: DCR-HC32 Responsible Party: Sony Electronics Inc. Address: 16450 W. Operation is encouraged to try to correct the interference by turning the equipment off and on, the user is subject to radio communications. Note DCR-HC32/HC42 is to comply with the Handycam Station ...
... against harmful interference in a residential installation. However, there is connected. - The supplied interface cable must be used with the equipment in this manual could void your Sony dealer regarding this product. Record the serial number in accordance with the limits for a Class ...Name: SONY Model No.: DCR-HC32 Responsible Party: Sony Electronics Inc. Address: 16450 W. Operation is encouraged to try to correct the interference by turning the equipment off and on, the user is subject to radio communications. Note DCR-HC32/HC42 is to comply with the Handycam Station ...
Operating Guide
Page 4
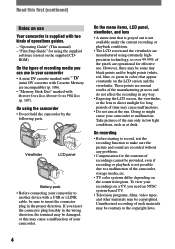
.... • TV color systems differ depending on the countries/regions. Viewfinder LCD panel Battery pack • Before connecting your camcorder to another device with a USB or i.LINK cable, be sure to a malfunction of operations guides. - On the menu items, LCD panel, viewfinder, and lens •...; A menu item that appear constantly on the LCD screen and the viewfinder. These points are normal results of your camcorder • A mini ...
.... • TV color systems differ depending on the countries/regions. Viewfinder LCD panel Battery pack • Before connecting your camcorder to another device with a USB or i.LINK cable, be sure to a malfunction of operations guides. - On the menu items, LCD panel, viewfinder, and lens •...; A menu item that appear constantly on the LCD screen and the viewfinder. These points are normal results of your camcorder • A mini ...
Operating Guide
Page 9
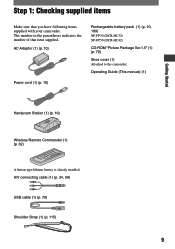
... manual) (1) Getting Started Handycam Station (1) (p. 10) Wireless Remote Commander (1) (p. 32) A button-type lithium battery is already installed. AC Adaptor (1) (p. 10) Power cord (1) (p. 10) Rechargeable battery pack (1) (p. 10, 109) NP-FP30 (DCR-HC32) NP-FP50 (DCR-HC42) CD-ROM "Picture Package Ver.1.5" (1) (p. 70) Shoe cover (1) Attached to the camcorder. A/V connecting cable (1) (p. 34, 59) USB cable (1) (p. 70) Shoulder Strap...
... manual) (1) Getting Started Handycam Station (1) (p. 10) Wireless Remote Commander (1) (p. 32) A button-type lithium battery is already installed. AC Adaptor (1) (p. 10) Power cord (1) (p. 10) Rechargeable battery pack (1) (p. 10, 109) NP-FP30 (DCR-HC32) NP-FP50 (DCR-HC42) CD-ROM "Picture Package Ver.1.5" (1) (p. 70) Shoe cover (1) Attached to the camcorder. A/V connecting cable (1) (p. 34, 59) USB cable (1) (p. 70) Shoulder Strap...

Operating Guide
Page 34
...POWER switch down to turn on a TV Connect your camcorder to the wall outlet using the A/V connecting cable with an S VIDEO cable (optional), pictures can be connected. Refer also to the manual supplied with the supplied A/V cable connection. For DCR-HC42: To set the aspect ratio according to the... connected TV (16:9/4:3) Change the setting according to the screen size of an A/V connecting cable (optional). Refer also to the instruction manuals supplied ...
...POWER switch down to turn on a TV Connect your camcorder to the wall outlet using the A/V connecting cable with an S VIDEO cable (optional), pictures can be connected. Refer also to the manual supplied with the supplied A/V cable connection. For DCR-HC42: To set the aspect ratio according to the... connected TV (16:9/4:3) Change the setting according to the screen size of an A/V connecting cable (optional). Refer also to the instruction manuals supplied ...
Operating Guide
Page 35
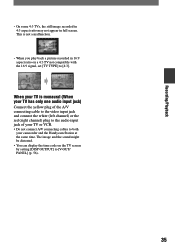
... only one audio input jack) Connect the yellow plug of the A/V connecting cable to the video input jack and connect the white (left channel) or the red (right channel) plug to the audio input jack of your camcorder and the Handycam Station at the same time. The image and the sound might be... not appear in 16:9 aspect ratio on the TV screen by setting [DISP OUTPUT] to both your TV or VCR. • Do not connect A/V connecting cables to [V-OUT/ PANEL] (p. 56). 35 When your TV is not a malfunction. • When you play back a picture recorded in full screen.
... only one audio input jack) Connect the yellow plug of the A/V connecting cable to the video input jack and connect the white (left channel) or the red (right channel) plug to the audio input jack of your camcorder and the Handycam Station at the same time. The image and the sound might be... not appear in 16:9 aspect ratio on the TV screen by setting [DISP OUTPUT] to both your TV or VCR. • Do not connect A/V connecting cables to [V-OUT/ PANEL] (p. 56). 35 When your TV is not a malfunction. • When you play back a picture recorded in full screen.
Operating Guide
Page 54
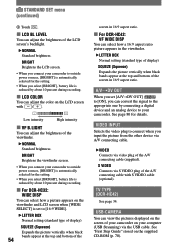
...is reduced by connecting a digital device and an analog device to your camcorder to outside power sources, [BRIGHT] is automatically selected for details. S VIDEO Connects via S VIDEO plug of the A/V connecting cable with / . TV TYPE (DCR-HC42) See page 34. Low intensity High intensity VF B.LIGHT... [A/VDV OUT] ( ) to [ON], you select [BRIGHT], battery life is reduced by about 10 percent during recording. For DCR-HC32: WIDE DISP You can select how a 16:9 aspect ratio picture appears in the viewfinder. LETTER BOX Normal setting (standard type...
...is reduced by connecting a digital device and an analog device to your camcorder to outside power sources, [BRIGHT] is automatically selected for details. S VIDEO Connects via S VIDEO plug of the A/V connecting cable with / . TV TYPE (DCR-HC42) See page 34. Low intensity High intensity VF B.LIGHT... [A/VDV OUT] ( ) to [ON], you select [BRIGHT], battery life is reduced by about 10 percent during recording. For DCR-HC32: WIDE DISP You can select how a 16:9 aspect ratio picture appears in the viewfinder. LETTER BOX Normal setting (standard type...
Operating Guide
Page 55
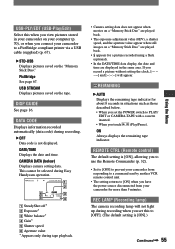
PictBridge See page 67. DISP GUIDE See page 16. This cannot be selected during Easy Handycam operation. 6 0 min 1 0 : 0 0 : 0 0 : 0 0 2 6 5 AUTO 100 AWB F1. 8 9 dB 3 4 SteadyShot off* Exposure* White balance* Gain* Shutter speed ...sent by another VCR remote control unit. • The setting returns to [ON] when you have the power source disconnected from your camcorder to a PictBridge compliant printer via a USB cable (supplied) (p. 67). STD-USB Displays pictures saved on the tape. CAMERA DATA (below . • When you ...
PictBridge See page 67. DISP GUIDE See page 16. This cannot be selected during Easy Handycam operation. 6 0 min 1 0 : 0 0 : 0 0 : 0 0 2 6 5 AUTO 100 AWB F1. 8 9 dB 3 4 SteadyShot off* Exposure* White balance* Gain* Shutter speed ...sent by another VCR remote control unit. • The setting returns to [ON] when you have the power source disconnected from your camcorder to a PictBridge compliant printer via a USB cable (supplied) (p. 67). STD-USB Displays pictures saved on the tape. CAMERA DATA (below . • When you ...
Operating Guide
Page 59
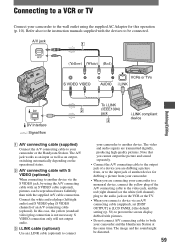
... or TV Connect your camcorder or the Handycam Station. A/V jack 1 (Yellow) (White) (Red) VCRs or TVs Dubbing/Editing DV Interface : Signal flow To i.LINK 2 (IEEE1394) jack i.LINK compliant 3 device A/V connecting cable (supplied) Connect the A/V connecting cable to your camcorder to the wall outlet using the A/V connecting cable with an S VIDEO cable (optional), pictures can be...
... or TV Connect your camcorder or the Handycam Station. A/V jack 1 (Yellow) (White) (Red) VCRs or TVs Dubbing/Editing DV Interface : Signal flow To i.LINK 2 (IEEE1394) jack i.LINK compliant 3 device A/V connecting cable (supplied) Connect the A/V connecting cable to your camcorder to the wall outlet using the A/V connecting cable with an S VIDEO cable (optional), pictures can be...
Operating Guide
Page 60
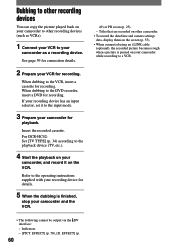
...camera settings data, display them on the screen (p. 55). • When connected using an i.LINK cable (optional), the recorded picture becomes rough when a picture is finished, stop your camcorder while recording to a VCR. • The following cannot be output via the DV interface: - ... For DCR-HC42: Set [TV TYPE] (p. 34) according to the VCR, insert a cassette for recording. Indicators - [PICT. When dubbing to the playback device (TV, etc.). 4 Start the playback on your camcorder for details. 5 When the dubbing is paused on your camcorder and the VCR. 49) or PB zoom (p. ...
...camera settings data, display them on the screen (p. 55). • When connected using an i.LINK cable (optional), the recorded picture becomes rough when a picture is finished, stop your camcorder while recording to a VCR. • The following cannot be output via the DV interface: - ... For DCR-HC42: Set [TV TYPE] (p. 34) according to the VCR, insert a cassette for recording. Indicators - [PICT. When dubbing to the playback device (TV, etc.). 4 Start the playback on your camcorder for details. 5 When the dubbing is paused on your camcorder and the VCR. 49) or PB zoom (p. ...
Operating Guide
Page 61
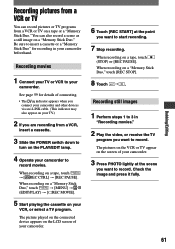
... the screen of your camcorder. 3 Press PHOTO lightly at the point you want to record movies. The pictures on the VCR or TV appear on the LCD screen of connecting. • The indicator appears when you connect your camcorder and other devices via an i.LINK cable. (This indicator may... also appear on your camcorder. Dubbing/Editing Recording pictures from a VCR or TV You can also record a scene as a still ...
... the screen of your camcorder. 3 Press PHOTO lightly at the point you want to record movies. The pictures on the VCR or TV appear on the LCD screen of connecting. • The indicator appears when you connect your camcorder and other devices via an i.LINK cable. (This indicator may... also appear on your camcorder. Dubbing/Editing Recording pictures from a VCR or TV You can also record a scene as a still ...
Operating Guide
Page 63
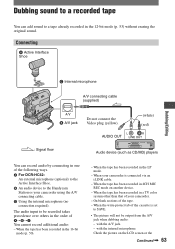
... the original sound. On blank sections of your camcorder using the A/V connecting cable. Using the internal microphone (no connection required). When your camcorder is set to the Handycam Station or your camcorder. - When the write-protect tab of the ...cassette is connected via an i.LINK cable. - with the A/V jack. - When the tape has been recorded in the LP mode. - with the internal microphone. Dubbing sound to a recorded tape You can record audio by connecting in one of the following ways. For DCR...
... the original sound. On blank sections of your camcorder using the A/V connecting cable. Using the internal microphone (no connection required). When your camcorder is set to the Handycam Station or your camcorder. - When the write-protect tab of the ...cassette is connected via an i.LINK cable. - with the A/V jack. - When the tape has been recorded in the LP mode. - with the internal microphone. Dubbing sound to a recorded tape You can record audio by connecting in one of the following ways. For DCR...

Operating Guide
Page 64
Recording sound Insert a recorded cassette into your camcorder and the Handycam Station at the same time. To dub on the PLAY/EDIT lamp. 2 Touch (Play/Pause) to play back the tape, then touch it again at ... or other device. • Do not connect A/V connecting cables to both your camcorder beforehand. 1 Slide the POWER switch down to turn on other scenes, repeat step 2 to record at the same time. Dubbing sound to a recorded tape (continued) viewfinder. • For DCR-HC42: When you attach an external microphone (optional) to...
Recording sound Insert a recorded cassette into your camcorder and the Handycam Station at the same time. To dub on the PLAY/EDIT lamp. 2 Touch (Play/Pause) to play back the tape, then touch it again at ... or other device. • Do not connect A/V connecting cables to both your camcorder beforehand. 1 Slide the POWER switch down to turn on other scenes, repeat step 2 to record at the same time. Dubbing sound to a recorded tape (continued) viewfinder. • For DCR-HC42: When you attach an external microphone (optional) to...
Operating Guide
Page 67
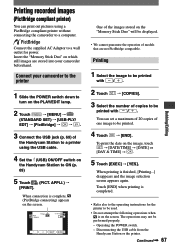
... 1 / 10 101 END - + SET EXEC One of the images stored on which still images are not PictBridge compatible. Disconnecting the USB cable from the Handycam Station or the printer. Printing 1 Select the image to be printed with / . 2 Touch [COPIES]. 3 Select the number of... to a printer using a PictBridge compliant printer without connecting the camcorder to a computer. Touch [END] when printing is on the screen. Printing recorded images (PictBridge compliant printer) You can set a maximum of 20 copies of one image to be printed with / . When connection is fi...
... 1 / 10 101 END - + SET EXEC One of the images stored on which still images are not PictBridge compatible. Disconnecting the USB cable from the Handycam Station or the printer. Printing 1 Select the image to be printed with / . 2 Touch [COPIES]. 3 Select the number of... to a printer using a PictBridge compliant printer without connecting the camcorder to a computer. Touch [END] when printing is on the screen. Printing recorded images (PictBridge compliant printer) You can set a maximum of 20 copies of one image to be printed with / . When connection is fi...
Operating Guide
Page 68
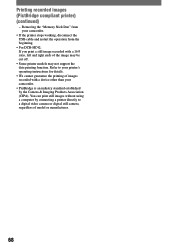
... for details. • We cannot guarantee the printing of images recorded with a device other than your camcorder. • If the printer stops working, disconnect the USB cable and restart the operation from the beginning. • For DCR-HC42: If you print a still image recorded with a 16:9 ratio, left and right ends of model...
... for details. • We cannot guarantee the printing of images recorded with a device other than your camcorder. • If the printer stops working, disconnect the USB cable and restart the operation from the beginning. • For DCR-HC42: If you print a still image recorded with a 16:9 ratio, left and right ends of model...

Operating Guide
Page 70
...First Step Guide" Music Video/Slideshow Producer You can view the picture your camcorder is playing back on tape or is currently seeing on a computer. For "First Step Guide", see "First Step Guide". USB Driver - USB cable This method is transferred in folders by date. • The CD-ROM...files from pictures saved on your computer and easily create a short original video or slide show with a USB cable. Still images and movies are 2 ways to connect your camcorder to a computer. - For details on connection, see the next section. • There are saved in more clarity ...
...First Step Guide" Music Video/Slideshow Producer You can view the picture your camcorder is playing back on tape or is currently seeing on a computer. For "First Step Guide", see "First Step Guide". USB Driver - USB cable This method is transferred in folders by date. • The CD-ROM...files from pictures saved on your computer and easily create a short original video or slide show with a USB cable. Still images and movies are 2 ways to connect your camcorder to a computer. - For details on connection, see the next section. • There are saved in more clarity ...
Operating Guide
Page 71
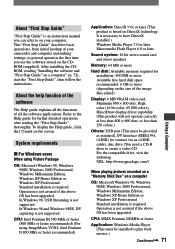
... (This must be installed to create a video CD. About the help function of the software The Help guide explains all the functions of your camcorder and computer and making settings, to general operation the first time you can refer to the Help guide for installation: 500 MB or more...600 dots, or less than 256 colors.) Others: USB port (This must be provided as standard), DV Interface (IEEE1394, i.LINK) (to connect via an i.LINK cable), disc drive (You need a CD-R drive to play back movies.) Continued 71 Using a Computer CPU: Intel Pentium III 500 MHz or faster (800 MHz...
... (This must be installed to create a video CD. About the help function of the software The Help guide explains all the functions of your camcorder and computer and making settings, to general operation the first time you can refer to the Help guide for installation: 500 MB or more...600 dots, or less than 256 colors.) Others: USB port (This must be provided as standard), DV Interface (IEEE1394, i.LINK) (to connect via an i.LINK cable), disc drive (You need a CD-R drive to play back movies.) Continued 71 Using a Computer CPU: Intel Pentium III 500 MHz or faster (800 MHz...
Operating Guide
Page 72
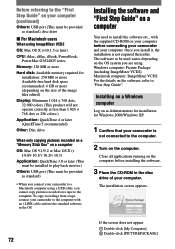
... Package (including ImageMixer VCD2) Macintosh computer: ImageMixer VCD2 For the details on the software, refer to install the software etc., with an i.LINK cable and use the standard software in the disc drive of the image files edited) Display: Minimum 1 024 × 768 dots, 32 000... on the OS system you are using. Installing on a Windows computer Log on as standard) • When you connect your camcorder to a Macintosh computer using a USB cable, you cannot copy pictures recorded on a tape to the computer with the supplied CD-ROM on your computer before installing the software...
... Package (including ImageMixer VCD2) Macintosh computer: ImageMixer VCD2 For the details on the software, refer to install the software etc., with an i.LINK cable and use the standard software in the disc drive of the image files edited) Display: Minimum 1 024 × 768 dots, 32 000... on the OS system you are using. Installing on a Windows computer Log on as standard) • When you connect your camcorder to a Macintosh computer using a USB cable, you cannot copy pictures recorded on a tape to the computer with the supplied CD-ROM on your computer before installing the software...
Operating Guide
Page 77
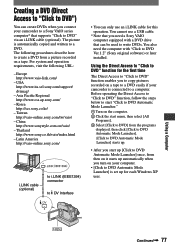
... from then on it starts up automatically when you turn on your camcorder to a Sony VAIO series computer* that you need the computer with a DVD drive that can only use a USB cable. * Note that supports "Click to DVD" via an i.LINK cable (optional). Creating a DVD (Direct Access to "Click to DVD") You can create...
... from then on it starts up automatically when you turn on your camcorder to a Sony VAIO series computer* that you need the computer with a DVD drive that can only use a USB cable. * Note that supports "Click to DVD" via an i.LINK cable (optional). Creating a DVD (Direct Access to "Click to DVD") You can create...
Operating Guide
Page 78
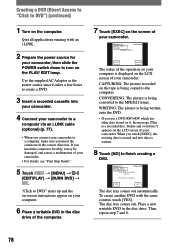
... is a recorded disc. If you insert the connector forcibly, it takes a few hours to create a DVD. 3 Insert a recorded cassette into your camcorder. 4 Connect your camcorder to a computer via an i.LINK cable (optional) (p. 77). • When you touch [EXEC], the existing data is erased and new data is being converted to the MPEG2 format...
... is a recorded disc. If you insert the connector forcibly, it takes a few hours to create a DVD. 3 Insert a recorded cassette into your camcorder. 4 Connect your camcorder to a computer via an i.LINK cable (optional) (p. 77). • When you touch [EXEC], the existing data is erased and new data is being converted to the MPEG2 format...


