
Operating Guide
Page 3
...If you are not sure of the type of electrical power supplied to your home, consult your dealer or local power company. Object and Liquid Entry Never push objects of the polarized plug by the manufacturer. Power-Cord Protection Route the power cord so that could result in a fire or ... electrician to have a suitable outlet installed. Ventilation The slots and openings in the cabinet are unable to insert the plug fully into the power outlet only one described in fire or electric shock. Carefully observe all warnings, precautions and instructions on a bed, sofa, rug, or other...
...If you are not sure of the type of electrical power supplied to your home, consult your dealer or local power company. Object and Liquid Entry Never push objects of the polarized plug by the manufacturer. Power-Cord Protection Route the power cord so that could result in a fire or ... electrician to have a suitable outlet installed. Ventilation The slots and openings in the cabinet are unable to insert the plug fully into the power outlet only one described in fire or electric shock. Carefully observe all warnings, precautions and instructions on a bed, sofa, rug, or other...
Operating Guide
Page 8
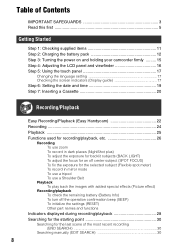
...SAFEGUARDS 3 Read this first 5 Getting Started Step 1: Checking supplied items 11 Step 2: Charging the battery pack 12 Step 3: Turning the power on and holding your camcorder firmly ......... 15 Step 4: Adjusting the LCD panel and viewfinder ...16 Step 5: Using the touch panel 17 Changing the language setting 17 Checking the screen indicators (Display guide 17 Step 6: Setting the date and time 19 Step 7: Inserting a Cassette 20 Recording/Playback Easy Recording/Playback (Easy Handycam...
...SAFEGUARDS 3 Read this first 5 Getting Started Step 1: Checking supplied items 11 Step 2: Charging the battery pack 12 Step 3: Turning the power on and holding your camcorder firmly ......... 15 Step 4: Adjusting the LCD panel and viewfinder ...16 Step 5: Using the touch panel 17 Changing the language setting 17 Checking the screen indicators (Display guide 17 Step 6: Setting the date and time 19 Step 7: Inserting a Cassette 20 Recording/Playback Easy Recording/Playback (Easy Handycam...
Operating Guide
Page 11
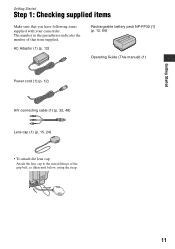
Getting Started Getting Started Step 1: Checking supplied items Make sure that item supplied. The number in the parentheses indicates the number of the grip belt, as illustrated below, using the strap. 11 AC Adaptor (1) (p. 12) Rechargeable battery pack NP-FP30 (1) (p. 12, 66) Operating Guide (This manual) (1) Power cord (1) (p. 12) A/V connecting cable (1) (p. 32, 48) Lens cap (1) (p. 15, 24) • To attach the lens cap Attach the lens cap to the metal fittings of that you have following items supplied with your camcorder.
Getting Started Getting Started Step 1: Checking supplied items Make sure that item supplied. The number in the parentheses indicates the number of the grip belt, as illustrated below, using the strap. 11 AC Adaptor (1) (p. 12) Rechargeable battery pack NP-FP30 (1) (p. 12, 66) Operating Guide (This manual) (1) Power cord (1) (p. 12) A/V connecting cable (1) (p. 32, 48) Lens cap (1) (p. 15, 24) • To attach the lens cap Attach the lens cap to the metal fittings of that you have following items supplied with your camcorder.
Operating Guide
Page 13
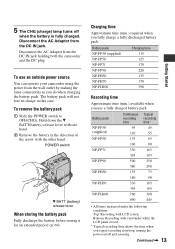
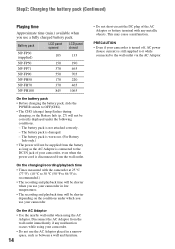
...: Top: Recording with viewfinder while the LCD panel closed. * Typical recording time shows the time when you use an outside power source You can operate your camcorder using the power from the wall outlet by making the same connections as you fully charge a fully discharged battery pack. Continued , 13 Getting ... its charge in the direction of the arrow with one hand. 2 Remove the battery in this case. Battery pack Charging time NP-FP30 (supplied) 115 NP-FP50 125 NP-FP71 170 NP-FP90 220 NP-FH50 135 NP-FH70 170 NP-FH100 390 Recording time Approximate time (min.) ...
...: Top: Recording with viewfinder while the LCD panel closed. * Typical recording time shows the time when you use an outside power source You can operate your camcorder using the power from the wall outlet by making the same connections as you fully charge a fully discharged battery pack. Continued , 13 Getting ... its charge in the direction of the arrow with one hand. 2 Remove the battery in this case. Battery pack Charging time NP-FP30 (supplied) 115 NP-FP50 125 NP-FP71 170 NP-FP90 220 NP-FH50 135 NP-FH70 170 NP-FH100 390 Recording time Approximate time (min.) ...
Operating Guide
Page 14
... immediately if any metallic objects. The battery pack is not attached correctly. - Disconnect the AC Adaptor from the wall outlet. PRECAUTION • Even if your camcorder is turned off, AC power (house current) is still supplied to it while connected to 86 °F) is worn-out. (For Battery Info only.) • The...
... immediately if any metallic objects. The battery pack is not attached correctly. - Disconnect the AC Adaptor from the wall outlet. PRECAUTION • Even if your camcorder is turned off, AC power (house current) is still supplied to it while connected to 86 °F) is worn-out. (For Battery Info only.) • The...
Operating Guide
Page 49
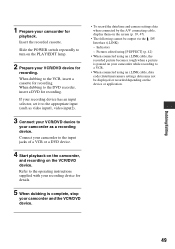
...POWER switch repeatedly to the input jacks of a VCR or a DVD device. 4 Start playback on the camcorder, and recording on the VCR/DVD device. Connect your camcorder to turn on the screen (p. 39, 47). • The following cannot be displayed or recorded depending on your camcorder ...while recording to the DVD recorder, insert a DVD for recording. Refer to your camcorder as video input1, video input2). 3 Connect your VCR/DVD device to the operating instructions supplied with your recording device for details. 5 When...
...POWER switch repeatedly to the input jacks of a VCR or a DVD device. 4 Start playback on the camcorder, and recording on the VCR/DVD device. Connect your camcorder to turn on the screen (p. 39, 47). • The following cannot be displayed or recorded depending on your camcorder ...while recording to the DVD recorder, insert a DVD for recording. Refer to your camcorder as video input1, video input2). 3 Connect your VCR/DVD device to the operating instructions supplied with your recording device for details. 5 When...

Operating Guide
Page 50
...supplied AC Adaptor for recording in your camcorder from a TV or VCR/DVD device, etc., on your camcorder beforehand. Be sure to be connected. • You cannot record pictures on a tape. Touch t [PAGE3] t [REC CTRL] t [REC PAUSE]. 5 When recording pictures from a VCR/ DVD device, insert a cassette or a DVD. 3 Slide the POWER... switch repeatedly to turn on the connected device.) 2 If you can connect your camcorder to the wall outlet using the i.LINK cable (optional). To i.LINK jack DV To...
...supplied AC Adaptor for recording in your camcorder from a TV or VCR/DVD device, etc., on your camcorder beforehand. Be sure to be connected. • You cannot record pictures on a tape. Touch t [PAGE3] t [REC CTRL] t [REC PAUSE]. 5 When recording pictures from a VCR/ DVD device, insert a cassette or a DVD. 3 Slide the POWER... switch repeatedly to turn on the connected device.) 2 If you can connect your camcorder to the wall outlet using the i.LINK cable (optional). To i.LINK jack DV To...

Operating Guide
Page 64
...Singapore, Slovak Republic, Spain, Sweden, Switzerland, Thailand, United Kingdom, etc. Brazil Argentina, Paraguay, Uruguay. AC-L25A/L25B [a] [b] On TV color systems Your camcorder is NTSC system, so its picture can easily set the time difference (p. 47). N SECAM Used in . Simple setting of the wall outlet [b]. M PAL...in the (OTHERS) menu, then set the clock to 240 V, 50/60 Hz range. Additional Information Using your camcorder abroad Power supply You can use your camcorder within the AC 100 V to local time abroad by time difference You can only be viewed on the design of...
...Singapore, Slovak Republic, Spain, Sweden, Switzerland, Thailand, United Kingdom, etc. Brazil Argentina, Paraguay, Uruguay. AC-L25A/L25B [a] [b] On TV color systems Your camcorder is NTSC system, so its picture can easily set the time difference (p. 47). N SECAM Used in . Simple setting of the wall outlet [b]. M PAL...in the (OTHERS) menu, then set the clock to 240 V, 50/60 Hz range. Additional Information Using your camcorder abroad Power supply You can use your camcorder within the AC 100 V to local time abroad by time difference You can only be viewed on the design of...
Operating Guide
Page 70
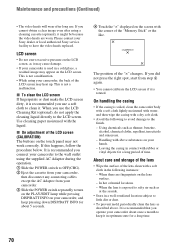
When you connect your camcorder to the wall outlet using the supplied AC Adaptor during the operation. 1 Slide the POWER switch to OFF(CHG). 2 Eject the cassette from your camcorder, then disconnect any connecting cables except the AC Adaptor from step 4 again. • You cannot calibrate the LCD screen if it ... If fingerprints or dust make the LCD screen dirty, it is recommended you did not press the right spot, start from your Sony dealer or local authorized Sony service facility to keep pressing down DISP/BATT INFO for a long time. 70 If you use . When there are worn....
When you connect your camcorder to the wall outlet using the supplied AC Adaptor during the operation. 1 Slide the POWER switch to OFF(CHG). 2 Eject the cassette from your camcorder, then disconnect any connecting cables except the AC Adaptor from step 4 again. • You cannot calibrate the LCD screen if it ... If fingerprints or dust make the LCD screen dirty, it is recommended you did not press the right spot, start from your Sony dealer or local authorized Sony service facility to keep pressing down DISP/BATT INFO for a long time. 70 If you use . When there are worn....
Operating Guide
Page 71
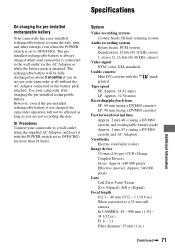
...rewind time Approx. 2 min 40 s (using a DVM60 cassette and rechargeable battery pack) Approx. 1 min 45 s (using the supplied AC Adaptor, and leave it with the POWER switch set to the wall outlet via the AC Adaptor or while the battery pack is attached. However, even if the pre...-installed rechargeable battery is not charged, the camcorder operation will be affected as long as you do not use your camcorder is connected to OFF(CHG). x Procedures Connect your camcorder after charging the pre-installed rechargeable battery. Specifications On charging the pre-...
...rewind time Approx. 2 min 40 s (using a DVM60 cassette and rechargeable battery pack) Approx. 1 min 45 s (using the supplied AC Adaptor, and leave it with the POWER switch set to the wall outlet via the AC Adaptor or while the battery pack is attached. However, even if the pre...-installed rechargeable battery is not charged, the camcorder operation will be affected as long as you do not use your camcorder is connected to OFF(CHG). x Procedures Connect your camcorder after charging the pre-installed rechargeable battery. Specifications On charging the pre-...
Operating Guide
Page 72
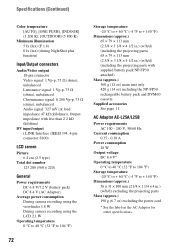
....) 56 × 31 × 100 mm (2 1/4 × 1 1/4 × 4 in.) (w/h/d) excluding the projecting parts Mass (approx.) 190 g (6.7 oz) excluding the power cord * See the label on the AC Adaptor for other specifications. 72 Specifications (Continued) Color temperature [AUTO], [ONE PUSH], [INDOOR] (3 200 K), [OUTDOOR] (5 800 K) ...signal: 0.286 Vp-p, 75 Ω (ohms), unbalanced Audio signal: 327 mV (at load impedance 47 kΩ (kilohms)), Output impedance with supplied battery pack NP-FP30 attached) Mass (approx.) 360 g (12 oz) main unit only 420 g (14 oz) including the NP-FP30 rechargeable...
....) 56 × 31 × 100 mm (2 1/4 × 1 1/4 × 4 in.) (w/h/d) excluding the projecting parts Mass (approx.) 190 g (6.7 oz) excluding the power cord * See the label on the AC Adaptor for other specifications. 72 Specifications (Continued) Color temperature [AUTO], [ONE PUSH], [INDOOR] (3 200 K), [OUTDOOR] (5 800 K) ...signal: 0.286 Vp-p, 75 Ω (ohms), unbalanced Audio signal: 327 mV (at load impedance 47 kΩ (kilohms)), Output impedance with supplied battery pack NP-FP30 attached) Mass (approx.) 360 g (12 oz) main unit only 420 g (14 oz) including the NP-FP30 rechargeable...
Marketing Specifications
Page 2
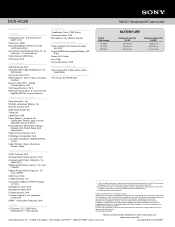
...Supplied Accessories Power Adapter/In-Camera Charger (AC-L25) InfoLITHIUM® Rechargeable Battery (NPFP30) Stereo A/V Cable Lens Cap Enjoy Handycam DVD Optional Accessories High Grade A/V Cable with NightShot® Plus Infrared System) Hardware Viewfinder: Color (123K Pixels) Docking Station: N/A Microphone: Yes (Built-in part without notice. PictBridge is a registered trademark of CIPA. DCR-HC28 MiniDV Handycam® Camcorder...2007 Sony Electronics Inc. All other . 2. i.LINK is prohibited. All rights reserved. Microsoft and Windows are registered trademarks of Sony, used...
...Supplied Accessories Power Adapter/In-Camera Charger (AC-L25) InfoLITHIUM® Rechargeable Battery (NPFP30) Stereo A/V Cable Lens Cap Enjoy Handycam DVD Optional Accessories High Grade A/V Cable with NightShot® Plus Infrared System) Hardware Viewfinder: Color (123K Pixels) Docking Station: N/A Microphone: Yes (Built-in part without notice. PictBridge is a registered trademark of CIPA. DCR-HC28 MiniDV Handycam® Camcorder...2007 Sony Electronics Inc. All other . 2. i.LINK is prohibited. All rights reserved. Microsoft and Windows are registered trademarks of Sony, used...


