
Operating Guide
Page 4
... been damaged. - Replacement parts When replacement parts are specified in fire, electric shock, or other hazards. Safety Check Upon completion of any service or repairs to the set has been subject to rain or water. - IMPORTANT SAFEGUARDS (Continued) Lightning For added protection for this indicates a need for long periods of other controls may result in the operating instructions. Improper adjustment of time, unplug it is...
... been damaged. - Replacement parts When replacement parts are specified in fire, electric shock, or other hazards. Safety Check Upon completion of any service or repairs to the set has been subject to rain or water. - IMPORTANT SAFEGUARDS (Continued) Lightning For added protection for this indicates a need for long periods of other controls may result in the operating instructions. Improper adjustment of time, unplug it is...
Operating Guide
Page 6
... device with the Cassette Memory function (p. 65). Your camcorder is not available under the current recording or playback conditions. 6 About menu items, LCD panel, viewfinder, and lens • A menu item that interference will not occur in the space provided below. The supplied interface cable must be used with the limits for help. Model No. See "Maintenance and precautions" (p. 68). • Before connecting your camcorder • You can use Types...
... device with the Cassette Memory function (p. 65). Your camcorder is not available under the current recording or playback conditions. 6 About menu items, LCD panel, viewfinder, and lens • A menu item that interference will not occur in the space provided below. The supplied interface cable must be used with the limits for help. Model No. See "Maintenance and precautions" (p. 68). • Before connecting your camcorder • You can use Types...
Operating Guide
Page 7
... the camcorder, storage media, etc. • TV color systems differ depending on the LCD screen and the viewfinder. It adopts the MTF* measurement system for Modulation Transfer Function. Black point White, red, blue or green point • Exposing the LCD screen, the viewfinder, or the lens to change without any way. These points are normal results of recording media and accessories are used in this manual • The images...
... the camcorder, storage media, etc. • TV color systems differ depending on the LCD screen and the viewfinder. It adopts the MTF* measurement system for Modulation Transfer Function. Black point White, red, blue or green point • Exposing the LCD screen, the viewfinder, or the lens to change without any way. These points are normal results of recording media and accessories are used in this manual • The images...
Operating Guide
Page 8
... adjust the focus for an off center subject (SPOT FOCUS) To fix the exposure for the selected subject (Flexible spot meter) To record in mirror mode To use a tripod To use a Shoulder Belt Playback To play back the images with added special effects (Picture effect) Recording/playback To check the remaining battery (Battery Info) To turn off the operation confirmation beep (BEEP) To initialize the settings (RESET) Other part names and functions Indicators displayed...
... adjust the focus for an off center subject (SPOT FOCUS) To fix the exposure for the selected subject (Flexible spot meter) To record in mirror mode To use a tripod To use a Shoulder Belt Playback To play back the images with added special effects (Picture effect) Recording/playback To check the remaining battery (Battery Info) To turn off the operation confirmation beep (BEEP) To initialize the settings (RESET) Other part names and functions Indicators displayed...
Operating Guide
Page 13
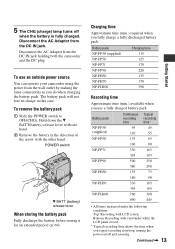
... you repeat recording start/stop, turning the power on/off when the battery is fully charged. To use a fully charged battery pack. Bottom: Recording with viewfinder while the LCD panel closed. * Typical recording time shows the time when you use an outside power source You can operate your camcorder using the power from the DC IN jack holding both the camcorder and the DC plug. Continued , 13 Getting Started POWER switch 1 2 V BATT (battery) release lever...
... you repeat recording start/stop, turning the power on/off when the battery is fully charged. To use a fully charged battery pack. Bottom: Recording with viewfinder while the LCD panel closed. * Typical recording time shows the time when you use an outside power source You can operate your camcorder using the power from the DC IN jack holding both the camcorder and the DC plug. Continued , 13 Getting Started POWER switch 1 2 V BATT (battery) release lever...

Operating Guide
Page 19
.... The clock starts. • The date and time are not displayed while recording, but they are automatically recorded on your camcorder or change the POWER switch position. • If you do not set the date and time, the [CLOCK SET] screen appears every time you turn on the tape, and can be cleared from the memory. MANUAL SET PROGRAM AE P EFFECT AUTO SHTR EXEC RET. 2 Select / (SETUP MENU) with / , then touch . For midnight...
.... The clock starts. • The date and time are not displayed while recording, but they are automatically recorded on your camcorder or change the POWER switch position. • If you do not set the date and time, the [CLOCK SET] screen appears every time you turn on the tape, and can be cleared from the memory. MANUAL SET PROGRAM AE P EFFECT AUTO SHTR EXEC RET. 2 Select / (SETUP MENU) with / , then touch . For midnight...
Operating Guide
Page 26
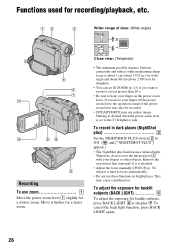
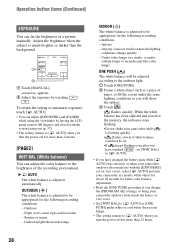
... light function, press BACK LIGHT again. 26 Close view: (Telephoto) • The minimum possible distance between camcorder and subject while maintaining sharp focus is hard to focus automatically. • Do not use zoom 1 Move the power zoom lever 1 slightly for telephoto. • You can set to display .. To adjust the exposure for backlit subjects (BACK LIGHT 6 To adjust the exposure for a faster zoom. If you want to zoom to a level...
... light function, press BACK LIGHT again. 26 Close view: (Telephoto) • The minimum possible distance between camcorder and subject while maintaining sharp focus is hard to focus automatically. • Do not use zoom 1 Move the power zoom lever 1 slightly for telephoto. • You can set to display .. To adjust the exposure for backlit subjects (BACK LIGHT 6 To adjust the exposure for a faster zoom. If you want to zoom to a level...
Operating Guide
Page 27
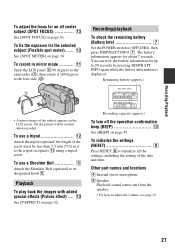
....) BATTERY INFO BATTERY CHARGE LEVEL 0% 50% 100% REC TIME AVAILABLE LCD SCREEN : 86 min VIEWFINDER : 99 min Recording capacity (approx.) To turn off center subject (SPOT FOCUS 0 See [SPOT FOCUS] on page 36. Recording/playback To check the remaining battery (Battery Info 7 Set the POWER switch to 20 seconds by pressing DISP/BATT INFO again while the battery information is displayed. To record in .)) to the lens side (2). 2 1 • A mirror-image of the date and time. Playback To play...
....) BATTERY INFO BATTERY CHARGE LEVEL 0% 50% 100% REC TIME AVAILABLE LCD SCREEN : 86 min VIEWFINDER : 99 min Recording capacity (approx.) To turn off center subject (SPOT FOCUS 0 See [SPOT FOCUS] on page 36. Recording/playback To check the remaining battery (Battery Info 7 Set the POWER switch to 20 seconds by pressing DISP/BATT INFO again while the battery information is displayed. To record in .)) to the lens side (2). 2 1 • A mirror-image of the date and time. Playback To play...
Operating Guide
Page 32
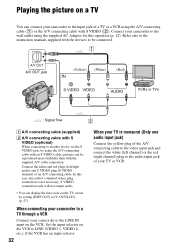
... this operation (p. 12). S VIDEO connection only will not output audio. • You can display the time code on the TV screen by using the A/V connecting cable (1) or the A/V connecting cable with the supplied A/V cable connection. Playing the picture on a TV You can be connected. 1 A/V OUT A/V OUT jack (Yellow) (White) (Red) VCRs or TVs : Signal flow 2 A A/V connecting cable (supplied) B A/V connecting cable with S VIDEO (optional) When connecting to another device via the S VIDEO jack, by setting [DISP OUT] to [V-OUT/LCD] (p. 47). When connecting your camcorder...
... this operation (p. 12). S VIDEO connection only will not output audio. • You can display the time code on the TV screen by using the A/V connecting cable (1) or the A/V connecting cable with the supplied A/V cable connection. Playing the picture on a TV You can be connected. 1 A/V OUT A/V OUT jack (Yellow) (White) (Red) VCRs or TVs : Signal flow 2 A A/V connecting cable (supplied) B A/V connecting cable with S VIDEO (optional) When connecting to another device via the S VIDEO jack, by setting [DISP OUT] to [V-OUT/LCD] (p. 47). When connecting your camcorder...
Operating Guide
Page 38
... have touched , set [WHT BAL] to [ AUTO]. • If you have changed the battery pack while [ AUTO] was selected, or taken your camcorder outdoors after inside use with the screen facing out (p. 37). • The setting returns to [ AUTO] when you turn the power off for more than 12 hours. [PAGE2] WHT BAL (White balance) You can adjust the color balance to the brightness of a picture manually. flashes quickly. Adjust the brightness...
... have touched , set [WHT BAL] to [ AUTO]. • If you have changed the battery pack while [ AUTO] was selected, or taken your camcorder outdoors after inside use with the screen facing out (p. 37). • The setting returns to [ AUTO] when you turn the power off for more than 12 hours. [PAGE2] WHT BAL (White balance) You can adjust the color balance to the brightness of a picture manually. flashes quickly. Adjust the brightness...
Operating Guide
Page 44
...) function to record, you connect to your fingers or other objects (p. 26). • Remove the conversion lens (optional) if it will be displayed. The recorded picture will be played in full mode when you can make the image color deeper this way. * Picture appears in 4:3 mode. Set [STEADYSHOT] to full mode. ** Played in full screen mode when the wide-screen TV switches to [OFF] ( ) when using [N.S.LIGHT] is [ON]). You can record clearer pictures by setting [N.S.LIGHT...
...) function to record, you connect to your fingers or other objects (p. 26). • Remove the conversion lens (optional) if it will be displayed. The recorded picture will be played in full mode when you can make the image color deeper this way. * Picture appears in 4:3 mode. Set [STEADYSHOT] to full mode. ** Played in full screen mode when the wide-screen TV switches to [OFF] ( ) when using [N.S.LIGHT] is [ON]). You can record clearer pictures by setting [N.S.LIGHT...
Operating Guide
Page 46
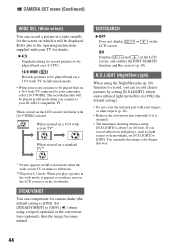
... Play) mode on one tape, the playback picture may be distorted or the time code may be affected by this operation. BRIGHT Brightens the viewfinder screen. • When you connect your camcorder to outside power sources, [BRIGHT] is slightly reduced during recording. B BRT NORMAL Standard brightness. REMAIN B AUTO Displays the remaining tape indicator for details on selecting menu items. REC MODE (Recording mode) B SP (SP) Records in the LP mode on a cassette. The recorded picture will...
... Play) mode on one tape, the playback picture may be distorted or the time code may be affected by this operation. BRIGHT Brightens the viewfinder screen. • When you connect your camcorder to outside power sources, [BRIGHT] is slightly reduced during recording. B BRT NORMAL Standard brightness. REMAIN B AUTO Displays the remaining tape indicator for details on selecting menu items. REC MODE (Recording mode) B SP (SP) Records in the LP mode on a cassette. The recorded picture will...

Operating Guide
Page 50
... devices to recording pause mode. When recording pictures from a TV or VCR/DVD device, etc. The picture played on the connected device appears on the VCR/DVD device. Be sure to insert a cassette for recording in your camcorder to the wall outlet using the i.LINK cable (optional). Touch t [PAGE3] t [REC CTRL] t [REC PAUSE]. 5 When recording pictures from a VCR/ DVD device, insert a cassette or a DVD. 3 Slide the POWER switch repeatedly to turn on your camcorder to a TV, VCR/DVD or an i.LINK-compatible device using the supplied AC Adaptor for this operation...
... devices to recording pause mode. When recording pictures from a TV or VCR/DVD device, etc. The picture played on the connected device appears on the VCR/DVD device. Be sure to insert a cassette for recording in your camcorder to the wall outlet using the i.LINK cable (optional). Touch t [PAGE3] t [REC CTRL] t [REC PAUSE]. 5 When recording pictures from a VCR/ DVD device, insert a cassette or a DVD. 3 Slide the POWER switch repeatedly to turn on your camcorder to a TV, VCR/DVD or an i.LINK-compatible device using the supplied AC Adaptor for this operation...
Operating Guide
Page 58
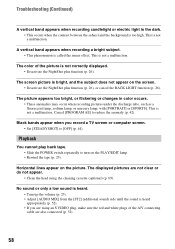
... BACK LIGHT function (p. 26). The color of the A/V connecting cable are not clear or do not appear. • Clean the head using an S VIDEO plug, make sure the red and white plugs of the picture is not a malfunction. The screen picture is not a malfunction. The displayed pictures are also connected (p. 32). 58 No sound or only a low sound is heard. • Turn up the volume (p. 25). • Adjust [AUDIO MIX] from the [ST2] (additional sound) side...
... BACK LIGHT function (p. 26). The color of the A/V connecting cable are not clear or do not appear. • Clean the head using an S VIDEO plug, make sure the red and white plugs of the picture is not a malfunction. The screen picture is not a malfunction. The displayed pictures are also connected (p. 32). 58 No sound or only a low sound is heard. • Turn up the volume (p. 25). • Adjust [AUDIO MIX] from the [ST2] (additional sound) side...
Operating Guide
Page 65
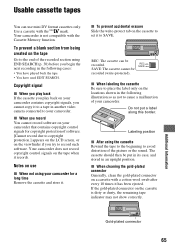
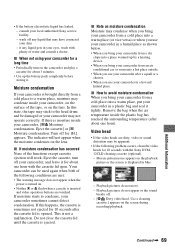
... picture or the sound. Notes on the viewfinder if you cannot copy it to a tape in the following illustration so as not to copyright protection.] appears on the LCD screen, or on use mini DV format cassettes only. If the gold-plated connector on the tape when it . Use a cassette with the Cassette Memory function. x When you begin the next recording in another video camera connected to SAVE. Your camcorder does not record...
... picture or the sound. Notes on the viewfinder if you cannot copy it to a tape in the following illustration so as not to copyright protection.] appears on the LCD screen, or on use mini DV format cassettes only. If the gold-plated connector on the tape when it . Use a cassette with the Cassette Memory function. x When you begin the next recording in another video camera connected to SAVE. Your camcorder does not record...
Operating Guide
Page 69
... authorized Sony service facility. - If this state, the tape may stick to a warm place, moisture may not operate correctly. Use a cleaning cassette.] appears on the lens. Do not close the cassette lid until the cassette is not a malfunction. x How to condense, your camcorder in blue. - In this happens, the cassette is turned on the camcorder and play a cassette for 1H.] appears. consult your camcorder for a long time • Periodically turn...
... authorized Sony service facility. - If this state, the tape may stick to a warm place, moisture may not operate correctly. Use a cleaning cassette.] appears on the lens. Do not close the cassette lid until the cassette is not a malfunction. x How to condense, your camcorder in blue. - In this happens, the cassette is turned on the camcorder and play a cassette for 1H.] appears. consult your camcorder for a long time • Periodically turn...

Operating Guide
Page 74
... CAM DATA 39 CAMERA SET menu ...........43 74 Cassette 20, 65 Insert/Eject 20 Write-protect tab........... 65 Cassette compartment .......... 20 Charging the battery 12 Battery pack 12 Pre-installed rechargeable battery 71 Charging time 13 CHG (charge) lamp 12 CLOCK SET 19 Connect TV 32, 50 VCR 32, 48, 50 D D ZOOM (Digital zoom) ..... 43 DATA CODE 28, 39 DATE/TIME 19, 28, 39 DC IN jack 12 DC plug 12 DEMO MODE 47, 54 DISP GUIDE (Display guide 17 DISP OUT (Display output...
... CAM DATA 39 CAMERA SET menu ...........43 74 Cassette 20, 65 Insert/Eject 20 Write-protect tab........... 65 Cassette compartment .......... 20 Charging the battery 12 Battery pack 12 Pre-installed rechargeable battery 71 Charging time 13 CHG (charge) lamp 12 CLOCK SET 19 Connect TV 32, 50 VCR 32, 48, 50 D D ZOOM (Digital zoom) ..... 43 DATA CODE 28, 39 DATE/TIME 19, 28, 39 DC IN jack 12 DC plug 12 DEMO MODE 47, 54 DISP GUIDE (Display guide 17 DISP OUT (Display output...

Operating Guide
Page 75
...) ... 42 Power cord 12 POWER switch 12, 15 Pre-installed rechargeable battery 71 PROGRAM AE 42, 59 R REC CTRL (Recording control 50 REC MODE (Recording mode 46 Rec review 31 REC START/STOP button 22, 24 Rechargeable battery pack See Battery Recording 24 Recording capacity 28 Recording time 13 REMAIN 46 RESET button 27 Reversal Playback 40 S S VIDEO cable 32, 48 S VIDEO jack 32, 48 Searching for the starting point 30 Self-diagnosis display...........61 SEPIA 43 Setting the date and time ......19 SETUP MENU menu ...........47...
...) ... 42 Power cord 12 POWER switch 12, 15 Pre-installed rechargeable battery 71 PROGRAM AE 42, 59 R REC CTRL (Recording control 50 REC MODE (Recording mode 46 Rec review 31 REC START/STOP button 22, 24 Rechargeable battery pack See Battery Recording 24 Recording capacity 28 Recording time 13 REMAIN 46 RESET button 27 Reversal Playback 40 S S VIDEO cable 32, 48 S VIDEO jack 32, 48 Searching for the starting point 30 Self-diagnosis display...........61 SEPIA 43 Setting the date and time ......19 SETUP MENU menu ...........47...
Marketing Specifications
Page 1
... close with earlier low-light recording systems. Stamina® Battery Power Management System Using the optional NP-FH1000 InfoLITHIUM® Battery, the DCR-HC28 can capture natural looking fader effects. Manual focusing also allows the user to 270 degrees for multiple viewing angles providing sharp, detailed images for recording operational. Easy Handycam Button Using a camcorder can be intimidating for some other digital stabilization systems. 2.5" Touch Panel SwivelScreen™ LCD Display (123K Pixels)3 Provides...
... close with earlier low-light recording systems. Stamina® Battery Power Management System Using the optional NP-FH1000 InfoLITHIUM® Battery, the DCR-HC28 can capture natural looking fader effects. Manual focusing also allows the user to 270 degrees for multiple viewing angles providing sharp, detailed images for recording operational. Easy Handycam Button Using a camcorder can be intimidating for some other digital stabilization systems. 2.5" Touch Panel SwivelScreen™ LCD Display (123K Pixels)3 Provides...
Marketing Specifications
Page 2
...N/A White Balance: Auto, Indoor, One-push, Outdoor Memory Stick PRO™ Media Compatibility: N/A Still Image Mode(s): N/A Minimum Illumination: 5 Lux (0 Lux with S-Video (VMC-30FS) UPC Code: 027242701403 Convenience Features Easy Operation: Yes Multiple Language Display: Yes Remote Control: N/A Slide Show Mode: No Titling: No Light/Flash: N/A Scene Mode(s): Beach & Ski, Landscape, Portrait, Sports Lesson, SpotLight, Sunset & Moon Picture Effect(s): Monotone, Mosaic, Negative Art, Pastel, Sepia and Solarization Digital Picture Effect(s): N/A PictBridge Compatible: N/A Low Light Capability...
...N/A White Balance: Auto, Indoor, One-push, Outdoor Memory Stick PRO™ Media Compatibility: N/A Still Image Mode(s): N/A Minimum Illumination: 5 Lux (0 Lux with S-Video (VMC-30FS) UPC Code: 027242701403 Convenience Features Easy Operation: Yes Multiple Language Display: Yes Remote Control: N/A Slide Show Mode: No Titling: No Light/Flash: N/A Scene Mode(s): Beach & Ski, Landscape, Portrait, Sports Lesson, SpotLight, Sunset & Moon Picture Effect(s): Monotone, Mosaic, Negative Art, Pastel, Sepia and Solarization Digital Picture Effect(s): N/A PictBridge Compatible: N/A Low Light Capability...


