Operating Guide
Page 8
...Turning the power on, and setting the date and time 23 Changing the language setting ... 24 Step 4: Making adjustments before operating your camcorder 4 Table of Contents 8 Subject examples and solutions ... 10 Enjoying with playback on other devices (Finalizing 62 Playing a disc on a... Duo 27 Recording/Playback Recording and playing back with ease (Easy Handycam operation) ....... 31 Recording 34 Zooming 36 Recording sound with more presence (5.1ch surround recording 36 Starting to VCR or DVD/HDD recorders 57 Printing still images (PictBridge compliant printer 59 Utilizing Media...
...Turning the power on, and setting the date and time 23 Changing the language setting ... 24 Step 4: Making adjustments before operating your camcorder 4 Table of Contents 8 Subject examples and solutions ... 10 Enjoying with playback on other devices (Finalizing 62 Playing a disc on a... Duo 27 Recording/Playback Recording and playing back with ease (Easy Handycam operation) ....... 31 Recording 34 Zooming 36 Recording sound with more presence (5.1ch surround recording 36 Starting to VCR or DVD/HDD recorders 57 Printing still images (PictBridge compliant printer 59 Utilizing Media...

Operating Guide
Page 16
For items available in the (SETTINGS) category, see page 72. ** The item is available during Easy Handycam operation (p. 31). Taking advantage of two types of the HOME MENU (CAMERA) category (MANAGE MEDIA) category Items Page MOVIE* 35 PHOTO* 35 SMTH SLW... MEDIA INFO 66 MEDIA FORMAT* 66 UNFINALIZE 68 DISC SELECT GUIDE 70 REPAIR IMG.DB F. 70 (SETTINGS) category* To customize your camcorder (p. 72). * You can also set these items during Easy Handycam operation (p. 31) when you select [MEMORY STICK] on [MOVIE MEDIA SET] (p. 26). 16 " HOME" and " OPTION" - the starting ...
For items available in the (SETTINGS) category, see page 72. ** The item is available during Easy Handycam operation (p. 31). Taking advantage of two types of the HOME MENU (CAMERA) category (MANAGE MEDIA) category Items Page MOVIE* 35 PHOTO* 35 SMTH SLW... MEDIA INFO 66 MEDIA FORMAT* 66 UNFINALIZE 68 DISC SELECT GUIDE 70 REPAIR IMG.DB F. 70 (SETTINGS) category* To customize your camcorder (p. 72). * You can also set these items during Easy Handycam operation (p. 31) when you select [MEMORY STICK] on [MOVIE MEDIA SET] (p. 26). 16 " HOME" and " OPTION" - the starting ...

Operating Guide
Page 19
... Step 1: Checking supplied items Make sure that item supplied. AC Adaptor (1) (p. 20) Rechargeable battery pack NP-FH60 (1) (p. 20) Power cord (mains lead) (1) (p. 20) CD-ROM "Handycam Application Software" (1) (p. 92) - The number in the parentheses indicates the number of that you have the following items supplied with your...
... Step 1: Checking supplied items Make sure that item supplied. AC Adaptor (1) (p. 20) Rechargeable battery pack NP-FH60 (1) (p. 20) Power cord (mains lead) (1) (p. 20) CD-ROM "Handycam Application Software" (1) (p. 92) - The number in the parentheses indicates the number of that you have the following items supplied with your...
Operating Guide
Page 28
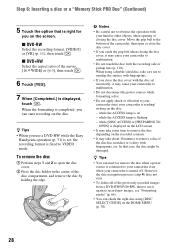
...not to malfunction. • Do not touch the disc with your camcorder is displayed, touch . Move the grip belt to the bottom of the previously recorded images from a DVD-RW/DVD+RW, then to use a DVD-RW while the Easy Handycam operation (p. 31) is set incorrectly, it again to record new ...images, see "Formatting media" (p. 66). • You can start . • To delete all of the camcorder, then open the disc cover. 2...
...not to malfunction. • Do not touch the disc with your camcorder is displayed, touch . Move the grip belt to the bottom of the previously recorded images from a DVD-RW/DVD+RW, then to use a DVD-RW while the Easy Handycam operation (p. 31) is set incorrectly, it again to record new ...images, see "Formatting media" (p. 66). • You can start . • To delete all of the camcorder, then open the disc cover. 2...

Operating Guide
Page 31
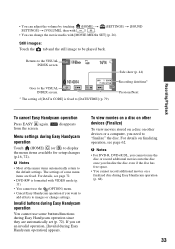
...until the (Movie) lamp lights up . 2 Press EASY A. Recording/Playback Recording and playing back with ease (Easy Handycam operation) Easy Handycam operation makes nearly all settings automatic so that you can perform recording or playing back operation without detailed settings. appears ...on the selected media (p. 26). z Tips • During Easy Handycam operation, a frame appears on the , screen. Recording/Playback R Movies 1 Turn the POWER switch G until the (Still) lamp ...
...until the (Movie) lamp lights up . 2 Press EASY A. Recording/Playback Recording and playing back with ease (Easy Handycam operation) Easy Handycam operation makes nearly all settings automatic so that you can perform recording or playing back operation without detailed settings. appears ...on the selected media (p. 26). z Tips • During Easy Handycam operation, a frame appears on the , screen. Recording/Playback R Movies 1 Turn the POWER switch G until the (Still) lamp ...
Operating Guide
Page 32
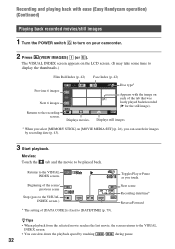
... you touch. Returns to be played back. The VISUAL INDEX screen appears on your camcorder. 2 Press (VIEW IMAGES) I (or E). Movies: Touch the tab and the movie to the VISUAL INDEX screen. Disc type* Appears with ease (Easy Handycam operation) (Continued) Playing back recorded movies/still images 1 Turn the POWER switch G to turn...
... you touch. Returns to be played back. The VISUAL INDEX screen appears on your camcorder. 2 Press (VIEW IMAGES) I (or E). Movies: Touch the tab and the movie to the VISUAL INDEX screen. Disc type* Appears with ease (Easy Handycam operation) (Continued) Playing back recorded movies/still images 1 Turn the POWER switch G to turn...
Operating Guide
Page 33
.... The settings of some buttons/functions during Easy Handycam operation Touch (HOME) C (or B) to the VISUAL INDEX screen. * The setting of the menu items automatically return to be played back. b Notes • For DVD-R, DVD+R DL, you cannot reuse the disc or record... or change the movie media with VIDEO mode (p. 11). • You cannot use some menu items are automatically set an invalid operation, [Invalid during Easy Handycam operation (p. 68). 33 Returns to [DATE/TIME] (p. 79). • You can adjust the volume by touching (HOME) t SETTINGS] t [VOLUME], ...
.... The settings of some buttons/functions during Easy Handycam operation Touch (HOME) C (or B) to the VISUAL INDEX screen. * The setting of the menu items automatically return to be played back. b Notes • For DVD-R, DVD+R DL, you cannot reuse the disc or record... or change the movie media with VIDEO mode (p. 11). • You cannot use some menu items are automatically set an invalid operation, [Invalid during Easy Handycam operation (p. 68). 33 Returns to [DATE/TIME] (p. 79). • You can adjust the volume by touching (HOME) t SETTINGS] t [VOLUME], ...

Operating Guide
Page 39
Cancel Easy Handycam operation first. The default setting is displayed in step 2. Recording/Playback 39 Your camcorder records sounds for about 12 seconds while [Recording···] is [OFF]. b Notes • Sounds cannot be recorded while recording a 3 second-movie (approx.). • ...
Cancel Easy Handycam operation first. The default setting is displayed in step 2. Recording/Playback 39 Your camcorder records sounds for about 12 seconds while [Recording···] is [OFF]. b Notes • Sounds cannot be recorded while recording a 3 second-movie (approx.). • ...
Operating Guide
Page 47
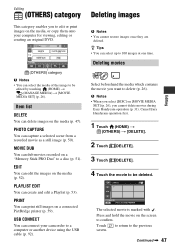
...category enables you to edit or print images on the media, or copy them onto your camcorder to be deleted. EDIT You can delete images on the media (p. 52). USB CONNECT... disc (p. 51). z Tips • You can connect your computer for viewing, editing or creating an original DVD. (OTHERS) category b Notes • You can select the media of the image to a computer or another ... (p. 26). The selected movie is marked with . b Notes • When you cannot delete movies during Easy Handycam operation (p. 31). Touch to return to be edited by touching (HOME) t (MANAGE MEDIA) t [MOVIE MEDIA...
...category enables you to edit or print images on the media, or copy them onto your camcorder to be deleted. EDIT You can delete images on the media (p. 52). USB CONNECT... disc (p. 51). z Tips • You can connect your computer for viewing, editing or creating an original DVD. (OTHERS) category b Notes • You can select the media of the image to a computer or another ... (p. 26). The selected movie is marked with . b Notes • When you cannot delete movies during Easy Handycam operation (p. 31). Touch to return to be edited by touching (HOME) t (MANAGE MEDIA) t [MOVIE MEDIA...

Operating Guide
Page 63
Movies can be added. b Notes • During Easy Handycam operation (p. 31), even when you are using a DVD-RW or DVD+RW, you wish to a finalized disc (p.68) Movies cannot be added as usual. To play back a disc in case 1 Make desired settings for the DVD menu. When the DVD menu has been created, a confirmation screen prompts...
Movies can be added. b Notes • During Easy Handycam operation (p. 31), even when you are using a DVD-RW or DVD+RW, you wish to a finalized disc (p.68) Movies cannot be added as usual. To play back a disc in case 1 Make desired settings for the DVD menu. When the DVD menu has been created, a confirmation screen prompts...
Operating Guide
Page 64
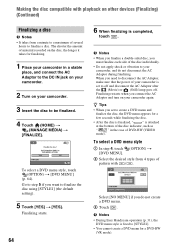
...the disc, the longer it takes for finalizing. 1 Place your camcorder in a stable place, and connect the AC Adaptor to the DC IN jack on your camcorder. 2 Turn on your camcorder is set to [STYLE1]. • You cannot create a DVD menu for a few seconds while finalizing the disc. • ...64). b Notes • When you finalize a double-sided disc, you set to finalize a disc. b Notes • During Easy Handycam operation (p. 31), the DVD menu style is completed, touch . Finalizing restarts when you do not disconnect the AC Adaptor during finalizing. Select [NO MENU] if you ...
...the disc, the longer it takes for finalizing. 1 Place your camcorder in a stable place, and connect the AC Adaptor to the DC IN jack on your camcorder. 2 Turn on your camcorder is set to [STYLE1]. • You cannot create a DVD menu for a few seconds while finalizing the disc. • ...64). b Notes • When you finalize a double-sided disc, you set to finalize a disc. b Notes • During Easy Handycam operation (p. 31), the DVD menu style is completed, touch . Finalizing restarts when you do not disconnect the AC Adaptor during finalizing. Select [NO MENU] if you ...

Operating Guide
Page 67
... Media Format the disc again to VIDEO mode. b Notes • Do not apply shock or vibration to your camcorder, and do not disconnect the AC Adaptor during Easy Handycam operation (p. 31), the recording format is required on each side in the different recording format. • In the... accidental deletion are also deleted. b Notes • Do not apply shock or vibration to your camcorder, and do not disconnect the AC Adaptor during formatting. • When you format a DVD-RW during formatting. • Even the images protected with the original device, and then format it...
... Media Format the disc again to VIDEO mode. b Notes • Do not apply shock or vibration to your camcorder, and do not disconnect the AC Adaptor during Easy Handycam operation (p. 31), the recording format is required on each side in the different recording format. • In the... accidental deletion are also deleted. b Notes • Do not apply shock or vibration to your camcorder, and do not disconnect the AC Adaptor during formatting. • When you format a DVD-RW during formatting. • Even the images protected with the original device, and then format it...
Operating Guide
Page 73
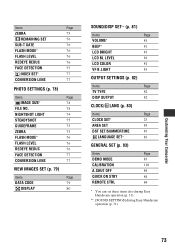
...) Items Page DEMO MODE 83 CALIBRATION 118 A.SHUT OFF 84 QUICK ON STBY 84 REMOTE CTRL 84 * You can set these items also during Easy Handycam operation (p. 31). ** [SOUND SETTINGS] during Easy Handycam operation (p. 31) Customizing Your Camcorder 73
...) Items Page DEMO MODE 83 CALIBRATION 118 A.SHUT OFF 84 QUICK ON STBY 84 REMOTE CTRL 84 * You can set these items also during Easy Handycam operation (p. 31). ** [SOUND SETTINGS] during Easy Handycam operation (p. 31) Customizing Your Camcorder 73

Operating Guide
Page 85
... the time. • Some items appear without a tab. • The OPTION MENU cannot be used during Easy Handycam operation (p. 31). (OPTION) Customizing Your Camcorder Tab 2 Touch the desired item. If you right-click the mouse on the screen. 3 Change the setting, then touch . Continued , 85 Various functions are displayed. ... OPTION MENU The OPTION MENU appears just like the pop-up window that appear on the screen depend on the recording/playback status of your camcorder, touch (OPTION) on a computer.
... the time. • Some items appear without a tab. • The OPTION MENU cannot be used during Easy Handycam operation (p. 31). (OPTION) Customizing Your Camcorder Tab 2 Touch the desired item. If you right-click the mouse on the screen. 3 Change the setting, then touch . Continued , 85 Various functions are displayed. ... OPTION MENU The OPTION MENU appears just like the pop-up window that appear on the screen depend on the recording/playback status of your camcorder, touch (OPTION) on a computer.
Operating Guide
Page 96
...: - [DVD MENU] - [FLASH MODE] - [FOCUS] - [SPOT FOCUS] - [EXPOSURE] - [SPOT METER] - [SCENE SELECTION] - [WHITE BAL.] - [COLOR SLOW SHTR] - [SUPER NIGHTSHOT] - [BLT-IN ZOOM MIC] -...be used simultaneously 104 Overall operations/Easy Handycam operation/Remote Commander The power does not turn on your camcorder to be ready to troubleshoot the problem. Playback zoom (p. 43) The (OPTION) button is...camcorder does not operate even when the power is extremely high. If the problem persists, disconnect the power source and contact your Sony dealer. • Overall operations/Easy Handycam...
...: - [DVD MENU] - [FLASH MODE] - [FOCUS] - [SPOT FOCUS] - [EXPOSURE] - [SPOT METER] - [SCENE SELECTION] - [WHITE BAL.] - [COLOR SLOW SHTR] - [SUPER NIGHTSHOT] - [BLT-IN ZOOM MIC] -...be used simultaneously 104 Overall operations/Easy Handycam operation/Remote Commander The power does not turn on your camcorder to be ready to troubleshoot the problem. Playback zoom (p. 43) The (OPTION) button is...camcorder does not operate even when the power is extremely high. If the problem persists, disconnect the power source and contact your Sony dealer. • Overall operations/Easy Handycam...

Operating Guide
Page 103
...Memory Stick PRO Duo" (p. 53). DVD+RW - Make sure that the A/V connecting cable is full. • To a Playlist, you can add 999 movies on a disc, or 99 movies on your camcorder (p. 57). Make sure that you cannot delete movies during Easy Handycam operation (p. 31). • Images... protected on a disc using other devices. Continued , 103 Troubleshooting DVD+R DL You cannot edit or record additional images on ...
...Memory Stick PRO Duo" (p. 53). DVD+RW - Make sure that the A/V connecting cable is full. • To a Playlist, you can add 999 movies on a disc, or 99 movies on your camcorder (p. 57). Make sure that you cannot delete movies during Easy Handycam operation (p. 31). • Images... protected on a disc using other devices. Continued , 103 Troubleshooting DVD+R DL You cannot edit or record additional images on ...

Operating Guide
Page 121
...; 81 mm (1 15/16 × 1 3/16 × 3 1/4 in the United States and/or other countries. On trademarks • "Handycam" and are registered trademarks of Sony Corporation. • "Memory Stick," , "Memory Stick Duo," " ," "Memory Stick PRO Duo," " ," "Memory Stick PRO-HG Duo," "...and "MagicGate Memory Stick Duo" are trademarks or registered trademarks of Sony Corporation. • "InfoLITHIUM" is a trademark of Sony Corporation. • "BIONZ" is a trademark of Sony Corporation. • DVD-RW, DVD+RW, DVD-R, and DVD+R DL logo are trademarks. • Dolby and the double-D...
...; 81 mm (1 15/16 × 1 3/16 × 3 1/4 in the United States and/or other countries. On trademarks • "Handycam" and are registered trademarks of Sony Corporation. • "Memory Stick," , "Memory Stick Duo," " ," "Memory Stick PRO Duo," " ," "Memory Stick PRO-HG Duo," "...and "MagicGate Memory Stick Duo" are trademarks or registered trademarks of Sony Corporation. • "InfoLITHIUM" is a trademark of Sony Corporation. • "BIONZ" is a trademark of Sony Corporation. • DVD-RW, DVD+RW, DVD-R, and DVD+R DL logo are trademarks. • Dolby and the double-D...
Operating Guide
Page 130
... A/V connecting cable .....45, 57 B BACK LIGHT 38, 104 Battery 20, 126 Battery Info 21 BEACH 89 BEEP 81 BLACK FADER 90 BLT-IN ZOOM MIC............91 Button-type lithium battery 126 B&W 91 C CALIBRATION 118 CAMERA DATA 79 CANDLE 88 CD-ROM 92 Charging time 21 CLOCK SET 23 130... Digital 5.1 Creator .. 129 Double-sided disc 113 DST SET 83 Dual Rec 37 Dubbing movies 57 DVD drive 65 DVD menu 64 DVD-R 12 DVD-RW 12 DVD+R DL 12 DVD+RW 12 D.EFFECT (Digital effect 91, 105 E Easy Handycam operation....31 Editing 52 EXPOSURE 88, 104 F FACE DETECTION .... 77, 104 Face Index 42, 77...
... A/V connecting cable .....45, 57 B BACK LIGHT 38, 104 Battery 20, 126 Battery Info 21 BEACH 89 BEEP 81 BLACK FADER 90 BLT-IN ZOOM MIC............91 Button-type lithium battery 126 B&W 91 C CALIBRATION 118 CAMERA DATA 79 CANDLE 88 CD-ROM 92 Charging time 21 CLOCK SET 23 130... Digital 5.1 Creator .. 129 Double-sided disc 113 DST SET 83 Dual Rec 37 Dubbing movies 57 DVD drive 65 DVD menu 64 DVD-R 12 DVD-RW 12 DVD+R DL 12 DVD+RW 12 D.EFFECT (Digital effect 91, 105 E Easy Handycam operation....31 Editing 52 EXPOSURE 88, 104 F FACE DETECTION .... 77, 104 Face Index 42, 77...


