
Operating Guide
Page 5
...recordable time of California, USA only Perchlorate Material - See page 11 for help. "PMB Guide" for using your camcorder with a computer connected (stored on use Sony discs or discs with "Memory Stick PRO" compatible equipment. - Consult the dealer or an experienced radio/TV technician ...; See page 30 for your camcorder You can use in your camcorder. * Depending on a circuit different from your camcorder.) "Memory Stick" (You cannot use it is recommended that you use the following discs only. - 8cm DVD-RW - 8cm DVD+RW - 8cm DVD-R - 8cm DVD+R DL Use the discs with...
...recordable time of California, USA only Perchlorate Material - See page 11 for help. "PMB Guide" for using your camcorder with a computer connected (stored on use Sony discs or discs with "Memory Stick PRO" compatible equipment. - Consult the dealer or an experienced radio/TV technician ...; See page 30 for your camcorder You can use in your camcorder. * Depending on a circuit different from your camcorder.) "Memory Stick" (You cannot use it is recommended that you use the following discs only. - 8cm DVD-RW - 8cm DVD+RW - 8cm DVD-R - 8cm DVD+R DL Use the discs with...

Operating Guide
Page 6
...a "Memory Stick PRO Duo" with a cable, be sure to remove the "Memory Stick PRO Duo" from the camcorder - Take images of the sun only in any problems. Use a DVD-RW/DVD+RW for trial recording. • Compensation for long periods of time may result in the correct way. These points ...are normal results of the manufacturing process and do the following parts. to insert the connector plug in a malfunction of your camcorder to make sure the...
...a "Memory Stick PRO Duo" with a cable, be sure to remove the "Memory Stick PRO Duo" from the camcorder - Take images of the sun only in any problems. Use a DVD-RW/DVD+RW for trial recording. • Compensation for long periods of time may result in the correct way. These points ...are normal results of the manufacturing process and do the following parts. to insert the connector plug in a malfunction of your camcorder to make sure the...
Operating Guide
Page 7
... • If you can use for video cameras and offers a quality typical of light from what you actually see. • Discs in Germany, and Sony Corporation, and produces superior images. Unauthorized recording of media first (p. 51, 57), and then format the "Memory Stick PRO Duo" (p. 67). In such ... your images on another type of such materials may look different from a subject coming into the lens. About the Carl Zeiss lens Your camcorder is T -coated to 8cm DVD discs. • In this manual, a disc and a "Memory Stick PRO Duo" are called the media. • Design and ...
... • If you can use for video cameras and offers a quality typical of light from what you actually see. • Discs in Germany, and Sony Corporation, and produces superior images. Unauthorized recording of media first (p. 51, 57), and then format the "Memory Stick PRO Duo" (p. 67). In such ... your images on another type of such materials may look different from a subject coming into the lens. About the Carl Zeiss lens Your camcorder is T -coated to 8cm DVD discs. • In this manual, a disc and a "Memory Stick PRO Duo" are called the media. • Design and ...
Operating Guide
Page 8
... Making adjustments before operating your camcorder 4 Table of Contents 8 Subject examples and solutions ... 10 Enjoying with Your Camcorder Media for your camcorder 11 Using your camcorder 51 Dividing movies 52 Creating the Playlist 53 Dubbing movies to VCR or DVD/HDD recorders 57 Printing still ...Step 6: Inserting a disc or a "Memory Stick PRO Duo 27 Recording/Playback Recording and playing back with ease (Easy Handycam operation) ....... 31 Recording 34 Zooming 36 Recording sound with playback on other devices (Finalizing 62 Playing a disc on a TV ......... 45 Editing (OTHERS) ...
... Making adjustments before operating your camcorder 4 Table of Contents 8 Subject examples and solutions ... 10 Enjoying with Your Camcorder Media for your camcorder 11 Using your camcorder 51 Dividing movies 52 Creating the Playlist 53 Dubbing movies to VCR or DVD/HDD recorders 57 Printing still ...Step 6: Inserting a disc or a "Memory Stick PRO Duo 27 Recording/Playback Recording and playing back with ease (Easy Handycam operation) ....... 31 Recording 34 Zooming 36 Recording sound with playback on other devices (Finalizing 62 Playing a disc on a TV ......... 45 Editing (OTHERS) ...
Operating Guide
Page 11
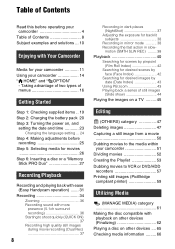
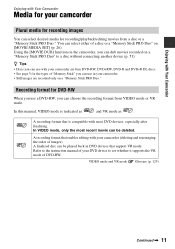
...MOVIE MEDIA SET] (p. 26). In this manual, VIDEO mode is compatible with most recent movie can be played back in your camcorder. • Still images are 8cm DVD-RW, DVD+RW, DVD-R and DVD+R DL discs. • See page 5 for the types of a disc or a "Memory Stick PRO Duo" on a... PRO Duo" to a disc without connecting another device (p. 51). Enjoying with Your Camcorder Enjoying with Your Camcorder Media for your camcorder Plural media for recording images You can select desired media for DVD-RW When you use a DVD-RW, you can choose the recording format from a disc or a "Memory Stick ...
...MOVIE MEDIA SET] (p. 26). In this manual, VIDEO mode is compatible with most recent movie can be played back in your camcorder. • Still images are 8cm DVD-RW, DVD+RW, DVD-R and DVD+R DL discs. • See page 5 for the types of a disc or a "Memory Stick PRO Duo" on a... PRO Duo" to a disc without connecting another device (p. 51). Enjoying with Your Camcorder Enjoying with Your Camcorder Media for your camcorder Plural media for recording images You can select desired media for DVD-RW When you use a DVD-RW, you can choose the recording format from a disc or a "Memory Stick ...
Operating Guide
Page 12
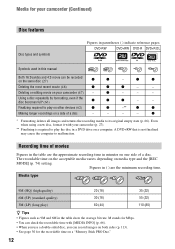
...z z - Recording time of movies Figures in parentheses ( ) indicate reference pages. A DVD+RW that is required to play on other devices (62) z z *1-** z z Making longer recordings on your camcorder (Continued) Disc features Disc types and symbols Figures in the table are the minimum recording ...time. Figures in ( ) are the approximate recording time in a DVD drive on both sides (p. 113). • See page 30 for your camcorder (47) - The recordable time on the acceptable media varies depending on one side of a disc -...
...z z - Recording time of movies Figures in parentheses ( ) indicate reference pages. A DVD+RW that is required to play on other devices (62) z z *1-** z z Making longer recordings on your camcorder (Continued) Disc features Disc types and symbols Figures in the table are the minimum recording ...time. Figures in ( ) are the approximate recording time in a DVD drive on both sides (p. 113). • See page 30 for your camcorder (47) - The recordable time on the acceptable media varies depending on one side of a disc -...

Operating Guide
Page 15
... more it takes time to finalize the disc. Like commercially sold DVD, this disc can view the images recorded and edited on your camcorder on the connected TV. Refer to the instruction manual supplied with your DVD device or consult your camcorder on other devices x Viewing images on a TV (p. 45)...finalizing. Unfinalizing allows you need to finalize the disc first. The disc can be played back in a device compatible with the DVD-RW VR mode. Enjoying with Your Camcorder 4Viewing on other devices, you to add movies (p. 68). bNotes • The less the recording volume of a finalized ...
... more it takes time to finalize the disc. Like commercially sold DVD, this disc can view the images recorded and edited on your camcorder on the connected TV. Refer to the instruction manual supplied with your DVD device or consult your camcorder on other devices x Viewing images on a TV (p. 45)...finalizing. Unfinalizing allows you need to finalize the disc first. The disc can be played back in a device compatible with the DVD-RW VR mode. Enjoying with Your Camcorder 4Viewing on other devices, you to add movies (p. 68). bNotes • The less the recording volume of a finalized ...

Operating Guide
Page 27
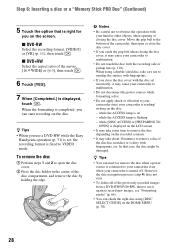
...disc with the label side facing out when using a soft cloth (p. 114). 1 Check that the power of your camcorder, then press the center of the disc until it clicks. x DVD-RW/DVD+RW A screen appears to steps after [DISC ACCESS] disappears from the disc beforehand, using a single-sided disc....switch in the direction of the arrow (OPEN l). [PREPARING TO OPEN] appears on the screen. It may take some time for the camcorder to step 5. x DVD-R/DVD+R DL You can start recording immediately after step 5. The disc cover slightly opens automatically. b Notes • Remove dust or fingerprints ...
...disc with the label side facing out when using a soft cloth (p. 114). 1 Check that the power of your camcorder, then press the center of the disc until it clicks. x DVD-RW/DVD+RW A screen appears to steps after [DISC ACCESS] disappears from the disc beforehand, using a single-sided disc....switch in the direction of the arrow (OPEN l). [PREPARING TO OPEN] appears on the screen. It may take some time for the camcorder to step 5. x DVD-R/DVD+R DL You can start recording immediately after step 5. The disc cover slightly opens automatically. b Notes • Remove dust or fingerprints ...
Operating Guide
Page 28
... Select the recording format, [VIDEO] or [VR] (p. 11), then touch . x DVD+RW Select the aspect ratio of the previously recorded images from a DVD-RW/DVD+RW, then to use a DVD-RW while the Easy Handycam operation (p. 31) is set incorrectly, it may cause your camcorder to malfunction. • Do not disconnect the power sources while formatting...
... Select the recording format, [VIDEO] or [VR] (p. 11), then touch . x DVD+RW Select the aspect ratio of the previously recorded images from a DVD-RW/DVD+RW, then to use a DVD-RW while the Easy Handycam operation (p. 31) is set incorrectly, it may cause your camcorder to malfunction. • Do not disconnect the power sources while formatting...
Operating Guide
Page 33
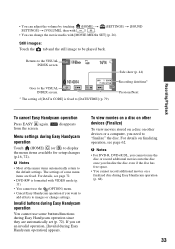
... disc has free space. • You cannot record additional movies on a finalized disc during Easy Handycam operation since they are fixed. b Notes • Most of some buttons/functions during Easy Handycam operation (p. 68). 33 b Notes • For DVD-R, DVD+R DL, you cannot reuse the disc or record additional movies onto the disc once you...
... disc has free space. • You cannot record additional movies on a finalized disc during Easy Handycam operation since they are fixed. b Notes • Most of some buttons/functions during Easy Handycam operation (p. 68). 33 b Notes • For DVD-R, DVD+R DL, you cannot reuse the disc or record additional movies onto the disc once you...

Operating Guide
Page 41
... on a disc, one touch of / makes the movie reverse/fast forward about 5 times faster than normal, 2 touches about 10 times faster (about 8 times faster for a DVD+RW). • When playing movies from the selected movie reaches the last movie, the screen returns to the VISUAL INDEX screen.) Toggles Play or Pause...
... on a disc, one touch of / makes the movie reverse/fast forward about 5 times faster than normal, 2 touches about 10 times faster (about 8 times faster for a DVD+RW). • When playing movies from the selected movie reaches the last movie, the screen returns to the VISUAL INDEX screen.) Toggles Play or Pause...
Operating Guide
Page 47
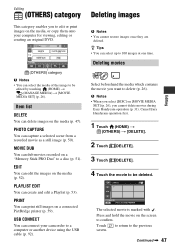
...for viewing, editing or creating an original DVD. (OTHERS) category b Notes • You can dub movies recorded on a "Memory Stick PRO Duo" to the previous screen. PHOTO CAPTURE You can delete images on the media, or copy them onto your camcorder to a computer or another device using... select the media of the image to be deleted. EDIT You can create and edit a Playlist (p. 53). Touch to return to a disc (p. 51). Cancel Easy Handycam operation first. 1 Touch (HOME) t (OTHERS) t [DELETE]. 2 Touch [ DELETE]. 3 Touch [ DELETE]. 4 Touch the movie to confirm. Press and hold the movie ...
...for viewing, editing or creating an original DVD. (OTHERS) category b Notes • You can dub movies recorded on a "Memory Stick PRO Duo" to the previous screen. PHOTO CAPTURE You can delete images on the media, or copy them onto your camcorder to a computer or another device using... select the media of the image to be deleted. EDIT You can create and edit a Playlist (p. 53). Touch to return to a disc (p. 51). Cancel Easy Handycam operation first. 1 Touch (HOME) t (OTHERS) t [DELETE]. 2 Touch [ DELETE]. 3 Touch [ DELETE]. 4 Touch the movie to confirm. Press and hold the movie ...

Operating Guide
Page 57
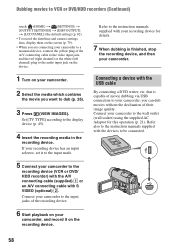
...movies to VCR or DVD/HDD recorders Editing Connecting a device with the A/V connecting cable You can be connected. Refer also to the instruction manuals supplied with the devices to other device via analog data transfer, the image quality may deteriorate. Connect your camcorder to be produced than ...with an A/V connecting VCRs or DVD/HDD recorders cable. Connecting only the S VIDEO plug will not output audio.
...movies to VCR or DVD/HDD recorders Editing Connecting a device with the A/V connecting cable You can be connected. Refer also to the instruction manuals supplied with the devices to other device via analog data transfer, the image quality may deteriorate. Connect your camcorder to be produced than ...with an A/V connecting VCRs or DVD/HDD recorders cable. Connecting only the S VIDEO plug will not output audio.
Operating Guide
Page 58
... manuals supplied with S VIDEO (optional) 2. Connect your camcorder to the input jacks of the recording device. 6 Start playback on your camcorder, and record it to the input mode. 5 Connect your camcorder to the recording device (VCR or DVD/ HDD recorder) with the A/V connecting cable (supplied)..., etc. Set [TV TYPE] according to be connected. 58 that is finished, stop the recording device, and then your camcorder. Dubbing movies to VCR or DVD/HDD recorders (Continued) touch (HOME) t (SETTINGS) t [OUTPUT SETTINGS] t [DISP OUTPUT] t [LCD PANEL] (the default setting) (p. 82...
... manuals supplied with S VIDEO (optional) 2. Connect your camcorder to the input jacks of the recording device. 6 Start playback on your camcorder, and record it to the input mode. 5 Connect your camcorder to the recording device (VCR or DVD/ HDD recorder) with the A/V connecting cable (supplied)..., etc. Set [TV TYPE] according to be connected. 58 that is finished, stop the recording device, and then your camcorder. Dubbing movies to VCR or DVD/HDD recorders (Continued) touch (HOME) t (SETTINGS) t [OUTPUT SETTINGS] t [DISP OUTPUT] t [LCD PANEL] (the default setting) (p. 82...

Operating Guide
Page 59
... "Memory Stick PRO Duo" that contains the still images you want to print into your camcorder to the AC Adaptor to obtain power from the wall outlet (wall socket) (p. 20)....recording on the screen. 3 Touch [PRINT]. using a PictBridge compliant printer, without connecting the camcorder to a computer. Connect your camcorder. When connection is finished, touch [END] t [YES] and disconnect the USB cable. Also..., turn on the printer. 1 Turn on your camcorder. 2 Connect the (USB) jack of your camcorder to the printer using the supplied USB cable (p. 124). Refer to the ...
... "Memory Stick PRO Duo" that contains the still images you want to print into your camcorder to the AC Adaptor to obtain power from the wall outlet (wall socket) (p. 20)....recording on the screen. 3 Touch [PRINT]. using a PictBridge compliant printer, without connecting the camcorder to a computer. Connect your camcorder. When connection is finished, touch [END] t [YES] and disconnect the USB cable. Also..., turn on the printer. 1 Turn on your camcorder. 2 Connect the (USB) jack of your camcorder to the printer using the supplied USB cable (p. 124). Refer to the ...

Operating Guide
Page 62
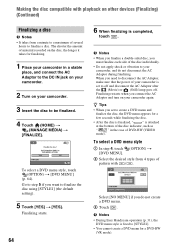
... which displays the movie list (p. 64). in HQ mode, 8 min. Operation flow To play back on a computer DVD drive 3 If the disc has a short total recording time (less than 5 min. Making the disc compatible with playback on other devices (Finalizing) Finalizing makes the ...recorded disc compatible for playback with all devices is not guaranteed. • No DVD menu is not required, except in the following cases: 1 To create a DVD menu 2 To play back a disc in other devices for the first time (p.64) Playback on other devices Finalize In...
... which displays the movie list (p. 64). in HQ mode, 8 min. Operation flow To play back on a computer DVD drive 3 If the disc has a short total recording time (less than 5 min. Making the disc compatible with playback on other devices (Finalizing) Finalizing makes the ...recorded disc compatible for playback with all devices is not guaranteed. • No DVD menu is not required, except in the following cases: 1 To create a DVD menu 2 To play back a disc in other devices for the first time (p.64) Playback on other devices Finalize In...

Operating Guide
Page 63
b Notes • During Easy Handycam operation (p. 31), even when you are using a DVD-RW or DVD+RW, you wish to a finalized disc (p.68) Movies cannot be added as usual. Continued , 63 Movies can be added. Utilizing Media To add movies to ...add movies. To play back a disc in other devices Finalize Only in case 1 Make desired settings for the DVD menu. When the DVD menu has been created, a confirmation screen prompts you to confirm that you cannot record additional movies onto the disc after adding movies (p.64) Playback...
b Notes • During Easy Handycam operation (p. 31), even when you are using a DVD-RW or DVD+RW, you wish to a finalized disc (p.68) Movies cannot be added as usual. Continued , 63 Movies can be added. Utilizing Media To add movies to ...add movies. To play back a disc in other devices Finalize Only in case 1 Make desired settings for the DVD menu. When the DVD menu has been created, a confirmation screen prompts you to confirm that you cannot record additional movies onto the disc after adding movies (p.64) Playback...
Operating Guide
Page 64
... the power of your camcorder is set to off and disconnect the AC Adaptor after the (Movie) or (Still) lamp goes off. To select a DVD menu style, touch (OPTION) t [DVD MENU] (p. 64). When you set to create a DVD menu and finalize the disc, the DVD menu appears for a ...vibration to your camcorder in the case of DVD-RW (VIDEO mode). Finalizing restarts when you do not disconnect the AC Adaptor during finalizing. b Notes • During Easy Handycam operation (p. 31), the DVD menu style is completed, touch . To select a DVD menu style 1 In step 4, touch (OPTION) t [DVD MENU]. 2 Select...
... the power of your camcorder is set to off and disconnect the AC Adaptor after the (Movie) or (Still) lamp goes off. To select a DVD menu style, touch (OPTION) t [DVD MENU] (p. 64). When you set to create a DVD menu and finalize the disc, the DVD menu appears for a ...vibration to your camcorder in the case of DVD-RW (VIDEO mode). Finalizing restarts when you do not disconnect the AC Adaptor during finalizing. b Notes • During Easy Handycam operation (p. 31), the DVD menu style is completed, touch . To select a DVD menu style 1 In step 4, touch (OPTION) t [DVD MENU]. 2 Select...
Operating Guide
Page 65
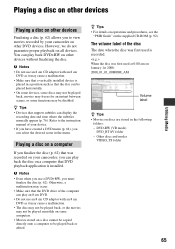
...subtitles can select the desired scene in the menu. Playing a disc on a computer If you finalize the disc (p. 62) that was recorded on your camcorder, you can play back the disc on discs are stored in a position such as it may cause a malfunction. • The disc may not ...Playing a disc on other devices Utilizing Media Playing a disc on other devices Finalizing a disc (p. 62) allows you to view movies recorded by your camcorder on other DVD devices. z Tips • Devices that DVD playback application is placed in the following folders: - DVD-RW (VR mode) DVD_RTAV folder -
...subtitles can select the desired scene in the menu. Playing a disc on a computer If you finalize the disc (p. 62) that was recorded on your camcorder, you can play back the disc on discs are stored in a position such as it may cause a malfunction. • The disc may not ...Playing a disc on other devices Utilizing Media Playing a disc on other devices Finalizing a disc (p. 62) allows you to view movies recorded by your camcorder on other DVD devices. z Tips • Devices that DVD playback application is placed in the following folders: - DVD-RW (VR mode) DVD_RTAV folder -

Operating Guide
Page 66
... slightly smaller. • Since there is an image database file area, the used space is displayed. Formatting a disc A DVD-R/DVD+R DL cannot be formatted into your camcorder, then connect the power cord (mains lead) to the unfinalized state. Formatting media Formatting deletes all movies on your... camcorder. 3 Insert the disc to its contents on other devices.* * To create the DVD menu on a DVD+RW, finalize the disc again (p. 64). 1 Connect the AC Adaptor to the DC IN jack on your camcorder. 66 Replace it with a new disc...
... slightly smaller. • Since there is an image database file area, the used space is displayed. Formatting a disc A DVD-R/DVD+R DL cannot be formatted into your camcorder, then connect the power cord (mains lead) to the unfinalized state. Formatting media Formatting deletes all movies on your... camcorder. 3 Insert the disc to its contents on other devices.* * To create the DVD menu on a DVD+RW, finalize the disc again (p. 64). 1 Connect the AC Adaptor to the DC IN jack on your camcorder. 66 Replace it with a new disc...


