Operating Guide
Page 5
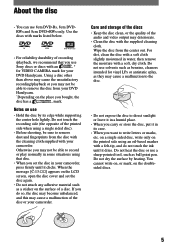
... moistened in your camcorder. Do not heat the disc or use • Hold the disc by heating. Do not touch the recording side (the opposite of the audio and video output may cause a malfunction of recording /playback, we recommend that disc. • When you use Sony discs or discs with an * .... on a single sided disc, write only on the doublesided discs. 5 For dirt, clean the disc with a felt-tip, and do so, the disc may become unbalanced, and this may deteriorate. • Clean the disc with your DVD Handycam. * Depending on the place you bought, the disc has a mark....
... moistened in your camcorder. Do not heat the disc or use • Hold the disc by heating. Do not touch the recording side (the opposite of the audio and video output may cause a malfunction of recording /playback, we recommend that disc. • When you use Sony discs or discs with an * .... on a single sided disc, write only on the doublesided discs. 5 For dirt, clean the disc with a felt-tip, and do so, the disc may become unbalanced, and this may deteriorate. • Clean the disc with your DVD Handycam. * Depending on the place you bought, the disc has a mark....
Operating Guide
Page 24
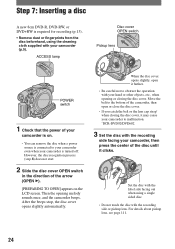
... or closing the disc cover, it may cause your camcorder to malfunction. *DCR-DVD92/DVD602 3 Set the disc with the recording side facing your camcorder, then press the center of the camcorder, then open it clicks. Set the disc with the label side facing out when using a single sided disc. • Do not touch the disc with your camcorder is required for recording (p.13). •...
... or closing the disc cover, it may cause your camcorder to malfunction. *DCR-DVD92/DVD602 3 Set the disc with the recording side facing your camcorder, then press the center of the camcorder, then open it clicks. Set the disc with the label side facing out when using a single sided disc. • Do not touch the disc with your camcorder is required for recording (p.13). •...
Operating Guide
Page 45
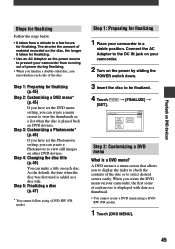
...below. • It takes from a minute to prevent your camcorder from running out of power during finalizing. • When you finalize a double-sided disc, you must finalize each side of the disc. As the default, the date when the disc was first used is a menu screen that allows you... to display the index to check the contents of the disc or to view the thumbnails as a thumbnail. • You cannot create a DVD menu using a DVD-RW (VR mode). The shorter the amount of material recorded on the disc, the longer it takes for finalizing.
...below. • It takes from a minute to prevent your camcorder from running out of power during finalizing. • When you finalize a double-sided disc, you must finalize each side of the disc. As the default, the date when the disc was first used is a menu screen that allows you... to display the index to check the contents of the disc or to view the thumbnails as a thumbnail. • You cannot create a DVD menu using a DVD-RW (VR mode). The shorter the amount of material recorded on the disc, the longer it takes for finalizing.
Operating Guide
Page 50
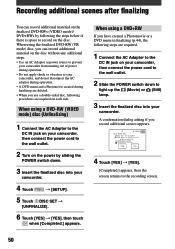
... the power by following the steps below if there is space to your camcorder. When using a DVD+RW If you use a double-sided disc, following steps are required on each side. Recording additional scenes after finalizing You can record additional material on the disc without any additional steps. • Use an AC Adaptor as power source...
... the power by following the steps below if there is space to your camcorder. When using a DVD+RW If you use a double-sided disc, following steps are required on each side. Recording additional scenes after finalizing You can record additional material on the disc without any additional steps. • Use an AC Adaptor as power source...
Operating Guide
Page 51
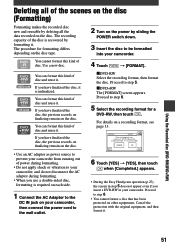
...all of the scenes on the disc (Formatting) Formatting makes the recorded disc new and reusable by deleting all the data recorded on a recording format, see page 13. Proceed to step 6. 5 Select the recording format for formatting differs depending on the disc type. 2 Turn on other ...camcorder, and do not disconnect the AC adaptor during formatting. • When you use a double-sided disc, formatting is recovered by sliding the POWER switch down. 3 Insert the disc to the wall outlet. 6 Touch [YES] [YES], then touch when [Completed.] appears. • During the Easy Handycam...
...all of the scenes on the disc (Formatting) Formatting makes the recorded disc new and reusable by deleting all the data recorded on a recording format, see page 13. Proceed to step 6. 5 Select the recording format for formatting differs depending on the disc type. 2 Turn on other ...camcorder, and do not disconnect the AC adaptor during formatting. • When you use a double-sided disc, formatting is recovered by sliding the POWER switch down. 3 Insert the disc to the wall outlet. 6 Touch [YES] [YES], then touch when [Completed.] appears. • During the Easy Handycam...
Operating Guide
Page 60
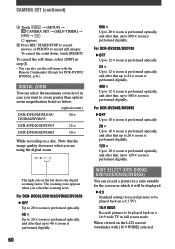
... to be played back on a 4:3 TV). 16:9 WIDE Records pictures to 800 × zoom is performed digitally. For DCR-DVD403/DVD803 OFF Up to 10 × zoom is ... . To cancel the count down, touch [RESET]. The right side of the bar shows the digital zooming factor. For DCR-DVD92/DVD103/DVD602/DVD653 OFF Up to 20 × zoom is...record pictures to be played back on a disc. To cancel the self-timer, select [OFF] in step . • You can select the maximum zoom level in full screen mode. The zooming zone appears when you want to record...
... to be played back on a 4:3 TV). 16:9 WIDE Records pictures to 800 × zoom is performed digitally. For DCR-DVD403/DVD803 OFF Up to 10 × zoom is ... . To cancel the count down, touch [RESET]. The right side of the bar shows the digital zooming factor. For DCR-DVD92/DVD103/DVD602/DVD653 OFF Up to 20 × zoom is...record pictures to be played back on a disc. To cancel the self-timer, select [OFF] in step . • You can select the maximum zoom level in full screen mode. The zooming zone appears when you want to record...
Operating Guide
Page 62
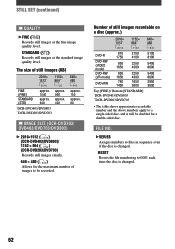
...Top:[FINE] / Bottom:[STANDARD] *DCR-DVD403/DVD803 **DCR-DVD203/DVD703 5100 8100 5400 8600 5400 8600 2950 3800 • The table shows approximate recordable number and the above numbers apply to 0001 each time the disc is changed . 62 Number of ... SIZE (DCR-DVD203/ DVD403/DVD703/DVD803) 2016×1512 ( ) (DCR-DVD403/DVD803)/ 1152 × 864 ( ) (DCR-DVD203/DVD703) Records still images clearly. 640 × 480 ( ) Allows for a double-sided disc. RESET Resets the file numbering to a single-sided disc, and it will be recorded. STANDARD ( ) Records still images...
...Top:[FINE] / Bottom:[STANDARD] *DCR-DVD403/DVD803 **DCR-DVD203/DVD703 5100 8100 5400 8600 5400 8600 2950 3800 • The table shows approximate recordable number and the above numbers apply to 0001 each time the disc is changed . 62 Number of ... SIZE (DCR-DVD203/ DVD403/DVD703/DVD803) 2016×1512 ( ) (DCR-DVD403/DVD803)/ 1152 × 864 ( ) (DCR-DVD203/DVD703) Records still images clearly. 640 × 480 ( ) Allows for a double-sided disc. RESET Resets the file numbering to a single-sided disc, and it will be recorded. STANDARD ( ) Records still images...
Operating Guide
Page 65
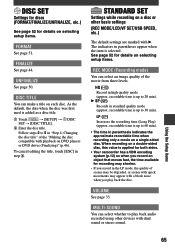
... (approx. STANDARD SET Settings while recording on a disc or other devices with playback on DVD players or DVD drives (Finalizing)" (p.46). recordable time is up to 5 in standard quality mode (approx. FINALIZE See page 44. The indicators in parentheses appear when the item is applied for both sides. • Your camcorder has a VBR encoding system...
... (approx. STANDARD SET Settings while recording on a disc or other devices with playback on DVD players or DVD drives (Finalizing)" (p.46). recordable time is up to 5 in standard quality mode (approx. FINALIZE See page 44. The indicators in parentheses appear when the item is applied for both sides. • Your camcorder has a VBR encoding system...
Operating Guide
Page 93
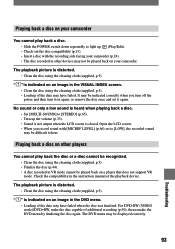
" " is closed. The DVD menu may be displayed correctly. 93 Troubleshooting It may be indicated correctly when you record sound with the recording side facing your camcorder (p.24). • The disc recorded in other players You cannot play back a disc. • Slide the POWER switch down repeatedly to hear. Check the compatibility in the DVD menu. • Loading...
" " is closed. The DVD menu may be displayed correctly. 93 Troubleshooting It may be indicated correctly when you record sound with the recording side facing your camcorder (p.24). • The disc recorded in other players You cannot play back a disc. • Slide the POWER switch down repeatedly to hear. Check the compatibility in the DVD menu. • Loading...
Operating Guide
Page 101
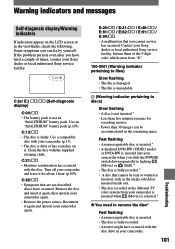
...camcorder when you have occurred. Some symptoms you cannot service has occurred. Use a compatible disc with the disc drive in the viewfinder, check the following. C:32: • Symptoms that you can be read or written is inserted, such as the single-sided disc inserted inside out. • The disc recorded... to discs) Slow flashing • A disc is dirty or has scratches on the LCD screen or in your Sony dealer or local authorized Sony service facility. Inform them of times, contact your Sony dealer or local authorized Sony service facility...
...camcorder when you have occurred. Some symptoms you cannot service has occurred. Use a compatible disc with the disc drive in the viewfinder, check the following. C:32: • Symptoms that you can be read or written is inserted, such as the single-sided disc inserted inside out. • The disc recorded... to discs) Slow flashing • A disc is dirty or has scratches on the LCD screen or in your Sony dealer or local authorized Sony service facility. Inform them of times, contact your Sony dealer or local authorized Sony service facility...
Operating Guide
Page 111
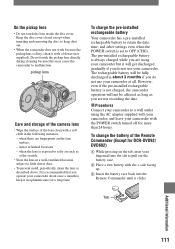
...to keep it with the + side facing up. Insert the battery case back into the slit to malfunction. when there are not recording the date. Procedures Connect your camcorder to a wall outlet using your camcorder. Tab Additional Information 111 Keep the disc cover closed except when inserting and...to keep dust out. • When the camcorder does not work because the pickup lens is dirty, clean it in hot or humid locations - To change the battery of the lens clean with the POWER switch turned off for DCR-DVD92/ DVD602) While pressing on ...
...to keep it with the + side facing up. Insert the battery case back into the slit to malfunction. when there are not recording the date. Procedures Connect your camcorder to a wall outlet using your camcorder. Tab Additional Information 111 Keep the disc cover closed except when inserting and...to keep dust out. • When the camcorder does not work because the pickup lens is dirty, clean it in hot or humid locations - To change the battery of the lens clean with the POWER switch turned off for DCR-DVD92/ DVD602) While pressing on ...

