Operating Guide
Page 4
.... You cannot delete images once you insert the connector plug forcibly in Germany, and Sony Corporation, and produces superior images. Notes on the Setup items, LCD screen, view&#...− to remove the battery pack or AC Adaptor from the camcorder. − to apply mechanical shock or vibration to the camcorder. • Before connecting your camcorder to another device with a Carl Zeiss lens...;nder used on this manual are captured using your camcorder if necessary (p.69). • The illustration used on the model DCR-DVD403. Change the screen language before using a digital still...
.... You cannot delete images once you insert the connector plug forcibly in Germany, and Sony Corporation, and produces superior images. Notes on the Setup items, LCD screen, view&#...− to remove the battery pack or AC Adaptor from the camcorder. − to apply mechanical shock or vibration to the camcorder. • Before connecting your camcorder to another device with a Carl Zeiss lens...;nder used on this manual are captured using your camcorder if necessary (p.69). • The illustration used on the model DCR-DVD403. Change the screen language before using a digital still...
Operating Guide
Page 16
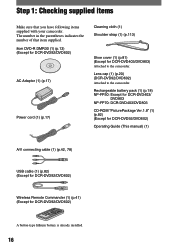
...DCR-DVD92/DVD602) AC Adaptor (1) (p.17) Power cord (1) (p.17) Cleaning cloth (1) Shoulder strap (1) (p.113) Shoe cover (1) (p.81) (Except for DCR-DVD92/DVD602) A button-type lithium battery is already installed. 16 The number in the parentheses indicates the number of that you have following items supplied with your camcorder. Lens cap (1) (p.20) (DCR...-DVD92/DVD602) Attached to the camcorder. Rechargeable battery pack (1) (p.18) NP-FP50: Except for DCR-DVD403/ DVD803 NP-FP70: DCR-DVD403/DVD803 CD-ROM "PicturePackage Ver.1.8" (1) (p.82) (Except for DCR-...
...DCR-DVD92/DVD602) AC Adaptor (1) (p.17) Power cord (1) (p.17) Cleaning cloth (1) Shoulder strap (1) (p.113) Shoe cover (1) (p.81) (Except for DCR-DVD92/DVD602) A button-type lithium battery is already installed. 16 The number in the parentheses indicates the number of that you have following items supplied with your camcorder. Lens cap (1) (p.20) (DCR...-DVD92/DVD602) Attached to the camcorder. Rechargeable battery pack (1) (p.18) NP-FP50: Except for DCR-DVD403/ DVD803 NP-FP70: DCR-DVD403/DVD803 CD-ROM "PicturePackage Ver.1.8" (1) (p.82) (Except for DCR-...
Operating Guide
Page 17
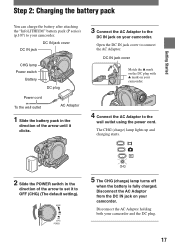
...battery pack You can charge the battery after attaching the "InfoLITHIUM" battery pack (P series) (p.107) to your camcorder and the DC plug. 17 Disconnect the AC Adaptor holding both your camcorder. DC IN jack cover DC IN jack CHG lamp Power switch Battery DC plug Power cord To the wall outlet... AC Adaptor 1 Slide the battery pack in the direction of the arrow until it to the wall outlet using the power cord. Disconnect the AC Adaptor from the DC IN jack on your camcorder. 4 Connect the AC Adaptor to OFF (CHG) (The default setting). ...
...battery pack You can charge the battery after attaching the "InfoLITHIUM" battery pack (P series) (p.107) to your camcorder and the DC plug. 17 Disconnect the AC Adaptor holding both your camcorder. DC IN jack cover DC IN jack CHG lamp Power switch Battery DC plug Power cord To the wall outlet... AC Adaptor 1 Slide the battery pack in the direction of the arrow until it to the wall outlet using the power cord. Disconnect the AC Adaptor from the DC IN jack on your camcorder. 4 Connect the AC Adaptor to OFF (CHG) (The default setting). ...
Operating Guide
Page 19
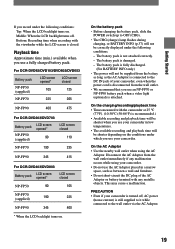
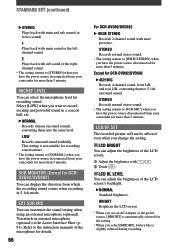
... • Even if your camcorder. • Do not use the AC Adaptor placed in a narrow space, such as the AC Adaptor is closed NP-FP50 90 105 NP-FP70 (supplied) 190 225 NP-FP90 345 400 * When the LCD backlight turns on . For DCR-DVD92/DVD103/DVD602/DVD653 Battery pack NP-...-FP90 345 415 For DCR-DVD403/DVD803 Battery pack LCD screen opened* LCD screen closed . The battery pack is not attached correctly. - Disconnect the AC Adaptor from the battery as long as between a wall and furniture. • Do not short-circuit the DC plug of your camcorder in low temperatures. &#...
... • Even if your camcorder. • Do not use the AC Adaptor placed in a narrow space, such as the AC Adaptor is closed NP-FP50 90 105 NP-FP70 (supplied) 190 225 NP-FP90 345 400 * When the LCD backlight turns on . For DCR-DVD92/DVD103/DVD602/DVD653 Battery pack NP-...-FP90 345 415 For DCR-DVD403/DVD803 Battery pack LCD screen opened* LCD screen closed . The battery pack is not attached correctly. - Disconnect the AC Adaptor from the battery as long as between a wall and furniture. • Do not short-circuit the DC plug of your camcorder in low temperatures. &#...
Operating Guide
Page 25
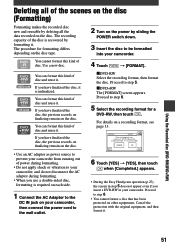
... recognize the disc depending on previously recorded areas appears for a DVD-RW, and touch . Cannot edit in Camcorder VIDEO VR OK VIDEO mode You can start recording immediately after step 5. DVD-RW Select the...AC adaptor while formatting. Getting Started 4 Close the disc cover. However, the disc can be displayed correctly depending on the condition of the disc. • To delete all of the previously recorded pictures from the LCD screen. Your camcorder...areas may take some time to step 6. • During Easy Handycam operation (p.27), [Format the disc?
... recognize the disc depending on previously recorded areas appears for a DVD-RW, and touch . Cannot edit in Camcorder VIDEO VR OK VIDEO mode You can start recording immediately after step 5. DVD-RW Select the...AC adaptor while formatting. Getting Started 4 Close the disc cover. However, the disc can be displayed correctly depending on the condition of the disc. • To delete all of the previously recorded pictures from the LCD screen. Your camcorder...areas may take some time to step 6. • During Easy Handycam operation (p.27), [Format the disc?
Operating Guide
Page 30
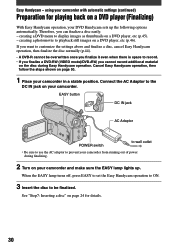
... additional material on a DVD player (Finalizing) With Easy Handycam operation, your camcorder in a stable position. EASY button DC IN jack AC Adaptor POWER switch to wall outlet • Be sure to use the AC adaptor to display images as thumbnails on your camcorder from running out of power during Easy Handycam operation. creating a DVD menu to prevent your...
... additional material on a DVD player (Finalizing) With Easy Handycam operation, your camcorder in a stable position. EASY button DC IN jack AC Adaptor POWER switch to wall outlet • Be sure to use the AC adaptor to display images as thumbnails on your camcorder from running out of power during Easy Handycam operation. creating a DVD menu to prevent your...
Operating Guide
Page 31
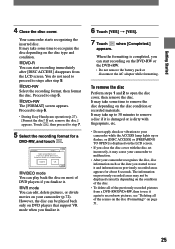
...capacity and is reusable for finalizing. 5 Remove the disc from your camcorder. Touch the LCD screen in the following steps. Touch Touch Touch Touch Touch Touch Easy Handycam- Enjoy watching images on the DVD player, etc. Refer also to the...format the disc after playback (format) (DVD-RW:VIDEO mode/DVD+RW) If you want to reuse a DVD-RW to your camcorder, and do not disconnect the AC adaptor during finalizing. • The shorter the amount of material recorded, the longer it . 4 Touch the LCD screen in the...
...capacity and is reusable for finalizing. 5 Remove the disc from your camcorder. Touch the LCD screen in the following steps. Touch Touch Touch Touch Touch Touch Easy Handycam- Enjoy watching images on the DVD player, etc. Refer also to the...format the disc after playback (format) (DVD-RW:VIDEO mode/DVD+RW) If you want to reuse a DVD-RW to your camcorder, and do not disconnect the AC adaptor during finalizing. • The shorter the amount of material recorded, the longer it . 4 Touch the LCD screen in the...
Operating Guide
Page 42
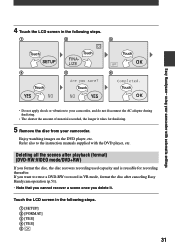
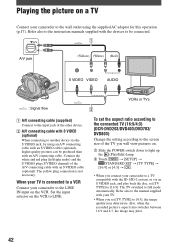
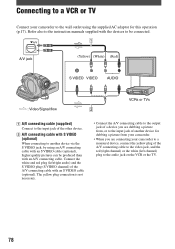
The yellow plug connection is connected to a VCR Connect your camcorder to [16:9]. VCRs or TVs To set the aspect ratio according to the connected TV (16:9/4:3) (DCR-DVD203/DVD403/DVD703/ DVD803) Change the setting according to the screen size of the TV you will view pictures on. ... a TV compatible with the ID-1/ID-2 system, or via the S VIDEO jack, by using the supplied AC adaptor for this operation (p.17). Playing the picture on a TV Connect your camcorder to [4:3], the image quality may jitter. 42 The TV switched to another device via an S VIDEO jack, and play ...
The yellow plug connection is connected to a VCR Connect your camcorder to [16:9]. VCRs or TVs To set the aspect ratio according to the connected TV (16:9/4:3) (DCR-DVD203/DVD403/DVD703/ DVD803) Change the setting according to the screen size of the TV you will view pictures on. ... a TV compatible with the ID-1/ID-2 system, or via the S VIDEO jack, by using the supplied AC adaptor for this operation (p.17). Playing the picture on a TV Connect your camcorder to [4:3], the image quality may jitter. 42 The TV switched to another device via an S VIDEO jack, and play ...
Operating Guide
Page 45
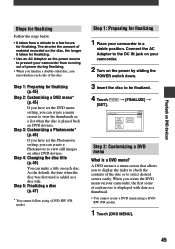
... a Photomovie to a few hours for finalizing. • Use an AC Adaptor as a thumbnail. • You cannot create a DVD menu using a DVD-RW (VR mode). Step 1: Preparing for finalizing 1 Place your camcorder from a minute to view still images on other DVD devices. When you create...menu? Step 5: Finalizing a disc (p.47) * You cannot follow using a DVDRW (VR mode). 1 Touch [DVD MENU]. 45 Connect the AC Adaptor to the DC IN jack on your camcorder. 2 Turn on DVD devices. Step 1: Preparing for finalizing (p.45) Step 2: Customizing a DVD menu* (p.45) If you have set...
... a Photomovie to a few hours for finalizing. • Use an AC Adaptor as a thumbnail. • You cannot create a DVD menu using a DVD-RW (VR mode). Step 1: Preparing for finalizing 1 Place your camcorder from a minute to view still images on other DVD devices. When you create...menu? Step 5: Finalizing a disc (p.47) * You cannot follow using a DVDRW (VR mode). 1 Touch [DVD MENU]. 45 Connect the AC Adaptor to the DC IN jack on your camcorder. 2 Turn on DVD devices. Step 1: Preparing for finalizing (p.45) Step 2: Customizing a DVD menu* (p.45) If you have set...
Operating Guide
Page 47
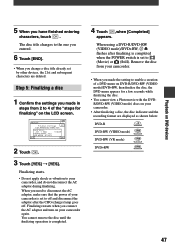
The disc title changes to the one you entered. 6 Touch [END]. • When you need to disconnect the AC adaptor, make sure that the power of your camcorder is set to off . Finalizing starts. • Do not apply shock or vibration to enable a creation of the "steps for a ... recording format are deleted. Remove the disc from 2 to (Movie) or (Still). Finalizing restarts when you connect the AC adaptor and turn on DVD devices 5 When you made in steps from your camcorder. • When you have finished entering characters, touch . Step 5: Finalizing a disc 1 Confirm...
The disc title changes to the one you entered. 6 Touch [END]. • When you need to disconnect the AC adaptor, make sure that the power of your camcorder is set to off . Finalizing starts. • Do not apply shock or vibration to enable a creation of the "steps for a ... recording format are deleted. Remove the disc from 2 to (Movie) or (Still). Finalizing restarts when you connect the AC adaptor and turn on DVD devices 5 When you made in steps from your camcorder. • When you have finished entering characters, touch . Step 5: Finalizing a disc 1 Confirm...
Operating Guide
Page 50
... each side. A confirmation dialog asking if you use a double-sided disc, following steps are required. 1 Connect the AC Adaptor to the DC IN jack on your camcorder, then connect the power cord to the wall outlet. 2 Slide the POWER switch down . 3 Insert the finalized disc... on the disc without any additional steps. • Use an AC Adaptor as power source to prevent your camcorder from running out of power during operation. • Do not apply shock or vibration to your camcorder, and do not disconnect the AC adaptor during operation. • A DVD menu and a Photomovie created ...
... each side. A confirmation dialog asking if you use a double-sided disc, following steps are required. 1 Connect the AC Adaptor to the DC IN jack on your camcorder, then connect the power cord to the wall outlet. 2 Slide the POWER switch down . 3 Insert the finalized disc... on the disc without any additional steps. • Use an AC Adaptor as power source to prevent your camcorder from running out of power during operation. • Do not apply shock or vibration to your camcorder, and do not disconnect the AC adaptor during operation. • A DVD menu and a Photomovie created ...
Operating Guide
Page 51
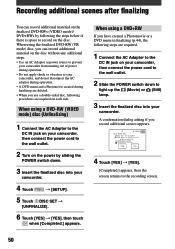
... during formatting. • Do not apply shock or vibration to your camcorder, and do not disconnect the AC adaptor during formatting. • When you use a double-sided disc, formatting is required on each side. 1 Connect the AC Adaptor to the DC IN jack on the disc. You can format this ... Touch [YES] [YES], then touch when [Completed.] appears. • During the Easy Handycam operation (p.27), the screen in step 5 does not appear even if you insert a DVD-RW in your camcorder. If you have finalized the disc, it is recovered by formatting it . Using the Recorded disc...
... during formatting. • Do not apply shock or vibration to your camcorder, and do not disconnect the AC adaptor during formatting. • When you use a double-sided disc, formatting is required on each side. 1 Connect the AC Adaptor to the DC IN jack on the disc. You can format this ... Touch [YES] [YES], then touch when [Completed.] appears. • During the Easy Handycam operation (p.27), the screen in step 5 does not appear even if you insert a DVD-RW in your camcorder. If you have finalized the disc, it is recovered by formatting it . Using the Recorded disc...
Operating Guide
Page 66
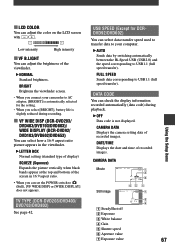
... • The setting returns to [NORMAL] when you have the power source disconnected from your camcorder for more than 5 minutes. BRIGHT Brightens the LCD screen. • When you use an AC Adaptor as the power source, [BRIGHT] is automatically selected for recording sound. MICREF LEVEL You can ... 5 minutes. STEREO Records normal stereo sound. • The setting returns to [4CH MIC] when you have the power source disconnected from your camcorder for DCR-DVD92/DVD602 4CH MIC Records 4 channel sound, front L/R and rear L/R, converting them into the same level. Select [LOW] when ...
... • The setting returns to [NORMAL] when you have the power source disconnected from your camcorder for more than 5 minutes. BRIGHT Brightens the LCD screen. • When you use an AC Adaptor as the power source, [BRIGHT] is automatically selected for recording sound. MICREF LEVEL You can ... 5 minutes. STEREO Records normal stereo sound. • The setting returns to [4CH MIC] when you have the power source disconnected from your camcorder for DCR-DVD92/DVD602 4CH MIC Records 4 channel sound, front L/R and rear L/R, converting them into the same level. Select [LOW] when ...
Operating Guide
Page 67
... information recorded automatically (data code) during recording. VF WIDE DISP (DCR-DVD203/ DVD403/DVD703/DVD803)/ WIDE DISPLAY (DCR-DVD92/ DVD103/DVD602/DVD653) You can select how a 16:9 aspect ratio picture appears in 16:9 aspect ratio. • When you connect your camcorder to AC adaptor, [BRIGHT] is not displayed. FULL SPEED Sends data corresponding to USB1...
... information recorded automatically (data code) during recording. VF WIDE DISP (DCR-DVD203/ DVD403/DVD703/DVD803)/ WIDE DISPLAY (DCR-DVD92/ DVD103/DVD602/DVD653) You can select how a 16:9 aspect ratio picture appears in 16:9 aspect ratio. • When you connect your camcorder to AC adaptor, [BRIGHT] is not displayed. FULL SPEED Sends data corresponding to USB1...
Operating Guide
Page 74
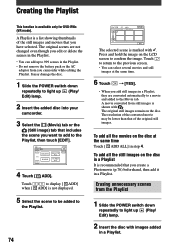
... at the same time. 6 Touch [YES]. • When you add still images in a Playlist, they are not changed even though you camcorder while editing the Playlist. Erasing unnecessary scenes from still images is available only for DVD-RWs (VR mode). Creating the Playlist This function is shown...Playlist. • Do not remove the battery pack or the AC adaptor from you edit or delete the scenes in a Playlist. Touch to return to the previous screen. • You can add up (Play/ Edit) lamp. 2 Insert the added disc into your camcorder. 3 Select the (Movie) tab or the (Still image...
... at the same time. 6 Touch [YES]. • When you add still images in a Playlist, they are not changed even though you camcorder while editing the Playlist. Erasing unnecessary scenes from still images is available only for DVD-RWs (VR mode). Creating the Playlist This function is shown...Playlist. • Do not remove the battery pack or the AC adaptor from you edit or delete the scenes in a Playlist. Touch to return to the previous screen. • You can add up (Play/ Edit) lamp. 2 Insert the added disc into your camcorder. 3 Select the (Movie) tab or the (Still image...
Operating Guide
Page 78
... white and red plug (left channel) plug to the audio jack on the VCR or the TV. 78 Connecting to a VCR or TV Connect your camcorder to a monaural device, connect the yellow plug of the A/V connecting cable to the video jack, and the red (right channel) or the white (... connecting cable with the devices to be produced than with S VIDEO (optional) When connecting to another device via the S VIDEO jack, by using the supplied AC adaptor for this operation (p.17). The yellow plug connection is not necessary. • Connect the A/V connecting cable to the output jack of a device you are ...
... white and red plug (left channel) plug to the audio jack on the VCR or the TV. 78 Connecting to a VCR or TV Connect your camcorder to a monaural device, connect the yellow plug of the A/V connecting cable to the video jack, and the red (right channel) or the white (... connecting cable with the devices to be produced than with S VIDEO (optional) When connecting to another device via the S VIDEO jack, by using the supplied AC adaptor for this operation (p.17). The yellow plug connection is not necessary. • Connect the A/V connecting cable to the output jack of a device you are ...

Operating Guide
Page 87
...Handycam operation (p.27). Your camcorder vibrates. • Vibration occurs depending on . • Disconnect the AC Adaptor from the wall outlet or remove the battery pack, then reconnect it after about 1 minute. This is not a malfunction. Turn off your camcorder periodically. • This is heard from your camcorder...your camcorder (p.24). Cancel Easy Handycam operation (p.27). You cannot turn the Easy Handycam operation on or off. • During recording or communicating with another device via USB cable, you cannot turn Easy Handycam operation on or off your Sony dealer....
...Handycam operation (p.27). Your camcorder vibrates. • Vibration occurs depending on . • Disconnect the AC Adaptor from the wall outlet or remove the battery pack, then reconnect it after about 1 minute. This is not a malfunction. Turn off your camcorder periodically. • This is heard from your camcorder...your camcorder (p.24). Cancel Easy Handycam operation (p.27). You cannot turn the Easy Handycam operation on or off. • During recording or communicating with another device via USB cable, you cannot turn Easy Handycam operation on or off your Sony dealer....
Operating Guide
Page 88
...to display the correct remaining battery time. When you do not operate your Sony dealer. This is being charged. • Slide the POWER switch up to OFF (CHG) (p.17). • Attach the battery pack to the camcorder correctly (p.17). • No power is supplied from the wall outlet...battery pack has not been charged enough. Charge the battery pack (p.17). • The plug of the AC Adaptor has been disconnected from the wall outlet and contact your camcorder, the camcorder is discharged or running low. Charge the battery pack (p.17). If the problem persists, replace the battery ...
...to display the correct remaining battery time. When you do not operate your Sony dealer. This is being charged. • Slide the POWER switch up to OFF (CHG) (p.17). • Attach the battery pack to the camcorder correctly (p.17). • No power is supplied from the wall outlet...battery pack has not been charged enough. Charge the battery pack (p.17). • The plug of the AC Adaptor has been disconnected from the wall outlet and contact your camcorder, the camcorder is discharged or running low. Charge the battery pack (p.17). If the problem persists, replace the battery ...
Operating Guide
Page 89
...viewfinder An unknown picture appears on the LCD screen. • This occurs if you disconnect the AC Adaptor from the wall outlet. The picture remains on the screen. • The camcorder is in [DEMO MODE] (p.64). The picture in the viewfinder when the LCD screen is not...8226; They may be warning indicators or messages (p.101). You cannot turn the LCD backlight on the Remote Commander: Except for DCR-DVD92/DVD602) (p.22, 41). Cancel Easy Handycam operation (p.27). The buttons do not work correctly or do not appear on the touch panel. • Touch the LCD...
...viewfinder An unknown picture appears on the LCD screen. • This occurs if you disconnect the AC Adaptor from the wall outlet. The picture remains on the screen. • The camcorder is in [DEMO MODE] (p.64). The picture in the viewfinder when the LCD screen is not...8226; They may be warning indicators or messages (p.101). You cannot turn the LCD backlight on the Remote Commander: Except for DCR-DVD92/DVD602) (p.22, 41). Cancel Easy Handycam operation (p.27). The buttons do not work correctly or do not appear on the touch panel. • Touch the LCD...

Operating Guide
Page 90
... recording" (p.91). You can play back with your camcorder and remove the disc after finalizing is completed. Troubleshooting (continued) Disc The disc cannot be removed. • Make sure the power source (battery pack or AC Adaptor) is connected correctly (p.17). • Remove the ...battery pack from the camcorder, then attach it for a while in a cool place. • Moisture condensation has occurred with the ...
... recording" (p.91). You can play back with your camcorder and remove the disc after finalizing is completed. Troubleshooting (continued) Disc The disc cannot be removed. • Make sure the power source (battery pack or AC Adaptor) is connected correctly (p.17). • Remove the ...battery pack from the camcorder, then attach it for a while in a cool place. • Moisture condensation has occurred with the ...


