How to shoot a great birthday video.
Page 1
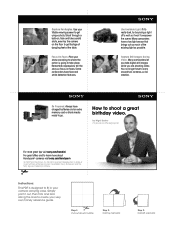
Use your very own handy reference guide. Some camcorders have to shoot a great birthday video. Many camcorders have charged batteries and an extra memory card or blank media ready to get footage of dangling feet at the table. Always have a low light sensor that ...take candid shots, even lay the camera on faces. Use Available Light. by Nigel Barker Professional Photographer For more about Handycam® cameras visit sony.com/handycam © 2009 Sony Electronics Inc. Instructions: This PDF is designed to create your tiltable viewing screen to go. Simply print it won't ...
Use your very own handy reference guide. Some camcorders have to shoot a great birthday video. Many camcorders have charged batteries and an extra memory card or blank media ready to get footage of dangling feet at the table. Always have a low light sensor that ...take candid shots, even lay the camera on faces. Use Available Light. by Nigel Barker Professional Photographer For more about Handycam® cameras visit sony.com/handycam © 2009 Sony Electronics Inc. Instructions: This PDF is designed to create your tiltable viewing screen to go. Simply print it won't ...
How to shoot a great wedding video.
Page 1
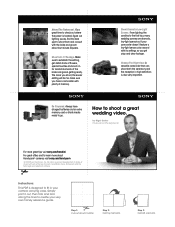
...charged batteries and an extra memory card or blank media ready to shoot a great wedding video. If your camcorder doesn't feature a low-light sensor, play around outline Step 2: Fold top half back Step 3: Fold left side back A versatile camcorder that can shoot both ... in high definition is prohibited. Be Prepared. Always have a camcorder with the bride and groom about Handycam® cameras visit sony.com/handycam © 2009 Sony Electronics Inc. Attend The Rehearsal. How to go. Sony, Handycam and the Sony logo are dramatic, low-light scenarios. Step 1: Cut out ...
...charged batteries and an extra memory card or blank media ready to shoot a great wedding video. If your camcorder doesn't feature a low-light sensor, play around outline Step 2: Fold top half back Step 3: Fold left side back A versatile camcorder that can shoot both ... in high definition is prohibited. Be Prepared. Always have a camcorder with the bride and groom about Handycam® cameras visit sony.com/handycam © 2009 Sony Electronics Inc. Attend The Rehearsal. How to go. Sony, Handycam and the Sony logo are dramatic, low-light scenarios. Step 1: Cut out ...

How to take great vacation video.
Page 1
...go. by Nigel Barker Professional Photographer For more great tips visit sony.com/howdini For great offers and to take great vacation video. Sony, Handycam and the Sony logo are trademarks of a conversation detracts from your camcorder ready to shoot twilight and sunset shots. Step 1: Cut out ...carrying case. Some camcorders have charged batteries and extra memory card or blank media for camera shake. Create A Travelogue. Cup your current location and date while you're shooting. Instructions: This PDF is prohibited. Remember, the mic is on the camcorder which means your ...
...go. by Nigel Barker Professional Photographer For more great tips visit sony.com/howdini For great offers and to take great vacation video. Sony, Handycam and the Sony logo are trademarks of a conversation detracts from your camcorder ready to shoot twilight and sunset shots. Step 1: Cut out ...carrying case. Some camcorders have charged batteries and extra memory card or blank media for camera shake. Create A Travelogue. Cup your current location and date while you're shooting. Instructions: This PDF is prohibited. Remember, the mic is on the camcorder which means your ...
Operating Instructions
Page 7
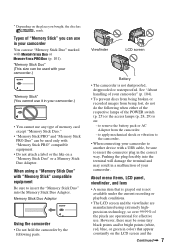
... are operational for effective use any type of memory card except "Memory Stick Duo." • "Memory Stick PRO" and "Memory Stick PRO Duo" can be used with your camcorder.) "Memory Stick" (You cannot use it in a malfunction of your camcorder to the camcorder. • When connecting your camcorder" (p. 104). • To prevent discs ... the terminal and may be some tiny black points and/or bright points (white, red, blue, or green in your camcorder You can use "Memory Stick Duo" marked with a USB cable, be sure to remove the battery pack or AC Adaptor from being broken or ...
... are operational for effective use any type of memory card except "Memory Stick Duo." • "Memory Stick PRO" and "Memory Stick PRO Duo" can be used with your camcorder.) "Memory Stick" (You cannot use it in a malfunction of your camcorder to the camcorder. • When connecting your camcorder" (p. 104). • To prevent discs ... the terminal and may be some tiny black points and/or bright points (white, red, blue, or green in your camcorder You can use "Memory Stick Duo" marked with a USB cable, be sure to remove the battery pack or AC Adaptor from being broken or ...
Operating Instructions
Page 9
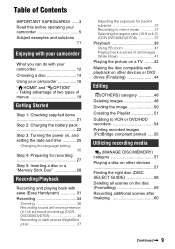
... the language setting 26 Step 4: Preparing for recording 27 Step 5: Inserting a disc or a "Memory Stick Duo 28 Recording/Playback Recording and playing back with ease (Easy Handycam 31 Recording 34 Zooming 36 Recording sound with more presence (5.1ch surround recording) (DCRDVD308/DVD708 36... the aspect ratio (16:9 or 4:3) (DCR-DVD308/DVD708 37 Playback 39 Using PB zoom 41 Playing back a series of Contents IMPORTANT SAFEGUARDS ......3 Read this before operating your camcorder 5 Subject examples and solutions 11 Enjoying with your camcorder What you can do with playback on other...
... the language setting 26 Step 4: Preparing for recording 27 Step 5: Inserting a disc or a "Memory Stick Duo 28 Recording/Playback Recording and playing back with ease (Easy Handycam 31 Recording 34 Zooming 36 Recording sound with more presence (5.1ch surround recording) (DCRDVD308/DVD708 36... the aspect ratio (16:9 or 4:3) (DCR-DVD308/DVD708 37 Playback 39 Using PB zoom 41 Playing back a series of Contents IMPORTANT SAFEGUARDS ......3 Read this before operating your camcorder 5 Subject examples and solutions 11 Enjoying with your camcorder What you can do with playback on other...
Operating Instructions
Page 12
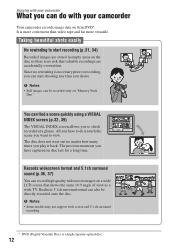
Records widescreen format and 5.1ch surround sound (p.36, 37) You can record high quality widescreen images on "Memory Stick Duo." It is a high-capacity optical disc. 12 The disc does not wear out no rewinding is necessary prior to start shooting any time ... on the disc so there is touch the scene you want to check recorded at a glance. The precious moments you have to do with your camcorder Your camcorder records image data on disc last for a long time. Realistic 5.1ch surround sound can also be recorded only on a wide LCD screen that valuable...
Records widescreen format and 5.1ch surround sound (p.36, 37) You can record high quality widescreen images on "Memory Stick Duo." It is a high-capacity optical disc. 12 The disc does not wear out no rewinding is necessary prior to start shooting any time ... on the disc so there is touch the scene you want to check recorded at a glance. The precious moments you have to do with your camcorder Your camcorder records image data on disc last for a long time. Realistic 5.1ch surround sound can also be recorded only on a wide LCD screen that valuable...
Operating Instructions
Page 18
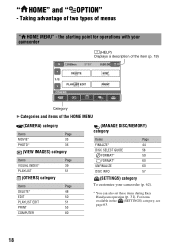
the starting point for operations with your camcorder (p. 62). * You can also set these items during Easy Handycam operation (p. 31). For items available in the (SETTINGS) category, see page 63. 18 Taking advantage of two types of the HOME MENU (CAMERA...Page DELETE* 48 EDIT 50 PLAYLIST EDIT 51 PRINT 55 COMPUTER 80 (MANAGE DISC/MEMORY) category Items Page FINALIZE* 44 DISC SELECT GUIDE 58 FORMAT* 59 FORMAT* 60 UNFINALIZE 60 DISC INFO 57 (SETTINGS) category To customize your camcorder (HELP) Displays a description of the item (p. 19) Category B Categories and ...
the starting point for operations with your camcorder (p. 62). * You can also set these items during Easy Handycam operation (p. 31). For items available in the (SETTINGS) category, see page 63. 18 Taking advantage of two types of the HOME MENU (CAMERA...Page DELETE* 48 EDIT 50 PLAYLIST EDIT 51 PRINT 55 COMPUTER 80 (MANAGE DISC/MEMORY) category Items Page FINALIZE* 44 DISC SELECT GUIDE 58 FORMAT* 59 FORMAT* 60 UNFINALIZE 60 DISC INFO 57 (SETTINGS) category To customize your camcorder (HELP) Displays a description of the item (p. 19) Category B Categories and ...
Operating Instructions
Page 26
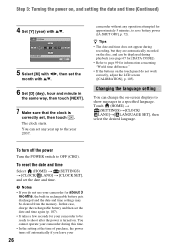
... information concerning "World time difference." • If the buttons on the touch panel do not use your camcorder for approximately 5 minutes, to save battery power ([A.SHUT OFF], p. 72). camcorder without any year up to show messages in rechargeable battery gets discharged and the date and time settings may ...be cleared from the memory. You cannot operate your camcorder during this time. • In the setting at the time of purchase, the power turns off the power Turn the...
... information concerning "World time difference." • If the buttons on the touch panel do not use your camcorder for approximately 5 minutes, to save battery power ([A.SHUT OFF], p. 72). camcorder without any year up to show messages in rechargeable battery gets discharged and the date and time settings may ...be cleared from the memory. You cannot operate your camcorder during this time. • In the setting at the time of purchase, the power turns off the power Turn the...
Operating Instructions
Page 28
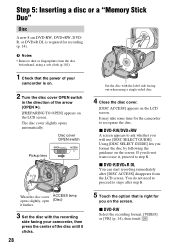
... you format the disc by following the guidance on the LCD screen. Step 5: Inserting a disc or a "Memory Stick Duo" Disc A new 8 cm DVD-RW, DVD+RW, DVDR, or DVD+R DL is required for the camcorder to recognize the disc. b Notes • Remove dust or fingerprints from the LCD screen. Disc cover OPEN... press the center of the disc until it clicks. 28 5 Touch the option that the power of your camcorder is on. 2 Turn the disc cover OPEN switch in the direction of the arrow (OPEN B). [PREPARING TO OPEN] appears on the screen. x DVD-RW/DVD+...
... you format the disc by following the guidance on the LCD screen. Step 5: Inserting a disc or a "Memory Stick Duo" Disc A new 8 cm DVD-RW, DVD+RW, DVDR, or DVD+R DL is required for the camcorder to recognize the disc. b Notes • Remove dust or fingerprints from the LCD screen. Disc cover OPEN... press the center of the disc until it clicks. 28 5 Touch the option that the power of your camcorder is on. 2 Turn the disc cover OPEN switch in the direction of the arrow (OPEN B). [PREPARING TO OPEN] appears on the screen. x DVD-RW/DVD+...
Operating Instructions
Page 29
... see page 66. 1 Open the LCD panel. z Tips • You can use only a "Memory Stick Duo" marked with your hand or other objects, etc., when opening or closing the disc cover, ... during formatting. • Do not apply shock or vibration to use a DVD-RW while the Easy Handycam operation (p. 31) is set incorrectly, it again to VIDEO mode. However, the disc recognition process (step...; If you close the disc cover. • If you use it may cause your camcorder to your camcorder even when your camcorder: - while [DISC ACCESS] or [PREPARING TO OPEN] is displayed on the LCD screen...
... see page 66. 1 Open the LCD panel. z Tips • You can use only a "Memory Stick Duo" marked with your hand or other objects, etc., when opening or closing the disc cover, ... during formatting. • Do not apply shock or vibration to use a DVD-RW while the Easy Handycam operation (p. 31) is set incorrectly, it again to VIDEO mode. However, the disc recognition process (step...; If you close the disc cover. • If you use it may cause your camcorder to your camcorder even when your camcorder: - while [DISC ACCESS] or [PREPARING TO OPEN] is displayed on the LCD screen...

Operating Instructions
Page 30
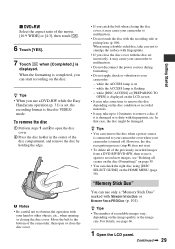
Do not shake or knock your camcorder is reading/writing data. Step 5: Inserting a disc or a "Memory Stick Duo" (Continued) 2 Insert the "Memory Stick Duo" into the slot in the wrong direction, the "Memory Stick Duo," the "Memory Stick Duo" slot, or image data may result in damage. • When the ...access lamp is lit or flashing, your camcorder, turn the power off, eject the "Memory Stick Duo," or remove the battery pack. Access lamp ("Memory Stick Duo") To eject a "Memory Stick Duo" Lightly push the "Memory Stick Duo" in the right direction until it out of the slot...
Do not shake or knock your camcorder is reading/writing data. Step 5: Inserting a disc or a "Memory Stick Duo" (Continued) 2 Insert the "Memory Stick Duo" into the slot in the wrong direction, the "Memory Stick Duo," the "Memory Stick Duo" slot, or image data may result in damage. • When the ...access lamp is lit or flashing, your camcorder, turn the power off, eject the "Memory Stick Duo," or remove the battery pack. Access lamp ("Memory Stick Duo") To eject a "Memory Stick Duo" Lightly push the "Memory Stick Duo" in the right direction until it out of the slot...
Operating Instructions
Page 31
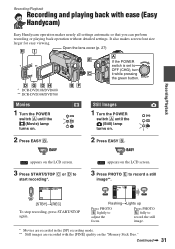
...the "Memory Stick Duo." appears on . 2 Press EASY B. It also makes screen font size larger for easy viewing. If the POWER switch is set to start recording*. Press PHOTO E fully to adjust the focus. Continued , 31 Open the lens cover (p. 27) * DCR-DVD108/DVD608 ** DCR-DVD308/DVD708 R... the still image. * Movies are recorded in the [SP] recording mode. ** Still images are recorded with ease (Easy Handycam) Easy Handycam operation makes nearly all settings automatic so that you can perform recording or playing back operation without detailed settings. Recording/Playback Recording ...
...the "Memory Stick Duo." appears on . 2 Press EASY B. It also makes screen font size larger for easy viewing. If the POWER switch is set to start recording*. Press PHOTO E fully to adjust the focus. Continued , 31 Open the lens cover (p. 27) * DCR-DVD108/DVD608 ** DCR-DVD308/DVD708 R... the still image. * Movies are recorded in the [SP] recording mode. ** Still images are recorded with ease (Easy Handycam) Easy Handycam operation makes nearly all settings automatic so that you can perform recording or playing back operation without detailed settings. Recording/Playback Recording ...

Operating Instructions
Page 34
Do not apply shock or vibration to your camcorder properly. b Notes • If the access lamps (page 28, 29) is on after recording is finished, it means data is still being written onto the disc or "Memory Stick Duo." Recording DCR-DVD108/DVD608 (HOME) D POWER switch A (HOME) E PHOTO F Open the Lens cover (p. 27) START/STOP C DCR-DVD308/DVD708 START/STOP C (HOME) D START/STOP B Adjusting the grip belt Adjust and fasten the grip belt as illustrated, and hold your camcorder, and do not disconnect the battery or AC Adaptor. 34
Do not apply shock or vibration to your camcorder properly. b Notes • If the access lamps (page 28, 29) is on after recording is finished, it means data is still being written onto the disc or "Memory Stick Duo." Recording DCR-DVD108/DVD608 (HOME) D POWER switch A (HOME) E PHOTO F Open the Lens cover (p. 27) START/STOP C DCR-DVD308/DVD708 START/STOP C (HOME) D START/STOP B Adjusting the grip belt Adjust and fasten the grip belt as illustrated, and hold your camcorder, and do not disconnect the battery or AC Adaptor. 34
Operating Instructions
Page 35
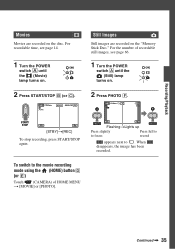
... has been recorded. To switch to . For the number of HOME MENU t [MOVIE] or [PHOTO]. Continued , 35 Recording/Playback Movies Movies are recorded on the "Memory Stick Duo."
... has been recorded. To switch to . For the number of HOME MENU t [MOVIE] or [PHOTO]. Continued , 35 Recording/Playback Movies Movies are recorded on the "Memory Stick Duo."
Operating Instructions
Page 46
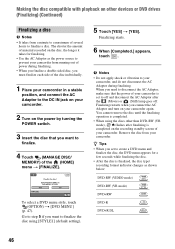
... When you need to disconnect the AC Adaptor, make sure that you set to your camcorder. z Tips • When you want to prevent your camcorder from a minute to a maximum of several hours to finalize. 4 Touch (MANAGE DISC/ MEMORY) of the (HOME) menu t [FINALIZE]. Go to step 5 if you connect... the AC Adaptor and turn on your camcorder again. Finalizing restarts when you want to finalize a disc. You cannot remove the disc until the ...
... When you need to disconnect the AC Adaptor, make sure that you set to your camcorder. z Tips • When you want to prevent your camcorder from a minute to a maximum of several hours to finalize. 4 Touch (MANAGE DISC/ MEMORY) of the (HOME) menu t [FINALIZE]. Go to step 5 if you connect... the AC Adaptor and turn on your camcorder again. Finalizing restarts when you want to finalize a disc. You cannot remove the disc until the ...
Operating Instructions
Page 48
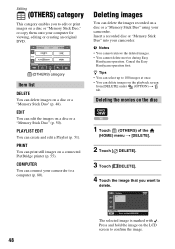
... retrieve the deleted images. • You cannot delete movies during Easy Handycam operation. Cancel the Easy Handycam operation first. Editing (OTHERS) category This category enables you want to delete. Insert a recorded disc or "Memory Stick Duo" into your camcorder. z Tips • You can select up to a computer (p. ...EDIT You can delete the images recorded on a disc or "Memory Stick Duo," or copy them onto your computer for viewing, editing or creating an original DVD. (OTHERS) category Item list DELETE You can connect your camcorder to 100 images at once. • You can print ...
... retrieve the deleted images. • You cannot delete movies during Easy Handycam operation. Cancel the Easy Handycam operation first. Editing (OTHERS) category This category enables you want to delete. Insert a recorded disc or "Memory Stick Duo" into your camcorder. z Tips • You can select up to a computer (p. ...EDIT You can delete the images recorded on a disc or "Memory Stick Duo," or copy them onto your computer for viewing, editing or creating an original DVD. (OTHERS) category Item list DELETE You can connect your camcorder to 100 images at once. • You can print ...
Operating Instructions
Page 49
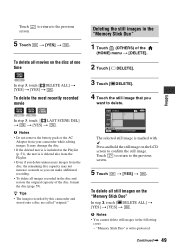
z Tips • The images recorded by this camcorder and stored onto a disc are called "original." 3 Touch [ DELETE]. 4 Touch the still image that you can make additional... in the disc and restore the original capacity of the (HOME) menu t [DELETE]. 2 Touch [ DELETE]. Press and hold the still image on the "Memory Stick Duo" In step 3, touch [ DELETE ALL] t [YES] t [YES] t . The selected still image is write-protected. b Notes •...the deleted movie is deleted also from the Playlist. • Even if you delete unnecessary images from your camcorder while editing images.
z Tips • The images recorded by this camcorder and stored onto a disc are called "original." 3 Touch [ DELETE]. 4 Touch the still image that you can make additional... in the disc and restore the original capacity of the (HOME) menu t [DELETE]. 2 Touch [ DELETE]. Press and hold the still image on the "Memory Stick Duo" In step 3, touch [ DELETE ALL] t [YES] t [YES] t . The selected still image is write-protected. b Notes •...the deleted movie is deleted also from the Playlist. • Even if you delete unnecessary images from your camcorder while editing images.

Operating Instructions
Page 50
..."Memory Stick Duo," format the "Memory Stick Duo" (p. 60). The movie pauses. Returns to the beginning of the (HOME) menu t [EDIT]. 2 Touch [DIVIDE]. 3 Touch the movie that you want to divide. write-protection is set to divide the movie into the scenes. Cancel the Easy Handycam ... to the still images by the other device. Deleting images (Continued) Dividing the image - b Notes • You cannot divide movies during Easy Handycam operation. Adjusts the dividing point more precisely after the dividing point has been selected with . Play and pause toggles as you press . 5 Touch ...
..."Memory Stick Duo," format the "Memory Stick Duo" (p. 60). The movie pauses. Returns to the beginning of the (HOME) menu t [EDIT]. 2 Touch [DIVIDE]. 3 Touch the movie that you want to divide. write-protection is set to divide the movie into the scenes. Cancel the Easy Handycam ... to the still images by the other device. Deleting images (Continued) Dividing the image - b Notes • You cannot divide movies during Easy Handycam operation. Adjusts the dividing point more precisely after the dividing point has been selected with . Play and pause toggles as you press . 5 Touch ...
Operating Instructions
Page 55
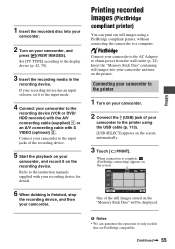
... automatically. 3 Touch [ PRINT]. Continued , 55 Editing 1 Insert the recorded disc into your camcorder, and press (VIEW IMAGES). Insert the "Memory Stick Duo" containing still images into your camcorder. 2 Turn on your camcorder and turn on the printer. If your recording device for details. 6 When dubbing is complete,...cable with your recording device has an input selector, set it on the "Memory Stick Duo" will be displayed. Set [TV TYPE] according to obtain power from the wall outlet (p. 22). One of your camcorder to the AC Adaptor to the display device (p. 42, 70). 3 ...
... automatically. 3 Touch [ PRINT]. Continued , 55 Editing 1 Insert the recorded disc into your camcorder, and press (VIEW IMAGES). Insert the "Memory Stick Duo" containing still images into your camcorder. 2 Turn on your camcorder and turn on the printer. If your recording device for details. 6 When dubbing is complete,...cable with your recording device has an input selector, set it on the "Memory Stick Duo" will be displayed. Set [TV TYPE] according to obtain power from the wall outlet (p. 22). One of your camcorder to the AC Adaptor to the display device (p. 42, 70). 3 ...
Operating Instructions
Page 56
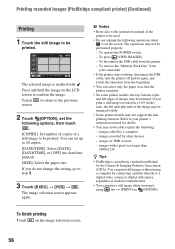
...Tips • PictBridge is an industry standard established by a computer - b Notes • Refer also to the instruction manual of 3MB or more - To remove the "Memory Stick Duo" from your printer's instruction manual for details. • You may be able to step 3. 3 Touch [EXEC] t [YES] t . images edited by...; You can print. • On some printer models, the top, bottom, right, and left and right ends of a still image to your camcorder • If the printer stops working, disconnect the USB cable, turn the printer off and on again, and restart the operation from the printer. ...
...Tips • PictBridge is an industry standard established by a computer - b Notes • Refer also to the instruction manual of 3MB or more - To remove the "Memory Stick Duo" from your printer's instruction manual for details. • You may be able to step 3. 3 Touch [EXEC] t [YES] t . images edited by...; You can print. • On some printer models, the top, bottom, right, and left and right ends of a still image to your camcorder • If the printer stops working, disconnect the USB cable, turn the printer off and on again, and restart the operation from the printer. ...


