Operating Instructions
Page 47
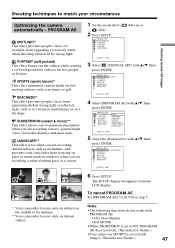
...to (Still). 2 Press SETUP. To cancel PROGRAM AE Set [PROGRAM AE] to [AUTO] in step 5. * Your camcorder focuses only on subjects in the middle to far distance. ** Your camcorder focuses only on distant subject. MANUAL SET PROGRAM AE P EFFECT D EFFECT WHT BAL AUTO SHTR (Movie) or [ ...SETUP display disappears from appearing excessively white when shooting subjects lit by strong light. Shooting techniques to match your camcorder from focusing on glass or metal mesh in windows when you are recording sunsets, general night views, fireworks displays and neon signs. MANUAL SET PROGRAM AE ...
...to (Still). 2 Press SETUP. To cancel PROGRAM AE Set [PROGRAM AE] to [AUTO] in step 5. * Your camcorder focuses only on subjects in the middle to far distance. ** Your camcorder focuses only on distant subject. MANUAL SET PROGRAM AE P EFFECT D EFFECT WHT BAL AUTO SHTR (Movie) or [ ...SETUP display disappears from appearing excessively white when shooting subjects lit by strong light. Shooting techniques to match your camcorder from focusing on glass or metal mesh in windows when you are recording sunsets, general night views, fireworks displays and neon signs. MANUAL SET PROGRAM AE ...

Operating Instructions
Page 68
...•A DVD playback application must have been installed on your computer. 2 Insert the finalized disc to your computer. Following screens are example of Microsoft Windows XP Professional. 1 Turn on your computer. •When playing back movies from the [Start] menu of your computer. My Computer screen appears.... label of your computer (page 89). Or, double-click the [My Computer] icon on a computer without a DVD drive, by connecting your camcorder to the DVD drive of the disc. The date the disc was first used is played back. A DVD playback application starts and the movie ...
...•A DVD playback application must have been installed on your computer. 2 Insert the finalized disc to your computer. Following screens are example of Microsoft Windows XP Professional. 1 Turn on your computer. •When playing back movies from the [Start] menu of your computer. My Computer screen appears.... label of your computer (page 89). Or, double-click the [My Computer] icon on a computer without a DVD drive, by connecting your camcorder to the DVD drive of the disc. The date the disc was first used is played back. A DVD playback application starts and the movie ...
Operating Instructions
Page 89
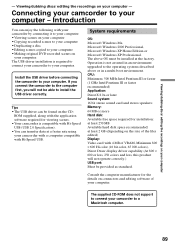
System requirements OS: Microsoft Windows Me, Microsoft Windows 2000 Professional, Microsoft Windows XP Home Edition or Microsoft Windows XP Professional. Operation is required to connect your camcorder to your computer. Consult the computer manufacturer for viewing scenes. •Your camcorder is compatible with Hi-Speed USB (USB 2.0 Specification). •You can transfer data at a faster rate using...
System requirements OS: Microsoft Windows Me, Microsoft Windows 2000 Professional, Microsoft Windows XP Home Edition or Microsoft Windows XP Professional. Operation is required to connect your camcorder to your computer. Consult the computer manufacturer for viewing scenes. •Your camcorder is compatible with Hi-Speed USB (USB 2.0 Specification). •You can transfer data at a faster rate using...

Operating Instructions
Page 90
...Computer,] then [ImageMixer] (CD-ROM Drive). When your computer is already turned on your computer. Connecting your camcorder to your computer. Introduction Notes on using Windows 2000 Professional or Windows XP Home Edition/Professional, log in as administrator. 1 Turn on , close all the software. 2 Insert... the supplied CD-ROM into the CD-ROM drive of your camcorder from Sleep status. Installing the ...
...Computer,] then [ImageMixer] (CD-ROM Drive). When your computer is already turned on your computer. Connecting your camcorder to your computer. Introduction Notes on using Windows 2000 Professional or Windows XP Home Edition/Professional, log in as administrator. 1 Turn on , close all the software. 2 Insert... the supplied CD-ROM into the CD-ROM drive of your camcorder from Sleep status. Installing the ...
Operating Instructions
Page 92
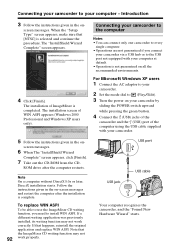
... Click [Finish]. When the "Setup Type" screen appears, make sure that [NTSC] is complete. Connecting your camcorder to the computer Notes •You can connect only one camcorder to every single computer. •Operations are not guaranteed if you need to your computer - screen messages. 6... screen of ImageMixer is not guaranteed on - The installation of WIN ASPI appears (Windows 2000 Professional and Windows XP users only). For Microsoft Windows XP users 1 Connect the AC adaptor to your camcorder. 2 Set the mode dial to the USB port not equipped with your computer ...
... Click [Finish]. When the "Setup Type" screen appears, make sure that [NTSC] is complete. Connecting your camcorder to the computer Notes •You can connect only one camcorder to every single computer. •Operations are not guaranteed if you need to your computer - screen messages. 6... screen of ImageMixer is not guaranteed on - The installation of WIN ASPI appears (Windows 2000 Professional and Windows XP users only). For Microsoft Windows XP users 1 Connect the AC adaptor to your camcorder. 2 Set the mode dial to the USB port not equipped with your computer ...

Operating Instructions
Page 94
Introduction For Microsoft Windows 2000 Professional users 1 Connect the AC adaptor to your camcorder. 2 Set the mode dial to your computer - To disconnect the USB cable See "To disconnect the USB cable" (page 96). The connection between your camcorder and the computer is completed. 94 screen ...messages. USB port USB jack USB cable Your computer recognizes the camcorder, and the "Found New Hardware" dialog box appears. 5 Follow the instructions given in the on your camcorder by sliding the POWER switch upward while pressing the green button. 4 Connect the ...
Introduction For Microsoft Windows 2000 Professional users 1 Connect the AC adaptor to your camcorder. 2 Set the mode dial to your computer - To disconnect the USB cable See "To disconnect the USB cable" (page 96). The connection between your camcorder and the computer is completed. 94 screen ...messages. USB port USB jack USB cable Your computer recognizes the camcorder, and the "Found New Hardware" dialog box appears. 5 Follow the instructions given in the on your camcorder by sliding the POWER switch upward while pressing the green button. 4 Connect the ...

Operating Instructions
Page 95
...completed. 95 If any of the computer using the USB cable supplied with your camcorder and the computer is installed correctly. "Device Manager" screen appears. 5 Make sure that "SONY DDX-A1000 USB Device" appears in DVD/CD-ROM drives, "Generic volume" ...The connection between your camcorder. "System Properties" screen appears. 3 Click [Hardware] tab. 4 Click [Device Manager]. Introduction To confirm the USB driver installation 1 Click [Start] t [Settings] t [Control Panel]. 2 Click [System]. For Microsoft Windows Me users 1 Connect the AC adaptor to your camcorder. 2 Set the mode...
...completed. 95 If any of the computer using the USB cable supplied with your camcorder and the computer is installed correctly. "Device Manager" screen appears. 5 Make sure that "SONY DDX-A1000 USB Device" appears in DVD/CD-ROM drives, "Generic volume" ...The connection between your camcorder. "System Properties" screen appears. 3 Click [Hardware] tab. 4 Click [Device Manager]. Introduction To confirm the USB driver installation 1 Click [Start] t [Settings] t [Control Panel]. 2 Click [System]. For Microsoft Windows Me users 1 Connect the AC adaptor to your camcorder. 2 Set the mode...
Operating Instructions
Page 97
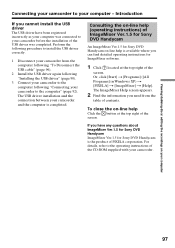
...driver have any questions about ImageMixer Ver.1.5 for Sony DVD Handycam ImageMixer Ver.1.5 for Sony DVD Handycam is available where you have been registered incorrectly as your computer was completed. Perform the following "Connecting your camcorder to the computer" (page 92). To close...screen. If you can find detailed operating instructions for Sony DVD Handycam on -line help is the product of PIXELA corporation. Connecting your camcorder to your camcorder from the table of contents. Or, click [Start] t [Programs] ([All Programs] in Windows XP) t [PIXELA] t [ImageMixer] t [Help...
...driver have any questions about ImageMixer Ver.1.5 for Sony DVD Handycam ImageMixer Ver.1.5 for Sony DVD Handycam is available where you have been registered incorrectly as your computer was completed. Perform the following "Connecting your camcorder to the computer" (page 92). To close...screen. If you can find detailed operating instructions for Sony DVD Handycam on -line help is the product of PIXELA corporation. Connecting your camcorder to your camcorder from the table of contents. Or, click [Start] t [Programs] ([All Programs] in Windows XP) t [PIXELA] t [ImageMixer] t [Help...
Operating Instructions
Page 98
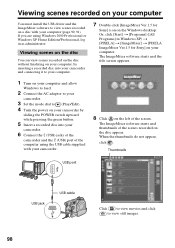
...). 4 Turn the power on your camcorder by inserting a recorded disc into your camcorder. 6 Connect the (USB) jacks of the camcorder and the (USB) port of the computer using Windows 2000 Professional or Windows XP Home Edition/Professional, log in Windows XP) t [PIXELA] t [ImageMixer] t [PIXELA ImageMixer Ver.1.5 for Sony] icon on the Windows desktop. Viewing scenes on the disc...
...). 4 Turn the power on your camcorder by inserting a recorded disc into your camcorder. 6 Connect the (USB) jacks of the camcorder and the (USB) port of the computer using Windows 2000 Professional or Windows XP Home Edition/Professional, log in Windows XP) t [PIXELA] t [ImageMixer] t [PIXELA ImageMixer Ver.1.5 for Sony] icon on the Windows desktop. Viewing scenes on the disc...
Operating Instructions
Page 99
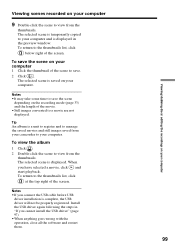
... properly registered. To return to the thumbnails list, click below right of the screen. Install the USB driver again following the steps in the preview window. To return to the thumbnails list, click at the top right of the screen. To view the album 1 Click . 2 Double-click the scene to view... from your camcorder to your computer. The selected scene is saved on your computer 1 Click the thumbnail of the scene to save the scene depending on your computer...
... properly registered. To return to the thumbnails list, click below right of the screen. Install the USB driver again following the steps in the preview window. To return to the thumbnails list, click at the top right of the screen. To view the album 1 Click . 2 Double-click the scene to view... from your camcorder to your computer. The selected scene is saved on your computer 1 Click the thumbnail of the scene to save the scene depending on your computer...
Operating Instructions
Page 100
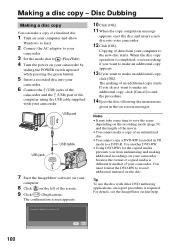
... The making additional recordings on your camcorder because the format of copied media is completed, a screen asking if you want to make an additional copy appears. 13 If you do not want to (Play/Edit). 4 Turn the power on your computer and allow Windows to load. 2 Connect the AC ...adaptor to your computer to record additional material on -screen messages. Disc Dubbing Making a disc copy You can make an additional copy, click [OK]. When the disc copy operation is different from your camcorder. 3 Set the mode ...
... The making additional recordings on your camcorder because the format of copied media is completed, a screen asking if you want to make an additional copy appears. 13 If you do not want to (Play/Edit). 4 Turn the power on your computer and allow Windows to load. 2 Connect the AC ...adaptor to your computer to record additional material on -screen messages. Disc Dubbing Making a disc copy You can make an additional copy, click [OK]. When the disc copy operation is different from your camcorder. 3 Set the mode ...

Operating Instructions
Page 101
Windows Media Player starts and the file is also saved as on your computer 2 Drag and drop the thumbnails on the storyboard in the My Documents ...
Windows Media Player starts and the file is also saved as on your computer 2 Drag and drop the thumbnails on the storyboard in the My Documents ...
Operating Instructions
Page 130
...locations subject to extremely high temperatures Under the hot sun or inside a car when the windows are not using your camcorder, the back of the LCD screen may heat up inside. •Keep your camcorder away from strong magnetic fields or mechanical vibration. •Do not touch the LCD screen...and play back a disc for about an hour). 130 Precautions Camcorder operation •Operate your camcorder on the LCD screen. How to prevent moisture condensation When you bring your camcorder from a cold place into a place warmed up by a Sony dealer before operating it is in use or not, avoid ...
...locations subject to extremely high temperatures Under the hot sun or inside a car when the windows are not using your camcorder, the back of the LCD screen may heat up inside. •Keep your camcorder away from strong magnetic fields or mechanical vibration. •Do not touch the LCD screen...and play back a disc for about an hour). 130 Precautions Camcorder operation •Operate your camcorder on the LCD screen. How to prevent moisture condensation When you bring your camcorder from a cold place into a place warmed up by a Sony dealer before operating it is in use or not, avoid ...

Operating Instructions
Page 145
... On trademarks •DVD-VIDEO, DVD-RW, and the DVD-R logo are trademarks. •InfoLITHIUM is a trademark of Sony Corporation. •PlayStation is a registered trademark of Sony Computer Entertainment Inc. •Microsoft and Windows are trademarks or registered trademarks of Microsoft Corporation in the United States and/or other countries. •Pentium is...
... On trademarks •DVD-VIDEO, DVD-RW, and the DVD-R logo are trademarks. •InfoLITHIUM is a trademark of Sony Corporation. •PlayStation is a registered trademark of Sony Computer Entertainment Inc. •Microsoft and Windows are trademarks or registered trademarks of Microsoft Corporation in the United States and/or other countries. •Pentium is...


