Operating Guide
Page 4
... adjustment of any service or repairs to the set, as opening or removing covers may expose you to normal operation. - If the set due to rain or water. - This will often require extensive work by the manufacturer that are required, be sure the service technician has used replacement parts specified by a qualified technician to perform routine safety checks (as the original parts. When the power cord or plug...
... adjustment of any service or repairs to the set, as opening or removing covers may expose you to normal operation. - If the set due to rain or water. - This will often require extensive work by the manufacturer that are required, be sure the service technician has used replacement parts specified by a qualified technician to perform routine safety checks (as the original parts. When the power cord or plug...
Operating Guide
Page 8
... this manual are captured using a digital still camera, and thus may be contrary to change without any problems. You cannot delete images once you need an NTSC system-based TV. • Television programs, films, video tapes, and other materials may appear different from a subject coming into the lens. The number value indicates the amount of light from what you see. • Design and specifications of recordings cannot be...
... this manual are captured using a digital still camera, and thus may be contrary to change without any problems. You cannot delete images once you need an NTSC system-based TV. • Television programs, films, video tapes, and other materials may appear different from a subject coming into the lens. The number value indicates the amount of light from what you see. • Design and specifications of recordings cannot be...
Operating Guide
Page 10
... Using your DVD Handycam 18 Getting Started Step 1: Checking supplied items 20 Step 2: Charging the battery pack 21 Step 3: Turning the power on a DVD player (Finalizing 40 Recording/Playback Recording 42 Playback 44 Functions used for recording/playback, etc 46 Recording To use zoom To record sound with more presence (5.1ch surround recording) (For DCR-DVD305/DVD755) To record in dark places (NightShot plus) To adjust the exposure for backlit subjects (BACK LIGHT) 10 Table of the recording picture (DCR-DVD205...
... Using your DVD Handycam 18 Getting Started Step 1: Checking supplied items 20 Step 2: Charging the battery pack 21 Step 3: Turning the power on a DVD player (Finalizing 40 Recording/Playback Recording 42 Playback 44 Functions used for recording/playback, etc 46 Recording To use zoom To record sound with more presence (5.1ch surround recording) (For DCR-DVD305/DVD755) To record in dark places (NightShot plus) To adjust the exposure for backlit subjects (BACK LIGHT) 10 Table of the recording picture (DCR-DVD205...
Operating Guide
Page 11
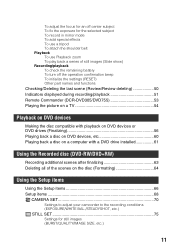
... still images (Slide show) Recording/playback To check the remaining battery To turn off the operation confirmation beep To initialize the settings (RESET) Other part names and functions Checking/Deleting the last scene (Review/Review deleting 50 Indicators displayed during recording/playback 51 Remote Commander (DCR-DVD305/DVD755 53 Playing the picture on a TV 54 Playback on DVD devices Making the disc compatible with playback on DVD devices or DVD drives (Finalizing 56 Playing back a disc on DVD devices, etc 60 Playing back a disc on a computer with a DVD drive installed 61 Using the...
... still images (Slide show) Recording/playback To check the remaining battery To turn off the operation confirmation beep To initialize the settings (RESET) Other part names and functions Checking/Deleting the last scene (Review/Review deleting 50 Indicators displayed during recording/playback 51 Remote Commander (DCR-DVD305/DVD755 53 Playing the picture on a TV 54 Playback on DVD devices Making the disc compatible with playback on DVD devices or DVD drives (Finalizing 56 Playing back a disc on DVD devices, etc 60 Playing back a disc on a computer with a DVD drive installed 61 Using the...
Operating Guide
Page 12
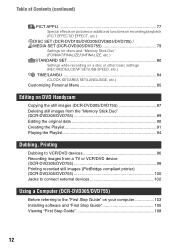
... effects on pictures or additional functions on recording/playback (PICT.EFFECT/D.EFFECT, etc.) DISC SET (DCR-DVD105/DVD205/DVD605/DVD705) / MEDIA SET (DCR-DVD305/DVD755 79 Settings for discs and "Memory Stick Duo" (FORMAT/FINALIZE/UNFINALIZE, etc.) STANDARD SET 80 Settings while recording on a disc or other basic settings (REC MODE/LCD/VF SET/USB SPEED, etc.) TIME/LANGU 84 (CLOCK SET/AREA SET/LANGUAGE, etc.) Customizing Personal Menu 85 Editing on DVD Handycam Copying the still images (DCR-DVD305/DVD755 87 Deleting still images from the "Memory Stick Duo" (DCR-DVD305...
... effects on pictures or additional functions on recording/playback (PICT.EFFECT/D.EFFECT, etc.) DISC SET (DCR-DVD105/DVD205/DVD605/DVD705) / MEDIA SET (DCR-DVD305/DVD755 79 Settings for discs and "Memory Stick Duo" (FORMAT/FINALIZE/UNFINALIZE, etc.) STANDARD SET 80 Settings while recording on a disc or other basic settings (REC MODE/LCD/VF SET/USB SPEED, etc.) TIME/LANGU 84 (CLOCK SET/AREA SET/LANGUAGE, etc.) Customizing Personal Menu 85 Editing on DVD Handycam Copying the still images (DCR-DVD305/DVD755 87 Deleting still images from the "Memory Stick Duo" (DCR-DVD305...
Operating Guide
Page 17
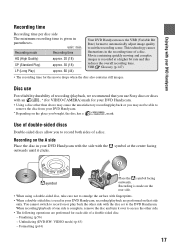
... * (for VIDEO CAMERA) mark for the movie drops when the disc also contains still images. Formatting (p.64) 17 Enjoying with the disc set to the DVD Handycam. Recording on that you bought, the disc has a mark. This technology causes fluctuations in your DVD Handycam Recording time Recording time per disc side The minimum recording time is complete, remove the disc and turn it clicks. Recording mode Recording time HQ (High Quality) approx. 20 (18) SP (Standard Play) approx. 30...
... * (for VIDEO CAMERA) mark for the movie drops when the disc also contains still images. Formatting (p.64) 17 Enjoying with the disc set to the DVD Handycam. Recording on that you bought, the disc has a mark. This technology causes fluctuations in your DVD Handycam Recording time Recording time per disc side The minimum recording time is complete, remove the disc and turn it clicks. Recording mode Recording time HQ (High Quality) approx. 20 (18) SP (Standard Play) approx. 30...

Operating Guide
Page 18
... do after recording? You can delete or edit You can also connect it to 32.) Select the disc that best suits your needs. recorded (p.50). 3Viewing on a various DVD devices The disc can be played back on various DVD devices * Select the mode on the right page 18 Using your DVD Handycam 1Preparing (See page 20 to a TV for viewing (p.54). Repeated use of a disc To save recorded To use one disc images repeatedly...
... do after recording? You can delete or edit You can also connect it to 32.) Select the disc that best suits your needs. recorded (p.50). 3Viewing on a various DVD devices The disc can be played back on various DVD devices * Select the mode on the right page 18 Using your DVD Handycam 1Preparing (See page 20 to a TV for viewing (p.54). Repeated use of a disc To save recorded To use one disc images repeatedly...
Operating Guide
Page 23
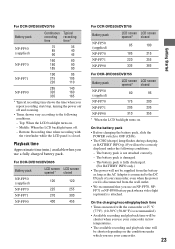
...°F) is fully discharged. (For BATTERY INFO only.) • The power will not be correctly displayed under which you use your camcorder in low temperatures. • The available recording and playback time will be shorter when you use your camcorder. 23 Getting Started Playback time Approximate time (min.) available when you use a fully charged battery pack. Top: When the LCD backlight turns on the conditions under the following...
...°F) is fully discharged. (For BATTERY INFO only.) • The power will not be correctly displayed under which you use your camcorder in low temperatures. • The available recording and playback time will be shorter when you use your camcorder. 23 Getting Started Playback time Approximate time (min.) available when you use a fully charged battery pack. Top: When the LCD backlight turns on the conditions under the following...
Operating Guide
Page 30
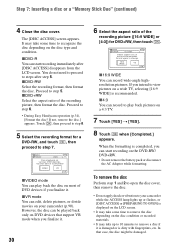
... the recording picture ([16:9 WIDE] or [4:3]) for a DVD-RW, and touch , then proceed to step 7. Proceed to step 5. FORMAT : VIDEO Can playback on the disc condition or recorded materials. • It may take up or flashes, or [DISC ACCESS] or [PREPARING TO OPEN] is recommended. xVR mode You can edit, delete pictures, or divide movies on your camcorder while the ACCESS lamp lights up to 10 minutes to change. 16...
... the recording picture ([16:9 WIDE] or [4:3]) for a DVD-RW, and touch , then proceed to step 7. Proceed to step 5. FORMAT : VIDEO Can playback on the disc condition or recorded materials. • It may take up or flashes, or [DISC ACCESS] or [PREPARING TO OPEN] is recommended. xVR mode You can edit, delete pictures, or divide movies on your camcorder while the ACCESS lamp lights up to 10 minutes to change. 16...

Operating Guide
Page 32
.... • You cannot change [REC MODE] (p.80)/ with a DVD-R/DVD-RW (VIDEO mode)/ DVD+RW inserted while 4:3 is set . MODE ON 32 * When viewing on the zoom position. • Available recording time may appear rough depending on a DVD-R/DVDRW (VIDEO mode). - To play back pictures after connecting your camcorder to a TV Set [TV TYPE] to [16:9] or [4:3] according to your device. Step 8: Selecting the aspect ratio (16:9 or 4:3) of the recording picture (DCR-DVD205/DVD305/ DVD705/DVD755) By...
.... • You cannot change [REC MODE] (p.80)/ with a DVD-R/DVD-RW (VIDEO mode)/ DVD+RW inserted while 4:3 is set . MODE ON 32 * When viewing on the zoom position. • Available recording time may appear rough depending on a DVD-R/DVDRW (VIDEO mode). - To play back pictures after connecting your camcorder to a TV Set [TV TYPE] to [16:9] or [4:3] according to your device. Step 8: Selecting the aspect ratio (16:9 or 4:3) of the recording picture (DCR-DVD205/DVD305/ DVD705/DVD755) By...
Operating Guide
Page 34
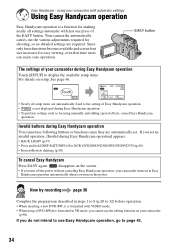
... settings such as focusing manually and adding special effects, cancel Easy Handycam operation. If you cannot use Easy Handycam operation, go to display the available setup items. For details on your camcorder turns on in VR mode, you do not intend to use the editing function on setup, See page 66. using your camcorder with VIDEO mode. • When using a DVD-RW disc formatted in Easy Handycam operation automatically when you turn off the power without canceling Easy Handycam operation...
... settings such as focusing manually and adding special effects, cancel Easy Handycam operation. If you cannot use Easy Handycam operation, go to display the available setup items. For details on your camcorder turns on in VR mode, you do not intend to use the editing function on setup, See page 66. using your camcorder with VIDEO mode. • When using a DVD-RW disc formatted in Easy Handycam operation automatically when you turn off the power without canceling Easy Handycam operation...
Operating Guide
Page 39
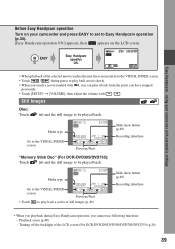
... show button (p.49) Recording date/time • When you playback during pause to Easy Handycam operation (p.34). [Easy Handycam operation ON.] appears, then appears on your camcorder with / . Before Easy Handycam operation Turn on the LCD screen. Playback zoom (p.48) - using your camcorder and press EASY to set to play back movie slowly. • When you touch a movie marked with i, you have stopped previously. • Touch [SETUP] t [VOLUME], then adjust the volume with automatic settings • When playback of the LCD screen (For DCR-DVD205...
... show button (p.49) Recording date/time • When you playback during pause to Easy Handycam operation (p.34). [Easy Handycam operation ON.] appears, then appears on your camcorder with / . Before Easy Handycam operation Turn on the LCD screen. Playback zoom (p.48) - using your camcorder and press EASY to set to play back movie slowly. • When you touch a movie marked with i, you have stopped previously. • Touch [SETUP] t [VOLUME], then adjust the volume with automatic settings • When playback of the LCD screen (For DCR-DVD205...

Operating Guide
Page 49
... the selected image. Recording/Playback 1 Play back the picture you press this button once, BATTERY INFO appears on the screen for date and time. (Setup items customized on Personal Menu are not initialized.) Other part names and functions 9 Built-in the center of still images (Slide show 6 Touch on the still image playback screen. To cancel, touch [END]. • You cannot change the zoom speed with T (Telephoto). To turn off the operation confirmation...
... the selected image. Recording/Playback 1 Play back the picture you press this button once, BATTERY INFO appears on the screen for date and time. (Setup items customized on Personal Menu are not initialized.) Other part names and functions 9 Built-in the center of still images (Slide show 6 Touch on the still image playback screen. To cancel, touch [END]. • You cannot change the zoom speed with T (Telephoto). To turn off the operation confirmation...
Operating Guide
Page 75
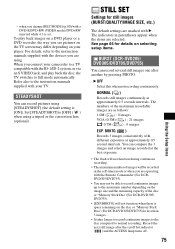
... ( ) : 8 images EXP. The numbers of the disc or "Memory Stick Duo"(For DCR-DVD305/ DVD755). • [EXP.BRKTG] will be able to record continuous images up to normal recording. BRKTG ( ) Records 3 images consecutively with the devices you change [REC MODE] (p.80)/with your TV. Record the next still image after another by pressing PHOTO. when you are selected. To play back the disc, the TV switches to the instruction manuals supplied with a DVD-R/DVD-RW (VIDEO mode)/DVD...
... ( ) : 8 images EXP. The numbers of the disc or "Memory Stick Duo"(For DCR-DVD305/ DVD755). • [EXP.BRKTG] will be able to record continuous images up to normal recording. BRKTG ( ) Records 3 images consecutively with the devices you change [REC MODE] (p.80)/with your TV. Record the next still image after another by pressing PHOTO. when you are selected. To play back the disc, the TV switches to the instruction manuals supplied with a DVD-R/DVD-RW (VIDEO mode)/DVD...
Operating Guide
Page 96
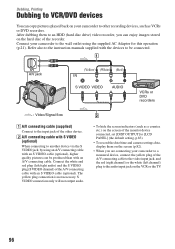
... device connected, set [DISP OUTPUT] to [LCD PANEL] (the default setting, p.83). • To record the date/time and camera settings data, display them to the audio input jack on the VCR or the TV. 96 The yellow plug connection is not necessary. Dubbing, Printing Dubbing to VCR/DVD devices You can copy pictures played back on your camcorder to another device via the S VIDEO jack, by using the supplied AC Adaptor for this operation (p.21). Connect your camcorder to a monaural device, connect...
... device connected, set [DISP OUTPUT] to [LCD PANEL] (the default setting, p.83). • To record the date/time and camera settings data, display them to the audio input jack on the VCR or the TV. 96 The yellow plug connection is not necessary. Dubbing, Printing Dubbing to VCR/DVD devices You can copy pictures played back on your camcorder to another device via the S VIDEO jack, by using the supplied AC Adaptor for this operation (p.21). Connect your camcorder to a monaural device, connect...
Operating Guide
Page 101
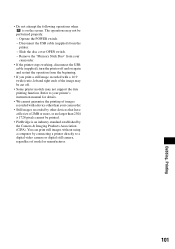
... operations may not support the date printing function. Disconnect the USB cable (supplied) from the beginning. • If you print a still image recorded with a device other devices that have a file size of the image may be performed properly. - Operate the POWER switch. - • Do not attempt the following operations when is an industry standard established by the Camera & Imaging Products Association (CIPA). Refer to a digital video camera or digital still camera, regardless of images recorded with...
... operations may not support the date printing function. Disconnect the USB cable (supplied) from the beginning. • If you print a still image recorded with a device other devices that have a file size of the image may be performed properly. - Operate the POWER switch. - • Do not attempt the following operations when is an industry standard established by the Camera & Imaging Products Association (CIPA). Refer to a digital video camera or digital still camera, regardless of images recorded with...
Operating Guide
Page 103
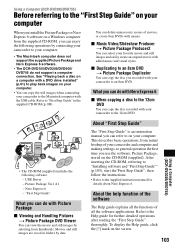
... copy the still images when connecting your camcorder to the Macintosh computer with the USB cable. You can copy the disc you recorded with your camcorder to an 8cm DVD. Picture Package Ver.1.8.1 - x Duplicating to an 8cm DVD t Picture Package Duplicator You can delete unnecessary scenes of movies, or create 8cm DVDs with menus. Movies and still images are saved in the supplied CD-ROM (p.108). About the help function of the software The Help guide...
... copy the still images when connecting your camcorder to the Macintosh computer with the USB cable. You can copy the disc you recorded with your camcorder to an 8cm DVD. Picture Package Ver.1.8.1 - x Duplicating to an 8cm DVD t Picture Package Duplicator You can delete unnecessary scenes of movies, or create 8cm DVDs with menus. Movies and still images are saved in the supplied CD-ROM (p.108). About the help function of the software The Help guide...
Operating Guide
Page 108
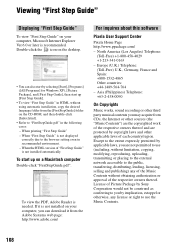
... Music works, sound recording or other third party musical contents you are protected by implication, estoppel or otherwise, any of the Music Contents without limitation, copying, modifying, reproducing, uploading, transmitting or placing to the external network accessible to "FirstStepGuide.pdf" in recommended environment. - Except to the extent expressly permitted by selecting [Start], [Programs] ([All Programs] for Windows XP), [Picture Package...
... Music works, sound recording or other third party musical contents you are protected by implication, estoppel or otherwise, any of the Music Contents without limitation, copying, modifying, reproducing, uploading, transmitting or placing to the external network accessible to "FirstStepGuide.pdf" in recommended environment. - Except to the extent expressly permitted by selecting [Start], [Programs] ([All Programs] for Windows XP), [Picture Package...

Operating Guide
Page 135
... compatibility with MagicGate) - a*2*3 "MagicGate Memory Stick Duo" *1 "Memory Stick PRO" "Memory Stick PRO Duo" *1 a*3 - Compensation for replacement while your camcorder. a*2*3 *1 A "Memory Stick Duo" is about the half size of a computer. DSC00001.JPG: This file name appears on the "Memory Stick Duo" (while the ACCESS lamp is lit or flashing). • If you slide the write-protect tab on the hard disk of a standard "Memory Stick" in your camcorder is reading or writing image files on the display...
... compatibility with MagicGate) - a*2*3 "MagicGate Memory Stick Duo" *1 "Memory Stick PRO" "Memory Stick PRO Duo" *1 a*3 - Compensation for replacement while your camcorder. a*2*3 *1 A "Memory Stick Duo" is about the half size of a computer. DSC00001.JPG: This file name appears on the "Memory Stick Duo" (while the ACCESS lamp is lit or flashing). • If you slide the write-protect tab on the hard disk of a standard "Memory Stick" in your camcorder is reading or writing image files on the display...
Operating Guide
Page 150
... Battery Recordable still images ........76 Recording 36, 42 Recording format............16, 30 Recording time 22 REC MODE 80 REMAINING 83 Remaining battery 51 Remaining display Battery 49 Disc 51 "Memory Stick Duo" ....49 Remote Commander 53 Remote sensor 49 RESET 49 Review 50 Review deleting 50 S Self-diagnosis display.........127 SELF-TIMER 73 SEPIA 78 Setup 66 150 CAMERA SET 70 MEDIA SET 79 Personal Menu ........ 66, 85 PICT.APPLI 77 Setup items 68 STANDARD SET......... 80 STILL SET 75 TIME/LANGU 84 Using...
... Battery Recordable still images ........76 Recording 36, 42 Recording format............16, 30 Recording time 22 REC MODE 80 REMAINING 83 Remaining battery 51 Remaining display Battery 49 Disc 51 "Memory Stick Duo" ....49 Remote Commander 53 Remote sensor 49 RESET 49 Review 50 Review deleting 50 S Self-diagnosis display.........127 SELF-TIMER 73 SEPIA 78 Setup 66 150 CAMERA SET 70 MEDIA SET 79 Personal Menu ........ 66, 85 PICT.APPLI 77 Setup items 68 STANDARD SET......... 80 STILL SET 75 TIME/LANGU 84 Using...


