
Operating Guide
Page 2
... located on the bottom. You can help preserve our environment by returning your used rechargeable batteries to the presence of rechargeable batteries, call : Sony Customer Information Center 1-800-222-SONY (7669). Model No. If you have any questions about this product, you may call ...the user to the collection and recycling location nearest you call upon your Sony dealer regarding recycling of important operating and maintenance (servicing) instructions in the literature accompanying the appliance. DCR-DVD Serial No. Serial No. This symbol is intended to alert the user...
... located on the bottom. You can help preserve our environment by returning your used rechargeable batteries to the presence of rechargeable batteries, call : Sony Customer Information Center 1-800-222-SONY (7669). Model No. If you have any questions about this product, you may call ...the user to the collection and recycling location nearest you call upon your Sony dealer regarding recycling of important operating and maintenance (servicing) instructions in the literature accompanying the appliance. DCR-DVD Serial No. Serial No. This symbol is intended to alert the user...
Operating Guide
Page 3
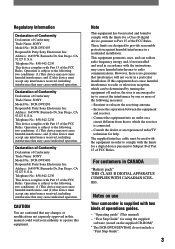
... subject to Subpart B of Part 15 of the FCC Rules. Notes on use Your camcorder is encouraged to try to correct the interference by turning the equipment off and on, ...guides. - However, there is no guarantee that to Part 15 of Conformity Trade Name: SONY Model No.: DCR-DVD203 Responsible Party:Sony Electronics Inc. "First Step Guide" for a digital device pursuant to the following two ...protection against harmful interference in CANADA "Battery pack" THIS CLASS B DIGITAL APPARATUS COMPLIES WITH CANADIAN ICES003. For customers in a residential installation....
... subject to Subpart B of Part 15 of the FCC Rules. Notes on use Your camcorder is encouraged to try to correct the interference by turning the equipment off and on, ...guides. - However, there is no guarantee that to Part 15 of Conformity Trade Name: SONY Model No.: DCR-DVD203 Responsible Party:Sony Electronics Inc. "First Step Guide" for a digital device pursuant to the following two ...protection against harmful interference in CANADA "Battery pack" THIS CLASS B DIGITAL APPARATUS COMPLIES WITH CANADIAN ICES003. For customers in a residential installation....
Operating Guide
Page 4
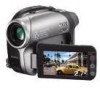
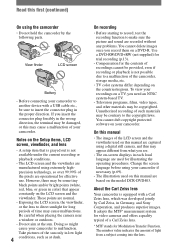
...model DCR-DVD403. Notes on the LCD screen and the viewfinder. However, there may be damaged, or this first (continued) On using the camcorder • Do not hold the camcorder by Carl Zeiss, in Germany, and Sony ...DVD-R. Use a DVD-RW/DVD+RW (not supplied) for trial recording (p.13). • Compensation for long periods of time may cause malfunctions. About the Carl Zeiss lens Your camcorder is not possible due to direct sunlight for the contents of recordings cannot be copyrighted. View finder LCD screen Battery • Before connecting your camcorder...
...model DCR-DVD403. Notes on the LCD screen and the viewfinder. However, there may be damaged, or this first (continued) On using the camcorder • Do not hold the camcorder by Carl Zeiss, in Germany, and Sony ...DVD-R. Use a DVD-RW/DVD+RW (not supplied) for trial recording (p.13). • Compensation for long periods of time may cause malfunctions. About the Carl Zeiss lens Your camcorder is not possible due to direct sunlight for the contents of recordings cannot be copyrighted. View finder LCD screen Battery • Before connecting your camcorder...
Operating Guide
Page 6
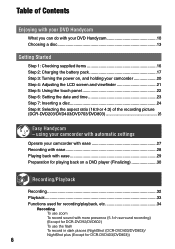
...Except for DCR-DVD403/DVD803)) 6 Table of Contents Enjoying with your DVD Handycam What you can do with your DVD Handycam 10 Choosing a disc 13 Getting Started Step 1: Checking supplied items 16 Step 2: Charging the battery pack 17 Step 3: Turning the power on, and holding your camcorder with ...camcorder 20 Step 4: Adjusting the LCD screen and viewfinder 21 Step 5: Using the touch panel 22 Step 6: Setting the date and time 23 Step 7: Inserting a disc 24 Step 8: Selecting the aspect ratio (16:9 or 4:3) of the recording picture (DCR-DVD203/DVD403/DVD703/DVD803 26 Easy Handycam...
...Except for DCR-DVD403/DVD803)) 6 Table of Contents Enjoying with your DVD Handycam What you can do with your DVD Handycam 10 Choosing a disc 13 Getting Started Step 1: Checking supplied items 16 Step 2: Charging the battery pack 17 Step 3: Turning the power on, and holding your camcorder with ...camcorder 20 Step 4: Adjusting the LCD screen and viewfinder 21 Step 5: Using the touch panel 22 Step 6: Setting the date and time 23 Step 7: Inserting a disc 24 Step 8: Selecting the aspect ratio (16:9 or 4:3) of the recording picture (DCR-DVD203/DVD403/DVD703/DVD803 26 Easy Handycam...
Operating Guide
Page 7
... images in sequence To use PB zoom Recording/playback To check the remaining battery To turn off the operation confirmation beep To initialize the settings Other...for DCR-DVD92/DVD602 41 Playing the picture on a TV 42 Playback on DVD devices Making the disc compatible with playback on DVD players or DVD drives (Finalizing 44 Playing back a disc on DVD ...DVD-RW/DVD+RW) Recording additional scenes after finalizing 50 Deleting all of the scenes on the disc (Formatting 51 Using the Setup items Using the Setup items 52 Setup items 54 CAMERA SET 56 Settings to adjust your camcorder...
... images in sequence To use PB zoom Recording/playback To check the remaining battery To turn off the operation confirmation beep To initialize the settings Other...for DCR-DVD92/DVD602 41 Playing the picture on a TV 42 Playback on DVD devices Making the disc compatible with playback on DVD players or DVD drives (Finalizing 44 Playing back a disc on DVD ...DVD-RW/DVD+RW) Recording additional scenes after finalizing 50 Deleting all of the scenes on the disc (Formatting 51 Using the Setup items Using the Setup items 52 Setup items 54 CAMERA SET 56 Settings to adjust your camcorder...
Operating Guide
Page 9
Troubleshooting Troubleshooting 87 Warning indicators and messages 101 Additional Information Using your camcorder abroad 105 About the "InfoLITHIUM" battery pack 107 Maintenance and precautions 109 Using the Strap Belt as a wrist strap 113 Attaching the Shoulder Strap 113 Specifications 114 Index...117 9
Troubleshooting Troubleshooting 87 Warning indicators and messages 101 Additional Information Using your camcorder abroad 105 About the "InfoLITHIUM" battery pack 107 Maintenance and precautions 109 Using the Strap Belt as a wrist strap 113 Attaching the Shoulder Strap 113 Specifications 114 Index...117 9
Operating Guide
Page 16
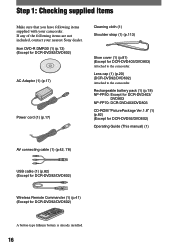
...) Attached to the camcorder. If any of the following items supplied with your nearest Sony dealer. 8cm DVD-R DMR30 (1) (p.13) (Except for DCR-DVD92/DVD602) AC Adaptor (1) (p.17) Power cord (1) (p.17) Cleaning cloth (1) Shoulder strap (1) (p.113) Shoe cover (1) (p.81) (Except for DCR-DVD92/DVD602) A button-type lithium battery is already installed. 16 Rechargeable battery pack (1) (p.18) NP...
...) Attached to the camcorder. If any of the following items supplied with your nearest Sony dealer. 8cm DVD-R DMR30 (1) (p.13) (Except for DCR-DVD92/DVD602) AC Adaptor (1) (p.17) Power cord (1) (p.17) Cleaning cloth (1) Shoulder strap (1) (p.113) Shoe cover (1) (p.81) (Except for DCR-DVD92/DVD602) A button-type lithium battery is already installed. 16 Rechargeable battery pack (1) (p.18) NP...
Operating Guide
Page 17
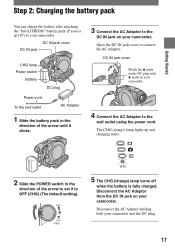
... power cord. Disconnect the AC Adaptor from the DC IN jack on your camcorder. DC IN jack cover DC IN jack CHG lamp Power switch Battery DC plug Power cord To the wall outlet AC Adaptor 1 Slide the battery pack in the direction of the arrow until it to OFF (CHG) ...(The default setting). Getting Started Step 2: Charging the battery pack You can charge the battery after attaching the "InfoLITHIUM" battery pack (P series) (p.107) to your camcorder and the DC plug. 17 MODE ON OFF (CHG) POWER CHG 5 The CHG (charge) lamp turns off...
... power cord. Disconnect the AC Adaptor from the DC IN jack on your camcorder. DC IN jack cover DC IN jack CHG lamp Power switch Battery DC plug Power cord To the wall outlet AC Adaptor 1 Slide the battery pack in the direction of the arrow until it to OFF (CHG) ...(The default setting). Getting Started Step 2: Charging the battery pack You can charge the battery after attaching the "InfoLITHIUM" battery pack (P series) (p.107) to your camcorder and the DC plug. 17 MODE ON OFF (CHG) POWER CHG 5 The CHG (charge) lamp turns off...
Operating Guide
Page 18
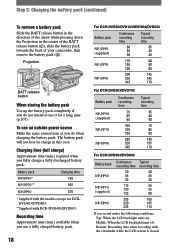
... recording time 80 85 90 170 185 190 300 335 345 Typical recording time 35 40 40 80 90 90 145 165 170 For DCR-DVD203/DVD703 Battery pack NP-FP50 (supplied) NP-FP70 NP-FP90 Continuous recording time 75 85 90 160 180 190 290 320 345 Typical recording time ...a long time (p.107). Middle: When the LCD backlight turns off. The battery pack will not lose its charge in the center of the BATT release button (), slide the battery pack towards the back of your camcorder, then remove the battery pack (). Recording time Approximate time (min.) available when you use it...
... recording time 80 85 90 170 185 190 300 335 345 Typical recording time 35 40 40 80 90 90 145 165 170 For DCR-DVD203/DVD703 Battery pack NP-FP50 (supplied) NP-FP70 NP-FP90 Continuous recording time 75 85 90 160 180 190 290 320 345 Typical recording time ...a long time (p.107). Middle: When the LCD backlight turns off. The battery pack will not lose its charge in the center of the BATT release button (), slide the battery pack towards the back of your camcorder, then remove the battery pack (). Recording time Approximate time (min.) available when you use it...
Operating Guide
Page 19
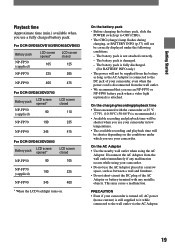
...closed 125 NP-FP70 225 265 NP-FP90 400 475 For DCR-DVD203/DVD703 Battery pack NP-FP50 (supplied) LCD screen opened* 90 LCD screen closed 110 NP-FP70 190 235 NP-FP90 345 415 For DCR-DVD403/DVD803 Battery pack LCD screen opened* LCD screen closed NP-FP50 90 105... Disconnect the AC Adaptor from the wall outlet immediately if any metallic objects. This may cause a malfunction. PRECAUTION • Even if your camcorder. The battery pack is still supplied to it while connected to the wall outlet via the AC Adaptor. 19 On the charging/recording/playback time •...
...closed 125 NP-FP70 225 265 NP-FP90 400 475 For DCR-DVD203/DVD703 Battery pack NP-FP50 (supplied) LCD screen opened* 90 LCD screen closed 110 NP-FP70 190 235 NP-FP90 345 415 For DCR-DVD403/DVD803 Battery pack LCD screen opened* LCD screen closed NP-FP50 90 105... Disconnect the AC Adaptor from the wall outlet immediately if any metallic objects. This may cause a malfunction. PRECAUTION • Even if your camcorder. The battery pack is still supplied to it while connected to the wall outlet via the AC Adaptor. 19 On the charging/recording/playback time •...
Operating Guide
Page 20
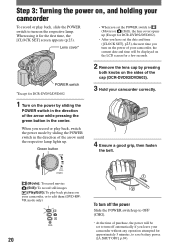
... screen appears (p.23). When using it for DCR-DVD92/DVD602 2 Remove the lens cap by pressing both knobs on the sides of the cap (DCR-DVD92/DVD602). 3 Hold your camcorder correctly. 1 Turn on the power by sliding...respective lamp. Step 3: Turning the power on, and holding your camcorder To record or play back pictures on your camcorder, or to edit them (DVD-RW: VR mode only) CHG 20 To turn off the power... time you turn on the power of your camcorder, the current date and time will be displayed on the LCD screen for approximately 5 minutes, to save battery power. ([A.SHUT OFF], p.69).
... screen appears (p.23). When using it for DCR-DVD92/DVD602 2 Remove the lens cap by pressing both knobs on the sides of the cap (DCR-DVD92/DVD602). 3 Hold your camcorder correctly. 1 Turn on the power by sliding...respective lamp. Step 3: Turning the power on, and holding your camcorder To record or play back pictures on your camcorder, or to edit them (DVD-RW: VR mode only) CHG 20 To turn off the power... time you turn on the power of your camcorder, the current date and time will be displayed on the LCD screen for approximately 5 minutes, to save battery power. ([A.SHUT OFF], p.69).
Operating Guide
Page 21
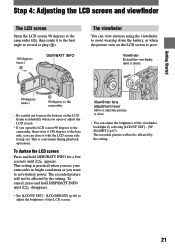
... careful not to press the buttons on the LCD screen is practical when you use your camcorder in bright conditions or you can close it 180 degrees to the lens side, you want to save battery power. Getting Started Step 4: Adjusting the LCD screen and viewfinder The LCD screen Open... the LCD screen 90 degrees to the camcorder (), then rotate it to the best angle to record or play (...
... careful not to press the buttons on the LCD screen is practical when you use your camcorder in bright conditions or you can close it 180 degrees to the lens side, you want to save battery power. Getting Started Step 4: Adjusting the LCD screen and viewfinder The LCD screen Open... the LCD screen 90 degrees to the camcorder (), then rotate it to the best angle to record or play (...
Operating Guide
Page 23
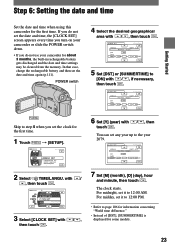
In that case, charge the rechargeable battery and then set the date and time, the [CLOCK SET] screen appears every time you turn on your camcorder or slide the POWER switch down. • If you do not set the date and time again (p.111). POWER switch 4 Select the desired geographical area ... midday, set it to the year 2079. CLOCK SET -:--:-- Step 6: Setting the date and time Getting Started Set the date and time when using this camcorder for about 3 months, the built-in rechargeable battery gets discharged and the date and time settings may be cleared from the memory.
In that case, charge the rechargeable battery and then set the date and time, the [CLOCK SET] screen appears every time you turn on your camcorder or slide the POWER switch down. • If you do not set the date and time again (p.111). POWER switch 4 Select the desired geographical area ... midday, set it to the year 2079. CLOCK SET -:--:-- Step 6: Setting the date and time Getting Started Set the date and time when using this camcorder for about 3 months, the built-in rechargeable battery gets discharged and the date and time settings may be cleared from the memory.
Operating Guide
Page 25
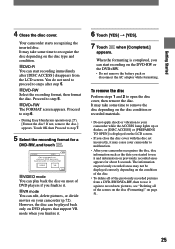
... it. VR mode You can start recording on DVD players that support VR mode when you finalize it may take some time to malfunction. • After your camcorder (p.72). Proceed to step 6. • During Easy Handycam operation (p.27), [Format the disc? Getting Started 4 ...Close the disc cover. Your camcorder starts recognizing the inserted disc. If not, remove the disc.] appears. It may not be played back only on the DVD-RW or the DVD+RW. • Do not remove the battery pack ...
... it. VR mode You can start recording on DVD players that support VR mode when you finalize it may take some time to malfunction. • After your camcorder (p.72). Proceed to step 6. • During Easy Handycam operation (p.27), [Format the disc? Getting Started 4 ...Close the disc cover. Your camcorder starts recognizing the inserted disc. If not, remove the disc.] appears. It may not be played back only on the DVD-RW or the DVD+RW. • Do not remove the battery pack ...
Operating Guide
Page 35
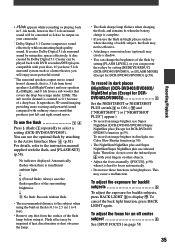
...charging the flash, and remains lit when the battery charge is hard to display . To record in dark places (NightShot (DCR-DVD403/DVD803)/ NightShot plus use these functions in bright...refer to the instruction manual supplied with your discs. You can be played back with DVD recorders/DVD players compatible with ordinary stereo sound that covers the deep bass range under 120Hz. A...(Except for an off center subject See [SPOT FOCUS] on your camcorder. * Dolby Digital 5.1 Creater compresses sound effectively while maintaining high quality sound. To cancel the ...
...charging the flash, and remains lit when the battery charge is hard to display . To record in dark places (NightShot (DCR-DVD403/DVD803)/ NightShot plus use these functions in bright...refer to the instruction manual supplied with your discs. You can be played back with DVD recorders/DVD players compatible with ordinary stereo sound that covers the deep bass range under 120Hz. A...(Except for an off center subject See [SPOT FOCUS] on your camcorder. * Dolby Digital 5.1 Creater compresses sound effectively while maintaining high quality sound. To cancel the ...
Operating Guide
Page 37
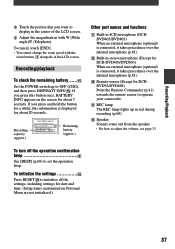
... settings, including settings for date and time. (Setup items customized on the screen for about 20 seconds. Recording capacity (approx.) Remaining battery (approx.) Other part names and functions Built-in 4CH microphone (DCRDVD403/DVD803) When an external microphone (optional) is connected,...microphone (p.81). Built-in stereo microphone (Except for DCR-DVD403/DVD803) When an external microphone (optional) is displayed for DCRDVD92/DVD602) Point the Remote Commander (p.41) towards the remote sensor to operate your camcorder. REC lamp The REC lamp lights up to ...
... settings, including settings for date and time. (Setup items customized on the screen for about 20 seconds. Recording capacity (approx.) Remaining battery (approx.) Other part names and functions Built-in 4CH microphone (DCRDVD403/DVD803) When an external microphone (optional) is connected,...microphone (p.81). Built-in stereo microphone (Except for DCR-DVD403/DVD803) When an external microphone (optional) is displayed for DCRDVD92/DVD602) Point the Remote Commander (p.41) towards the remote sensor to operate your camcorder. REC lamp The REC lamp lights up to ...
Operating Guide
Page 39
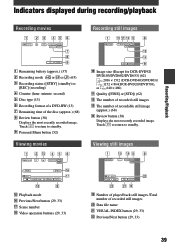
... movies Image size (Except for DCR-DVD92/ DVD103/DVD602/DVD653) (62) 2016 × 1512 (DCR-DVD403/DVD803)/ 1152 × 864(DCR-DVD203/DVD703), or 640 × 480) &#... standby. Indicators displayed during recording/playback Recording movies Recording still images Recording/Playback Remaining battery (approx.) (37) Recording mode ( or or ...58158; Counter (hour: minute: second) Disc type (13) Recording format of a DVD-RW (13) Remaining time of recorded still images Data file name ...
... movies Image size (Except for DCR-DVD92/ DVD103/DVD602/DVD653) (62) 2016 × 1512 (DCR-DVD403/DVD803)/ 1152 × 864(DCR-DVD203/DVD703), or 640 × 480) &#... standby. Indicators displayed during recording/playback Recording movies Recording still images Recording/Playback Remaining battery (approx.) (37) Recording mode ( or or ...58158; Counter (hour: minute: second) Disc type (13) Recording format of a DVD-RW (13) Remaining time of recorded still images Data file name ...
Operating Guide
Page 41
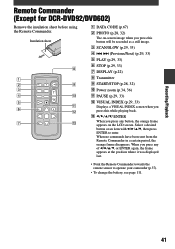
... Commander towards the remote sensor to enter. Select a desired button or an item with then press ENTER to operate your camcorder (p.37). • To change the battery, see page 111. 41 When no commands have been sent from the Remote Commander in a certain period, the orange ...frame disappears. Insulation sheet DATA CODE (p.67) PHOTO (p.28, 32) The on the LCD screen. Recording/Playback Remote Commander (Except for DCR-DVD92/DVD602...
... Commander towards the remote sensor to enter. Select a desired button or an item with then press ENTER to operate your camcorder (p.37). • To change the battery, see page 111. 41 When no commands have been sent from the Remote Commander in a certain period, the orange ...frame disappears. Insulation sheet DATA CODE (p.67) PHOTO (p.28, 32) The on the LCD screen. Recording/Playback Remote Commander (Except for DCR-DVD92/DVD602...
Operating Guide
Page 57
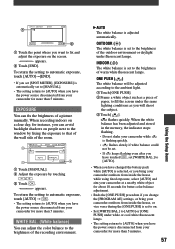
... setting returns to [AUTO]. • When you have changed the battery pack while [AUTO] is selected, or you bring your camcorder outdoors from inside the house while using fixed exposure, select [AUTO] and aim your camcorder at a nearby white object for about 10 seconds for better color ... will shoot the subject. Touch [ ]. flashes quickly. Touch the point where you have the power source disconnected from your camcorder for more than 5 minutes. appears. To return the setting to automatic exposure, touch [AUTO][END]. • If you set [SPOT METER],...
... setting returns to [AUTO]. • When you have changed the battery pack while [AUTO] is selected, or you bring your camcorder outdoors from inside the house while using fixed exposure, select [AUTO] and aim your camcorder at a nearby white object for about 10 seconds for better color ... will shoot the subject. Touch [ ]. flashes quickly. Touch the point where you have the power source disconnected from your camcorder for more than 5 minutes. appears. To return the setting to automatic exposure, touch [AUTO][END]. • If you set [SPOT METER],...
Operating Guide
Page 66
... selected for the setting. • When you select [BRIGHT], battery life is not suitable for recording conversations. • The setting returns to [NORMAL] when you have the power source disconnected from your camcorder for recording sound. You attach an external microphone (optional) to ...sub sound or the right channel sound. • The setting returns to [STEREO] when you have the power source disconnected from your camcorder for DCR-DVD92/DVD602 4CH MIC Records 4 channel sound, front L/R and rear L/R, converting them into the same level. STEREO Records normal...
... selected for the setting. • When you select [BRIGHT], battery life is not suitable for recording conversations. • The setting returns to [NORMAL] when you have the power source disconnected from your camcorder for recording sound. You attach an external microphone (optional) to ...sub sound or the right channel sound. • The setting returns to [STEREO] when you have the power source disconnected from your camcorder for DCR-DVD92/DVD602 4CH MIC Records 4 channel sound, front L/R and rear L/R, converting them into the same level. STEREO Records normal...


