
Operating Instructions
Page 2
... relocate the receiving antenna. - Install this manual, ™ and ® marks are cautioned that to which can be unplugged from that any changes or modifications not expressly approved in this manual could void your authority to operate this equipment does cause harmful interference to radio or television reception, which the receiver is no guarantee that the power cord can radiate radio frequency energy...
... relocate the receiving antenna. - Install this manual, ™ and ® marks are cautioned that to which can be unplugged from that any changes or modifications not expressly approved in this manual could void your authority to operate this equipment does cause harmful interference to radio or television reception, which the receiver is no guarantee that the power cord can radiate radio frequency energy...

Operating Instructions
Page 3
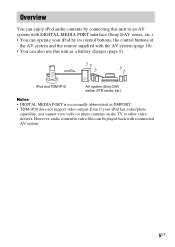
... iPod Dock Adapters are as follows. will need to be purchased separately. • This product has been designed specifically to work with iPod and has US been certified to use the latest software before you use it. iPod nano 1st generation iPod 4th generation (color display) iPod 4th generation iPod mini 3US You can not connect any other iPod models, a compatible Dock Adapter from Apple Inc. When you use other portable audio players. • Sony...
... iPod Dock Adapters are as follows. will need to be purchased separately. • This product has been designed specifically to work with iPod and has US been certified to use the latest software before you use it. iPod nano 1st generation iPod 4th generation (color display) iPod 4th generation iPod mini 3US You can not connect any other iPod models, a compatible Dock Adapter from Apple Inc. When you use other portable audio players. • Sony...

Operating Instructions
Page 4
Table of Contents Overview 5 Getting Started 1: Checking supplied items ...6 2: List of parts locations........6 3: Installing the TDM-iP10 ...7 Controlling the iPod Performing basic operations 10 Additional Information Troubleshooting 11 Precautions 12 Specifications 13 4US
Table of Contents Overview 5 Getting Started 1: Checking supplied items ...6 2: List of parts locations........6 3: Installing the TDM-iP10 ...7 Controlling the iPod Performing basic operations 10 Additional Information Troubleshooting 11 Precautions 12 Specifications 13 4US
Operating Instructions
Page 5
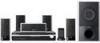
... can enjoy iPod audio contents by its control buttons, the control buttons of the AV system and the remote supplied with the AV system (page 10). • You can be played back with DIGITAL MEDIA PORT interface (Sony DAV series, etc.). • You can operate your iPod has video/photo capability, you cannot view video or photo contents on the TV or other video devices. However, audio content in video files can...
... can enjoy iPod audio contents by its control buttons, the control buttons of the AV system and the remote supplied with the AV system (page 10). • You can be played back with DIGITAL MEDIA PORT interface (Sony DAV series, etc.). • You can operate your iPod has video/photo capability, you cannot view video or photo contents on the TV or other video devices. However, audio content in video files can...
Operating Instructions
Page 6
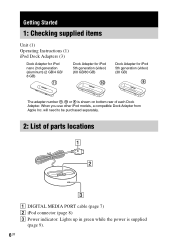
... (1) Operating Instructions (1) iPod Dock Adapters (3) Dock Adapter for iPod nano 2nd generation (aluminum) (2 GB/4 GB/ 8 GB) Dock Adapter for iPod 5th generation (video) (60 GB/80 GB) Dock Adapter for iPod 5th generation (video) (30 GB) The adapter number qa, 0 or 9 is shown on bottom-rear of parts locations 1 DIGITAL MEDIA PORT cable (page 7) 2 iPod connector (page 8) 3 Power indicator: Lights up in green while the power is supplied (page 9). 6US When you use other iPod models, a compatible Dock Adapter from Apple Inc. will need to...
... (1) Operating Instructions (1) iPod Dock Adapters (3) Dock Adapter for iPod nano 2nd generation (aluminum) (2 GB/4 GB/ 8 GB) Dock Adapter for iPod 5th generation (video) (60 GB/80 GB) Dock Adapter for iPod 5th generation (video) (30 GB) The adapter number qa, 0 or 9 is shown on bottom-rear of parts locations 1 DIGITAL MEDIA PORT cable (page 7) 2 iPod connector (page 8) 3 Power indicator: Lights up in green while the power is supplied (page 9). 6US When you use other iPod models, a compatible Dock Adapter from Apple Inc. will need to...
Operating Instructions
Page 7
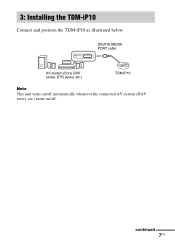
DMPORT DIGITAL MEDIA PORT cable AV system (Sony DAV series, STR series, etc.) TDM-iP10 Note This unit turns on/off automatically whenever the connected AV system (DAV series, etc.) turns on/off. 3: Installing the TDM-iP10 Connect and position the TDM-iP10 as illustrated below. continued 7US
DMPORT DIGITAL MEDIA PORT cable AV system (Sony DAV series, STR series, etc.) TDM-iP10 Note This unit turns on/off automatically whenever the connected AV system (DAV series, etc.) turns on/off. 3: Installing the TDM-iP10 Connect and position the TDM-iP10 as illustrated below. continued 7US

Operating Instructions
Page 8
... select the DIGITAL MEDIA PORT function. To put the iPod into the unit's connector 1 Choose the iPod Dock Adapter that both side buttons. Make sure the AV system is turned off the AV system. 3 Put the iPod into the unit. To remove the DIGITAL MEDIA PORT cable from the DMPORT jack, press both f marks are aligned. Connecting 1 Connect the DIGITAL MEDIA PORT cable of an AV system (DAV series, etc.). To connect/disconnect the unit DMPORT To DMPORT jack Connect...
... select the DIGITAL MEDIA PORT function. To put the iPod into the unit's connector 1 Choose the iPod Dock Adapter that both side buttons. Make sure the AV system is turned off the AV system. 3 Put the iPod into the unit. To remove the DIGITAL MEDIA PORT cable from the DMPORT jack, press both f marks are aligned. Connecting 1 Connect the DIGITAL MEDIA PORT cable of an AV system (DAV series, etc.). To connect/disconnect the unit DMPORT To DMPORT jack Connect...

Operating Instructions
Page 9
... iPod by mistake. To remove the iPod Dock Adapter To remove the iPod Dock Adapter, pull it up , the battery is charging. Notes • When placing or removing the iPod, handle the iPod in the iPod display. Doing so may cause a malfunction. • When placing or removing the iPod, brace the unit with one hand and take care not to press the controls of the iPod connector on the connector...
... iPod by mistake. To remove the iPod Dock Adapter To remove the iPod Dock Adapter, pull it up , the battery is charging. Notes • When placing or removing the iPod, handle the iPod in the iPod display. Doing so may cause a malfunction. • When placing or removing the iPod, brace the unit with one hand and take care not to press the controls of the iPod connector on the connector...
Operating Instructions
Page 10
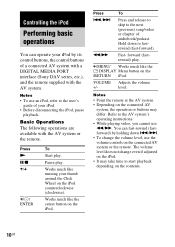
... on the iPod. forward (fastrewind) play . VOLUME Adjusts the volume +/- Refer to the AV system's operating instructions. • While playing video, you cannot use an iPod, refer to fastrewind (fast-forward). C/MENU/ Works much like the center button on the contents. 10US Notes • To use m/M. Works much like the DISPLAY Menu button on the connected AV system or the remote. The volume level does not change the volume level, use the volume controls on the /RETURN iPod. Works much like running your iPod. •...
... on the iPod. forward (fastrewind) play . VOLUME Adjusts the volume +/- Refer to the AV system's operating instructions. • While playing video, you cannot use an iPod, refer to fastrewind (fast-forward). C/MENU/ Works much like the center button on the contents. 10US Notes • To use m/M. Works much like the DISPLAY Menu button on the connected AV system or the remote. The volume level does not change the volume level, use the volume controls on the /RETURN iPod. Works much like running your iPod. •...
Operating Instructions
Page 11
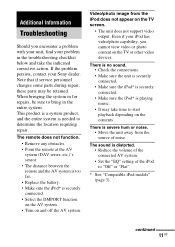
... the iPod* is securely connected. • Make sure the iPod* is distorted. • Reduce the volume of the connected AV system. • Set the "EQ" setting of noise. The sound is playing music. • It may be sure to "Off" or "Flat". * See "Compatible iPod models" (page 3). Even if your problem in the entire system. The remote does not function. • Remove any obstacles. • Point the remote at the AV system (DAV...
... the iPod* is securely connected. • Make sure the iPod* is distorted. • Reduce the volume of the connected AV system. • Set the "EQ" setting of noise. The sound is playing music. • It may be sure to "Off" or "Flat". * See "Compatible iPod models" (page 3). Even if your problem in the entire system. The remote does not function. • Remove any obstacles. • Point the remote at the AV system (DAV...

Operating Instructions
Page 12
... placement • Do not place the unit in an inclined position. • Do not place the unit in the unit. Do not use any type of abrasive pad, scouring powder or solvent such as staining or discoloration of the surface may result. Extremely hot or cold - ... to direct sunlight. • Use caution when placing the unit on surfaces that have any questions or problems concerning your unit, please consult your nearest Sony dealer. Precautions On safety Should any solid object or liquid fall into the system, unplug the system and have it checked by qualified personnel before operating it...
... placement • Do not place the unit in an inclined position. • Do not place the unit in the unit. Do not use any type of abrasive pad, scouring powder or solvent such as staining or discoloration of the surface may result. Extremely hot or cold - ... to direct sunlight. • Use caution when placing the unit on surfaces that have any questions or problems concerning your unit, please consult your nearest Sony dealer. Precautions On safety Should any solid object or liquid fall into the system, unplug the system and have it checked by qualified personnel before operating it...

Operating Instructions
Page 13
Specifications General Power requirements: DC IN: 5 V, 600 mA (via DIGITAL MEDIA PORT) Dimensions: Approx. φ 80 × 22(h) mm (φ 3 1/4 × 7/8(h) inch) Mass: Approx. 174 g (6.14 oz) (includes cable) Cable length: 1 m (3.3 ft) Design and specifications are subject to change without notice. 13US
Specifications General Power requirements: DC IN: 5 V, 600 mA (via DIGITAL MEDIA PORT) Dimensions: Approx. φ 80 × 22(h) mm (φ 3 1/4 × 7/8(h) inch) Mass: Approx. 174 g (6.14 oz) (includes cable) Cable length: 1 m (3.3 ft) Design and specifications are subject to change without notice. 13US

Operating Instructions
Page 40
Sony Corporation Printed in China
Sony Corporation Printed in China


