
Operating Instructions
Page 2
... other apparatus (including amplifiers) that to rain or moisture. If the provided plug does not fit into an outlet on , the user is encouraged to try to radio communications. DAV-X10 Serial No 2US WARNING This equipment has been tested and found to comply with the limits for replacement of the obsolete outlet. 10) Protect the power cord from being walked...
... other apparatus (including amplifiers) that to rain or moisture. If the provided plug does not fit into an outlet on , the user is encouraged to try to radio communications. DAV-X10 Serial No 2US WARNING This equipment has been tested and found to comply with the limits for replacement of the obsolete outlet. 10) Protect the power cord from being walked...

Operating Instructions
Page 4
... Selecting the Movie or Music Mode 31 Sound Adjustments Enjoying Surround Sound by Using Sound Field 32 Adjusting the Bass Level and Treble Level 33 Enjoying the Sound at Low Volume..... 34 (NIGHT MODE) Using the HDMI CONTROL Function for 'BRAVIA' Theatre Sync Preparing for the HDMI CONTROL function 36 Watching DVD by a Single Button Press 38 (One-Touch Play) Enjoying the TV Sound from the Speakers in this System 39 (System Audio Control) Turning off the System with the TV..... 40 (System Power Off) Enjoying STB (Set Top Box) Digital Sound or Digital Satellite Receiver Sound...
... Selecting the Movie or Music Mode 31 Sound Adjustments Enjoying Surround Sound by Using Sound Field 32 Adjusting the Bass Level and Treble Level 33 Enjoying the Sound at Low Volume..... 34 (NIGHT MODE) Using the HDMI CONTROL Function for 'BRAVIA' Theatre Sync Preparing for the HDMI CONTROL function 36 Watching DVD by a Single Button Press 38 (One-Touch Play) Enjoying the TV Sound from the Speakers in this System 39 (System Audio Control) Turning off the System with the TV..... 40 (System Power Off) Enjoying STB (Set Top Box) Digital Sound or Digital Satellite Receiver Sound...

Operating Instructions
Page 5
...) Tuner Functions Presetting Radio Stations 64 Listening to the Radio 65 Other Operations Controlling the TV with the Supplied Remote 67 Enjoying Multiplex Broadcast Sound 69 (DUAL MONO) Using the Sleep Timer 69 Changing the Brightness of the Front Panel Display 70 Changing the Display Appearance of the Soft-touch Buttons 70 (ILLUMINATION MODE) Using the DIGITAL MEDIA PORT Adapter 71 Advanced Settings and Adjustments Locking Discs 72 (CUSTOM PARENTAL CONTROL, PARENTAL CONTROL) Calibrating the Appropriate Settings Automatically 75 (AUTO CALIBRATION) Using the Setup Display...
...) Tuner Functions Presetting Radio Stations 64 Listening to the Radio 65 Other Operations Controlling the TV with the Supplied Remote 67 Enjoying Multiplex Broadcast Sound 69 (DUAL MONO) Using the Sleep Timer 69 Changing the Brightness of the Front Panel Display 70 Changing the Display Appearance of the Soft-touch Buttons 70 (ILLUMINATION MODE) Using the DIGITAL MEDIA PORT Adapter 71 Advanced Settings and Adjustments Locking Discs 72 (CUSTOM PARENTAL CONTROL, PARENTAL CONTROL) Calibrating the Appropriate Settings Automatically 75 (AUTO CALIBRATION) Using the Setup Display...
Operating Instructions
Page 19
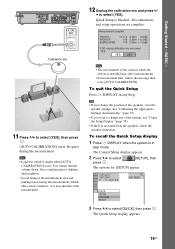
...; If you change any Step. OPTICAL TV DIGITAL IN OPTICAL COAXIAL SAT/ CABLE COAXIAL IMPEDANCE USE 4 VIDEO SPEAKER R AUDIO L IN 1 2 DMPORT (DVD COMPONENT VIDEO OUT ONLY) PB / PR / TV Y CB CR (DVD ONLY) OUT ANTENNA VIDEO A.CAL AM MIC ECM-AC2 R AUDIO L VIDEO SAT/CABLE IN R AUDIO L VIDEO VIDEO IN S VIDEO (DVD ONLY) MONITOR OUT FM 75 COAXIAL A.CAL MIC ECM-AC2 Calibration mic 11 Press X/x to select [QUICK], then press . Give consideration to select [YES]. Quick Setup is output when [AUTO CALIBRATION] starts. YES...
...; If you change any Step. OPTICAL TV DIGITAL IN OPTICAL COAXIAL SAT/ CABLE COAXIAL IMPEDANCE USE 4 VIDEO SPEAKER R AUDIO L IN 1 2 DMPORT (DVD COMPONENT VIDEO OUT ONLY) PB / PR / TV Y CB CR (DVD ONLY) OUT ANTENNA VIDEO A.CAL AM MIC ECM-AC2 R AUDIO L VIDEO SAT/CABLE IN R AUDIO L VIDEO VIDEO IN S VIDEO (DVD ONLY) MONITOR OUT FM 75 COAXIAL A.CAL MIC ECM-AC2 Calibration mic 11 Press X/x to select [QUICK], then press . Give consideration to select [YES]. Quick Setup is output when [AUTO CALIBRATION] starts. YES...
Operating Instructions
Page 26
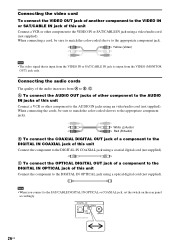
... jack of a component to the DIGITAL IN OPTICAL jack of this unit Connect the component to the appropriate component jacks. Connecting the video cord To connect the VIDEO OUT jack of another component to the VIDEO IN or SAT/CABLE IN jack of this unit Connect a VCR or other component to the SAT/CABLE DIGITAL IN OPTICAL or COAXIAL jack, set the switch on the rear panel accordingly. When connecting a cord, be sure to match the color-coded sleeves to the DIGITAL IN OPTICAL jack using a video/audio cord...
... jack of a component to the DIGITAL IN OPTICAL jack of this unit Connect the component to the appropriate component jacks. Connecting the video cord To connect the VIDEO OUT jack of another component to the VIDEO IN or SAT/CABLE IN jack of this unit Connect a VCR or other component to the SAT/CABLE DIGITAL IN OPTICAL or COAXIAL jack, set the switch on the rear panel accordingly. When connecting a cord, be sure to match the color-coded sleeves to the DIGITAL IN OPTICAL jack using a video/audio cord...

Operating Instructions
Page 30
... the input level. Basic Operations Enjoying the Radio or Other Components FUNCTION X/x/c, SYSTEM MENU With the cover opened. Changing the input level of the sound from connected components Distortion may be output from the sound of the unit. The system menu turns off. 30US Set this if the input level is not a malfunction and will depend on the rear panel. Press FUNCTION repeatedly until "ATTENUATE" appears in the following sequence. Set this , you set the [HDMI CONTROL] setting in the front panel display...
... the input level. Basic Operations Enjoying the Radio or Other Components FUNCTION X/x/c, SYSTEM MENU With the cover opened. Changing the input level of the sound from connected components Distortion may be output from the sound of the unit. The system menu turns off. 30US Set this if the input level is not a malfunction and will depend on the rear panel. Press FUNCTION repeatedly until "ATTENUATE" appears in the following sequence. Set this , you set the [HDMI CONTROL] setting in the front panel display...
Operating Instructions
Page 33
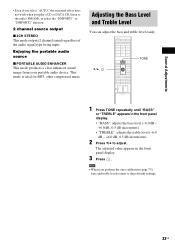
... front panel display. • "BASS": adjusts the bass level (-6.0 dB - +6.0 dB, 0.5 dB increments). • "TREBLE": adjusts the treble level (-6.0 dB - +6.0 dB, 0.5 dB increments). 2 Press X/x to the radio (FM/AM), or select the "DMPORT1" or "DMPORT2" function. 2 channel source output x 2CH STEREO This mode outputs 2 channel sound regardless of the audio signal type being input. Note • When you play a CD or DATA CD, listen to adjust. This mode is ideal for MP3, other compressed music. X/x, TONE 1 Press TONE...
... front panel display. • "BASS": adjusts the bass level (-6.0 dB - +6.0 dB, 0.5 dB increments). • "TREBLE": adjusts the treble level (-6.0 dB - +6.0 dB, 0.5 dB increments). 2 Press X/x to the radio (FM/AM), or select the "DMPORT1" or "DMPORT2" function. 2 channel source output x 2CH STEREO This mode outputs 2 channel sound regardless of the audio signal type being input. Note • When you play a CD or DATA CD, listen to adjust. This mode is ideal for MP3, other compressed music. X/x, TONE 1 Press TONE...
Operating Instructions
Page 35
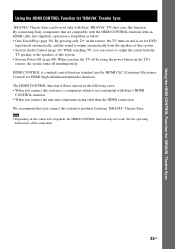
... system. • System Audio Control (page 39): While watching TV, you can be used by using other than the HDMI connection. Note • Depending on and is set for DVD input mode automatically, and the sound is not correspond with Sony 'BRAVIA' TVs that you connect the unit and components using the power button on the TV's remote, the system turns off by HDMI CEC (Consumer Electronics Control) for 'BRAVIA' Theatre Sync 'BRAVIA' Theatre Sync can select to output the sound from the TV speaker...
... system. • System Audio Control (page 39): While watching TV, you can be used by using other than the HDMI connection. Note • Depending on and is set for DVD input mode automatically, and the sound is not correspond with Sony 'BRAVIA' TVs that you connect the unit and components using the power button on the TV's remote, the system turns off by HDMI CEC (Consumer Electronics Control) for 'BRAVIA' Theatre Sync 'BRAVIA' Theatre Sync can select to output the sound from the TV speaker...

Operating Instructions
Page 36
... (compatible with HDMI CONTROL function) via the HDMI connection. 2 Turn on the system and the TV. 3 Switch the input selector on the TV so that the unit is in stop mode. Before you have performed the following procedures. 1 Make sure that the signal from the system appears on the setting up the system and the TV. Using the HDMI CONTROL Function for 'BRAVIA' Theatre Sync Preparing for this system, see the operating instructions of the HDMI CONTROL function may...
... (compatible with HDMI CONTROL function) via the HDMI connection. 2 Turn on the system and the TV. 3 Switch the input selector on the TV so that the unit is in stop mode. Before you have performed the following procedures. 1 Make sure that the signal from the system appears on the setting up the system and the TV. Using the HDMI CONTROL Function for 'BRAVIA' Theatre Sync Preparing for this system, see the operating instructions of the HDMI CONTROL function may...

Operating Instructions
Page 39
... TV sound from the speakers of this System (System Audio Control) You can also operate System Audio Control from the TV, set [AUDIO (HDMI)] to [AUTO] or [PCM] on the system (page 82). 39US You can use System Audio Control, connect the unit and the TV with an audio cord (not supplied) (A) and an HDMI cable (not supplied) (B). : Signal flow TV A AUDIO OUT L R IN R AUDIO L (DVD ONLY) OUT IN TV IN OPTICAL TV DIGITAL IN OPTICAL COAXIAL SAT/ CABLE COAXIAL IMPEDANCE USE 4 VIDEO SPEAKER R AUDIO L IN 1 2 DMPORT (DVD COMPONENT VIDEO...
... TV sound from the speakers of this System (System Audio Control) You can also operate System Audio Control from the TV, set [AUDIO (HDMI)] to [AUTO] or [PCM] on the system (page 82). 39US You can use System Audio Control, connect the unit and the TV with an audio cord (not supplied) (A) and an HDMI cable (not supplied) (B). : Signal flow TV A AUDIO OUT L R IN R AUDIO L (DVD ONLY) OUT IN TV IN OPTICAL TV DIGITAL IN OPTICAL COAXIAL SAT/ CABLE COAXIAL IMPEDANCE USE 4 VIDEO SPEAKER R AUDIO L IN 1 2 DMPORT (DVD COMPONENT VIDEO...
Operating Instructions
Page 42
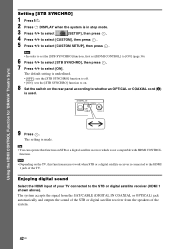
...]: sets the [STB SYNCHRO] function to on. 8 Set the switch on STB or a digital satellite receiver which is not compatible with HDMI CONTROL function. The system accepts the signal from the SAT/CABLE (DIGITAL IN COAXIAL or OPTICAL) jack automatically and outputs the sound of the STB or digital satellite receiver from the speakers of your TV connected to the STB or digital satellite receiver (HDMI 1 shown above). DIGITAL IN OPTICAL COAXIAL SAT/ CABLE COAXIAL 9 Press . Enjoying digital sound Select the HDMI input...
...]: sets the [STB SYNCHRO] function to on. 8 Set the switch on STB or a digital satellite receiver which is not compatible with HDMI CONTROL function. The system accepts the signal from the SAT/CABLE (DIGITAL IN COAXIAL or OPTICAL) jack automatically and outputs the sound of the STB or digital satellite receiver from the speakers of your TV connected to the STB or digital satellite receiver (HDMI 1 shown above). DIGITAL IN OPTICAL COAXIAL SAT/ CABLE COAXIAL 9 Press . Enjoying digital sound Select the HDMI input...
Operating Instructions
Page 47
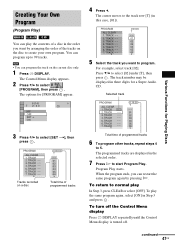
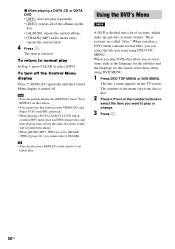
... three digits for [PROGRAM] appear. 6 (14) T 2:50 OFF OFF SET ON PLAY CD 3 Press X/x to create your own program. Note • You can restart the same program again by arranging the order of the tracks on the current disc only. 1 Press DISPLAY. TRACK - - 6. TRACK - - 7. To return to select [PROGRAM], then press . To turn off the Control Menu display Press DISPLAY repeatedly until the Control Menu display is turned off...
... three digits for [PROGRAM] appear. 6 (14) T 2:50 OFF OFF SET ON PLAY CD 3 Press X/x to create your own program. Note • You can restart the same program again by arranging the order of the tracks on the current disc only. 1 Press DISPLAY. TRACK - - 6. TRACK - - 7. To return to select [PROGRAM], then press . To turn off the Control Menu display Press DISPLAY repeatedly until the Control Menu display is turned off...
Operating Instructions
Page 48
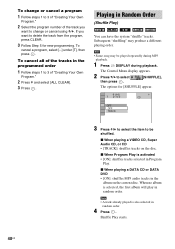
... the disc. Subsequent "shuffling" may be shuffled. x When Program Play is selected, the first album will play in Program Play. When no album is activated • [ON]: shuffles tracks selected in random order. Shuffle Play starts. 48US Note • A track already played is also selected in Random Order (Shuffle Play) You can have the system "shuffle" tracks. To change or cancel using X/x. x When playing a VIDEO CD, Super Audio...
... the disc. Subsequent "shuffling" may be shuffled. x When Program Play is selected, the first album will play in Program Play. When no album is activated • [ON]: shuffles tracks selected in random order. Shuffle Play starts. 48US Note • A track already played is also selected in Random Order (Shuffle Play) You can have the system "shuffle" tracks. To change or cancel using X/x. x When playing a VIDEO CD, Super Audio...
Operating Instructions
Page 50
... DVD MENU. The disc's menu appears on the remote. • You cannot use this function with VIDEO CDs and Super VCDs with PBC playback. • When playing a DATA CD/DATA DVD which make up a picture or music feature. To turn off . Tip • You can quickly display the [REPEAT] status. The item is turned off the Control Menu display Press DISPLAY repeatedly until the Control Menu display is selected. Press REPEAT on the TV screen. x When playing...
... DVD MENU. The disc's menu appears on the remote. • You cannot use this function with VIDEO CDs and Super VCDs with PBC playback. • When playing a DATA CD/DATA DVD which make up a picture or music feature. To turn off . Tip • You can quickly display the [REPEAT] status. The item is turned off the Control Menu display Press DISPLAY repeatedly until the Control Menu display is selected. Press REPEAT on the TV screen. x When playing...
Operating Instructions
Page 73
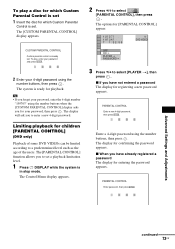
... Control Menu display appears. 2 Press X/x to select [PLAYER t], then press . x When you have not entered a password The display for registering a new password appears. To play a disc for which Custom Parental Control is set 1 Insert the disc for which Custom Parental Control is set a playback limitation level. 1 Press DISPLAY while the system is in stop mode. The display will ask you to enter a new 4-digit password. PARENTAL CONTROL Enter a new 4-digit password, then press ENTER . Enter a 4-digit password using...
... Control Menu display appears. 2 Press X/x to select [PLAYER t], then press . x When you have not entered a password The display for registering a new password appears. To play a disc for which Custom Parental Control is set 1 Insert the disc for which Custom Parental Control is set a playback limitation level. 1 Press DISPLAY while the system is in stop mode. The display will ask you to enter a new 4-digit password. PARENTAL CONTROL Enter a new 4-digit password, then press ENTER . Enter a 4-digit password using...
Operating Instructions
Page 75
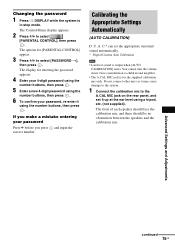
... calibration mic. Changing the password 1 Press DISPLAY while the system is output when [AUTO CALIBRATION] starts. Do not connect other mics as it may cause damage to the system. 1 Connect the calibration mic to the A.CAL MIC jack on the rear panel, and set the appropriate surround sound automatically. * Digital Cinema Auto Calibration Note • Loud test sound is in stop mode. Advanced Settings and Adjustments continued 75US If you make a mistake entering your password, re-enter it up at the ear level using the number buttons...
... calibration mic. Changing the password 1 Press DISPLAY while the system is output when [AUTO CALIBRATION] starts. Do not connect other mics as it may cause damage to the system. 1 Connect the calibration mic to the A.CAL MIC jack on the rear panel, and set the appropriate surround sound automatically. * Digital Cinema Auto Calibration Note • Loud test sound is in stop mode. Advanced Settings and Adjustments continued 75US If you make a mistake entering your password, re-enter it up at the ear level using the number buttons...
Operating Instructions
Page 82
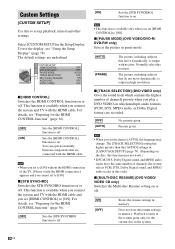
... the HDMI connection.] appears and you set [HDMI CONTROL] to off. This function is available only when you play a DVD VIDEO on which contains the highest number of channels, the system selects PCM, DTS, Dolby Digital sound, and MPEG audio tracks in this order. Note • When you cannot set to [AUTO], the language may not work.) • If PCM, DTS, Dolby Digital sound, and MPEG audio tracks have the same number of channels priority when you set the...
... the HDMI connection.] appears and you set [HDMI CONTROL] to off. This function is available only when you play a DVD VIDEO on which contains the highest number of channels, the system selects PCM, DTS, Dolby Digital sound, and MPEG audio tracks in this order. Note • When you cannot set to [AUTO], the language may not work.) • If PCM, DTS, Dolby Digital sound, and MPEG audio tracks have the same number of channels priority when you set the...

Operating Instructions
Page 86
... accept the signal in [SCREEN SETUP] may be affected when you set progressive format. Note that if service personnel changes some parts during repair, these parts may occur, as a high-strength magnet is employed. In this case, disconnect the HDMI cable from the unit and then select "INTERLACE" (INTERLACE) so that the "PROGRESSIVE" indicator turns off the system, and check the following difficulties while using a video jack other...
... accept the signal in [SCREEN SETUP] may be affected when you set progressive format. Note that if service personnel changes some parts during repair, these parts may occur, as a high-strength magnet is employed. In this case, disconnect the HDMI cable from the unit and then select "INTERLACE" (INTERLACE) so that the "PROGRESSIVE" indicator turns off the system, and check the following difficulties while using a video jack other...
Operating Instructions
Page 87
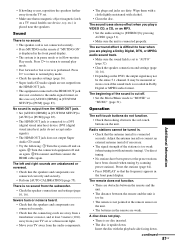
... jack. • Set [AUDIO (HDMI)] in [CUSTOM SETUP] to normal play mode. • Fast forward or fast reverse is connected securely. The sound loses stereo effect when you are connected correctly and securely. • Perform [AUTO CALIBRATION] (page 75). The beginning of the stations is too weak (when tuning in . • Check that the speakers and components are playing a Dolby Digital, DTS, or MPEG audio sound track. • Make sure the sound field is connected...
... jack. • Set [AUDIO (HDMI)] in [CUSTOM SETUP] to normal play mode. • Fast forward or fast reverse is connected securely. The sound loses stereo effect when you are connected correctly and securely. • Perform [AUTO CALIBRATION] (page 75). The beginning of the stations is too weak (when tuning in . • Check that the speakers and components are playing a Dolby Digital, DTS, or MPEG audio sound track. • Make sure the sound field is connected...
Operating Instructions
Page 105
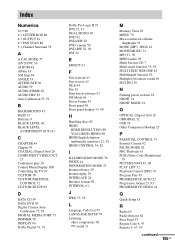
... Program Play 47 PROGRESSIVE AUTO 23 Progressive format 23, 93 PROGRESSIVE VIDEO 24 Q Quick Setup 18 R Radio 65 Radio Stations 64 Rear Panel 97 Region Code 8, 93 Remote 9, 67, 99 continued 105US Index Numerics 16:9 80 4:3 LETTER BOX 80 4:3 OUTPUT 81 4:3 PAN SCAN 80 5.1 Channel Surround 52 A A.CAL MODE 77 A/V SYNC 56 ALBUM 44 Album 91 AM Step 64 ANGLE 55 ATTENUATE 30 AUDIO 79 AUDIO (HDMI) 83 AUDIO DRC 83 Auto Calibration 75, 91 B BACKGROUND 81 BASS...
... Program Play 47 PROGRESSIVE AUTO 23 Progressive format 23, 93 PROGRESSIVE VIDEO 24 Q Quick Setup 18 R Radio 65 Radio Stations 64 Rear Panel 97 Region Code 8, 93 Remote 9, 67, 99 continued 105US Index Numerics 16:9 80 4:3 LETTER BOX 80 4:3 OUTPUT 81 4:3 PAN SCAN 80 5.1 Channel Surround 52 A A.CAL MODE 77 A/V SYNC 56 ALBUM 44 Album 91 AM Step 64 ANGLE 55 ATTENUATE 30 AUDIO 79 AUDIO (HDMI) 83 AUDIO DRC 83 Auto Calibration 75, 91 B BACKGROUND 81 BASS...


