Operating Instructions
Page 1
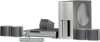
Model No. DAV-S300 Serial No TV SLEEP FUNCTION 1 SOUND FIELD 4 BAND 7 DISPLAY >10 23 56 89 ENTER 10/0 P.MODE AUDIO ANGLE SUBTITLE PRESET PREV NEXT TUNING PLAY/SELECT PAUSE STOP TITLE DVD MENU VOL ENTER DVD DISPLAY RETURN MUTING DAV-S300 © 2000 Sony Corporation Refer to them whenever you call upon your Sony dealer regarding this product. Record the serial number in the space provided below. 4-232-189-11(1) Compact AV System Operating Instructions Owner's Record The model and serial numbers are located at the rear of the unit.
Model No. DAV-S300 Serial No TV SLEEP FUNCTION 1 SOUND FIELD 4 BAND 7 DISPLAY >10 23 56 89 ENTER 10/0 P.MODE AUDIO ANGLE SUBTITLE PRESET PREV NEXT TUNING PLAY/SELECT PAUSE STOP TITLE DVD MENU VOL ENTER DVD DISPLAY RETURN MUTING DAV-S300 © 2000 Sony Corporation Refer to them whenever you call upon your Sony dealer regarding this product. Record the serial number in the space provided below. 4-232-189-11(1) Compact AV System Operating Instructions Owner's Record The model and serial numbers are located at the rear of the unit.
Operating Instructions
Page 3
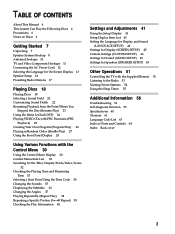
... Unpacking 7 Speaker System Hookup 8 Antenna Hookups 10 TV and Video Component Hookups 11 Connecting the AC Power Cord 12 Selecting the Language for On-Screen Display 13 Speaker Setup 14 Presetting Radio Stations 17 Playing Discs 18 Playing Discs 18 Selecting a Sound Field 20 Customizing Sound Fields 22 Resuming... Playback from the Point Where You Stopped the Disc (Resume Play) 23 Using the Menu for Each DVD 24 Playing VIDEO CDs with PBC Functions (PBC Playback) 25 ...
... Unpacking 7 Speaker System Hookup 8 Antenna Hookups 10 TV and Video Component Hookups 11 Connecting the AC Power Cord 12 Selecting the Language for On-Screen Display 13 Speaker Setup 14 Presetting Radio Stations 17 Playing Discs 18 Playing Discs 18 Selecting a Sound Field 20 Customizing Sound Fields 22 Resuming... Playback from the Point Where You Stopped the Disc (Resume Play) 23 Using the Menu for Each DVD 24 Playing VIDEO CDs with PBC Functions (PBC Playback) 25 ...
Operating Instructions
Page 8
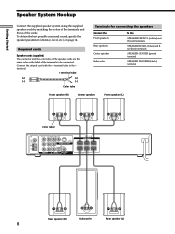
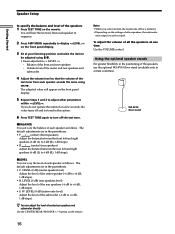
Getting Started Speaker System Hookup Connect the supplied speaker system using the supplied speaker cords by matching the colors of the terminals and those of the terminals to...75Ω COAXIAL AM VIDEO OUT VIDEO IN VIDEO IN VIDEO AUDIO OUT AUDIO IN AUDIO IN L L DIGITAL IN R R OPTICAL S VIDEO (DVD ONLY) FRONT R CENTER FRONT L REAR R WOOFER IMPEDANCE USE 3Ω REAR L Rear speaker (R) Subwoofer Rear speaker (L) 8 Connect the striped... the label of the cords. To obtain the best possible surround sound, specify the speaker parameters (distance, level, etc.) on page 14.
Getting Started Speaker System Hookup Connect the supplied speaker system using the supplied speaker cords by matching the colors of the terminals and those of the terminals to...75Ω COAXIAL AM VIDEO OUT VIDEO IN VIDEO IN VIDEO AUDIO OUT AUDIO IN AUDIO IN L L DIGITAL IN R R OPTICAL S VIDEO (DVD ONLY) FRONT R CENTER FRONT L REAR R WOOFER IMPEDANCE USE 3Ω REAR L Rear speaker (R) Subwoofer Rear speaker (L) 8 Connect the striped... the label of the cords. To obtain the best possible surround sound, specify the speaker parameters (distance, level, etc.) on page 14.

Operating Instructions
Page 9
...each speaker cord does not touch another speaker terminal or the stripped end of another speaker terminal. Stripped cords are connected correctly. If no sound is heard from a speaker while outputting a test tone or a test tone is output from the SPEAKER WOOFER terminal. To prevent this... low maximum input rating, adjust the volume carefully to avoid excessive output on the front panel display, the speaker may damage the system. Examples of poor conditions of the speaker cord Stripped speaker cord is currently displayed on the speakers. When you connect an active ...
...each speaker cord does not touch another speaker terminal or the stripped end of another speaker terminal. Stripped cords are connected correctly. If no sound is heard from a speaker while outputting a test tone or a test tone is output from the SPEAKER WOOFER terminal. To prevent this... low maximum input rating, adjust the volume carefully to avoid excessive output on the front panel display, the speaker may damage the system. Examples of poor conditions of the speaker cord Stripped speaker cord is currently displayed on the speakers. When you connect an active ...

Operating Instructions
Page 14
...center speaker up to 5 feet closer (B) and the rear speakers up to 15 feet closer (C) to the listening position. Open the cover. However, this system lets you or to 50 feet (A) from the listening position (A). Use the test tone to adjust the speaker volumes to the side B A A 45°...; C C 90° Specifying the speaker parameters To obtain the best possible surround sound, first specify the distance of the front, rear and center speakers - Position and height of your room, etc. Details of each item will follow...
...center speaker up to 5 feet closer (B) and the rear speakers up to 15 feet closer (C) to the listening position. Open the cover. However, this system lets you or to 50 feet (A) from the listening position (A). Use the test tone to adjust the speaker volumes to the side B A A 45°...; C C 90° Specifying the speaker parameters To obtain the best possible surround sound, first specify the distance of the front, rear and center speakers - Position and height of your room, etc. Details of each item will follow...

Operating Instructions
Page 15
... and height of the closest speaker. The default settings are underlined. DIST. (17ft) (front speakers distance) Front speaker distance can be set in the "Virtual" sound field (p. 20) properly. - HGT. NO: If you do not connect center or rear speakers, or move the rear speakers, set the distance of the rear...
... and height of the closest speaker. The default settings are underlined. DIST. (17ft) (front speakers distance) Front speaker distance can be set in the "Virtual" sound field (p. 20) properly. - HGT. NO: If you do not connect center or rear speakers, or move the rear speakers, set the distance of the rear...
Operating Instructions
Page 16
Balance of the test tone from each speaker sounds the same using M/m. • Items adjusted in sequence. 2 Press AMP MENU repeatedly to be adjusted using You will hear the test tone from each speaker in > - Volume level of the center and rear speakers and subwoofer 4 Adjust the volume level so that the volume of the front and rear speakers - Speaker Setup Getting Started To specify the balance and level of the speakers 1 Press TEST TONE on the front panel display. 3 Sit at your listening position and select the item to display on the remote.
Balance of the test tone from each speaker sounds the same using M/m. • Items adjusted in sequence. 2 Press AMP MENU repeatedly to be adjusted using You will hear the test tone from each speaker in > - Volume level of the center and rear speakers and subwoofer 4 Adjust the volume level so that the volume of the front and rear speakers - Speaker Setup Getting Started To specify the balance and level of the speakers 1 Press TEST TONE on the front panel display. 3 Sit at your listening position and select the item to display on the remote.
Operating Instructions
Page 19
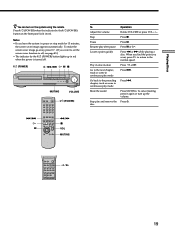
... MUTING. Notes • If you want to set the screen saver function to the preceding chapter, track or scene in continuous play mode Mute the sound Stop play mode Go back to off . ?/1 (POWER) A ./> H X x ./> H X MUTING VOLUME 123 456 789 >10 10/0 ?/1 (POWER) m/M x VOL MUTING To Adjust the volume ... or scene in continuous play and remove the disc Operation Rotate VOLUME or press VOL +/-. To cancel muting, press it again or turn on the system using the remote Press ?/1 (POWER) when the indicator by the ?/1 (POWER) button lights up the volume. Playing Discs z You can turn up in...
... MUTING. Notes • If you want to set the screen saver function to the preceding chapter, track or scene in continuous play mode Mute the sound Stop play mode Go back to off . ?/1 (POWER) A ./> H X x ./> H X MUTING VOLUME 123 456 789 >10 10/0 ?/1 (POWER) m/M x VOL MUTING To Adjust the volume ... or scene in continuous play and remove the disc Operation Rotate VOLUME or press VOL +/-. To cancel muting, press it again or turn on the system using the remote Press ?/1 (POWER) when the indicator by the ?/1 (POWER) button lights up the volume. Playing Discs z You can turn up in...
Operating Instructions
Page 20
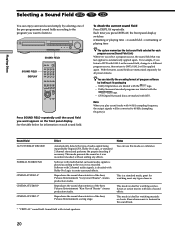
... sound fields according to the program you press DISPLAY, the front panel display switches: remaining or playing time t sound field t remaining or playing time z The system memorizes the last sound ...Sony Pictures Entertainment "Kim Novak Theater" cinema production studio. To check the current sound field Press DISPLAY repeatedly. Note When you select a program source, the sound field that was recorded. This mode presents the sound as a reference. SOUND FIELD SOUND FIELD DISPLAY 123 456 789 >10 10/0 Press SOUND FIELD repeatedly until the sound field you listen to DVD...
... sound fields according to the program you press DISPLAY, the front panel display switches: remaining or playing time t sound field t remaining or playing time z The system memorizes the last sound ...Sony Pictures Entertainment "Kim Novak Theater" cinema production studio. To check the current sound field Press DISPLAY repeatedly. Note When you select a program source, the sound field that was recorded. This mode presents the sound as a reference. SOUND FIELD SOUND FIELD DISPLAY 123 456 789 >10 10/0 Press SOUND FIELD repeatedly until the sound field you listen to DVD...
Operating Instructions
Page 21
...channel (stereo) sources completely bypass the sound field processing. Reproduces the acoustics of a 300-seat live house. Outputs the sound from the front left and right speakers and subwoofer. * "VIRTUAL" sound field: Sound field with stereo sound capabilities. DIMENSION* (Virtual Semi Multi ...virtual speakers, you to create virtual rear speakers from video game software. Great for soft acoustic sounds. MULTI DIMENSION* (Virtual Multi Dimension) Effect Uses 3D sound imaging to hear any source using only the front left and right speakers and subwoofer. L...
...channel (stereo) sources completely bypass the sound field processing. Reproduces the acoustics of a 300-seat live house. Outputs the sound from the front left and right speakers and subwoofer. * "VIRTUAL" sound field: Sound field with stereo sound capabilities. DIMENSION* (Virtual Semi Multi ...virtual speakers, you to create virtual rear speakers from video game software. Great for soft acoustic sounds. MULTI DIMENSION* (Virtual Multi Dimension) Effect Uses 3D sound imaging to hear any source using only the front left and right speakers and subwoofer. L...
Operating Instructions
Page 22
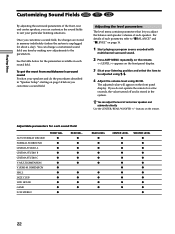
... any time by making new adjustments to be adjusted using M/m. 4 Adjust the volume level using You can customize the sound fields to suit your speakers and do the procedures described in "Speaker Setup" starting on the front panel display. 3 Sit at your ... select the item to the parameters. See the table below for the parameters available in memory indefinitely (unless the system is unplugged for about a day). To get the most from multichannel surround sound Position your particular listening situations. For details of each parameter, refer to "xBALANCE" and "xLEVEL" on page 16...
... any time by making new adjustments to be adjusted using M/m. 4 Adjust the volume level using You can customize the sound fields to suit your speakers and do the procedures described in "Speaker Setup" starting on the front panel display. 3 Sit at your ... select the item to the parameters. See the table below for the parameters available in memory indefinitely (unless the system is unplugged for about a day). To get the most from multichannel surround sound Position your particular listening situations. For details of each parameter, refer to "xBALANCE" and "xLEVEL" on page 16...
Operating Instructions
Page 24
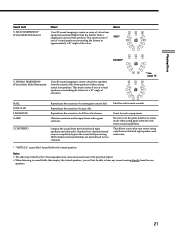
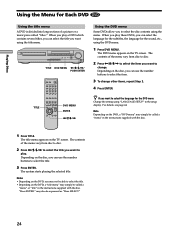
TITLE DVD MENU 10 10/0 TITLE DVD MENU ENTER Playing Discs Using the Menu for Each DVD Using the title menu A DVD is divided into long sections of a picture or a music piece called "titles." When you play a DVD which contains several titles, you can select the title you want using the title menu.
TITLE DVD MENU 10 10/0 TITLE DVD MENU ENTER Playing Discs Using the Menu for Each DVD Using the title menu A DVD is divided into long sections of a picture or a music piece called "titles." When you play a DVD which contains several titles, you can select the title you want using the title menu.
Operating Instructions
Page 32
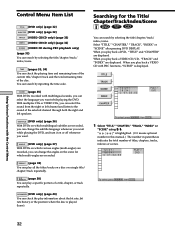
... by inputting the time code. REPEAT (page 38) You can select the sound from the right or left channel and listen to the sound of the disc. " " is displayed. With multiplex CDs or VIDEO CDs, you play back a DVD, "TITLE" and "CHAPTER" are recorded. When you can check the playing...current title/chapter/track and the total remaining time of the selected channel through both the right and left speakers. AUDIO (page 35) With DVDs recorded with multilingual sounds, you play back a VIDEO CD/CD, "TRACK" and "INDEX" are recorded, you play all the titles/tracks on or off ...
... by inputting the time code. REPEAT (page 38) You can select the sound from the right or left channel and listen to the sound of the disc. " " is displayed. With multiplex CDs or VIDEO CDs, you play back a DVD, "TITLE" and "CHAPTER" are recorded. When you can check the playing...current title/chapter/track and the total remaining time of the selected channel through both the right and left speakers. AUDIO (page 35) With DVDs recorded with multilingual sounds, you play back a VIDEO CD/CD, "TRACK" and "INDEX" are recorded, you play all the titles/tracks on or off ...
Operating Instructions
Page 35
... languages you can select the language you can select the left speakers. you turn the power off • While playing the DVD, the sound may be resumed when: - you open or close the disc tray - you can select are displayed by number as a 4 digit number, refer to 5.1 channels...it from monaural to the language code list on the screen. the rear component of the right channel (monaural) z You can select the sound from the list on the DVD. • While playing the CD/VIDEO CD, the standard stereo playback will be changed when: - In "DOLBY DIGITAL" case, the channels...
... languages you can select the language you can select the left speakers. you turn the power off • While playing the DVD, the sound may be resumed when: - you open or close the disc tray - you can select are displayed by number as a 4 digit number, refer to 5.1 channels...it from monaural to the language code list on the screen. the rear component of the right channel (monaural) z You can select the sound from the list on the DVD. • While playing the CD/VIDEO CD, the standard stereo playback will be changed when: - In "DOLBY DIGITAL" case, the channels...

Operating Instructions
Page 36
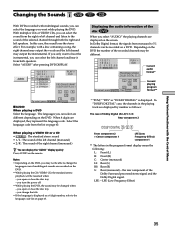
...Use discs with the Control Menu Changing the Sounds The display examples are recorded on for subtitles vary from the list on the DVD. Select "SUBTITLE" after pressing DVD DISPLAY. SUBTITLE 1 2 ( 2 7 ) 1 8 ( 3 4 ) C 01:32:55 1: ENGLISH OFF 1: ENGLISH 2: FRENCH 3: SPANISH PLAY DVD To select, press , then ENTER . When...LS RS , then ENTER . 1: ENGLISH PROGRAM FORMAT DTS 3/2.1 To select, press L CR LFE LS RS , then ENTER . With DVDs on which subtitles are displayed, they are recorded on it on or off whenever you want to enjoy Dolby Digital playback you press the button...
...Use discs with the Control Menu Changing the Sounds The display examples are recorded on for subtitles vary from the list on the DVD. Select "SUBTITLE" after pressing DVD DISPLAY. SUBTITLE 1 2 ( 2 7 ) 1 8 ( 3 4 ) C 01:32:55 1: ENGLISH OFF 1: ENGLISH 2: FRENCH 3: SPANISH PLAY DVD To select, press , then ENTER . When...LS RS , then ENTER . 1: ENGLISH PROGRAM FORMAT DTS 3/2.1 To select, press L CR LFE LS RS , then ENTER . With DVDs on which subtitles are displayed, they are recorded on it on or off whenever you want to enjoy Dolby Digital playback you press the button...
Operating Instructions
Page 40
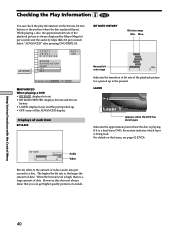
... . • OFF: turns off the ADVANCED display. Using Various Functions with the Control Menu Checking the Play Information Z You can get higher quality pictures or sounds. 40 While playing a disc, the approximate bit rate of video/audio data per second). ADVANCED 1 2 ( 2 7 ) 1 8 ( 3 4 ) C 01:32:55 BIT RATE ... the approximate point where the disc is being read. The higher the bit rate is played (layer). If it is a dual-layer DVD, the system indicates which layer is playing. However, this does not always mean that you can check the play information on the layers, see page...
... . • OFF: turns off the ADVANCED display. Using Various Functions with the Control Menu Checking the Play Information Z You can get higher quality pictures or sounds. 40 While playing a disc, the approximate bit rate of video/audio data per second). ADVANCED 1 2 ( 2 7 ) 1 8 ( 3 4 ) C 01:32:55 BIT RATE ... the approximate point where the disc is being read. The higher the bit rate is played (layer). If it is a dual-layer DVD, the system indicates which layer is playing. However, this does not always mean that you can check the play information on the layers, see page...

Operating Instructions
Page 44
... you have once selected, the language code (4 digits) is displayed. LANGUAGE SETUP OSD: DVD MENU: AUDIO: SUBTITLE: ENGLISH ENGLISH ORIGINAL AUDIO FOLLOW To set various languages for the sounds. • ORIGINAL: the language given priority in "AUDIO." After you select "OTHERS ,,"... • ENGLISH • FRENCH • SPANISH • PORTUGUESE xDVD MENU Switches the language for Display and Sound (LANGUAGE SETUP) Z Select "LANGUAGE SETUP" after pressing DVD SETUP. The default settings are underlined. xOSD (On-Screen Display) Switches the language for the on -screen display ...
... you have once selected, the language code (4 digits) is displayed. LANGUAGE SETUP OSD: DVD MENU: AUDIO: SUBTITLE: ENGLISH ENGLISH ORIGINAL AUDIO FOLLOW To set various languages for the sounds. • ORIGINAL: the language given priority in "AUDIO." After you select "OTHERS ,,"... • ENGLISH • FRENCH • SPANISH • PORTUGUESE xDVD MENU Switches the language for Display and Sound (LANGUAGE SETUP) Z Select "LANGUAGE SETUP" after pressing DVD SETUP. The default settings are underlined. xOSD (On-Screen Display) Switches the language for the on -screen display ...
Operating Instructions
Page 49
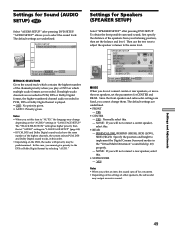
... OFF To set the balance and level. To quit, press SDEVTDUSPET.UP . In this . • SUBWOOFER - To obtain the best possible surround sound, first specify the distance of the channels priority when you will not connect a center speaker, select this . - Settings and Adjustments 49 "AUDIO SETUP... volumes to "AUTO," the language may change them. NONE: If you play a DVD on the settings of the highest channels, the system selects PCM, DTS and Dolby Digital sound tracks, in the "Virtual Multi Dimension" sound field (p. 20) properly. - xSIZE When you to the DTS or Dolby Digital ...
... OFF To set the balance and level. To quit, press SDEVTDUSPET.UP . In this . • SUBWOOFER - To obtain the best possible surround sound, first specify the distance of the channels priority when you will not connect a center speaker, select this . - Settings and Adjustments 49 "AUDIO SETUP... volumes to "AUTO," the language may change them. NONE: If you play a DVD on the settings of the highest channels, the system selects PCM, DTS and Dolby Digital sound tracks, in the "Virtual Multi Dimension" sound field (p. 20) properly. - xSIZE When you to the DTS or Dolby Digital ...

Operating Instructions
Page 50
... tone is set "TEST TONE" to turn off for Speakers (SPEAKER SETUP) Specifying the rear speaker position and height If you set the distance, the sound cuts off the test tone. During this if the rear speakers are in the parentheses. • CENTER (0 dB) Adjust the level of the center speaker... the rear speakers are located in the section A and D. • SIDE (HIGH) Select this adjustment, the test tone is played, select "SPEAKER SETUP" after pressing DVD SETUP. 2 Select "TEST TONE" and set to the default setting Select the item, then press CLEAR.
... tone is set "TEST TONE" to turn off for Speakers (SPEAKER SETUP) Specifying the rear speaker position and height If you set the distance, the sound cuts off the test tone. During this if the rear speakers are in the parentheses. • CENTER (0 dB) Adjust the level of the center speaker... the rear speakers are located in the section A and D. • SIDE (HIGH) Select this adjustment, the test tone is played, select "SPEAKER SETUP" after pressing DVD SETUP. 2 Select "TEST TONE" and set to the default setting Select the item, then press CLEAR.
Operating Instructions
Page 53
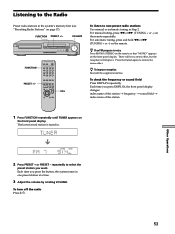
... + or -) on page 17). Other Operations 2 Press PRESET + or PRESET - To check the frequency or sound field Press DISPLAY repeatedly. repeatedly to select the preset station you press the button, the system tunes in one preset station at a time. 3 Adjust the volume by rotating VOLUME. z If an FM program...stereo effect, but the reception will improve. To turn off the radio Press ?/1. 53 Listening to the Radio Preset radio stations in the system's memory first (see "Presetting Radio Stations" on the remote repeatedly. Press the button again to non-preset radio stations Use manual or...
... + or -) on page 17). Other Operations 2 Press PRESET + or PRESET - To check the frequency or sound field Press DISPLAY repeatedly. repeatedly to select the preset station you press the button, the system tunes in one preset station at a time. 3 Adjust the volume by rotating VOLUME. z If an FM program...stereo effect, but the reception will improve. To turn off the radio Press ?/1. 53 Listening to the Radio Preset radio stations in the system's memory first (see "Presetting Radio Stations" on the remote repeatedly. Press the button again to non-preset radio stations Use manual or...


