
Limited Warranty (US Only)
Page 1
... any authorized Sony service facility. 4-557-172-02 General Stereo/Hifi Components/Tape Decks ® CD Players/Mini Disc Players/Audio Systems Hifi Audio LIMITED WARRANTY Sony Electronics Inc. ("Sony") warrants this Product is within 90 days of the date of one (1) year. This warranty does not cover damage due to improper operation or maintenance, connection to improper voltage supply, or attempted repair by anyone...
... any authorized Sony service facility. 4-557-172-02 General Stereo/Hifi Components/Tape Decks ® CD Players/Mini Disc Players/Audio Systems Hifi Audio LIMITED WARRANTY Sony Electronics Inc. ("Sony") warrants this Product is within 90 days of the date of one (1) year. This warranty does not cover damage due to improper operation or maintenance, connection to improper voltage supply, or attempted repair by anyone...
Operating Instructions
Page 3
... This Manual 4 This System Can Play the Following Discs 4 Precautions 6 Notes on Discs 6 Getting Started 7 Unpacking 7 Speaker System Hookup 8 Antenna Hookups 10 TV and Video Component Hookups 11 Connecting the AC Power Cord 12 Selecting the Language for On-Screen Display 13 Speaker Setup 14 Presetting Radio Stations 17 Playing Discs 18 Playing Discs 18 Selecting a Sound Field 20 Customizing Sound Fields 22 Resuming Playback from the Point Where You Stopped the Disc (Resume Play) 23 Using the Menu for Each DVD 24 Playing VIDEO CDs with PBC Functions...
... This Manual 4 This System Can Play the Following Discs 4 Precautions 6 Notes on Discs 6 Getting Started 7 Unpacking 7 Speaker System Hookup 8 Antenna Hookups 10 TV and Video Component Hookups 11 Connecting the AC Power Cord 12 Selecting the Language for On-Screen Display 13 Speaker Setup 14 Presetting Radio Stations 17 Playing Discs 18 Playing Discs 18 Selecting a Sound Field 20 Customizing Sound Fields 22 Resuming Playback from the Point Where You Stopped the Disc (Resume Play) 23 Using the Menu for Each DVD 24 Playing VIDEO CDs with PBC Functions...
Operating Instructions
Page 5
... (CD) / Video Index (VIDEO CD) A number that is intended for a picture piece on an audio software. You can play discs other worldwide patents issued and pending. Discs that are trademarks of a picture or a music piece on the disc. All rights reserved. **Manufactured under license from Digital Theater Systems, Inc. Each track is assigned a chapter number enabling you want . Depending on PBC (Playback Control) (VIDEO CDs) This system conforms to...
... (CD) / Video Index (VIDEO CD) A number that is intended for a picture piece on an audio software. You can play discs other worldwide patents issued and pending. Discs that are trademarks of a picture or a music piece on the disc. All rights reserved. **Manufactured under license from Digital Theater Systems, Inc. Each track is assigned a chapter number enabling you want . Depending on PBC (Playback Control) (VIDEO CDs) This system conforms to...

Operating Instructions
Page 6
... very low level inputs or no audio signals. Precautions On safety • Caution - On operation • If the system is placed in a location with this case, remove the disc and leave the system turned on the disc. Wipe the disc from the center out. • Do not use the system for an extended period of optical instruments with adequate ventilation to prevent heat build-up the volume while...
... very low level inputs or no audio signals. Precautions On safety • Caution - On operation • If the system is placed in a location with this case, remove the disc and leave the system turned on the disc. Wipe the disc from the center out. • Do not use the system for an extended period of optical instruments with adequate ventilation to prevent heat build-up the volume while...

Operating Instructions
Page 9
... a speaker while outputting a test tone or a test tone is output from the SPEAKER WOOFER terminal. to the WOOFER OUT jack using a monaural audio cord (not supplied). Black Black After connecting all the components, speakers, and AC power cord, output a test tone to check that all the speakers are reversed, the sound will lack bass. • If you use front speakers with low maximum input rating, adjust the volume carefully to + and - For details on the components: + to avoid excessive output on the front panel display...
... a speaker while outputting a test tone or a test tone is output from the SPEAKER WOOFER terminal. to the WOOFER OUT jack using a monaural audio cord (not supplied). Black Black After connecting all the components, speakers, and AC power cord, output a test tone to check that all the speakers are reversed, the sound will lack bass. • If you use front speakers with low maximum input rating, adjust the volume carefully to + and - For details on the components: + to avoid excessive output on the front panel display...
Operating Instructions
Page 11
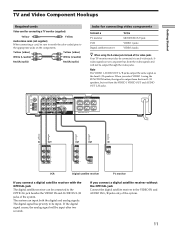
...VIDEO IN VIDEO AUDIO OUT AUDIO IN AUDIO IN L L DIGITAL IN R R OPTICAL S VIDEO (DVD ONLY) FRONT R CENTER FRONT L REAR R WOOFER IMPEDANCE USE 3Ω REAR L IN OUT INPUT OUTPUT VIDEO VIDEO IN OUT AUDIO AUDIO IN OUT L R OUT OUTPUT VIDEO OUT AUDIO OUT L R OUT OUTPUT OPTICAL IN INPUT VIDEO IN VCR Digital satellite receiver TV monitor If you connect a digital satellite receiver with the OPTICAL jack The digital satellite receiver can input both the digital and analog signals. The digital signal has priority to be connected via an S-video jack. If the digital signal...
...VIDEO IN VIDEO AUDIO OUT AUDIO IN AUDIO IN L L DIGITAL IN R R OPTICAL S VIDEO (DVD ONLY) FRONT R CENTER FRONT L REAR R WOOFER IMPEDANCE USE 3Ω REAR L IN OUT INPUT OUTPUT VIDEO VIDEO IN OUT AUDIO AUDIO IN OUT L R OUT OUTPUT VIDEO OUT AUDIO OUT L R OUT OUTPUT OPTICAL IN INPUT VIDEO IN VCR Digital satellite receiver TV monitor If you connect a digital satellite receiver with the OPTICAL jack The digital satellite receiver can input both the digital and analog signals. The digital signal has priority to be connected via an S-video jack. If the digital signal...

Operating Instructions
Page 14
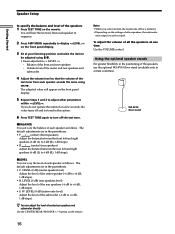
... test tone to adjust the speaker volumes to the listening position. Details of each item will follow the description of the speakers from the listening position (A). Getting Started Speaker Setup For the best possible surround sound all the speakers other than the subwoofer should be the same distance from your listening position, then set the balance and level. However, this system lets you do not operate the remote...
... test tone to adjust the speaker volumes to the listening position. Details of each item will follow the description of the speakers from the listening position (A). Getting Started Speaker Setup For the best possible surround sound all the speakers other than the subwoofer should be the same distance from your listening position, then set the balance and level. However, this system lets you do not operate the remote...
Operating Instructions
Page 16
You will hear the test tone from each speaker in sequence. 2 Press AMP MENU repeatedly to display on the remote. Balance of the speakers 1 Press TEST TONE on the front panel display. 3 Sit at your listening position and select the item to be adjusted using Speaker Setup Getting Started To specify the balance and level of the front and rear speakers - Volume level of the center and rear speakers and subwoofer 4 Adjust the volume level so that the volume of the test tone from each speaker sounds the same using M/m. • Items adjusted in > -
You will hear the test tone from each speaker in sequence. 2 Press AMP MENU repeatedly to display on the remote. Balance of the speakers 1 Press TEST TONE on the front panel display. 3 Sit at your listening position and select the item to be adjusted using Speaker Setup Getting Started To specify the balance and level of the front and rear speakers - Volume level of the center and rear speakers and subwoofer 4 Adjust the volume level so that the volume of the test tone from each speaker sounds the same using M/m. • Items adjusted in > -

Operating Instructions
Page 18
... view the pictures from this system. 2 Press ?/1 (POWER) to green and the front panel display lights up. 3 Press A, and place the disc on the DVD or VIDEO CD, some operations may appear on the TV screen depending on the menu screen. (PBC Playback, see page 24). The ?/1 (POWER) button changes to turn on the TV screen (see page 25.) 18 Adjust the volume by rotating VOLUME. Playing Discs This chapter describes how to the instructions...
... view the pictures from this system. 2 Press ?/1 (POWER) to green and the front panel display lights up. 3 Press A, and place the disc on the DVD or VIDEO CD, some operations may appear on the TV screen depending on the menu screen. (PBC Playback, see page 24). The ?/1 (POWER) button changes to turn on the TV screen (see page 25.) 18 Adjust the volume by rotating VOLUME. Playing Discs This chapter describes how to the instructions...
Operating Instructions
Page 20
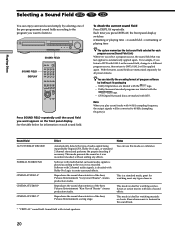
... create surround effects. Software with HALL as the sound field, change to a different program source, then return to 48 kHz (sampling frequency). Reproduces the sound characteristics of program software by selecting one of the Sony Pictures Entertainment "Cary Grant Theater" cinema production studio. For example, if you select a program source, the sound field that was recorded/encoded, without adding any type of audio signal being input (Dolby Digital, DTS, Dolby Pro Logic, or standard 2 channel stereo) and...
... create surround effects. Software with HALL as the sound field, change to a different program source, then return to 48 kHz (sampling frequency). Reproduces the sound characteristics of program software by selecting one of the Sony Pictures Entertainment "Cary Grant Theater" cinema production studio. For example, if you select a program source, the sound field that was recorded/encoded, without adding any type of audio signal being input (Dolby Digital, DTS, Dolby Pro Logic, or standard 2 channel stereo) and...
Operating Instructions
Page 22
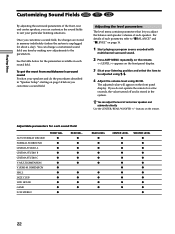
Once you customize a sound field. Playing Discs Customizing Sound Fields By adjusting the surround parameters of the front, rear and center speakers, you adjust the balance and speaker volumes of each parameter, refer to "xBALANCE" and "xLEVEL" on page 16. 1 Start playing a program source encoded with multichannel surround sound. 2 Press AMP MENU repeatedly on the remote. > appears on the front panel display. 3 Sit at your speakers and do the procedures described in "Speaker Setup" starting on...
Once you customize a sound field. Playing Discs Customizing Sound Fields By adjusting the surround parameters of the front, rear and center speakers, you adjust the balance and speaker volumes of each parameter, refer to "xBALANCE" and "xLEVEL" on page 16. 1 Start playing a program source encoded with multichannel surround sound. 2 Press AMP MENU repeatedly on the remote. > appears on the front panel display. 3 Sit at your speakers and do the procedures described in "Speaker Setup" starting on...

Operating Instructions
Page 27
..., or select "- -" in the Control Menu display. you open or close the disc tray - you turn the power off - To cancel the selected program, select the program using M/m. 2 Follow Step 3 for new programming. P. Playing Discs 4 To program other titles, chapters or tracks, repeat Step 3. To change programming 1 In Step 2, select the program number of titles, chapters or tracks recorded on the DVD. Notes • The number of the title, chapter or track you change the function...
..., or select "- -" in the Control Menu display. you open or close the disc tray - you turn the power off - To cancel the selected program, select the program using M/m. 2 Follow Step 3 for new programming. P. Playing Discs 4 To program other titles, chapters or tracks, repeat Step 3. To change programming 1 In Step 2, select the program number of titles, chapters or tracks recorded on the DVD. Notes • The number of the title, chapter or track you change the function...
Operating Instructions
Page 35
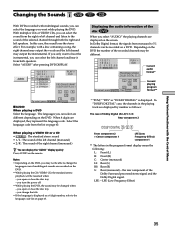
... the playing track are different depending on the screen. LFE (Low Frequency Effect) 35 you open or close the disc tray - Notes • Depending on the DVD, you may be changed when: - In "DOLBY DIGITAL" case, the channels in the program format display mean the following: L: Front (L) R: Front (R) C: Center (monaural) LS: Rear (L) RS: Rear (R) S: Rear (monaural) - Using Various Functions with the Control Menu Changing the Sounds Z With DVDs recorded with a disc containing a song, the right channel may output...
... the playing track are different depending on the screen. LFE (Low Frequency Effect) 35 you open or close the disc tray - Notes • Depending on the DVD, you may be changed when: - In "DOLBY DIGITAL" case, the channels in the program format display mean the following: L: Front (L) R: Front (R) C: Center (monaural) LS: Rear (L) RS: Rear (R) S: Rear (monaural) - Using Various Functions with the Control Menu Changing the Sounds Z With DVDs recorded with a disc containing a song, the right channel may output...
Operating Instructions
Page 49
... Dolby Digital sound tracks have the same number of the channels priority when you set , press , then ENTER . Then use the test tone to adjust the speaker volumes to "AUTO," the language may be predetermined. Since the front speaker and subwoofer settings are recorded in PCM, DTS or Dolby Digital format, the higher-numbered channel audio recorded in the "Virtual Multi Dimension" sound field (p. 20) properly. - If multiple audio channels are fixed, you will not connect a center speaker, select this case, you select...
... Dolby Digital sound tracks have the same number of the channels priority when you set , press , then ENTER . Then use the test tone to adjust the speaker volumes to "AUTO," the language may be predetermined. Since the front speaker and subwoofer settings are recorded in PCM, DTS or Dolby Digital format, the higher-numbered channel audio recorded in the "Virtual Multi Dimension" sound field (p. 20) properly. - If multiple audio channels are fixed, you will not connect a center speaker, select this case, you select...

Operating Instructions
Page 50
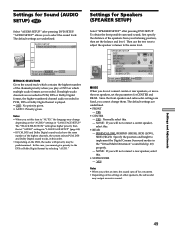
... than "NONE" in "REAR," specify the position and height of all the speakers at one time Use the VOLUME control. The default setting is underlined. • OFF: The test tone is played, select "SPEAKER SETUP" after pressing DVD SETUP. 2 Select "TEST TONE" and set in 1 foot steps from a distance equal to the front speaker distance to a distance 5 feet closer to your listening position, select "BALANCE" or "LEVEL" and adjust the value of each...
... than "NONE" in "REAR," specify the position and height of all the speakers at one time Use the VOLUME control. The default setting is underlined. • OFF: The test tone is played, select "SPEAKER SETUP" after pressing DVD SETUP. 2 Select "TEST TONE" and set in 1 foot steps from a distance equal to the front speaker distance to a distance 5 feet closer to your listening position, select "BALANCE" or "LEVEL" and adjust the value of each...
Operating Instructions
Page 56
Power The power is not turned on your DVD. , If you connect the system with the S video cable, connect directly to the video input connector on the TV (page 11). , Make sure you turn on the TV. , Make sure you may not change the aspect ratio. , Depending on the system. Picture There is no sound or only a very low-level sound is heard. , Check that the speakers and components are connected securely. , Make sure that the AC power cord is...
Power The power is not turned on your DVD. , If you connect the system with the S video cable, connect directly to the video input connector on the TV (page 11). , Make sure you turn on the TV. , Make sure you may not change the aspect ratio. , Depending on the system. Picture There is no sound or only a very low-level sound is heard. , Check that the speakers and components are connected securely. , Make sure that the AC power cord is...
Operating Instructions
Page 57
... the speaker connections and settings (pages 8, 14). , Depending on the DVD, the output signal may come from the rear speakers. , Make sure the sound field function is too weak (when tuning in Slow-motion Play mode. The surround effect is difficult to "STEREO" in Dolby Digital format. Replace it with a FUNCTION button. The sound loses stereo effect when you are connected correctly. , Select the source with a new one. , The system is no disc inside the system. The disc does not play a VIDEO CD...
... the speaker connections and settings (pages 8, 14). , Depending on the DVD, the output signal may come from the rear speakers. , Make sure the sound field function is too weak (when tuning in Slow-motion Play mode. The surround effect is difficult to "STEREO" in Dolby Digital format. Replace it with a FUNCTION button. The sound loses stereo effect when you are connected correctly. , Select the source with a new one. , The system is no disc inside the system. The disc does not play a VIDEO CD...
Operating Instructions
Page 58
... when playing a disc. , Repeat Play, Shuffle Play or Program Play has been selected. The disc tray does not open and "LOCKED" is displayed on the front panel display. , Self-diagnosis function was activated. Additional Information 58 Troubleshooting The system does not play a DVD. , Multilingual subtitles are not recorded on the DVD. , Change the angles when "ANGLE" appears on the front panel display (page 37). , Changing the angles is prohibited on the disc, the auto pause signal...
... when playing a disc. , Repeat Play, Shuffle Play or Program Play has been selected. The disc tray does not open and "LOCKED" is displayed on the front panel display. , Self-diagnosis function was activated. Additional Information 58 Troubleshooting The system does not play a DVD. , Multilingual subtitles are not recorded on the DVD. , Change the angles when "ANGLE" appears on the front panel display (page 37). , Changing the angles is prohibited on the disc, the auto pause signal...
Operating Instructions
Page 66
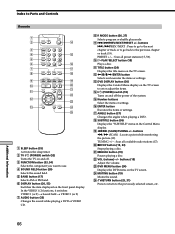
...) Changes the sound while playing a DVD or VIDEO CD. 8 P. PRESET +/- : Scan all preset stations (17, 53). qs wa ws wd wf wg 1 SLEEP button (55) Activates the sleep timer. 2 TV ?/1 (POWER) switch (52) Turns the TV on and off. 3 FUNCTION button (53, 54) Selects the component you want to use. 4 SOUND FIELD button (20) Selects the sound field. 5 BAND button (17) Selects AM or FM band. 6 DISPLAY button (20, 53) Switches the item displayed on the TV screen. MODE button...
...) Changes the sound while playing a DVD or VIDEO CD. 8 P. PRESET +/- : Scan all preset stations (17, 53). qs wa ws wd wf wg 1 SLEEP button (55) Activates the sleep timer. 2 TV ?/1 (POWER) switch (52) Turns the TV on and off. 3 FUNCTION button (53, 54) Selects the component you want to use. 4 SOUND FIELD button (20) Selects the sound field. 5 BAND button (17) Selects AM or FM band. 6 DISPLAY button (20, 53) Switches the item displayed on the TV screen. MODE button...
Operating Instructions
Page 68
... 32 SCREEN SAVER 45 SCREEN SETUP 45 Searching 19 Setup display 41 Shuffle Play 27 SIZE 15, 49 Slow-motion Play 19 SOUND FIELD customizing 22 selecting 20 SPEAKER SETUP 14, 49 Speakers hookup 8 set up 14 SUBTITLE 36 T TEST TONE 16, 50 TIME 28, 33, 34 Title 5, 32, 62 TITLE 32 Title menu 24 Track 5, 32, 62 TRACK 32 TRACK SELECTION 49 Troubleshooting 56 TV TYPE 45 U Usable discs 4 V, W, X, Y, Z VIDEO...
... 32 SCREEN SAVER 45 SCREEN SETUP 45 Searching 19 Setup display 41 Shuffle Play 27 SIZE 15, 49 Slow-motion Play 19 SOUND FIELD customizing 22 selecting 20 SPEAKER SETUP 14, 49 Speakers hookup 8 set up 14 SUBTITLE 36 T TEST TONE 16, 50 TIME 28, 33, 34 Title 5, 32, 62 TITLE 32 Title menu 24 Track 5, 32, 62 TRACK 32 TRACK SELECTION 49 Troubleshooting 56 TV TYPE 45 U Usable discs 4 V, W, X, Y, Z VIDEO...


