Operating Instructions
Page 3
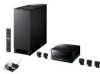
... way, such as power-supply cord or plug is used. About the S-AIR function The system is underlined. Notes or instructions for North American models. • The default setting is compatible with the system: • Surround amplifier: You can enjoy surround speaker sound wirelessly. • S-AIR receiver...cart, stand, tripod, bracket, or table specified by the manufacturer, or sold with the apparatus. These S-AIR products can enjoy system sound in this system so that the AC power cord (mains lead) can be purchased as an option (the S-AIR product lineup differs depending on ...
... way, such as power-supply cord or plug is used. About the S-AIR function The system is underlined. Notes or instructions for North American models. • The default setting is compatible with the system: • Surround amplifier: You can enjoy surround speaker sound wirelessly. • S-AIR receiver...cart, stand, tripod, bracket, or table specified by the manufacturer, or sold with the apparatus. These S-AIR products can enjoy system sound in this system so that the AC power cord (mains lead) can be purchased as an option (the S-AIR product lineup differs depending on ...
Operating Instructions
Page 5
... Display or Sound Track Language 80 [LANGUAGE SETUP] Settings for the Display 80 [VIDEO SETUP] Settings for the HDMI 82 [HDMI SETUP] Settings for the Audio 83 [AUDIO SETUP] Other Settings 84 [SYSTEM SETUP] Settings for the Speakers 85 [SPEAKER SETUP] Returning to the Default Settings.......... 88 Additional Information Precautions 89 Notes about the Discs 90 Troubleshooting...
... Display or Sound Track Language 80 [LANGUAGE SETUP] Settings for the Display 80 [VIDEO SETUP] Settings for the HDMI 82 [HDMI SETUP] Settings for the Audio 83 [AUDIO SETUP] Other Settings 84 [SYSTEM SETUP] Settings for the Speakers 85 [SPEAKER SETUP] Returning to the Default Settings.......... 88 Additional Information Precautions 89 Notes about the Discs 90 Troubleshooting...
Operating Instructions
Page 8
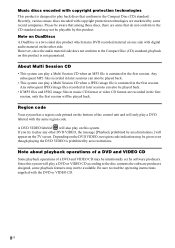
... the message [Playback prohibited by software producers. Any subsequent MP3 files recorded in later sessions can also be played back. • This system can play a Multi Session CD when an MP3 file is contained in the first session. Any subsequent JPEG image files recorded in later ...music discs encoded with copyright protection technologies are recorded in the first session. Region code Your system has a region code printed on the bottom of a DVD and VIDEO CD may be intentionally set by area limitations.] will play on the TV screen. Music discs encoded with copyright protection ...
... the message [Playback prohibited by software producers. Any subsequent MP3 files recorded in later sessions can also be played back. • This system can play a Multi Session CD when an MP3 file is contained in the first session. Any subsequent JPEG image files recorded in later ...music discs encoded with copyright protection technologies are recorded in the first session. Region code Your system has a region code printed on the bottom of a DVD and VIDEO CD may be intentionally set by area limitations.] will play on the TV screen. Music discs encoded with copyright protection ...
Operating Instructions
Page 11
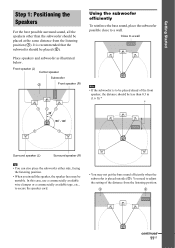
... should be placed at the same distance from the listening position. 3 3 continued 11US Close to a wall Note • If the subwoofer is to adjust the setting of the front speaker, the distance should be less than the subwoofer should be placed (2). You need to be placed ahead of the distance from...
... should be placed at the same distance from the listening position. 3 3 continued 11US Close to a wall Note • If the subwoofer is to adjust the setting of the front speaker, the distance should be less than the subwoofer should be placed (2). You need to be placed ahead of the distance from...

Operating Instructions
Page 12
... Use caution when placing the speakers and/or speaker stands (not supplied) that are : - Tip • When you change the position of the speakers, Sony recommends that are attached to vibrations - Extremely hot or cold - TV etc. • Do not place the subwoofer under a desk or in locations that... you change the settings. Dusty or dirty - Subject to the speakers on the location of the subwoofer. In this case, place the subwoofer away from the TV. Note ...
... Use caution when placing the speakers and/or speaker stands (not supplied) that are : - Tip • When you change the position of the speakers, Sony recommends that are attached to vibrations - Extremely hot or cold - TV etc. • Do not place the subwoofer under a desk or in locations that... you change the settings. Dusty or dirty - Subject to the speakers on the location of the subwoofer. In this case, place the subwoofer away from the TV. Note ...
Operating Instructions
Page 20
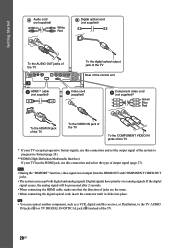
... and analog signals. Note • During the "DMPORT" function, video signal is not output from the HDMI OUT and COMPONENT VIDEO OUT jacks. • The system can connect another component, such as a VCR, digital satellite receiver, or PlayStation, to progressive format (page 28). ** HDMI (High-Definition Multimedia Interface) If your ... Red PB/CB PR/CR To the COMPONENT VIDEO IN jacks of the TV * If your TV accepts progressive format signals, use this connection and set the output signal of the system to the TV AUDIO IN jacks (A) or TV DIGITAL IN OPTICAL jack (B) instead of the TV. 20US
... and analog signals. Note • During the "DMPORT" function, video signal is not output from the HDMI OUT and COMPONENT VIDEO OUT jacks. • The system can connect another component, such as a VCR, digital satellite receiver, or PlayStation, to progressive format (page 28). ** HDMI (High-Definition Multimedia Interface) If your ... Red PB/CB PR/CR To the COMPONENT VIDEO IN jacks of the TV * If your TV accepts progressive format signals, use this connection and set the output signal of the system to the TV AUDIO IN jacks (A) or TV DIGITAL IN OPTICAL jack (B) instead of the TV. 20US
Operating Instructions
Page 25
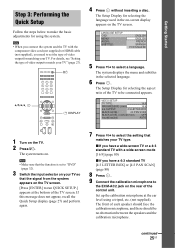
...on . If this message does not appear, recall the Quick Setup display (page 27) and perform again. 7 Press X/x to select the setting that the signal from the system appears on your TV so that matches your TV type. "/1 C/X/x/c, DISPLAY 4 Press without inserting a disc. The Setup Display for selecting ...screen mode [16:9] (page 80) x If you need to set to "DVD" (page 32). 3 Switch the input selector on the TV screen. [Press [ENTER] to run QUICK SETUP.] appears at the ear level using the system. The system displays the menu and subtitles in the on-screen display appears ...
...on . If this message does not appear, recall the Quick Setup display (page 27) and perform again. 7 Press X/x to select the setting that the signal from the system appears on your TV so that matches your TV type. "/1 C/X/x/c, DISPLAY 4 Press without inserting a disc. The Setup Display for selecting ...screen mode [16:9] (page 80) x If you need to set to "DVD" (page 32). 3 Switch the input selector on the TV screen. [Press [ENTER] to run QUICK SETUP.] appears at the ear level using the system. The system displays the menu and subtitles in the on-screen display appears ...
Operating Instructions
Page 26
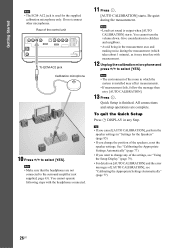
..."Using the Setup Display" (page 79). • For details on [AUTO CALIBRATION] and the error messages of the room in "Settings for the supplied calibration microphone only. To quit the Quick Setup Press DISPLAY in the measurement area and making noise during the measurement. ...Tip • If you change any Step. Be quiet during the measurement (which the system is output when [AUTO CALIBRATION] starts. Rear of the speakers, reset the speaker settings. Note • Make sure that the headphones are complete. Note • Loud test sound ...
..."Using the Setup Display" (page 79). • For details on [AUTO CALIBRATION] and the error messages of the room in "Settings for the supplied calibration microphone only. To quit the Quick Setup Press DISPLAY in the measurement area and making noise during the measurement. ...Tip • If you change any Step. Be quiet during the measurement (which the system is output when [AUTO CALIBRATION] starts. Rear of the speakers, reset the speaker settings. Note • Make sure that the headphones are complete. Note • Loud test sound ...
Operating Instructions
Page 27
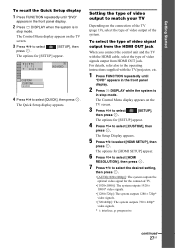
...], then press . The Setup Display appears. 5 Press X/x to select [CUSTOM], then press . Setting the type of video output to select the desired setting, then press . • [AUTO(1920×1080p)]: The system outputs the optimal video signal for [HDMI SETUP] appear. 6 Press X/x to select [HDMI RESOLUTION... 1 Press FUNCTION repeatedly until "DVD" appears in the front panel display. 2 Press DISPLAY when the system is in stop mode. To select the type of the system. Getting Started To recall the Quick Setup display 1 Press FUNCTION repeatedly until "DVD" appears in the ...
...], then press . The Setup Display appears. 5 Press X/x to select [CUSTOM], then press . Setting the type of video output to select the desired setting, then press . • [AUTO(1920×1080p)]: The system outputs the optimal video signal for [HDMI SETUP] appear. 6 Press X/x to select [HDMI RESOLUTION... 1 Press FUNCTION repeatedly until "DVD" appears in the front panel display. 2 Press DISPLAY when the system is in stop mode. To select the type of the system. Getting Started To recall the Quick Setup display 1 Press FUNCTION repeatedly until "DVD" appears in the ...
Operating Instructions
Page 28
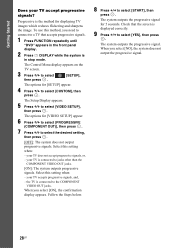
.... 1 Press FUNCTION repeatedly until "DVD" appears in the front panel display. 2 Press DISPLAY while the system is displayed correctly. 9 Press C/c to select [YES], then press . To use this setting when: - The Control Menu display appears on the TV screen. 3 Press X/x to select [VIDEO SETUP...connect to a TV that the screen is in stop mode. Select this setting when: - the TV is the method for 5 seconds. Progressive is connected to select the desired setting, then press . [OFF]: The system does not output progressive signals. your TV accepts progressive signals, and, ...
.... 1 Press FUNCTION repeatedly until "DVD" appears in the front panel display. 2 Press DISPLAY while the system is displayed correctly. 9 Press C/c to select [YES], then press . To use this setting when: - The Control Menu display appears on the TV screen. 3 Press X/x to select [VIDEO SETUP...connect to a TV that the screen is in stop mode. Select this setting when: - the TV is the method for 5 seconds. Progressive is connected to select the desired setting, then press . [OFF]: The system does not output progressive signals. your TV accepts progressive signals, and, ...
Operating Instructions
Page 30
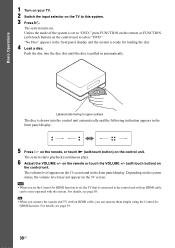
... (soft-touch button) on the TV screen. Push the disc into the control unit automatically and the following indication appears in automatically. Depending on the system status, the volume level may not appear on the control unit. Labeled side facing to select "DVD." Note • When you can be sync-...) on the control unit to upper surface The disc is drawn into the disc slot until the disc is set the Control for loading the disc. 4 Load a disc. Unless the mode of the system is pulled in the front panel display. 5 Press H on the remote, or touch N (soft-touch button) ...
... (soft-touch button) on the TV screen. Push the disc into the control unit automatically and the following indication appears in automatically. Depending on the system status, the volume level may not appear on the control unit. Labeled side facing to select "DVD." Note • When you can be sync-...) on the control unit to upper surface The disc is drawn into the disc slot until the disc is set the Control for loading the disc. 4 Load a disc. Unless the mode of the system is pulled in the front panel display. 5 Press H on the remote, or touch N (soft-touch button) ...
Operating Instructions
Page 31
...playback speed changes. To cancel muting, press it again or VOLUME + to normal playback speed, press H. M/ or /m4) while the system is set to the preceding frame while the system is turned off the sound temporarily MUTING. Two speeds are available. Press to go to "OFF" (page 66). Note • When the...To return to the or scene1) beginning of the current chapter, track or scene. Each time you can go to the next frame while the system is set to use the instant replay or instant advance function with some discs. 3)DVD VIDEO, DVD-R, DVD-RW, VIDEO CD only. 4)Except for JPEG ...
...playback speed changes. To cancel muting, press it again or VOLUME + to normal playback speed, press H. M/ or /m4) while the system is set to the preceding frame while the system is turned off the sound temporarily MUTING. Two speeds are available. Press to go to "OFF" (page 66). Note • When the...To return to the or scene1) beginning of the current chapter, track or scene. Each time you can go to the next frame while the system is set to use the instant replay or instant advance function with some discs. 3)DVD VIDEO, DVD-R, DVD-RW, VIDEO CD only. 4)Except for JPEG ...

Operating Instructions
Page 33
...in the front panel display. 2 Press SYSTEM MENU. 3 Press X/x repeatedly until "ATTENUATE" appears in the front panel display, then press or c. 4 Press X/x to the "TV" function. 33US The output level is made. 6 Press SYSTEM MENU. This is set to select a setting. • "ATT ON": You can... attenuates the input level. The setting is changed. • "ATT OFF": Normal input level. 5 Press . Note • "ATTENUATE" appears...
...in the front panel display. 2 Press SYSTEM MENU. 3 Press X/x repeatedly until "ATTENUATE" appears in the front panel display, then press or c. 4 Press X/x to the "TV" function. 33US The output level is made. 6 Press SYSTEM MENU. This is set to select a setting. • "ATT ON": You can... attenuates the input level. The setting is changed. • "ATT OFF": Normal input level. 5 Press . Note • "ATTENUATE" appears...

Operating Instructions
Page 34
... VCR sound from all the speakers in [HDMI SETUP] to [ON] (page 60), the System Audio Control function is made. 6 Press SYSTEM MENU. For details, see page 52. 5 Press . When you set the [CONTROL FOR HDMI] setting in this system. The setting is activated and no sound may need to turn off . For details, see "Connecting...
... VCR sound from all the speakers in [HDMI SETUP] to [ON] (page 60), the System Audio Control function is made. 6 Press SYSTEM MENU. For details, see page 52. 5 Press . When you set the [CONTROL FOR HDMI] setting in this system. The setting is activated and no sound may need to turn off . For details, see "Connecting...

Operating Instructions
Page 36
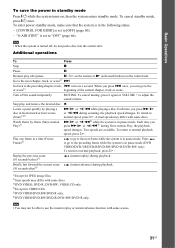
...you change the parental control level. • For a DVD-VR, VIDEO CD, CD, DATA CD, and DATA DVD, the system remembers the resume playback point for the earliest disc is set [MULTI-DISC RESUME] in the front panel display. 2 Press H. Tip • To play from exactly the same point. &#...8226; The point where you change or reset the settings on where you pressed x and "Resume" appears in [SYSTEM SETUP] is set to [ON]. Note • Depending on the Setup Display. - Note • If [MULTI-DISC RESUME] in the front...
...you change the parental control level. • For a DVD-VR, VIDEO CD, CD, DATA CD, and DATA DVD, the system remembers the resume playback point for the earliest disc is set [MULTI-DISC RESUME] in the front panel display. 2 Press H. Tip • To play from exactly the same point. &#...8226; The point where you change or reset the settings on where you pressed x and "Resume" appears in [SYSTEM SETUP] is set to [ON]. Note • Depending on the Setup Display. - Note • If [MULTI-DISC RESUME] in the front...
Operating Instructions
Page 37
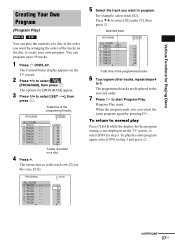
The options for the program setting is not displayed on the disc to create your own program. TRACK - - 7. PROGRAM ALL CLEAR 1. TRACK - - 4. TRACK - - 6. To return to program. continued 37US TRACK - - 4. TRACK - - 5. ... DISPLAY. TRACK - - 3. TRACK - - 0: 00:00 T - - 01 02 03 04 05 06 5 Select the track you can program up to start Program Play. Press X/x to select [SET t], then press . TRACK - - 5. To play Press CLEAR while the display for [PROGRAM] appear. 3 Press X/x to select [02] under [T], then press .
The options for the program setting is not displayed on the disc to create your own program. TRACK - - 7. PROGRAM ALL CLEAR 1. TRACK - - 4. TRACK - - 6. To return to program. continued 37US TRACK - - 4. TRACK - - 5. ... DISPLAY. TRACK - - 3. TRACK - - 0: 00:00 T - - 01 02 03 04 05 06 5 Select the track you can program up to start Program Play. Press X/x to select [SET t], then press . TRACK - - 5. To play Press CLEAR while the display for [PROGRAM] appear. 3 Press X/x to select [02] under [T], then press .

Operating Instructions
Page 40
4 Press . Note • You cannot use Repeat Play with a VIDEO CD and Super VCD with PBC playback. • When the system is playing a DATA CD/DATA DVD which contains MP3 files and JPEG image files, and their playing time is not the same, the audio sound ...will not match the image. • When [MODE (MUSIC, IMAGE)] is set to [IMAGE] (page 50), you cannot select [TRACK]. • When you press CLEAR to return to select [DISC MENU], then press . Press REPEAT on the...
4 Press . Note • You cannot use Repeat Play with a VIDEO CD and Super VCD with PBC playback. • When the system is playing a DATA CD/DATA DVD which contains MP3 files and JPEG image files, and their playing time is not the same, the audio sound ...will not match the image. • When [MODE (MUSIC, IMAGE)] is set to [IMAGE] (page 50), you cannot select [TRACK]. • When you press CLEAR to return to select [DISC MENU], then press . Press REPEAT on the...
Operating Instructions
Page 42
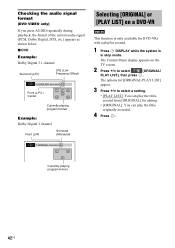
... LS RS Currently playing program format Example: Dolby Digital 3 channel Front (L/R) Surround (Monaural) Selecting [ORIGINAL] or [PLAY LIST] on the TV screen. 2 Press X/x to select a setting. • [PLAY LIST]: You can play the titles created from [ORIGINAL] for DVD-VRs with a playlist created. 1 Press DISPLAY while the...
... LS RS Currently playing program format Example: Dolby Digital 3 channel Front (L/R) Surround (Monaural) Selecting [ORIGINAL] or [PLAY LIST] on the TV screen. 2 Press X/x to select a setting. • [PLAY LIST]: You can play the titles created from [ORIGINAL] for DVD-VRs with a playlist created. 1 Press DISPLAY while the...
Operating Instructions
Page 46
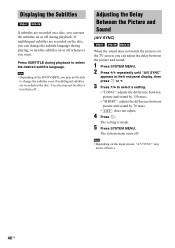
The system menu turns off during playback. Note • Depending on the DVD VIDEO, you may not be able to turn them off. If multilingual subtitles are ... the Subtitles If subtitles are recorded on a disc, you want. You also may not be able to change the subtitle language during playback to select a setting. • "LONG": adjusts the difference between picture and sound by 130 msec. • "SHORT": adjusts the difference between the picture and sound. 1 Press...
The system menu turns off during playback. Note • Depending on the DVD VIDEO, you may not be able to turn them off. If multilingual subtitles are ... the Subtitles If subtitles are recorded on a disc, you want. You also may not be able to change the subtitle language during playback to select a setting. • "LONG": adjusts the difference between picture and sound by 130 msec. • "SHORT": adjusts the difference between the picture and sound. 1 Press...
Operating Instructions
Page 49
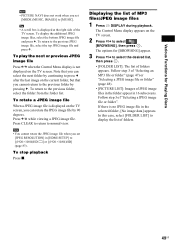
... press . Note that you can select the next folder by pressing C. The options for Playing Discs Note • PICTURE NAVI does not work when you set [MODE (MUSIC, IMAGE)] to [MUSIC]. If there is displayed at the right side of MP3 files/JPEG image files 1 Press DISPLAY during playback. Various... select the desired list, then press . • [FOLDER LIST]: The list of folders. 49US Note • You cannot rotate the JPEG image file when you set [JPEG RESOLUTION] in [HDMI SETUP] to [(1920×1080i)HD ] or [(1920×1080i)HD] (page 83). Follow step 3 of "Selecting an MP3 ...
... press . Note that you can select the next folder by pressing C. The options for Playing Discs Note • PICTURE NAVI does not work when you set [MODE (MUSIC, IMAGE)] to [MUSIC]. If there is displayed at the right side of MP3 files/JPEG image files 1 Press DISPLAY during playback. Various... select the desired list, then press . • [FOLDER LIST]: The list of folders. 49US Note • You cannot rotate the JPEG image file when you set [JPEG RESOLUTION] in [HDMI SETUP] to [(1920×1080i)HD ] or [(1920×1080i)HD] (page 83). Follow step 3 of "Selecting an MP3 ...


