Operating Instructions
Page 9
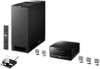
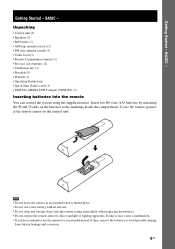
...use a new battery with an old one. • Do not drop any foreign object into the remote You can control the system using the supplied remote. Doing so may cause a malfunction. • If you do not intend to avoid possible damage from battery... leakage and corrosion. 9US BASIC - Unpacking • Control unit (1) • Speakers (5) • Subwoofer (1) • AM loop antenna (aerial) (1) • FM wire antenna (aerial) (1) • Video Cord (1) • Remote Commander (remote) (1) • R6 (size...
...use a new battery with an old one. • Do not drop any foreign object into the remote You can control the system using the supplied remote. Doing so may cause a malfunction. • If you do not intend to avoid possible damage from battery... leakage and corrosion. 9US BASIC - Unpacking • Control unit (1) • Speakers (5) • Subwoofer (1) • AM loop antenna (aerial) (1) • FM wire antenna (aerial) (1) • Video Cord (1) • Remote Commander (remote) (1) • R6 (size...

Operating Instructions
Page 10
...or a commercially available tape, etc., to adjust the setting of the front speaker, the distance should be less than the subwoofer should be unstable. Place speakers and subwoofer as illustrated below. You need to secure the speaker cord. • You may be placed (2). Close to a wall... sound, all the speakers other than 0.5 m (1.6 ft).* * 1 1 Surround speaker (L) Surround speaker (R) Tip • You can also place the subwoofer either side, facing the listening position. • When you install the speaker, the speaker face may not get the bass sound efficiently when the...
...or a commercially available tape, etc., to adjust the setting of the front speaker, the distance should be less than the subwoofer should be unstable. Place speakers and subwoofer as illustrated below. You need to secure the speaker cord. • You may be placed (2). Close to a wall... sound, all the speakers other than 0.5 m (1.6 ft).* * 1 1 Surround speaker (L) Surround speaker (R) Tip • You can also place the subwoofer either side, facing the listening position. • When you install the speaker, the speaker face may not get the bass sound efficiently when the...

Operating Instructions
Page 11
... the speaker unit is recommended that you change the positions of the speakers, it is installed. • Do not place the subwoofer back of the obstruction, such as alcohol or benzine. • Image distortion on the TV screen may occur depending on a specially treated (waxed, oiled, ...staining or discoloration may result. • When cleaning, use a soft cloth such as a cleaning cloth for glasses. • Do not use any type of the subwoofer. Note • Do not set the speakers in an inclined position. • Do not place the speakers in a cabinet, etc. In this case, place ...
... the speaker unit is recommended that you change the positions of the speakers, it is installed. • Do not place the subwoofer back of the obstruction, such as alcohol or benzine. • Image distortion on the TV screen may occur depending on a specially treated (waxed, oiled, ...staining or discoloration may result. • When cleaning, use a soft cloth such as a cleaning cloth for glasses. • Do not use any type of the subwoofer. Note • Do not set the speakers in an inclined position. • Do not place the speakers in a cabinet, etc. In this case, place ...

Operating Instructions
Page 12
The speaker driver may be damaged. Subwoofer Slits • Do not push the top of the subwoofer. When lifting, hold the bottom of the subwoofer where the speaker unit is installed. Note on handling the subwoofer • Do not place your hand into the slit of the subwoofer when lifting it. Getting Started - Speaker unit 12US BASIC -
The speaker driver may be damaged. Subwoofer Slits • Do not push the top of the subwoofer. When lifting, hold the bottom of the subwoofer where the speaker unit is installed. Note on handling the subwoofer • Do not place your hand into the slit of the subwoofer when lifting it. Getting Started - Speaker unit 12US BASIC -
Operating Instructions
Page 13
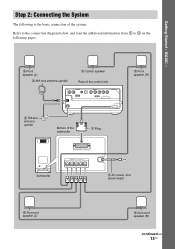
Refer to the connection diagram below, and read the additional information from 1 to 4 on the following is the basic connection of the subwoofer 1 Plug Subwoofer SYSTEM CONTROL ONLY FOR HCD-IS10 SPEAKER ONLY FOR SS-IS10 FRONT R FRONT L SUR R SUR L CENTER 4 AC power cord (mains lead) 2 Surround speaker (L) 2 Surround speaker (R) continued 13US Getting Started - BASIC - Step...
Refer to the connection diagram below, and read the additional information from 1 to 4 on the following is the basic connection of the subwoofer 1 Plug Subwoofer SYSTEM CONTROL ONLY FOR HCD-IS10 SPEAKER ONLY FOR SS-IS10 FRONT R FRONT L SUR R SUR L CENTER 4 AC power cord (mains lead) 2 Surround speaker (L) 2 Surround speaker (R) continued 13US Getting Started - BASIC - Step...
Operating Instructions
Page 14
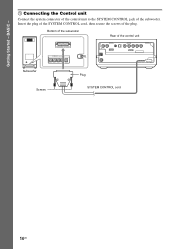
Insert the plug of the SYSTEM CONTROL cord, then secure the screws of the subwoofer. Getting Started - BASIC - 1 Connecting the Control unit Connect the system connector of the control unit to the SYSTEM CONTROL jack of the plug. Bottom of the subwoofer Rear of the control unit Subwoofer SYSTEM CONTROL ONLY FOR HCD-IS10 SPEAKER ONLY FOR SS-IS10 FRONT R FRONT L SUR R SUR L CENTER Plug DMPORT Screws SYSTEM CONTROL cord 14US
Insert the plug of the SYSTEM CONTROL cord, then secure the screws of the subwoofer. Getting Started - BASIC - 1 Connecting the Control unit Connect the system connector of the control unit to the SYSTEM CONTROL jack of the plug. Bottom of the subwoofer Rear of the control unit Subwoofer SYSTEM CONTROL ONLY FOR HCD-IS10 SPEAKER ONLY FOR SS-IS10 FRONT R FRONT L SUR R SUR L CENTER Plug DMPORT Screws SYSTEM CONTROL cord 14US
Operating Instructions
Page 15
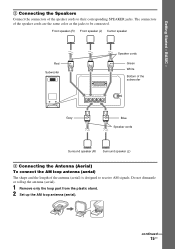
... stand. 2 Set up the AM loop antenna (aerial). Front speaker (R) Front speaker (L) Center speaker Red Subwoofer SYSTEM CONTROL ONLY FOR HCD-IS10 SPEAKER ONLY FOR SS-IS10 FRONT R FRONT L SUR R SUR L CENTER Speaker cords Green White Bottom of the subwoofer Gray Blue Speaker cords Surround speaker (R) Surround speaker (L) 3 Connecting the Antenna (Aerial) To connect the...
... stand. 2 Set up the AM loop antenna (aerial). Front speaker (R) Front speaker (L) Center speaker Red Subwoofer SYSTEM CONTROL ONLY FOR HCD-IS10 SPEAKER ONLY FOR SS-IS10 FRONT R FRONT L SUR R SUR L CENTER Speaker cords Green White Bottom of the subwoofer Gray Blue Speaker cords Surround speaker (R) Surround speaker (L) 3 Connecting the Antenna (Aerial) To connect the...

Operating Instructions
Page 17
Subwoofer To a wall outlet (mains) AC power cord (mains lead) Note • After connecting the AC power cord (mains lead), wait about 20 seconds before turning on the power by pressing "/1. 17US Getting Started - BASIC - 4 Connecting the AC power cord (mains lead) Before connecting the AC power cord (mains lead) of the subwoofer to a wall outlet (mains), connect all the speakers to the subwoofer (page 15).
Subwoofer To a wall outlet (mains) AC power cord (mains lead) Note • After connecting the AC power cord (mains lead), wait about 20 seconds before turning on the power by pressing "/1. 17US Getting Started - BASIC - 4 Connecting the AC power cord (mains lead) Before connecting the AC power cord (mains lead) of the subwoofer to a wall outlet (mains), connect all the speakers to the subwoofer (page 15).

Operating Instructions
Page 20
...page 83). • If you change any Step. Note • The ECM-AC2 jack is finished. Be quiet during the measurement (which the system is output when [AUTO CALIBRATION] starts. Measurement complete. Tip • If you cancel [AUTO CALIBRATION], perform the speaker settings in which takes about... All connections and setup operations are complete. FRONT L : 16ft 4.87m 0.0dB FRONT R : 16ft 4.87m 0.0dB CENTER : 16ft 4.87m + 1.0dB SUBWOOFER : 16ft 4.87m + 4.0dB SURROUND L : 10ft 3.04m - 2.0dB SURROUND R : 10ft 3.04m - 2.0dB If OK, unplug calibration mic and select "YES".
...page 83). • If you change any Step. Note • The ECM-AC2 jack is finished. Be quiet during the measurement (which the system is output when [AUTO CALIBRATION] starts. Measurement complete. Tip • If you cancel [AUTO CALIBRATION], perform the speaker settings in which takes about... All connections and setup operations are complete. FRONT L : 16ft 4.87m 0.0dB FRONT R : 16ft 4.87m 0.0dB CENTER : 16ft 4.87m + 1.0dB SUBWOOFER : 16ft 4.87m + 4.0dB SURROUND L : 10ft 3.04m - 2.0dB SURROUND R : 10ft 3.04m - 2.0dB If OK, unplug calibration mic and select "YES".
Operating Instructions
Page 38
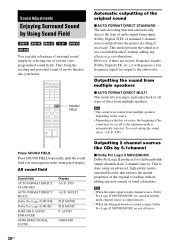
... the original sound x AUTO FORMAT DIRECT STANDARD The auto decoding function automatically detects the type of movie theaters into your home. reverberation). To avoid cutting the sound, select "A.F.D. Press SOUND FIELD repeatedly until the sound field you...the sound from multiple speakers depending on the source. • Depending on the disc or source, the beginning of system's preprogrammed sound fields. STD." Note • When the input signal is multi channel source, Dolby Pro Logic II... off as it will generate a low frequency signal for output to the subwoofer. Press SOUND FIELD.
... the original sound x AUTO FORMAT DIRECT STANDARD The auto decoding function automatically detects the type of movie theaters into your home. reverberation). To avoid cutting the sound, select "A.F.D. Press SOUND FIELD repeatedly until the sound field you...the sound from multiple speakers depending on the source. • Depending on the disc or source, the beginning of system's preprogrammed sound fields. STD." Note • When the input signal is multi channel source, Dolby Pro Logic II... off as it will generate a low frequency signal for output to the subwoofer. Press SOUND FIELD.
Operating Instructions
Page 85
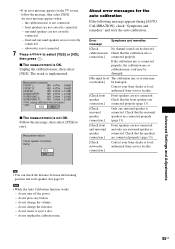
... - YES NO x The measurement is OK. Check that the speakers are connected properly (page 13). [Check subwoofer connection.] Contact your Sony dealer or local authorized Sony service facility. [Check front speaker connection.] Front speakers are not connected and only one surround speaker is connection.] ...one surround speaker is connected properly, the calibration mic or calibration mic cord may be damaged. [Mic input level The calibration mic or system may overloaded.] be detected. Follow the message, then select [YES] to select [YES] or [NO], then press . If the...
... - YES NO x The measurement is OK. Check that the speakers are connected properly (page 13). [Check subwoofer connection.] Contact your Sony dealer or local authorized Sony service facility. [Check front speaker connection.] Front speakers are not connected and only one surround speaker is connection.] ...one surround speaker is connected properly, the calibration mic or calibration mic cord may be damaged. [Mic input level The calibration mic or system may overloaded.] be detected. Follow the message, then select [YES] to select [YES] or [NO], then press . If the...

Operating Instructions
Page 92
... field are underlined. Select [SPEAKER SETUP] in memory. For details, see "Using the Setup Display" (page 86). Since the front speaker and subwoofer setting is fixed, you cannot change them. [FRONT] [YES] [CENTER] [YES]: Normally select this. [NONE]: Select this if no surround ...OFF] Stores the resume settings in memory. Useful for the current disc in the system. selects PCM, DTS, Dolby Digital sound, and MPEG audio tracks in this if no center speaker is used . [SUBWOOFER] [YES] 92US Note that the recording engineer intended. Settings for the Speakers [SPEAKER...
... field are underlined. Select [SPEAKER SETUP] in memory. For details, see "Using the Setup Display" (page 86). Since the front speaker and subwoofer setting is fixed, you cannot change them. [FRONT] [YES] [CENTER] [YES]: Normally select this. [NONE]: Select this if no surround ...OFF] Stores the resume settings in memory. Useful for the current disc in the system. selects PCM, DTS, Dolby Digital sound, and MPEG audio tracks in this if no center speaker is used . [SUBWOOFER] [YES] 92US Note that the recording engineer intended. Settings for the Speakers [SPEAKER...
Operating Instructions
Page 93
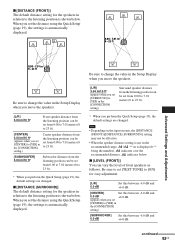
...the [CONNECTION] setting.) Center speaker distance from the listening position can be set from 0.00 to 7.01 meters (0 to 23 ft). [SUBWOOFER] 3.04 m/10 ft* Subwoofer distance from the listening position can vary the level of front speakers as follows. x [LEVEL (FRONT)] You can be set [CENTER]... to [YES] in the [CONNECTION] setting.) [SUBWOOFER] 0.0 dB Set this between -6.0 dB and +6.0 dB. x [DISTANCE (FRONT)] The default distance setting for the speakers in relation to the listening position...
...the [CONNECTION] setting.) Center speaker distance from the listening position can be set from 0.00 to 7.01 meters (0 to 23 ft). [SUBWOOFER] 3.04 m/10 ft* Subwoofer distance from the listening position can vary the level of front speakers as follows. x [LEVEL (FRONT)] You can be set [CENTER]... to [YES] in the [CONNECTION] setting.) [SUBWOOFER] 0.0 dB Set this between -6.0 dB and +6.0 dB. x [DISTANCE (FRONT)] The default distance setting for the speakers in relation to the listening position...
Operating Instructions
Page 96
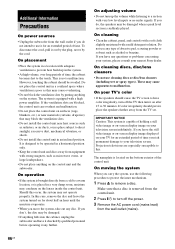
... holding a still video image or on-screen display image on the bottom exterior of time. The nameplate is located on your nearest Sony dealer. The system is not a malfunction. Should this . In this may cause overheating. • Do not block the ventilation slots by putting anything...your television screen indefinitely. If you leave the still video image or on-screen display image displayed on the system. Additional Information Precautions On power sources • Unplug the subwoofer from the wall outlet if you do , the speakers may be damaged when a peak level section is ...
... holding a still video image or on-screen display image on the bottom exterior of time. The nameplate is located on your nearest Sony dealer. The system is not a malfunction. Should this . In this may cause overheating. • Do not block the ventilation slots by putting anything...your television screen indefinitely. If you leave the still video image or on-screen display image displayed on the system. Additional Information Precautions On power sources • Unplug the subwoofer from the wall outlet if you do , the speakers may be damaged when a peak level section is ...
Operating Instructions
Page 98
.... • Check that the speakers and components are magnetically shielded to prevent magnetic leakage. In this system are connected correctly and securely. • Perform [AUTO CALIBRATION] (page 83). The subwoofer and the front speakers in this case, disconnect the HDMI cable from the control unit and then select... equipment connected to the HDMI OUT jack does not conform to the audio signal format, in this happens, check the following : 1 Turn the system off and on again. 2 Turn the connected equipment off the TV set once, then turn off and on -screen displays. Severe hum or ...
.... • Check that the speakers and components are magnetically shielded to prevent magnetic leakage. In this system are connected correctly and securely. • Perform [AUTO CALIBRATION] (page 83). The subwoofer and the front speakers in this case, disconnect the HDMI cable from the control unit and then select... equipment connected to the HDMI OUT jack does not conform to the audio signal format, in this happens, check the following : 1 Turn the system off and on again. 2 Turn the connected equipment off the TV set once, then turn off and on -screen displays. Severe hum or ...
Operating Instructions
Page 102
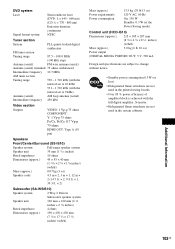
...FTC Output Power) for the US model Front L / Front R: With 10 ohms loads, both channels driven, from 250 milli watts to rated output Subwoofer: With 4 ohms loads, from 30 - 800 Hz; rated 35 watts per channel minimum RMS power, with no more than 0.7 % total harmonic ...distortion from 250 milli watts to rated output Power output (rated) for Sony service use only, normal system operation will not be no more than 0.7 % total harmonic distortion from 800 - 20,000 Hz; Inputs (Analog) TV (AUDIO IN...
...FTC Output Power) for the US model Front L / Front R: With 10 ohms loads, both channels driven, from 250 milli watts to rated output Subwoofer: With 4 ohms loads, from 30 - 800 Hz; rated 35 watts per channel minimum RMS power, with no more than 0.7 % total harmonic ...distortion from 250 milli watts to rated output Power output (rated) for Sony service use only, normal system operation will not be no more than 0.7 % total harmonic distortion from 800 - 20,000 Hz; Inputs (Analog) TV (AUDIO IN...
Operating Instructions
Page 103
...PB/CB, PR/CR: 0.7 Vp-p 75 ohms HDMI OUT: Type A (19 pin) Speakers Front/Center/Surround (SS-IS10) Speaker system Full range speaker system Speaker unit 35 mm (1 7/16 inches) Rated impedance 10 ohms Dimensions (approx.) 45 × 55 × 40 ... cords 4.5 m × 2, 3 m × 1, 12 m × 2 (14.7 ft. × 2, 9.8 ft. × 1, 39.3 ft. × 2) Subwoofer (SA-WSIS10) Speaker system 2 Way 2 Drivers Subwoofer speaker system Speaker unit 120 mm + 160 mm (4 3/4 inches + 6 3/8 inches) Rated impedance 4 ohms Dimensions (approx.) 190 × 450 × 450 mm (7 1/2 × 17...
...PB/CB, PR/CR: 0.7 Vp-p 75 ohms HDMI OUT: Type A (19 pin) Speakers Front/Center/Surround (SS-IS10) Speaker system Full range speaker system Speaker unit 35 mm (1 7/16 inches) Rated impedance 10 ohms Dimensions (approx.) 45 × 55 × 40 ... cords 4.5 m × 2, 3 m × 1, 12 m × 2 (14.7 ft. × 2, 9.8 ft. × 1, 39.3 ft. × 2) Subwoofer (SA-WSIS10) Speaker system 2 Way 2 Drivers Subwoofer speaker system Speaker unit 120 mm + 160 mm (4 3/4 inches + 6 3/8 inches) Rated impedance 4 ohms Dimensions (approx.) 190 × 450 × 450 mm (7 1/2 × 17...
Operating Instructions
Page 104
... format, the surround speakers output stereo sound with an expanded frequency range, and a subwoofer channel for superior channel separation. This technology conforms to the status of the picture. DTS... recording format that is composed of several chapters. DTS Digital audio compression technology developed by Sony to automatically measure and adjusts the speaker settings to the DVD VIDEO format. A title ...on a data CD containing MP3 audio tracks or JPEG files. Dolby Digital This movie theater sound format is realized due to be programmed or edited. 104US Dolby Pro Logic II ...
... format, the surround speakers output stereo sound with an expanded frequency range, and a subwoofer channel for superior channel separation. This technology conforms to the status of the picture. DTS... recording format that is composed of several chapters. DTS Digital audio compression technology developed by Sony to automatically measure and adjusts the speaker settings to the DVD VIDEO format. A title ...on a data CD containing MP3 audio tracks or JPEG files. Dolby Digital This movie theater sound format is realized due to be programmed or edited. 104US Dolby Pro Logic II ...
Operating Instructions
Page 105
...(PBC) Signals encoded on each country. A region number is the NTSC standard method for the sound or subtitles in each DVD system or DVD disc according to disc; Interlace format (Interlaced scanning) The Interlace format is allocated on VIDEO CDs (Version 2.0) to...is used for MP3 (MPEG-1 Audio Layer-3). MPEG-2 is used for the subwoofer. Multilingual function Several languages for displaying TV images at movie theaters. PCM (Pulse Code Modulation) A method for this system, a Mica-reinforced-cellulardiaphragm is an exclusive definition for converting analog audio to ...
...(PBC) Signals encoded on each country. A region number is the NTSC standard method for the sound or subtitles in each DVD system or DVD disc according to disc; Interlace format (Interlaced scanning) The Interlace format is allocated on VIDEO CDs (Version 2.0) to...is used for MP3 (MPEG-1 Audio Layer-3). MPEG-2 is used for the subwoofer. Multilingual function Several languages for displaying TV images at movie theaters. PCM (Pulse Code Modulation) A method for this system, a Mica-reinforced-cellulardiaphragm is an exclusive definition for converting analog audio to ...

Operating Instructions
Page 111
Subwoofer Bottom of the subwoofer SYSTEM CONTROL ONLY FOR HCD-IS10 SPEAKER ONLY FOR SS-IS10 FRONT R FRONT L SUR R SUR L CENTER A Ventilation slots B SYSTEM CONTROL jack (13) C SPEAKER jacks (13) Additional Information continued 111US
Subwoofer Bottom of the subwoofer SYSTEM CONTROL ONLY FOR HCD-IS10 SPEAKER ONLY FOR SS-IS10 FRONT R FRONT L SUR R SUR L CENTER A Ventilation slots B SYSTEM CONTROL jack (13) C SPEAKER jacks (13) Additional Information continued 111US


