Operating Instructions
Page 4
... 56 Using the DIGITAL MEDIA PORT Adapter 59 Other Operations Getting Optimal Surround Sound for a Room 60 Calibrating the Appropriate Settings Automatically 61 Controlling the TV with the Supplied Remote 62 Using the Sound Effect 63 Using the Sleep Timer 63 Changing the Brightness of the Front Panel Display 64 Viewing... 69 Troubleshooting 70 Self-diagnosis Function 75 Specifications 76 Glossary 77 Language Code List 80 Index to Parts and Control 81 Guide to the Control Menu Display ..... 85 Index 88 4US
... 56 Using the DIGITAL MEDIA PORT Adapter 59 Other Operations Getting Optimal Surround Sound for a Room 60 Calibrating the Appropriate Settings Automatically 61 Controlling the TV with the Supplied Remote 62 Using the Sound Effect 63 Using the Sleep Timer 63 Changing the Brightness of the Front Panel Display 64 Viewing... 69 Troubleshooting 70 Self-diagnosis Function 75 Specifications 76 Glossary 77 Language Code List 80 Index to Parts and Control 81 Guide to the Control Menu Display ..... 85 Index 88 4US
Operating Instructions
Page 20
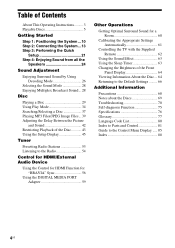
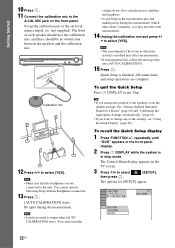
... R SUR L HDMI OUT DC5V 0.7A MAX DMPORT To the wall outlet (mains) Y PB/CB PR/CR COMPONENT VIDEO OUT R AUDIO IN L VIDEO OUT TV/VIDEO ANTENNA COAXIAL 75 FM AM About the demonstration After connecting the AC power cord (mains lead), the demonstration appears in the front panel display... default settings (ex., after performing "COLD RESET" (page 66)), you purchase the system from new, or if the system is made. 6 Press SYSTEM MENU. Setting the demonstration mode to the unit. Tip • When you can turn off the demonstration simply by pressing [/1 on /off . Getting Started 5...
... R SUR L HDMI OUT DC5V 0.7A MAX DMPORT To the wall outlet (mains) Y PB/CB PR/CR COMPONENT VIDEO OUT R AUDIO IN L VIDEO OUT TV/VIDEO ANTENNA COAXIAL 75 FM AM About the demonstration After connecting the AC power cord (mains lead), the demonstration appears in the front panel display... default settings (ex., after performing "COLD RESET" (page 66)), you purchase the system from new, or if the system is made. 6 Press SYSTEM MENU. Setting the demonstration mode to the unit. Tip • When you can turn off the demonstration simply by pressing [/1 on /off . Getting Started 5...
Operating Instructions
Page 21
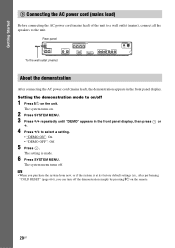
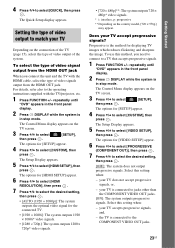
"/1 LANGUAGE SETUP OSD: MENU: AUDIO: SUBTITLE: ENGLISH ENGLISH FRENCH SPANISH PORTUGUESE 5 Press X/x to be connected appears. The Setup Display for selecting the speaker formation appears. 9 Press C/c to set to "DVD" (page 24). 3 Switch the input selector on your TV so that the signal from the system ... again. 4 Press without inserting a disc. For details, see "Getting Optimal Surround Sound for matching your TV. The system displays the menu and subtitles in the on the TV screen. [Press [ENTER] to select the setting that the function is set the type of video output...
"/1 LANGUAGE SETUP OSD: MENU: AUDIO: SUBTITLE: ENGLISH ENGLISH FRENCH SPANISH PORTUGUESE 5 Press X/x to be connected appears. The Setup Display for selecting the speaker formation appears. 9 Press C/c to set to "DVD" (page 24). 3 Switch the input selector on your TV so that the signal from the system ... again. 4 Press without inserting a disc. For details, see "Getting Optimal Surround Sound for matching your TV. The system displays the menu and subtitles in the on the TV screen. [Press [ENTER] to select the setting that the function is set the type of video output...
Operating Instructions
Page 22
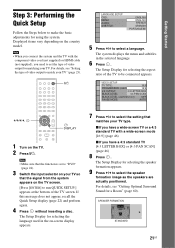
... front panel display. 2 Press DISPLAY while the system is installed may interfere with the headphones connected. 13 Press . [AUTO CALIBRATION] starts. The Control Menu display appears on the TV screen. 3 Press X/x to the A.CAL MIC jack on the front panel. Note • Loud test sound is finished. To quit the Quick Setup...
... front panel display. 2 Press DISPLAY while the system is installed may interfere with the headphones connected. 13 Press . [AUTO CALIBRATION] starts. The Control Menu display appears on the TV screen. 3 Press X/x to the A.CAL MIC jack on the front panel. Note • Loud test sound is finished. To quit the Quick Setup...
Operating Instructions
Page 23
... 480p* video signals. * i: interlace, p: progressive ** Depending on the country model, [720 × 576p] may appear. The Control Menu display appears on the connection of the TV (page 15), select the type of video output of video signal output from the HDMI OUT jack When you need to connect... [SETUP], then press . Setting the type of video signals output from the HDMI OUT jack. The Control Menu display appears on the TV screen. 3 Press X/x to match your TV Depending on the TV screen. 3 Press X/x to the COMPONENT VIDEO OUT jacks. 23US Getting Started To use this method, you ...
... 480p* video signals. * i: interlace, p: progressive ** Depending on the country model, [720 × 576p] may appear. The Control Menu display appears on the connection of the TV (page 15), select the type of video output of video signal output from the HDMI OUT jack When you need to connect... [SETUP], then press . Setting the type of video signals output from the HDMI OUT jack. The Control Menu display appears on the TV screen. 3 Press X/x to match your TV Depending on the TV screen. 3 Press X/x to the COMPONENT VIDEO OUT jacks. 23US Getting Started To use this method, you ...
Operating Instructions
Page 24
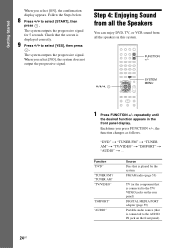
...select [ON], the confirmation display appears. FUNCTION +/- "DVD" t "TUNER FM" t "TUNER AM" t "TV/VIDEO" t "DMPORT" t "AUDIO" t ... Each time you press FUNCTION +/-, the function changes as follows.... press . Function "DVD" "TUNER FM"/ "TUNER AM" "TV/VIDEO" "DMPORT" "AUDIO" Source Disc that is played by the system FM/AM radio (page 53) TV (or the component that is displayed correctly. 9 Press C/c to... select [YES], then press . Step 4: Enjoying Sound from all the Speakers You can enjoy DVD, TV, or VCR sound...
...select [ON], the confirmation display appears. FUNCTION +/- "DVD" t "TUNER FM" t "TUNER AM" t "TV/VIDEO" t "DMPORT" t "AUDIO" t ... Each time you press FUNCTION +/-, the function changes as follows.... press . Function "DVD" "TUNER FM"/ "TUNER AM" "TV/VIDEO" "DMPORT" "AUDIO" Source Disc that is played by the system FM/AM radio (page 53) TV (or the component that is displayed correctly. 9 Press C/c to... select [YES], then press . Step 4: Enjoying Sound from all the Speakers You can enjoy DVD, TV, or VCR sound...
Operating Instructions
Page 25
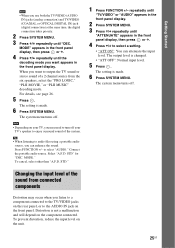
... • "ATT ON": You can enhance the sound. The setting is made . 6 Press SYSTEM MENU. Note • Depending on your TV, you may occur when you listen to a component connected to the TV/VIDEO jacks on the rear panel, or to enjoy surround sound of a 2 channel source from connected ...components Distortion may need to turn off your TV's speaker to the AUDIO IN jack on the unit. 25US repeatedly until "TV/VIDEO" or "AUDIO" appears in the front panel display. 2 Press SYSTEM MENU. 3 Press X/x repeatedly until "DEC. to output the TV sound or stereo sound of the system. MODE...
... • "ATT ON": You can enhance the sound. The setting is made . 6 Press SYSTEM MENU. Note • Depending on your TV, you may occur when you listen to a component connected to the TV/VIDEO jacks on the rear panel, or to enjoy surround sound of a 2 channel source from connected ...components Distortion may need to turn off your TV's speaker to the AUDIO IN jack on the unit. 25US repeatedly until "TV/VIDEO" or "AUDIO" appears in the front panel display. 2 Press SYSTEM MENU. 3 Press X/x repeatedly until "DEC. to output the TV sound or stereo sound of the system. MODE...
Operating Instructions
Page 32
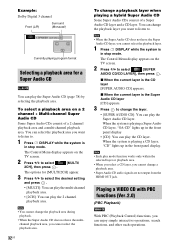
... playback area and a multi-channel playback area. The options for a Super Audio CD You can play the Super Audio CD layer. The Control Menu display appears on the TV screen. 2 Press X/x to . Note • Each play the 2 channel playback area. You can change the playback layer you want to listen to select...
... playback area and a multi-channel playback area. The options for a Super Audio CD You can play the Super Audio CD layer. The Control Menu display appears on the TV screen. 2 Press X/x to . Note • Each play the 2 channel playback area. You can change the playback layer you want to listen to select...
Operating Instructions
Page 33
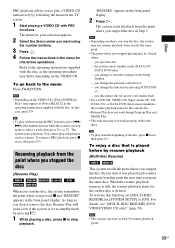
...in Step 1. You cannot play still pictures such as [Press SELECT] in the front panel display. you change the parental control level. - The menu for the earliest disc is in stop the disc, the system remembers the point where you pressed x and "RESUME" appears in the operating instructions ... the beginning of the disc, press x twice, then press H. Disc PBC playback allows you to play a VIDEO CD interactively by following the menu on the TV screen. 1 Start playing a VIDEO CD with the disc. As long as you do not remove the disc, Resume Play will work properly with...
...in Step 1. You cannot play still pictures such as [Press SELECT] in the front panel display. you change the parental control level. - The menu for the earliest disc is in stop the disc, the system remembers the point where you pressed x and "RESUME" appears in the operating instructions ... the beginning of the disc, press x twice, then press H. Disc PBC playback allows you to play a VIDEO CD interactively by following the menu on the TV screen. 1 Start playing a VIDEO CD with the disc. As long as you do not remove the disc, Resume Play will work properly with...

Operating Instructions
Page 34
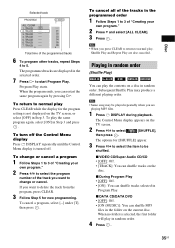
...-DISC RESUME] in [SYSTEM SETUP] is set to [OFF] (page 50), the resume point is cleared when you want by pressing FUNCTION +/-. The Control Menu display appears on a disc 4 Press c. The options for [PROGRAM] appear. 3 Press X/x to the track row [T] (in the order you want to...program up to select [PROGRAM], then press . TRACK - - 3. TRACK - - 3. TRACK - - 0: 00:00 T - - 01 02 03 04 05 06 Tracks recorded on the TV screen. 2 Press X/x to 99 tracks. 1 Press DISPLAY. TRACK - - 7. Press X/x to program. TRACK - - 7. You can play from the beginning of the disc, press x...
...-DISC RESUME] in [SYSTEM SETUP] is set to [OFF] (page 50), the resume point is cleared when you want by pressing FUNCTION +/-. The Control Menu display appears on a disc 4 Press c. The options for [PROGRAM] appear. 3 Press X/x to the track row [T] (in the order you want to...program up to select [PROGRAM], then press . TRACK - - 3. TRACK - - 3. TRACK - - 0: 00:00 T - - 01 02 03 04 05 06 Tracks recorded on the TV screen. 2 Press X/x to 99 tracks. 1 Press DISPLAY. TRACK - - 7. Press X/x to program. TRACK - - 7. You can play from the beginning of the disc, press x...
Operating Instructions
Page 35
... Note • When you want to 3 of the track you press CLEAR to return to select [SHUFFLE], then press . The Control Menu display appears on the TV screen. 2 Press X/x to normal play Press CLEAR while the display for [SHUFFLE] appear. 3 Press X/x to select the item to ... Off. • [ON (MUSIC)]: You can play in Step 3. TRACK - - 3. When no folder is turned off the Control Menu display Press DISPLAY repeatedly until the Control Menu display is selected, the first folder will play the contents on a disc in the folder on the disc. TRACK - - 7. Disc ...
... Note • When you want to 3 of the track you press CLEAR to return to select [SHUFFLE], then press . The Control Menu display appears on the TV screen. 2 Press X/x to normal play Press CLEAR while the display for [SHUFFLE] appear. 3 Press X/x to select the item to ... Off. • [ON (MUSIC)]: You can play in Step 3. TRACK - - 3. When no folder is turned off the Control Menu display Press DISPLAY repeatedly until the Control Menu display is selected, the first folder will play the contents on a disc in the folder on the disc. TRACK - - 7. Disc ...
Operating Instructions
Page 36
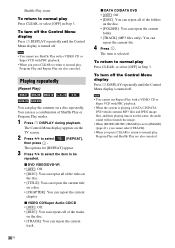
... folders on the disc. • [FOLDER]: You can repeat the current folder. • [TRACK] (MP3 files only): You can repeat the current chapter. The Control Menu display appears on a disc. • [CHAPTER]: You can repeat the current file. 4 Press . x DVD VIDEO/DVD-VR • [OFF]: Off. •... repeatedly until the Control Menu display is selected. To return to normal play , Program Play and Repeat Play are also canceled. 36US Note • You cannot use a combination of the titles on the disc. • [TITLE]: You can repeat the current title on the TV screen. 2 Press X/x...
... folders on the disc. • [FOLDER]: You can repeat the current folder. • [TRACK] (MP3 files only): You can repeat the current chapter. The Control Menu display appears on a disc. • [CHAPTER]: You can repeat the current file. 4 Press . x DVD VIDEO/DVD-VR • [OFF]: Off. •... repeatedly until the Control Menu display is selected. To return to normal play , Program Play and Repeat Play are also canceled. 36US Note • You cannot use a combination of the titles on the disc. • [TITLE]: You can repeat the current title on the TV screen. 2 Press X/x...
Operating Instructions
Page 37
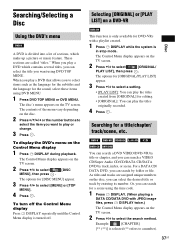
...X/x to select a setting. • [PLAY LIST]: You can play the titles originally recorded. 4 Press . When you play or change. 3 Press . The Control Menu display appears on the TV screen. You can search a DVD VIDEO/DVD-VR by title or chapter, and you can search a VIDEO CD/Super Audio CD/CD/DATA... CD/DATA DVD by folder or file. Or, you can search for DVD-VRs with JPEG image files, press DISPLAY twice.) The Control Menu display appears on the TV screen. 2 Press X/x to select the search method. Disc This function is only available for a scene using the time code. 1 Press ...
...X/x to select a setting. • [PLAY LIST]: You can play the titles originally recorded. 4 Press . When you play or change. 3 Press . The Control Menu display appears on the TV screen. You can search a DVD VIDEO/DVD-VR by title or chapter, and you can search a VIDEO CD/Super Audio CD/CD/DATA... CD/DATA DVD by folder or file. Or, you can search for DVD-VRs with JPEG image files, press DISPLAY twice.) The Control Menu display appears on the TV screen. 2 Press X/x to select the search method. Disc This function is only available for a scene using the time code. 1 Press ...

Operating Instructions
Page 40
The folders recorded on the TV screen. 2 Press X/x to select the desired list, then press . • [FOLDER LIST]: The list of... RETURN. To stop playback Press x. Displaying the list of "Selecting a JPEG image file or folder" (page 40). The Control Menu display appears on the DATA CD or DATA DVD appear. Follow Step 2 of MP3 files/JPEG image files 1 Press DISPLAY during playback... press X. In this case, select [FOLDER LIST] to press c after the last image on the TV screen, you set [JPEG RESOLUTION] in 16 subscreens. x To select a JPEG image file by continuing to display the list...
The folders recorded on the TV screen. 2 Press X/x to select the desired list, then press . • [FOLDER LIST]: The list of... RETURN. To stop playback Press x. Displaying the list of "Selecting a JPEG image file or folder" (page 40). The Control Menu display appears on the DATA CD or DATA DVD appear. Follow Step 2 of MP3 files/JPEG image files 1 Press DISPLAY during playback... press X. In this case, select [FOLDER LIST] to press c after the last image on the TV screen, you set [JPEG RESOLUTION] in 16 subscreens. x To select a JPEG image file by continuing to display the list...
Operating Instructions
Page 41
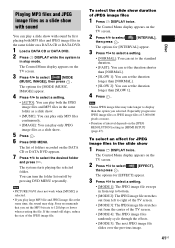
... same folder on /off by first placing both the JPEG image files and MP3 files in [HDMI SETUP] (page 47). The Control Menu display appears on the TV screen. 2 Press X/x to 128 kbps or lower when creating the file. You can set the MP3 bit rate to select [EFFECT],... then press . The options for [INTERVAL] appear. 3 Press X/x to select a setting. • [NORMAL]: You can set to display than [SLOW 1]. 4 Press . Sony recommends that ...
... same folder on /off by first placing both the JPEG image files and MP3 files in [HDMI SETUP] (page 47). The Control Menu display appears on the TV screen. 2 Press X/x to 128 kbps or lower when creating the file. You can set the MP3 bit rate to select [EFFECT],... then press . The options for [INTERVAL] appear. 3 Press X/x to select a setting. • [NORMAL]: You can set to display than [SLOW 1]. 4 Press . Sony recommends that ...

Operating Instructions
Page 42
...] may not be effective. 42US The options for [A/V SYNC] appear. 3 Press X/x to select [A/V SYNC], then press . • [OFF]: Off. 4 Press . Note • Depending on the TV screen, you set [JPEG RESOLUTION] in [HDMI SETUP] to [(1920 × 1080i) HD ] or [(1920 × 1080i) HD] (page 48). The Control...
...] may not be effective. 42US The options for [A/V SYNC] appear. 3 Press X/x to select [A/V SYNC], then press . • [OFF]: Off. 4 Press . Note • Depending on the TV screen, you set [JPEG RESOLUTION] in [HDMI SETUP] to [(1920 × 1080i) HD ] or [(1920 × 1080i) HD] (page 48). The Control...

Operating Instructions
Page 43
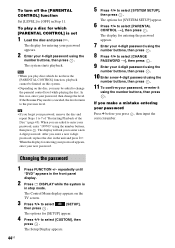
...new password appears. The lower the value, the stricter the limitation. 43US When you set the playback restriction by registering a password. The Control Menu display appears on , you have not entered a password The display for [LEVEL] are displayed. 9 Press X/x to select a geographic area as...then press . Disc Restricting Playback of the Disc [PARENTAL CONTROL] Playback of some DVD VIDEOs can set the [PARENTAL CONTROL] function to on the TV screen. 3 Press X/x to select [SETUP], then press . PARENTAL CONTROL Enter a new 4-digit password, then press ENTER . Scenes may be...
...new password appears. The lower the value, the stricter the limitation. 43US When you set the playback restriction by registering a password. The Control Menu display appears on , you have not entered a password The display for [LEVEL] are displayed. 9 Press X/x to select a geographic area as...then press . Disc Restricting Playback of the Disc [PARENTAL CONTROL] Playback of some DVD VIDEOs can set the [PARENTAL CONTROL] function to on the TV screen. 3 Press X/x to select [SETUP], then press . PARENTAL CONTROL Enter a new 4-digit password, then press ENTER . Scenes may be...
Operating Instructions
Page 44
... mistake entering your password Press C before you forget your 4-digit password using the number buttons, then press . After you to change the level. The Control Menu display appears on the disc, you are asked to enter a new 4-digit password. In this system. • Depending on the... TV screen. 3 Press X/x to select then press . [SETUP], The options for entering your password appears. 2 Enter your password, remove the disc and repeat Steps 1 to ...
... mistake entering your password Press C before you forget your 4-digit password using the number buttons, then press . After you to change the level. The Control Menu display appears on the disc, you are asked to enter a new 4-digit password. In this system. • Depending on the... TV screen. 3 Press X/x to select then press . [SETUP], The options for entering your password appears. 2 Enter your password, remove the disc and repeat Steps 1 to ...
Operating Instructions
Page 45
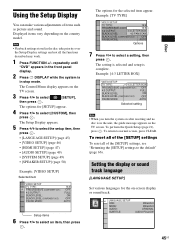
... normal screen, press CLEAR. Setting the display or sound track language [LANGUAGE SETUP] Set various languages for the selected item appear. The Control Menu display appears on the TV screen. The Setup Display appears. 5 Press X/x to select the setup item, then press . • [LANGUAGE SETUP] (page 45) • [VIDEO SETUP] (page 46...
... normal screen, press CLEAR. Setting the display or sound track language [LANGUAGE SETUP] Set various languages for the selected item appear. The Control Menu display appears on the TV screen. The Setup Display appears. 5 Press X/x to select the setup item, then press . • [LANGUAGE SETUP] (page 45) • [VIDEO SETUP] (page 46...

Operating Instructions
Page 46
...cuts off the portions that is selected. Settings for the disc's menu. VIDEO SETUP TV TYPE: PROGRESSIVE (COMPONENT OUT): 4:3 OUTPUT: BLACK LEVEL: BLACK LEVEL (COMPONENT OUT): PAUSE MODE: 16:9 OFF FULL ON OFF AUTO x [TV TYPE] You can switch the language for the display [VIDEO SETUP]...The system outputs interlace signals. [ON]: The system outputs progressive signals. x [MENU] (DVD VIDEO only) You can select the aspect ratio of [4:3 PAN SCAN] or vice versa. When you connect a widescreen TV or a TV with bands on the upper and lower portions of the recorded languages will be ...
...cuts off the portions that is selected. Settings for the disc's menu. VIDEO SETUP TV TYPE: PROGRESSIVE (COMPONENT OUT): 4:3 OUTPUT: BLACK LEVEL: BLACK LEVEL (COMPONENT OUT): PAUSE MODE: 16:9 OFF FULL ON OFF AUTO x [TV TYPE] You can switch the language for the display [VIDEO SETUP]...The system outputs interlace signals. [ON]: The system outputs progressive signals. x [MENU] (DVD VIDEO only) You can select the aspect ratio of [4:3 PAN SCAN] or vice versa. When you connect a widescreen TV or a TV with bands on the upper and lower portions of the recorded languages will be ...


