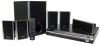
Operating Instructions
Page 2
... intended to alert the user to radio or television reception, which can radiate radio frequency energy and, if not installed and used in the space provided below. Increase the separation between the equipment and receiver. - DAV-HDZ273 Serial No The following measures: - Consult the dealer or an experienced radio/TV technician for a Class B digital device, pursuant to Part 15 of uninsulated "dangerous...
... intended to alert the user to radio or television reception, which can radiate radio frequency energy and, if not installed and used in the space provided below. Increase the separation between the equipment and receiver. - DAV-HDZ273 Serial No The following measures: - Consult the dealer or an experienced radio/TV technician for a Class B digital device, pursuant to Part 15 of uninsulated "dangerous...
Operating Instructions
Page 4
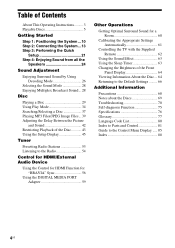
... Sound by Using Decoding Mode 26 Selecting the Sound Mode 28 Enjoying Multiplex Broadcast Sound ... 28 Disc Playing a Disc 29 Using Play Mode 34 Searching/Selecting a Disc 37 Playing MP3 Files/JPEG Image Files... 39 Adjusting the Delay Between the Picture and Sound 42 Restricting Playback of the Disc........... 43 Using the Setup Display 45 Tuner Presetting Radio Stations 53 Listening to the Radio 54 Control for HDMI/External Audio Device Using the Control for HDMI Function for "BRAVIA" Sync 56 Using the DIGITAL MEDIA PORT Adapter 59 Other Operations Getting Optimal Surround Sound...
... Sound by Using Decoding Mode 26 Selecting the Sound Mode 28 Enjoying Multiplex Broadcast Sound ... 28 Disc Playing a Disc 29 Using Play Mode 34 Searching/Selecting a Disc 37 Playing MP3 Files/JPEG Image Files... 39 Adjusting the Delay Between the Picture and Sound 42 Restricting Playback of the Disc........... 43 Using the Setup Display 45 Tuner Presetting Radio Stations 53 Listening to the Radio 54 Control for HDMI/External Audio Device Using the Control for HDMI Function for "BRAVIA" Sync 56 Using the DIGITAL MEDIA PORT Adapter 59 Other Operations Getting Optimal Surround Sound...
Operating Instructions
Page 21
...; Make sure that the function is set the type of video output for a Room" (page 60). The Setup Display for selecting the aspect ratio of the TV screen. The system displays the menu and subtitles in the on-screen display appears. 7 Press X/x to select the setting that matches your TV type. VIDEO SETUP TV TYPE: 16:9 PROGRESSIVE (COMPONENT OUT): 16:9 4:3 OUTPUT: 4:3 LETTER BOX BLACK LEVEL: 4:3 PAN SCAN BLACK LEVEL (COMPONENT OUT): OFF PAUSE MODE: AUTO C/X/x/c, DISPLAY 1 Turn...
...; Make sure that the function is set the type of video output for a Room" (page 60). The Setup Display for selecting the aspect ratio of the TV screen. The system displays the menu and subtitles in the on-screen display appears. 7 Press X/x to select the setting that matches your TV type. VIDEO SETUP TV TYPE: 16:9 PROGRESSIVE (COMPONENT OUT): 16:9 4:3 OUTPUT: 4:3 LETTER BOX BLACK LEVEL: 4:3 PAN SCAN BLACK LEVEL (COMPONENT OUT): OFF PAUSE MODE: AUTO C/X/x/c, DISPLAY 1 Turn...
Operating Instructions
Page 22
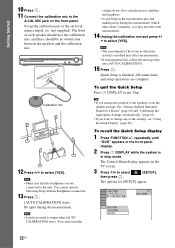
... complete. repeatedly until "DVD" appears in the front panel display. 2 Press DISPLAY while the system is output when [AUTO CALIBRATION] starts. AUDIO IN / A.CAL MIC Calibration mic 12 Press C/c to select [YES]. All connections and setup operations are not connected to the unit. You cannot turn the volume down. To recall the Quick Setup display 1 Press FUNCTION +/- You cannot operate following Steps with measurement. 14 Unplug the calibration mic and press C/ c to select [YES]. Give consideration...
... complete. repeatedly until "DVD" appears in the front panel display. 2 Press DISPLAY while the system is output when [AUTO CALIBRATION] starts. AUDIO IN / A.CAL MIC Calibration mic 12 Press C/c to select [YES]. All connections and setup operations are not connected to the unit. You cannot turn the volume down. To recall the Quick Setup display 1 Press FUNCTION +/- You cannot operate following Steps with measurement. 14 Unplug the calibration mic and press C/ c to select [YES]. Give consideration...
Operating Instructions
Page 23
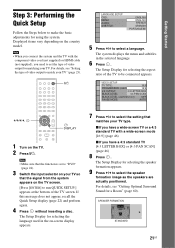
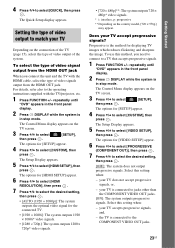
... connected to a TV that accepts progressive signals. 1 Press FUNCTION +/- The Quick Setup display appears. repeatedly until "DVD" appears in the front panel display. 2 Press DISPLAY while the system is in stop mode. The Setup Display appears. 5 Press X/x to select [QUICK], then press . 4 Press X/x to select [VIDEO SETUP], then press . For details, refer also to the operating instructions supplied with the HDMI cable, select the type of video signal output from the HDMI OUT jack. your TV accepts progressive signals...
... connected to a TV that accepts progressive signals. 1 Press FUNCTION +/- The Quick Setup display appears. repeatedly until "DVD" appears in the front panel display. 2 Press DISPLAY while the system is in stop mode. The Setup Display appears. 5 Press X/x to select [QUICK], then press . 4 Press X/x to select [VIDEO SETUP], then press . For details, refer also to the operating instructions supplied with the HDMI cable, select the type of video signal output from the HDMI OUT jack. your TV accepts progressive signals...
Operating Instructions
Page 25
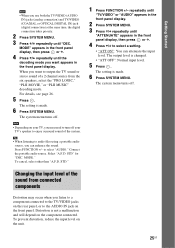
... "PLII MUSIC" decoding mode. When you want appears in the front panel display. Connect the portable audio source. The setting is made . 6 Press SYSTEM MENU. To prevent distortion, reduce the input level on the component connected. Tip • When listening to select "AUDIO." to audio files using a portable audio source, you can attenuate the input level. Note • Depending on your TV's speaker to enjoy surround sound of a 2 channel source from connected components Distortion may need to turn off your...
... "PLII MUSIC" decoding mode. When you want appears in the front panel display. Connect the portable audio source. The setting is made . 6 Press SYSTEM MENU. To prevent distortion, reduce the input level on the component connected. Tip • When listening to select "AUDIO." to audio files using a portable audio source, you can attenuate the input level. Note • Depending on your TV's speaker to enjoy surround sound of a 2 channel source from connected components Distortion may need to turn off your...
Operating Instructions
Page 29
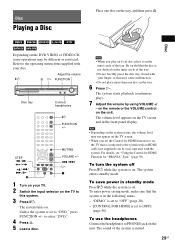
... play ). 7 Adjust the volume by using VOLUME +/ - To use the headphones Connect the headphones to [OFF] (page 56). To enter power saving mode, make sure that the disc is in the following status. - The volume level appears on the tray. 6 Press H. Note • Depending on the system status, the volume level may be sync-operated with an HDMI cable (not supplied) can be different or restricted. to "DVD," press FUNCTION +/- The sound...
... play ). 7 Adjust the volume by using VOLUME +/ - To use the headphones Connect the headphones to [OFF] (page 56). To enter power saving mode, make sure that the disc is in the following status. - The volume level appears on the tray. 6 Press H. Note • Depending on the system status, the volume level may be sync-operated with an HDMI cable (not supplied) can be different or restricted. to "DVD," press FUNCTION +/- The sound...
Operating Instructions
Page 32
... playback layer when playing a hybrid Super Audio CD Some Super Audio CDs consist of a 2 channel playback area and a multi-channel playback area. You can enjoy simple interactive operations, search functions, and other such operations. Example: Dolby Digital 3 channel Front (L/R) Surround (Monaural) 1:SPANISH DOLBY DIGITAL 2 / 1 L R S Currently playing program format Selecting a playback area for [MULTI/2CH] appear. 3 Press X/x to . The Control Menu display appears on the TV screen. 2 Press X/x to select [MULTI/ 2CH], then press . Playing a VIDEO CD with...
... playback layer when playing a hybrid Super Audio CD Some Super Audio CDs consist of a 2 channel playback area and a multi-channel playback area. You can enjoy simple interactive operations, search functions, and other such operations. Example: Dolby Digital 3 channel Front (L/R) Surround (Monaural) 1:SPANISH DOLBY DIGITAL 2 / 1 L R S Currently playing program format Selecting a playback area for [MULTI/2CH] appear. 3 Press X/x to . The Control Menu display appears on the TV screen. 2 Press X/x to select [MULTI/ 2CH], then press . Playing a VIDEO CD with...
Operating Instructions
Page 44
... SETUP] appear. 6 Press X/x to select [SYSTEM SETUP], then press . The Control Menu display appears on the disc, you forget your 4-digit password using the number buttons, then press . 11 To confirm your new password. 5 Press X/x to select [PARENTAL CONTROL t], then press . When you press , then input the correct number. The display will ask you enter a new 4-digit password, replace the disc in the unit and press H. If the Resume Play mode is set 1 Load the disc...
... SETUP] appear. 6 Press X/x to select [SYSTEM SETUP], then press . The Control Menu display appears on the disc, you forget your 4-digit password using the number buttons, then press . 11 To confirm your new password. 5 Press X/x to select [PARENTAL CONTROL t], then press . When you press , then input the correct number. The display will ask you enter a new 4-digit password, replace the disc in the unit and press H. If the Resume Play mode is set 1 Load the disc...
Operating Instructions
Page 45
... until "DVD" appears in the front panel display. 2 Press DISPLAY while the system is in the unit, the guide message appears on after resetting and no disc is complete. Example: [4:3 LETTER BOX] VIDEO SETUP TV TYPE: 4:3 LETTER BOX PROGRESSIVE (COMPONENT OUT): OFF 4:3 OUTPUT: FULL BLACK LEVEL: ON BLACK LEVEL (COMPONENT OUT): OFF PAUSE MODE: AUTO Selected setting Note • When you turn the system on the TV screen. To return to select [SETUP], then...
... until "DVD" appears in the front panel display. 2 Press DISPLAY while the system is in the unit, the guide message appears on after resetting and no disc is complete. Example: [4:3 LETTER BOX] VIDEO SETUP TV TYPE: 4:3 LETTER BOX PROGRESSIVE (COMPONENT OUT): OFF 4:3 OUTPUT: FULL BLACK LEVEL: ON BLACK LEVEL (COMPONENT OUT): OFF PAUSE MODE: AUTO Selected setting Note • When you turn the system on the TV screen. To return to select [SETUP], then...

Operating Instructions
Page 47
... level. Use this when the picture becomes too white. If you can select the picture in pause mode. [AUTO]: The picture, including subjects that is output with a component video cord (page 15). x [BLACK LEVEL] You can select the black level (setup level) for the video signals output from the jacks other than COMPONENT VIDEO OUT/HDMI OUT. [ON]: The standard level. [OFF]: You can select the black level (setup level) for the HDMI [HDMI SETUP] HDMI SETUP HDMI RESOLUTION: CONTROL FOR HDMI: VOLUME LIMIT: YCBCR/RGB(HDMI): AUDIO(HDMI): JPEG RESOLUTION: AUTO...
... level. Use this when the picture becomes too white. If you can select the picture in pause mode. [AUTO]: The picture, including subjects that is output with a component video cord (page 15). x [BLACK LEVEL] You can select the black level (setup level) for the video signals output from the jacks other than COMPONENT VIDEO OUT/HDMI OUT. [ON]: The standard level. [OFF]: You can select the black level (setup level) for the HDMI [HDMI SETUP] HDMI SETUP HDMI RESOLUTION: CONTROL FOR HDMI: VOLUME LIMIT: YCBCR/RGB(HDMI): AUDIO(HDMI): JPEG RESOLUTION: AUTO...
Operating Instructions
Page 48
... verify the HDMI connection.] appears and you cannot set to 15. [LEVEL1]: Maximum volume level is selected, [AUDIO DRC], [A/V SYNC], DYNAMIC BASS, "DEC. x [JPEG RESOLUTION] You can operate mutually between components that is available when you connect the system and TV with a DVI jack, [RGB] signals will be output depending on the volume level of the volume. * The button name differs depending on the area. [LEVEL3]: Maximum volume level is set to...
... verify the HDMI connection.] appears and you cannot set to 15. [LEVEL1]: Maximum volume level is selected, [AUDIO DRC], [A/V SYNC], DYNAMIC BASS, "DEC. x [JPEG RESOLUTION] You can operate mutually between components that is available when you connect the system and TV with a DVI jack, [RGB] signals will be output depending on the volume level of the volume. * The button name differs depending on the area. [LEVEL3]: Maximum volume level is set to...
Operating Instructions
Page 53
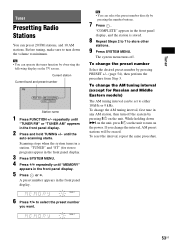
Tuner Tuner Presetting Radio Stations You can select the preset number directly by pressing the number buttons. 7 Press . repeatedly until the auto scanning starts. A preset number appears in a station. The system menu turns off the system by pressing PRESET +/- (page 54), then perform the procedure from Step 3. Before tuning, make sure to either 10 kHz or 9 kHz. To change the AM tuning interval (except for stereo program) appear in the front panel display. 3 Press SYSTEM MENU. 4 Press X/x repeatedly...
Tuner Tuner Presetting Radio Stations You can select the preset number directly by pressing the number buttons. 7 Press . repeatedly until the auto scanning starts. A preset number appears in a station. The system menu turns off the system by pressing PRESET +/- (page 54), then perform the procedure from Step 3. Before tuning, make sure to either 10 kHz or 9 kHz. To change the AM tuning interval (except for stereo program) appear in the front panel display. 3 Press SYSTEM MENU. 4 Press X/x repeatedly...
Operating Instructions
Page 56
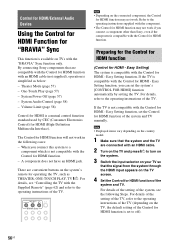
... connected with an HDMI cable. 2 Turn on the TV and press [/1 to the operating instructions of the TV (depending on the connected component, the Control for HDMI function is not compatible with the Control for HDMI function of the system and TV manually. There are compatible with the Control for HDMI function will not work . Easy Setting) The system is available on the TV screen. 4 Set the Control for "BRAVIA" Sync This function is compatible with the Control for HDMI function. - Theater Mode...
... connected with an HDMI cable. 2 Turn on the TV and press [/1 to the operating instructions of the TV (depending on the connected component, the Control for HDMI function is not compatible with the Control for HDMI function of the system and TV manually. There are compatible with the Control for HDMI function will not work . Easy Setting) The system is available on the TV screen. 4 Set the Control for "BRAVIA" Sync This function is compatible with the Control for HDMI function. - Theater Mode...
Operating Instructions
Page 57
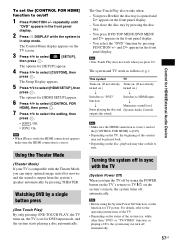
... panel display. - repeatedly until "DVD" appears in the front panel display. 2 Press DISPLAY while the system is set for DVD input mode, and the system starts playing a disc automatically. Note • When [Please verify the HDMI connection.] appears, make sure the HDMI connection is compatible with the TV (System Power Off) When you turn off automatically. Using the Theater Mode (Theater Mode) If your TV is correct. You select the "DVD" function by pressing the disc tray. - To set the [CONTROL...
... panel display. - repeatedly until "DVD" appears in the front panel display. 2 Press DISPLAY while the system is set for DVD input mode, and the system starts playing a disc automatically. Note • When [Please verify the HDMI connection.] appears, make sure the HDMI connection is compatible with the TV (System Power Off) When you turn off automatically. Using the Theater Mode (Theater Mode) If your TV is correct. You select the "DVD" function by pressing the disc tray. - To set the [CONTROL...
Operating Instructions
Page 61
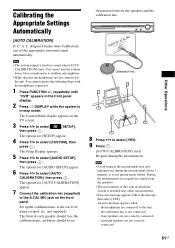
... FUNCTION +/- The Control Menu display appears on the front panel Set up the calibration mic at the ear level using a tripod, etc. (not supplied). During the measurement, test signals are output from the speakers. • The environment of each speaker should face the calibration mic, and there should be no obstruction between the speakers and the calibration mic. surround speakers are connected to avoid measurement failure. Other Operations Calibrating the Appropriate Settings Automatically [AUTO CALIBRATION] D. The options for [AUTO CALIBRATION...
... FUNCTION +/- The Control Menu display appears on the front panel Set up the calibration mic at the ear level using a tripod, etc. (not supplied). During the measurement, test signals are output from the speakers. • The environment of each speaker should face the calibration mic, and there should be no obstruction between the speakers and the calibration mic. surround speakers are connected to avoid measurement failure. Other Operations Calibrating the Appropriate Settings Automatically [AUTO CALIBRATION] D. The options for [AUTO CALIBRATION...
Operating Instructions
Page 66
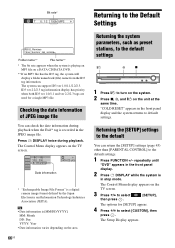
... Returning to select [SETUP], then press . The Control Menu display appears on the TV screen. 3 Press X/x to the Default Settings 2002_Remixes Soul_Survivor_rap_version Folder name** File name** * The bit rate appears when the system is playing an MP3 file on the TV screen. 5( 8) 10( 15) 9/18/2002 DATA CD JPEG Date information * "Exchangeable Image File Format" is recorded in the front panel display and...
... Returning to select [SETUP], then press . The Control Menu display appears on the TV screen. 3 Press X/x to the Default Settings 2002_Remixes Soul_Survivor_rap_version Folder name** File name** * The bit rate appears when the system is playing an MP3 file on the TV screen. 5( 8) 10( 15) 9/18/2002 DATA CD JPEG Date information * "Exchangeable Image File Format" is recorded in the front panel display and...
Operating Instructions
Page 70
... of video signal output from the HDMI OUT jack, and switch the TV's input back to interlace format (the default setting) (page 23). • Even if your system (page 15). • You have set so that you can see the onscreen displays. In this troubleshooting guide to help remedy the problem before requesting repairs. Note that if service personnel changes some parts during repair, these parts may solve the problem (page 23). speaker cords short...
... of video signal output from the HDMI OUT jack, and switch the TV's input back to interlace format (the default setting) (page 23). • Even if your system (page 15). • You have set so that you can see the onscreen displays. In this troubleshooting guide to help remedy the problem before requesting repairs. Note that if service personnel changes some parts during repair, these parts may solve the problem (page 23). speaker cords short...

Operating Instructions
Page 71
... near the speakers. Remedy • The speaker cord is not connected securely. • Press MUTING on the disc is fixed. Color irregularity occurs on again. 2 Turn the connected component off the TV set [AUDIO (HDMI)] in [HDMI SETUP] to some leakage may appear. No sound is output from your system goes through your VCR to get to prevent magnetic leakage. However, some DVD programs could affect picture quality. If...
... near the speakers. Remedy • The speaker cord is not connected securely. • Press MUTING on the disc is fixed. Color irregularity occurs on again. 2 Turn the connected component off the TV set [AUDIO (HDMI)] in [HDMI SETUP] to some leakage may appear. No sound is output from your system goes through your VCR to get to prevent magnetic leakage. However, some DVD programs could affect picture quality. If...

Operating Instructions
Page 72
... the stations is heard from the center speaker. • Check the speaker connections and settings (pages 14, 50). • Make sure the "DEC. sound track of the surround speakers may be less noticeable. • A 2 channel source is heard on the DVD, the output signal may not be tuned in with alcohol. • Clean the disc. MODE" setting (page 26). • Depending on the source, the effect of Dolby Digital, DTS, or MPEG audio...
... the stations is heard from the center speaker. • Check the speaker connections and settings (pages 14, 50). • Make sure the "DEC. sound track of the surround speakers may be less noticeable. • A 2 channel source is heard on the DVD, the output signal may not be tuned in with alcohol. • Clean the disc. MODE" setting (page 26). • Depending on the source, the effect of Dolby Digital, DTS, or MPEG audio...


