
Child Safety: It Makes A Difference Where Your TV Stands
Page 1
...on this hidden hazard of the home with furniture and television sets. 5 Avoid placing any items on top of TVs such as VCRs and remotes that may pique the children's curiosity. 6 Remember that children can become excited while watching a program and can potentially push or pull a ...that is a growing trend, and larger televisions are popular purchases and are like most Americans, you have more than one television. The home theater entertainment experience is large enough to support the weight of your television (and other electronic components). 2 Use appropriate angle braces, straps and ...
...on this hidden hazard of the home with furniture and television sets. 5 Avoid placing any items on top of TVs such as VCRs and remotes that may pique the children's curiosity. 6 Remember that children can become excited while watching a program and can potentially push or pull a ...that is a growing trend, and larger televisions are popular purchases and are like most Americans, you have more than one television. The home theater entertainment experience is large enough to support the weight of your television (and other electronic components). 2 Use appropriate angle braces, straps and ...
Operating Instructions
Page 4
... protection technology that is prohibited. This system incorporates High-Definition Multimedia Interface (HDMITM) technology. Use of Sony Corporation. This system incorporates with Dolby* Digital and Dolby ...978,762; 6,487,535 & other intellectual property rights. and worldwide patents issued & pending. "BRAVIA" is a trademark of this copyright protection technology must be used as a general term for ...Measurements are expressed in these Operating Instructions describe the controls on the remote. Reverse engineering or disassembly is protected by Macrovision. HDMI, the HDMI...
... protection technology that is prohibited. This system incorporates High-Definition Multimedia Interface (HDMITM) technology. Use of Sony Corporation. This system incorporates with Dolby* Digital and Dolby ...978,762; 6,487,535 & other intellectual property rights. and worldwide patents issued & pending. "BRAVIA" is a trademark of this copyright protection technology must be used as a general term for ...Measurements are expressed in these Operating Instructions describe the controls on the remote. Reverse engineering or disassembly is protected by Macrovision. HDMI, the HDMI...
Operating Instructions
Page 6
... Delay Between the Picture and Sound 45 Restricting Playback of the Disc........... 45 Changing the System Settings by Using the Setup Display 47 Tuner Presetting Radio Stations 55 Listening to the Radio... 56 Control for HDMI/External Audio Device Using the Control for HDMI Function for "BRAVIA" Sync 58 Using the DIGITAL MEDIA PORT Adapter 60 Using an S-AIR Product 61 Other...for a Room 66 Calibrating the Appropriate Settings Automatically 67 Controlling the TV with the Supplied Remote 68 Using the Sound Effect 69 Selecting the Effect to Suit the Source 70 Enjoying Multiplex...
... Delay Between the Picture and Sound 45 Restricting Playback of the Disc........... 45 Changing the System Settings by Using the Setup Display 47 Tuner Presetting Radio Stations 55 Listening to the Radio... 56 Control for HDMI/External Audio Device Using the Control for HDMI Function for "BRAVIA" Sync 58 Using the DIGITAL MEDIA PORT Adapter 60 Using an S-AIR Product 61 Other...for a Room 66 Calibrating the Appropriate Settings Automatically 67 Controlling the TV with the Supplied Remote 68 Using the Sound Effect 69 Selecting the Effect to Suit the Source 70 Enjoying Multiplex...
Operating Instructions
Page 10
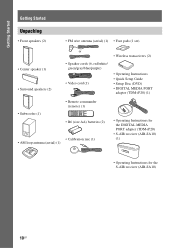
...) • Video cord (1) • Operating Instructions • Quick Setup Guide • Setup Disc (DVD) • DIGITAL MEDIA PORT adapter (TDM-iP20) (1) • Subwoofer (1) • Remote commander (remote) (1) • R6 (size AA) batteries (2) • Calibration mic (1) • AM loop antenna (aerial) (1) • Operating Instructions for the DIGITAL MEDIA PORT adapter (TDM-iP20) •...
...) • Video cord (1) • Operating Instructions • Quick Setup Guide • Setup Disc (DVD) • DIGITAL MEDIA PORT adapter (TDM-iP20) (1) • Subwoofer (1) • Remote commander (remote) (1) • R6 (size AA) batteries (2) • Calibration mic (1) • AM loop antenna (aerial) (1) • Operating Instructions for the DIGITAL MEDIA PORT adapter (TDM-iP20) •...

Operating Instructions
Page 11
Doing so may cause a malfunction. • If you do not intend to use the remote, point it at the remote sensor on the batteries to the markings inside the compartment. To use the remote for an extended period of time, remove the batteries to direct sunlight or lighting apparatus. Note • Do not... leave the remote in an extremely hot or humid place. • Do not use a new battery with an old...
Doing so may cause a malfunction. • If you do not intend to use the remote, point it at the remote sensor on the batteries to the markings inside the compartment. To use the remote for an extended period of time, remove the batteries to direct sunlight or lighting apparatus. Note • Do not... leave the remote in an extremely hot or humid place. • Do not use a new battery with an old...

Operating Instructions
Page 23
... wall outlet (mains) differs depending on the remote (except for U.S. The setting is at its factory default settings (ex., after performing "COLD RESET" (page 74)), you purchase the system new, or if the system is made. 6 Press SYSTEM MENU. Getting Started Connecting the AC power cords... to a wall outlet (mains). Setting the demonstration mode to the unit. The system menu turns off 1 Press [/1 on . 2 Press SYSTEM MENU. 3 Press X/x repeatedly until "DEMO" appears in the front panel display. The system turns on the unit. Tip • When you can turn off the demonstration ...
... wall outlet (mains) differs depending on the remote (except for U.S. The setting is at its factory default settings (ex., after performing "COLD RESET" (page 74)), you purchase the system new, or if the system is made. 6 Press SYSTEM MENU. Getting Started Connecting the AC power cords... to a wall outlet (mains). Setting the demonstration mode to the unit. The system menu turns off 1 Press [/1 on . 2 Press SYSTEM MENU. 3 Press X/x repeatedly until "DEMO" appears in the front panel display. The system turns on the unit. Tip • When you can turn off the demonstration ...
Operating Instructions
Page 31
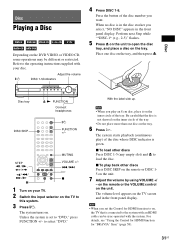
..., the TV that the disc is green. Perform next Step while "*DISC-1* (e.g., 2-5)" flashes. 5 Press Z on the unit to the operating instructions supplied with the system. to this system. 3 Press "/1. MUTING STEP /, / /m/ M/ X VOLUME +/- ./> H x 1 Turn on your disc. With the label side up. x To play an ...DVD." Disc Disc tray DISC SKIP Z N FUNCTION Connect headphones "/1 FUNCTION +/- Unless the system is connected to load the disc. Be careful that is set the Control for "BRAVIA" Sync" (page 58). 31US on the remote or the VOLUME control on the tray, and then press Z.
..., the TV that the disc is green. Perform next Step while "*DISC-1* (e.g., 2-5)" flashes. 5 Press Z on the unit to the operating instructions supplied with the system. to this system. 3 Press "/1. MUTING STEP /, / /m/ M/ X VOLUME +/- ./> H x 1 Turn on your disc. With the label side up. x To play an ...DVD." Disc Disc tray DISC SKIP Z N FUNCTION Connect headphones "/1 FUNCTION +/- Unless the system is connected to load the disc. Be careful that is set the Control for "BRAVIA" Sync" (page 58). 31US on the remote or the VOLUME control on the tray, and then press Z.
Operating Instructions
Page 54
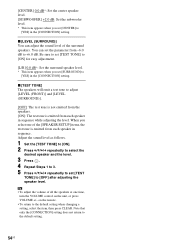
... item appears when you set [TEST TONE] to [OFF] after adjusting the speaker level. When you select one time, turn the VOLUME control on the remote. • To return to +6.0 dB. x [LEVEL (SURROUND)] You can set [SURROUND] to [YES] in sequence. x [TEST TONE] The speakers will emit a test tone to adjust...
... item appears when you set [TEST TONE] to [OFF] after adjusting the speaker level. When you select one time, turn the VOLUME control on the remote. • To return to +6.0 dB. x [LEVEL (SURROUND)] You can set [SURROUND] to [YES] in sequence. x [TEST TONE] The speakers will emit a test tone to adjust...
Operating Instructions
Page 58
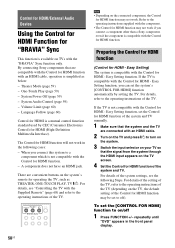
... work if you connect a component other than a Sony component, even if the component is compatible with an HDMI cable, operation is simplified as THEATER, ONE-TOUCH PLAY, TV [/1. For details, see the following cases: - ONE-TOUCH TV THEATER PLAY BRAVIA Sync Note • Depending on the system's remote for operating the TV, such as below: - repeatedly...
... work if you connect a component other than a Sony component, even if the component is compatible with an HDMI cable, operation is simplified as THEATER, ONE-TOUCH PLAY, TV [/1. For details, see the following cases: - ONE-TOUCH TV THEATER PLAY BRAVIA Sync Note • Depending on the system's remote for operating the TV, such as below: - repeatedly...
Operating Instructions
Page 59
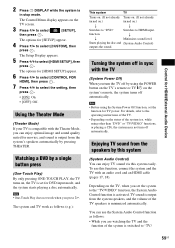
... already Turns on. (If not already turned on.) turned on the system's remote, the system turns off in stop mode. Starts playing the disc and (System Audio Control) outputs the sound. Using the Theater Mode (Theater Mode) If your TV is compatible with the Theater Mode, you are watching the TV and the function of the TV...
... already Turns on. (If not already turned on.) turned on the system's remote, the system turns off in stop mode. Starts playing the disc and (System Audio Control) outputs the sound. Using the Theater Mode (Theater Mode) If your TV is compatible with the Theater Mode, you are watching the TV and the function of the TV...

Operating Instructions
Page 60
... connected TV. You can control the system's volume by the remote of the volume. However, when the system's on the system 1 Press FUNCTION +/- Playing the connected component on -screen display is not output via the TV menu. TV sound is displayed, this by pressing THEATER), loud sound may be output depending on . • When you...
... connected TV. You can control the system's volume by the remote of the volume. However, when the system's on the system 1 Press FUNCTION +/- Playing the connected component on -screen display is not output via the TV menu. TV sound is displayed, this by pressing THEATER), loud sound may be output depending on . • When you...

Operating Instructions
Page 61
...units. (The number of usable S-AIR main units depends on the use up to operate a connected component using either the buttons on the remote or the unit. Tip • Depending on the type of DIGITAL MEDIA PORT adapter, you do not insert the wireless transceiver into the ... illustration shows an example of buttons that can use environment.) • S-AIR sub unit: This is for receiving sound. - Surround amplifier: You can enjoy system sound in this case. ./> H x X Using an S-AIR Product The unit is for transmitting sound. Control for HDMI/External Audio Device Note •...
...units. (The number of usable S-AIR main units depends on the use up to operate a connected component using either the buttons on the remote or the unit. Tip • Depending on the type of DIGITAL MEDIA PORT adapter, you do not insert the wireless transceiver into the ... illustration shows an example of buttons that can use environment.) • S-AIR sub unit: This is for receiving sound. - Surround amplifier: You can enjoy system sound in this case. ./> H x X Using an S-AIR Product The unit is for transmitting sound. Control for HDMI/External Audio Device Note •...
Operating Instructions
Page 63
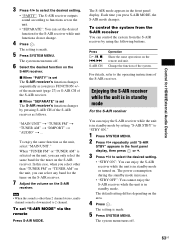
... repeatedly until "S-AIR STBY" appears in standby mode For the S-AIR receiver You can enjoy the S-AIR receiver while the unit is made . 5 Press SYSTEM MENU. Press H, X, x, ./> S-AIR CH Operation Share the same operations on the S-AIR receiver. Change the function of the S-AIR receiver. Enjoying ...the S-AIR receiver while the unit is in the front panel display, then press or c. 3 Press X/x to 2 channel. The system menu turns off . 6 Select the desired function on the remote and unit. "MAIN UNIT" t "TUNER FM" t "TUNER AM" t "DMPORT" t "AUDIO" t ... To set the desired ...
... repeatedly until "S-AIR STBY" appears in standby mode For the S-AIR receiver You can enjoy the S-AIR receiver while the unit is made . 5 Press SYSTEM MENU. Press H, X, x, ./> S-AIR CH Operation Share the same operations on the S-AIR receiver. Change the function of the S-AIR receiver. Enjoying ...the S-AIR receiver while the unit is in the front panel display, then press or c. 3 Press X/x to 2 channel. The system menu turns off . 6 Select the desired function on the remote and unit. "MAIN UNIT" t "TUNER FM" t "TUNER AM" t "DMPORT" t "AUDIO" t ... To set the desired ...
Operating Instructions
Page 68
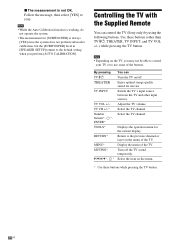
... the Auto Calibration function is working, do not operate the system. • The measurement for [SUBWOOFER] is not OK. Controlling the TV with the Supplied Remote You can TV [/1 Turn the TV on the menu of the TV. THEATER Enjoy optimal image quality suited for the current display. By ...pressing You can control the TV (Sony only) by using the following buttons. TV INPUT Switch the TV's input source between the TV and other than TV [/1, THEATER, TV INPUT, and TV VOL +/-) while pressing the TV button. Number Select...
... the Auto Calibration function is working, do not operate the system. • The measurement for [SUBWOOFER] is not OK. Controlling the TV with the Supplied Remote You can TV [/1 Turn the TV on the menu of the TV. THEATER Enjoy optimal image quality suited for the current display. By ...pressing You can control the TV (Sony only) by using the following buttons. TV INPUT Switch the TV's input source between the TV and other than TV [/1, THEATER, TV INPUT, and TV VOL +/-) while pressing the TV button. Number Select...
Operating Instructions
Page 80
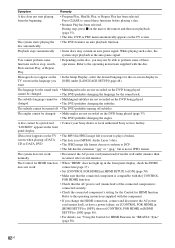
... 33). No sound is no sound. • The speaker cord is not connected securely. • Press MUTING on the remote if "MUTING ON" is displayed in the front panel display. • The system is in pause mode or in [HDMI SETUP] to normal play mode. • Check the speaker settings (page 52... Interface) jacks do not accept audio signals). • The HDMI OUT jack does not output Super Audio CD sound. • Try the following: 1 Turn the system off and on again. 2 Turn the connected component off and on the source, the effect of Dolby Digital, DTS, or MPEG audio. • Depending on...
... 33). No sound is no sound. • The speaker cord is not connected securely. • Press MUTING on the remote if "MUTING ON" is displayed in the front panel display. • The system is in pause mode or in [HDMI SETUP] to normal play mode. • Check the speaker settings (page 52... Interface) jacks do not accept audio signals). • The HDMI OUT jack does not output Super Audio CD sound. • Try the following: 1 Turn the system off and on again. 2 Turn the connected component off and on the source, the effect of Dolby Digital, DTS, or MPEG audio. • Depending on...
Operating Instructions
Page 81
... IN COAXIAL/ OPTICAL jack. Noise is heard on the DVD does not match the system. • Moisture has condensed inside the unit and may be tuned in progressive JPEG image file which is not pointed at the remote sensor on Internet Web sites. • It does not fit the TV screen ... • The distance between the remote and the unit is too far. • The remote is mainly used on the unit. • The batteries in the remote are reduced). • Check the [MEDIA] setting (page 44). The titles of folder/file/file name • The system can only display numbers and letters of...
... IN COAXIAL/ OPTICAL jack. Noise is heard on the DVD does not match the system. • Moisture has condensed inside the unit and may be tuned in progressive JPEG image file which is not pointed at the remote sensor on Internet Web sites. • It does not fit the TV screen ... • The distance between the remote and the unit is too far. • The remote is mainly used on the unit. • The batteries in the remote are reduced). • Check the [MEDIA] setting (page 44). The titles of folder/file/file name • The system can only display numbers and letters of...
Operating Instructions
Page 82
...the connected component is connected securely. • Check the connected component's setting for the Control for "BRAVIA" Sync" (page 58). 82US Refer to the operating instructions supplied with the component. • If.... • Some discs may not be ejected and • Contact your Sony dealer or local authorized Sony service facility. The language for the on the TV screen. The Control for... , press x on the unit or the remote and then start playing from the wall outlet (mains), then reconnect after several minutes. The system starts playing the disc automatically. • The...
...the connected component is connected securely. • Check the connected component's setting for the Control for "BRAVIA" Sync" (page 58). 82US Refer to the operating instructions supplied with the component. • If.... • Some discs may not be ejected and • Contact your Sony dealer or local authorized Sony service facility. The language for the on the TV screen. The Control for... , press x on the unit or the remote and then start playing from the wall outlet (mains), then reconnect after several minutes. The system starts playing the disc automatically. • The...

Operating Instructions
Page 91
Index to Parts and Control For more information, refer to the pages indicated in parentheses. Front panel A "/1 (on/standby) (24, 74) B DISC 1-5 buttons/indicators (31) C Front panel display (93) D (remote sensor) (11) E MOVIE/MUSIC indicator (70) F VOLUME control (31) G DMPORT BOOSTER (69) H PHONES jack (31) I AUDIO IN/A.CAL MIC jack (19, 24, 67) J FUNCTION (27) K Play operation buttons (31) L Z (open/close) (31) M Disc tray (31) Additional Information 91US
Index to Parts and Control For more information, refer to the pages indicated in parentheses. Front panel A "/1 (on/standby) (24, 74) B DISC 1-5 buttons/indicators (31) C Front panel display (93) D (remote sensor) (11) E MOVIE/MUSIC indicator (70) F VOLUME control (31) G DMPORT BOOSTER (69) H PHONES jack (31) I AUDIO IN/A.CAL MIC jack (19, 24, 67) J FUNCTION (27) K Play operation buttons (31) L Z (open/close) (31) M Disc tray (31) Additional Information 91US

Operating Instructions
Page 94
..." function. wj (68) TV INPUT w; (68) TV VOL +/- O P - wj (56) S-AIR MODE 4 SLEEP qj (71) SOUND MODE 5 (70) SUBTITLE ws (33) SYSTEM MENU wf (23, 28, 55, 61, 71) THEATER qk (58) TOOLS wh (68) TUNING +/- 0 (55) TV wl (68) TV CH +/- ef (68) VOLUME +/- 8 (31) BUTTON DESCRIPTIONS Number buttons qf (35... 6 (69) ENTER wf (68) FUNCTION +/- 2 (27, 31) MENU wg (68) MUTING 7 (31) NIGHT wd (69) ONE-TOUCH PLAY eg (59) PICTURE NAVI qg (42) PRESET +/- Remote control ALPHABETICAL ORDER A -
..." function. wj (68) TV INPUT w; (68) TV VOL +/- O P - wj (56) S-AIR MODE 4 SLEEP qj (71) SOUND MODE 5 (70) SUBTITLE ws (33) SYSTEM MENU wf (23, 28, 55, 61, 71) THEATER qk (58) TOOLS wh (68) TUNING +/- 0 (55) TV wl (68) TV CH +/- ef (68) VOLUME +/- 8 (31) BUTTON DESCRIPTIONS Number buttons qf (35... 6 (69) ENTER wf (68) FUNCTION +/- 2 (27, 31) MENU wg (68) MUTING 7 (31) NIGHT wd (69) ONE-TOUCH PLAY eg (59) PICTURE NAVI qg (42) PRESET +/- Remote control ALPHABETICAL ORDER A -

Operating Instructions
Page 98
... 35 PICTURE NAVI 42 Playable discs 7 Program Play 36 PROGRESSIVE (COMPONENT OUT) 49 Progressive format 26, 88 Q Quick Setup 24 R Rear panel 92 Region Code 9 Remote 11 Repeat Play 38 RESET 52, 75 Resume Play 35 RF CHANGE 65 RF POWER 65 S S-AIR 88 S-AIR ID 62 S-AIR MODE 62 S-AIR... SETUP 52 CONNECTION 52 DISTANCE 53 LEVEL 53, 54 SUBTITLE 33, 48 Super Audio CD 34, 88 Surround amplifier 61 SYSTEM MENU 23, 28, 33, 56, 62, 63, 64, 65, 71, 72 SYSTEM SETUP 52 T TEST TONE 54 TIME 40 TRACK SELECTION 51 TV TYPE 49 V VIDEO SETUP 48 VOLUME LIMIT 50...
... 35 PICTURE NAVI 42 Playable discs 7 Program Play 36 PROGRESSIVE (COMPONENT OUT) 49 Progressive format 26, 88 Q Quick Setup 24 R Rear panel 92 Region Code 9 Remote 11 Repeat Play 38 RESET 52, 75 Resume Play 35 RF CHANGE 65 RF POWER 65 S S-AIR 88 S-AIR ID 62 S-AIR MODE 62 S-AIR... SETUP 52 CONNECTION 52 DISTANCE 53 LEVEL 53, 54 SUBTITLE 33, 48 Super Audio CD 34, 88 Surround amplifier 61 SYSTEM MENU 23, 28, 33, 56, 62, 63, 64, 65, 71, 72 SYSTEM SETUP 52 T TEST TONE 54 TIME 40 TRACK SELECTION 51 TV TYPE 49 V VIDEO SETUP 48 VOLUME LIMIT 50...


