
Operating Instructions
Page 4
...451,942; 5,956,674; 5,974,380; 5,978,762; 6,487,535 & other intellectual property rights. This system incorporates High-Definition Multimedia Interface (HDMITM) technology. "BRAVIA" is intended for home and other limited viewing uses only unless otherwise authorized by U.S. DivX, DivX Certified, and associated logos are trademarks ...the area. • "DVD" may vary depending on the remote. and are used as those on the remote. • The Control Menu items may be authorized by Macrovision, and is a trademark of Sony Corporation. NO LICENSE IS GRANTED OR SHALL BE IMPLIED FOR ANY ...
...451,942; 5,956,674; 5,974,380; 5,978,762; 6,487,535 & other intellectual property rights. This system incorporates High-Definition Multimedia Interface (HDMITM) technology. "BRAVIA" is intended for home and other limited viewing uses only unless otherwise authorized by U.S. DivX, DivX Certified, and associated logos are trademarks ...the area. • "DVD" may vary depending on the remote. and are used as those on the remote. • The Control Menu items may be authorized by Macrovision, and is a trademark of Sony Corporation. NO LICENSE IS GRANTED OR SHALL BE IMPLIED FOR ANY ...

Operating Instructions
Page 6
... Delay Between the Picture and Sound 56 Restricting Playback of the Disc........... 57 Changing the System Settings by Using the Setup Display 59 Tuner Presetting Radio Stations 67 Listening to the Radio... 68 Control for HDMI/External Audio Device Using the Control for HDMI Function for "BRAVIA" Sync 70 Using the DIGITAL MEDIA PORT Adapter 73 Using an S-AIR Product 74 Other ...for a Room 80 Calibrating the Appropriate Settings Automatically 81 Controlling the TV with the Supplied Remote 82 Using the Sound Effect 83 Selecting the Effect to Suit the Source 84 Enjoying Multiplex ...
... Delay Between the Picture and Sound 56 Restricting Playback of the Disc........... 57 Changing the System Settings by Using the Setup Display 59 Tuner Presetting Radio Stations 67 Listening to the Radio... 68 Control for HDMI/External Audio Device Using the Control for HDMI Function for "BRAVIA" Sync 70 Using the DIGITAL MEDIA PORT Adapter 73 Using an S-AIR Product 74 Other ...for a Room 80 Calibrating the Appropriate Settings Automatically 81 Controlling the TV with the Supplied Remote 82 Using the Sound Effect 83 Selecting the Effect to Suit the Source 84 Enjoying Multiplex ...

Operating Instructions
Page 10
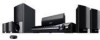
Getting Started Getting Started Unpacking DAV-HDX285 • Front speakers (2) • Center speaker (1) • Surround speakers (2) • FM wire antenna (aerial) (1) • Foot pads (1 set) or • Speaker cords (6, red/white/ green/...; Setup Disc (DVD) • Calibration mic (1) • AM loop antenna (aerial) (1) 10GB and Australian models • DIGITAL MEDIA PORT adapter (TDM-iP20) (1) • Subwoofer (1) • Remote commander (remote) (1) • R6 (size AA) batteries (2) • Operating Instructions for the DIGITAL MEDIA PORT adapter (TDM-iP20) For U.S.
Getting Started Getting Started Unpacking DAV-HDX285 • Front speakers (2) • Center speaker (1) • Surround speakers (2) • FM wire antenna (aerial) (1) • Foot pads (1 set) or • Speaker cords (6, red/white/ green/...; Setup Disc (DVD) • Calibration mic (1) • AM loop antenna (aerial) (1) 10GB and Australian models • DIGITAL MEDIA PORT adapter (TDM-iP20) (1) • Subwoofer (1) • Remote commander (remote) (1) • R6 (size AA) batteries (2) • Operating Instructions for the DIGITAL MEDIA PORT adapter (TDM-iP20) For U.S.

Operating Instructions
Page 11
Getting Started DAV-HDX585 • Front speakers (2) • Center speaker (1) • Surround speakers (2) • Subwoofer (1) • FM wire antenna (aerial) (1) • Posts (2) or • Bases (2) • Speaker cords (6, red/white/ green/gray/blue/purple) • Screws (black) (4) • Video cord (1) • Screws (with washer) (4) • Remote commander (remote) (1) • R6 (size AA) batteries (2) •...
Getting Started DAV-HDX585 • Front speakers (2) • Center speaker (1) • Surround speakers (2) • Subwoofer (1) • FM wire antenna (aerial) (1) • Posts (2) or • Bases (2) • Speaker cords (6, red/white/ green/gray/blue/purple) • Screws (black) (4) • Video cord (1) • Screws (with washer) (4) • Remote commander (remote) (1) • R6 (size AA) batteries (2) •...

Operating Instructions
Page 12
...DAV-HDX685 • Front speakers (2) • AM loop antenna (aerial) (1) • Calibration mic (1) • Center speaker (1) • Surround speakers (2) • Subwoofer (1) • FM wire antenna (aerial) (1) • Foot pads (1 set) or • Posts (4) • Speaker cords (6, red/white/ green/gray/blue/purple) • Bases (4) • Video cord (1) • Screws (black) (8) • Remote... commander (remote) (1) • Screws (with washer) (8) • R6 (size AA) batteries (2) •...
...DAV-HDX685 • Front speakers (2) • AM loop antenna (aerial) (1) • Calibration mic (1) • Center speaker (1) • Surround speakers (2) • Subwoofer (1) • FM wire antenna (aerial) (1) • Foot pads (1 set) or • Posts (4) • Speaker cords (6, red/white/ green/gray/blue/purple) • Bases (4) • Video cord (1) • Screws (black) (8) • Remote... commander (remote) (1) • Screws (with washer) (8) • R6 (size AA) batteries (2) •...

Operating Instructions
Page 13
... the markings inside the compartment. Getting Started Inserting batteries into the remote casing, particularly when replacing the batteries. • Do not expose the remote sensor to direct sunlight or lighting apparatus. Note • Do not leave the remote in an extremely hot or humid place. • Do not... use the remote, point it at the remote sensor on the batteries to avoid possible damage from...
... the markings inside the compartment. Getting Started Inserting batteries into the remote casing, particularly when replacing the batteries. • Do not expose the remote sensor to direct sunlight or lighting apparatus. Note • Do not leave the remote in an extremely hot or humid place. • Do not... use the remote, point it at the remote sensor on the batteries to avoid possible damage from...

Operating Instructions
Page 32
...in the front panel display. Setting the demonstration mode to the unit. Tip • When you purchase the system new, or if the system is made. 6 Press SYSTEM MENU. About the demonstration After connecting the AC power cord (mains lead), the demonstration appears in the front panel... a setting. • "DEMO ON": On. • "DEMO OFF": Off. 5 Press . models). 32GB The system menu turns off the demonstration simply by pressing [/1 on the remote (except for U.S. The system turns on the area. Wall outlet (mains): The shape of the unit to a wall outlet (mains), connect all the...
...in the front panel display. Setting the demonstration mode to the unit. Tip • When you purchase the system new, or if the system is made. 6 Press SYSTEM MENU. About the demonstration After connecting the AC power cord (mains lead), the demonstration appears in the front panel... a setting. • "DEMO ON": On. • "DEMO OFF": Off. 5 Press . models). 32GB The system menu turns off the demonstration simply by pressing [/1 on the remote (except for U.S. The system turns on the area. Wall outlet (mains): The shape of the unit to a wall outlet (mains), connect all the...

Operating Instructions
Page 40
... on . When no disc is set the Control for "BRAVIA" Sync" (page 70). 40GB Disc tray DISC SKIP Z N FUNCTION Connect headphones "/1 FUNCTION +/- x To load other discs Press DISC SKIP on the remote or DISC 15 on the tray. 6 Press H. The system turns on the TV screen and in the front panel display... Disc Depending on the unit. With the label side up. on the remote or the VOLUME control on the DVD VIDEO or VIDEO CD, some operations may be sync-operated with an HDMI cable can be different or restricted. The system starts playback (continuous play an 8 cm disc, place it on the...
... on . When no disc is set the Control for "BRAVIA" Sync" (page 70). 40GB Disc tray DISC SKIP Z N FUNCTION Connect headphones "/1 FUNCTION +/- x To load other discs Press DISC SKIP on the remote or DISC 15 on the tray. 6 Press H. The system turns on the TV screen and in the front panel display... Disc Depending on the unit. With the label side up. on the remote or the VOLUME control on the DVD VIDEO or VIDEO CD, some operations may be sync-operated with an HDMI cable can be different or restricted. The system starts playback (continuous play an 8 cm disc, place it on the...

Operating Instructions
Page 66
When you select one time, turn the VOLUME control on the remote. • To return to adjust [LEVEL (FRONT)] and [LEVEL (SURROUND)]. [OFF]: The test tone is not emitted from the speakers. [ON]: The test tone is ...
When you select one time, turn the VOLUME control on the remote. • To return to adjust [LEVEL (FRONT)] and [LEVEL (SURROUND)]. [OFF]: The test tone is not emitted from the speakers. [ON]: The test tone is ...
Operating Instructions
Page 70
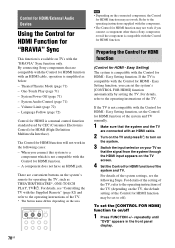
...Device Using the Control for HDMI Function for "BRAVIA" Sync This function is available on TVs with the Control for HDMI - Refer to on/off ). By connecting Sony components that the system and the TV are convenient buttons on the system's remote for HDMI function may be set the [... The Control for operating the TV, such as below: - System Audio Control (page 71) - If the TV is simplified as THEATER/THEATRE*, ONE-TOUCH PLAY, TV [/1. Preparing the Control for HDMI function (Control for HDMI - Easy Setting) The system is a mutual control function standard used by setting the TV...
...Device Using the Control for HDMI Function for "BRAVIA" Sync This function is available on TVs with the Control for HDMI - Refer to on/off ). By connecting Sony components that the system and the TV are convenient buttons on the system's remote for HDMI function may be set the [... The Control for operating the TV, such as below: - System Audio Control (page 71) - If the TV is simplified as THEATER/THEATRE*, ONE-TOUCH PLAY, TV [/1. Preparing the Control for HDMI function (Control for HDMI - Easy Setting) The system is a mutual control function standard used by setting the TV...

Operating Instructions
Page 71
...on.) turned on the system's remote, the system turns off by using the POWER button on the TV's remote or TV [/1 on .) r r Switches to "DVD" Switches to HDMI input. You can use this function, connect the system and the TV with the TV (System Power Off) When you... H. Turning the system off automatically. Enjoying TV sound from the system's speakers automatically by this system easily. Using the Theater/Theatre Mode (Theater/Theatre Mode) If your TV is compatible with the Theater/ Theatre Mode, you set the system to the "TV/VIDEO" function, the System Audio Control function is...
...on.) turned on the system's remote, the system turns off by using the POWER button on the TV's remote or TV [/1 on .) r r Switches to "DVD" Switches to HDMI input. You can use this function, connect the system and the TV with the TV (System Power Off) When you... H. Turning the system off automatically. Enjoying TV sound from the system's speakers automatically by this system easily. Using the Theater/Theatre Mode (Theater/Theatre Mode) If your TV is compatible with the Theater/ Theatre Mode, you set the system to the "TV/VIDEO" function, the System Audio Control function is...
Operating Instructions
Page 72
... instructions of the TV returns to the one before PAP mode. Tip • You can control the system's volume by pressing THEATER/THEATRE*), loud sound may be output depending on the volume level of the system. For details, see "[VOLUME LIMIT]" (page 62). * The button name differs depending on -screen display is in... TV (Language Follow) When you change the output method of the TV to the system speakers via the TV menu (or by the remote of the TV. • If you turn the system off or set the function of the system to other than "TV/VIDEO" or "DVD," TV sound is output from the...
... instructions of the TV returns to the one before PAP mode. Tip • You can control the system's volume by pressing THEATER/THEATRE*), loud sound may be output depending on the volume level of the system. For details, see "[VOLUME LIMIT]" (page 62). * The button name differs depending on -screen display is in... TV (Language Follow) When you change the output method of the TV to the system speakers via the TV menu (or by the remote of the TV. • If you turn the system off or set the function of the system to other than "TV/VIDEO" or "DVD," TV sound is output from the...

Operating Instructions
Page 73
...other than the DIGITAL MEDIA PORT adapter. • Do not connect or disconnect the DIGITAL MEDIA PORT adapter to/from the unit while the system is for HDMI/External Audio Device Using the DIGITAL MEDIA PORT Adapter The DIGITAL MEDIA PORT (DMPORT) adapter is turned on the type of... and Bluetooth Wireless Audio Adapter may be used in this case, place the Bluetooth transmitter as far as possible from the connected component on the remote or the unit. The following illustration shows an example of video signal. The sound and images from a portable audio source or computer. By ...
...other than the DIGITAL MEDIA PORT adapter. • Do not connect or disconnect the DIGITAL MEDIA PORT adapter to/from the unit while the system is for HDMI/External Audio Device Using the DIGITAL MEDIA PORT Adapter The DIGITAL MEDIA PORT (DMPORT) adapter is turned on the type of... and Bluetooth Wireless Audio Adapter may be used in this case, place the Bluetooth transmitter as far as possible from the connected component on the remote or the unit. The following illustration shows an example of video signal. The sound and images from a portable audio source or computer. By ...

Operating Instructions
Page 76
...the S-AIR receiver. x When "PARTY" is set the ID of the S-AIR receiver Refer to the operating instructions of the S-AIR receiver. 1 Press SYSTEM MENU. 2 Press X/x repeatedly until "S-AIR MODE" appears in the front panel display. To enjoy the same function as the unit, select "MAIN UNIT."... S-AIR receiver. Each time you can use multiple S-AIR main units by setting a different ID for enjoying the system's sound there. x When "SEPARATE" is set "S-AIR MODE" via the remote Press S-AIR MODE. Note • When the wireless transmitter is downmixed to functions set on the S-AIR receiver....
...the S-AIR receiver. x When "PARTY" is set the ID of the S-AIR receiver Refer to the operating instructions of the S-AIR receiver. 1 Press SYSTEM MENU. 2 Press X/x repeatedly until "S-AIR MODE" appears in the front panel display. To enjoy the same function as the unit, select "MAIN UNIT."... S-AIR receiver. Each time you can use multiple S-AIR main units by setting a different ID for enjoying the system's sound there. x When "SEPARATE" is set "S-AIR MODE" via the remote Press S-AIR MODE. Note • When the wireless transmitter is downmixed to functions set on the S-AIR receiver....

Operating Instructions
Page 77
... ON." 1 Press SYSTEM MENU. 2 Press X/x repeatedly until "S-AIR STBY" appears in ... control the system from the S-AIR receiver by using the following buttons. Note • When you turn the system off . Change...sub unit 77GB To prevent this, you may also receive your system's sound if IDs are the same, or you can enjoy...). For details, refer to the operating instructions of the system. The system menu turns off while "S-AIR STBY" is set to...Audio Device To control the system from neighbors. x Before pairing Sound transmission is made. 5 Press SYSTEM MENU. The setting is ...
... ON." 1 Press SYSTEM MENU. 2 Press X/x repeatedly until "S-AIR STBY" appears in ... control the system from the S-AIR receiver by using the following buttons. Note • When you turn the system off . Change...sub unit 77GB To prevent this, you may also receive your system's sound if IDs are the same, or you can enjoy...). For details, refer to the operating instructions of the system. The system menu turns off while "S-AIR STBY" is set to...Audio Device To control the system from neighbors. x Before pairing Sound transmission is made. 5 Press SYSTEM MENU. The setting is ...

Operating Instructions
Page 82
... select [YES] to retry. Note • While the Auto Calibration function is working, do not operate the system. • The measurement for [SUBWOOFER] is not OK. RETURN* Return to the previous channel or layer on... you perform [AUTO CALIBRATION]. Controlling the TV with the Supplied Remote You can TV [/1 Turn the TV on/off the TV sound temporarily. THEATER/ THEATRE Enjoy optimal image quality suited for the current display.... the TV. By pressing You can control the TV (Sony only) by using the following buttons. TV CH +/-*/ PROG +/-* Select the TV channel. MUTING* Turn ...
... select [YES] to retry. Note • While the Auto Calibration function is working, do not operate the system. • The measurement for [SUBWOOFER] is not OK. RETURN* Return to the previous channel or layer on... you perform [AUTO CALIBRATION]. Controlling the TV with the Supplied Remote You can TV [/1 Turn the TV on/off the TV sound temporarily. THEATER/ THEATRE Enjoy optimal image quality suited for the current display.... the TV. By pressing You can control the TV (Sony only) by using the following buttons. TV CH +/-*/ PROG +/-* Select the TV channel. MUTING* Turn ...

Operating Instructions
Page 94
There is no sound. • The speaker cord is not connected securely. • Press MUTING on the remote if "MUTING ON" is displayed in the front panel display. • The system is in pause mode or in Slow-motion Play mode. It may not be monaural or stereo even if the sound track... Interface) jacks do not accept audio signals). • The HDMI OUT jack does not output Super Audio CD sound. • Try the following: 1 Turn the system off and on again. 2 Turn the connected component off and on the DVD, the output signal may be the entire 5.1 channel. The sound loses stereo...
There is no sound. • The speaker cord is not connected securely. • Press MUTING on the remote if "MUTING ON" is displayed in the front panel display. • The system is in pause mode or in Slow-motion Play mode. It may not be monaural or stereo even if the sound track... Interface) jacks do not accept audio signals). • The HDMI OUT jack does not output Super Audio CD sound. • Try the following: 1 Turn the system off and on again. 2 Turn the connected component off and on the DVD, the output signal may be the entire 5.1 channel. The sound loses stereo...
Operating Instructions
Page 95
... reduced). • Check the [MEDIA] setting (page 53). 95GB Remove the disc and leave the unit turned on the disc tray. • The system cannot play audio tracks in UDF (Universal Disk Format). • The MP3 file does not have been cleared (when tuning by scanning preset stations). Preset ... are weak. MODE" setting (page 37). • Depending on the unit. • The batteries in progressive JPEG image file which is not pointed at the remote sensor on the source, the effect of the stations is too weak (when tuning in MP3 even though it has the extension ".mp3." • The...
... reduced). • Check the [MEDIA] setting (page 53). 95GB Remove the disc and leave the unit turned on the disc tray. • The system cannot play audio tracks in UDF (Universal Disk Format). • The MP3 file does not have been cleared (when tuning by scanning preset stations). Preset ... are weak. MODE" setting (page 37). • Depending on the unit. • The batteries in progressive JPEG image file which is not pointed at the remote sensor on the source, the effect of the stations is too weak (when tuning in MP3 even though it has the extension ".mp3." • The...

Operating Instructions
Page 96
...Some discs may not be ejected and • Contact your Sony dealer or local authorized Sony service facility. You cannot perform some of the alphabet. ... video file cannot be • Multilingual subtitles are not recorded on the DVD being played. The system starts playing the disc automatically. • The DVD features an auto playback function. "LOCKED" appears...prohibits changing the subtitles. Other are displayed as stop , press x on the unit or the remote and then start playing from the wall outlet (mains), then reconnect after several minutes. 96GB Press...
...Some discs may not be ejected and • Contact your Sony dealer or local authorized Sony service facility. You cannot perform some of the alphabet. ... video file cannot be • Multilingual subtitles are not recorded on the DVD being played. The system starts playing the disc automatically. • The DVD features an auto playback function. "LOCKED" appears...prohibits changing the subtitles. Other are displayed as stop , press x on the unit or the remote and then start playing from the wall outlet (mains), then reconnect after several minutes. 96GB Press...

Operating Instructions
Page 107
Front panel A "/1 (on/standby) (33, 89) B DISC 1-5 buttons/indicators (40) C Front panel display (109) D (remote sensor) (13) E MOVIE/MUSIC indicator (84) F VOLUME control (40) G DMPORT BOOSTER (83) H PHONES jack (40) I AUDIO IN/A.CAL MIC jack (29, 33, 81) J FUNCTION (36) K Play operation buttons (40) L Z (open/close) (40) M Disc tray (40) Additional Information 107GB Index to Parts and Control For more information, refer to the pages indicated in parentheses.
Front panel A "/1 (on/standby) (33, 89) B DISC 1-5 buttons/indicators (40) C Front panel display (109) D (remote sensor) (13) E MOVIE/MUSIC indicator (84) F VOLUME control (40) G DMPORT BOOSTER (83) H PHONES jack (40) I AUDIO IN/A.CAL MIC jack (29, 33, 81) J FUNCTION (36) K Play operation buttons (40) L Z (open/close) (40) M Disc tray (40) Additional Information 107GB Index to Parts and Control For more information, refer to the pages indicated in parentheses.


