
Operating Instructions
Page 2
...equipment into an outlet on the bottom exterior. THIS DEVICE COMPLIES WITH PART 15 OF THE FCC RULES. Reorient or relocate the receiving antenna. - OPERATION IS SUBJECT TO THE FOLLOWING TWO CONDITIONS: (1) THIS DEVICE MAY NOT CAUSE HARMFUL INTERFERENCE, AND (2) THIS DEVICE MUST ..., uses, and can be unplugged from the wall socket immediately in a residential installation. However, there is encouraged to try to operate this system so that interference will not occur in the U.S. CAUTION You are of Apple Inc., registered in a particular installation. The nameplate is a ...
...equipment into an outlet on the bottom exterior. THIS DEVICE COMPLIES WITH PART 15 OF THE FCC RULES. Reorient or relocate the receiving antenna. - OPERATION IS SUBJECT TO THE FOLLOWING TWO CONDITIONS: (1) THIS DEVICE MAY NOT CAUSE HARMFUL INTERFERENCE, AND (2) THIS DEVICE MUST ..., uses, and can be unplugged from the wall socket immediately in a residential installation. However, there is encouraged to try to operate this system so that interference will not occur in the U.S. CAUTION You are of Apple Inc., registered in a particular installation. The nameplate is a ...
Operating Instructions
Page 2
... applies only to the version of this apparatus to radio communications. Reorient or relocate the receiving antenna (aerial). - Important Safety Instructions 1) Read these instructions. 2) Keep these instructions.... that to provide reasonable protection against harmful interference in a residential installation. DAV-HDX277WC/DAV-HDX279W/ DAV-HDX576WF Serial No Date of Manufacture Marking is encouraged to try to correct... any changes or modifications not expressly approved in this manual could void your Sony dealer regarding this equipment. A polarized plug has two This symbol is no...
... applies only to the version of this apparatus to radio communications. Reorient or relocate the receiving antenna (aerial). - Important Safety Instructions 1) Read these instructions. 2) Keep these instructions.... that to provide reasonable protection against harmful interference in a residential installation. DAV-HDX277WC/DAV-HDX279W/ DAV-HDX576WF Serial No Date of Manufacture Marking is encouraged to try to correct... any changes or modifications not expressly approved in this manual could void your Sony dealer regarding this equipment. A polarized plug has two This symbol is no...
Operating Instructions
Page 4
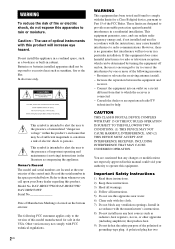
... S-AIR function The system is as follows: • DAV-HDX277WC: Surround amplifier (optional) S-AIR receiver (supplied) • DAV-HDX279W: Surround amplifier (supplied) S-AIR receiver (optional) • DAV-HDX576WF: Surround amplifier (supplied) S-AIR receiver (supplied) The S-AIR product can enjoy system sound in this manual are expressed in feet (ft) for the surround amplifier or S-AIR receiver in this Operating Instructions...
... S-AIR function The system is as follows: • DAV-HDX277WC: Surround amplifier (optional) S-AIR receiver (supplied) • DAV-HDX279W: Surround amplifier (supplied) S-AIR receiver (optional) • DAV-HDX576WF: Surround amplifier (supplied) S-AIR receiver (supplied) The S-AIR product can enjoy system sound in this manual are expressed in feet (ft) for the surround amplifier or S-AIR receiver in this Operating Instructions...
Operating Instructions
Page 9
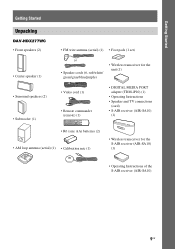
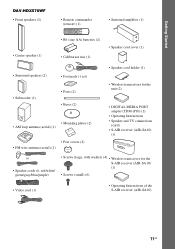
Getting Started Getting Started Unpacking DAV-HDX277WC • Front speakers (2) • Center speaker (1) • Surround speakers (2) • Subwoofer (1) • FM wire antenna (aerial) (1) • Foot pads (1 set) or • Speaker... cord (1) • Remote commander (remote) (1) • DIGITAL MEDIA PORT adapter (TDM-iP10) (1) • Operating Instructions • Speaker and TV connections (card) • S-AIR receiver (AIR-SA10) (1) • R6 (size AA) batteries (2) • AM loop antenna (aerial) (1) • Calibration mic (1) • Wireless transceiver for the S-AIR...
Getting Started Getting Started Unpacking DAV-HDX277WC • Front speakers (2) • Center speaker (1) • Surround speakers (2) • Subwoofer (1) • FM wire antenna (aerial) (1) • Foot pads (1 set) or • Speaker... cord (1) • Remote commander (remote) (1) • DIGITAL MEDIA PORT adapter (TDM-iP10) (1) • Operating Instructions • Speaker and TV connections (card) • S-AIR receiver (AIR-SA10) (1) • R6 (size AA) batteries (2) • AM loop antenna (aerial) (1) • Calibration mic (1) • Wireless transceiver for the S-AIR...
Operating Instructions
Page 11
Getting Started DAV-HDX576WF • Front speakers (2) • Remote commander (remote) (1) • Surround amplifier (1) • Center speaker (1) • R6 (size AA) batteries (2) • Calibration mic (1) • Speaker ... (1) • Wireless transceivers for the unit (2) • DIGITAL MEDIA PORT adapter (TDM-iP10) (1) • Operating Instructions • Speaker and TV connections (card) • S-AIR receiver (AIR-SA10) (1) or • Speaker cords (6, red/white/ green/gray/blue/purple) • Screws (large, with washer) (4) • Wireless transceiver for the S-AIR...
Getting Started DAV-HDX576WF • Front speakers (2) • Remote commander (remote) (1) • Surround amplifier (1) • Center speaker (1) • R6 (size AA) batteries (2) • Calibration mic (1) • Speaker ... (1) • Wireless transceivers for the unit (2) • DIGITAL MEDIA PORT adapter (TDM-iP10) (1) • Operating Instructions • Speaker and TV connections (card) • S-AIR receiver (AIR-SA10) (1) or • Speaker cords (6, red/white/ green/gray/blue/purple) • Screws (large, with washer) (4) • Wireless transceiver for the S-AIR...
Operating Instructions
Page 22
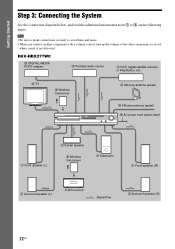
DAV-HDX277WC 3 DIGITAL MEDIA PORT adapter 3 Portable audio source 3 VCR, digital satellite receiver, or PlayStation, etc. 2 TV 5 Wireless transceiver 4 AM loop antenna (aerial) 4 FM wire antenna (aerial) 6 AC power cord (mains lead) 1 Front speaker (L) 1 Center speaker 5 Wireless transceiver 1 Subwoofer 1 Front speaker (R) 1 Surround speaker (L) S-AIR receiver :Signal flow 1 Surround speaker (R) 22US Note • Be sure to...
DAV-HDX277WC 3 DIGITAL MEDIA PORT adapter 3 Portable audio source 3 VCR, digital satellite receiver, or PlayStation, etc. 2 TV 5 Wireless transceiver 4 AM loop antenna (aerial) 4 FM wire antenna (aerial) 6 AC power cord (mains lead) 1 Front speaker (L) 1 Center speaker 5 Wireless transceiver 1 Subwoofer 1 Front speaker (R) 1 Surround speaker (L) S-AIR receiver :Signal flow 1 Surround speaker (R) 22US Note • Be sure to...
Operating Instructions
Page 23
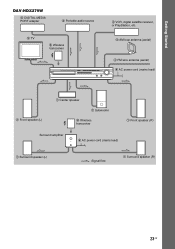
Getting Started DAV-HDX279W 3 DIGITAL MEDIA PORT adapter 3 Portable audio source 2 TV 5 Wireless transceiver 3 VCR, digital satellite receiver, or PlayStation, etc. 4 AM loop antenna (aerial) 4 FM wire antenna (aerial) 6 AC power cord (mains lead) 1 Front speaker (L) 1 Center speaker 1 Subwoofer 5 Wireless transceiver 1 Front speaker (R) Surround amplifier 6 AC power cord (mains lead) 1 Surround speaker (L) :Signal flow 1 Surround speaker (R) 23US
Getting Started DAV-HDX279W 3 DIGITAL MEDIA PORT adapter 3 Portable audio source 2 TV 5 Wireless transceiver 3 VCR, digital satellite receiver, or PlayStation, etc. 4 AM loop antenna (aerial) 4 FM wire antenna (aerial) 6 AC power cord (mains lead) 1 Front speaker (L) 1 Center speaker 1 Subwoofer 5 Wireless transceiver 1 Front speaker (R) Surround amplifier 6 AC power cord (mains lead) 1 Surround speaker (L) :Signal flow 1 Surround speaker (R) 23US
Operating Instructions
Page 30
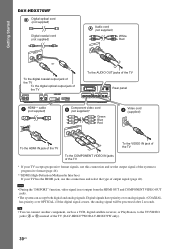
... COMPONENT VIDEO IN jacks of the TV * If your TV accepts progressive format signals, use this connection and set the output signal of the system to the TV/VIDEO jacks (A or B) instead of output signal (page 46). Note • During the "DMPORT" function, video signal ... jacks. • The system can connect another component, such as a VCR, digital satellite receiver, or PlayStation, to progressive format (page 46). ** HDMI (High-Definition Multimedia Interface) If your TV has the HDMI jack, use this connection and select the type of the TV (DAV-HDX277WC/DAV-HDX279W only). 30US Digital...
... COMPONENT VIDEO IN jacks of the TV * If your TV accepts progressive format signals, use this connection and set the output signal of the system to the TV/VIDEO jacks (A or B) instead of output signal (page 46). Note • During the "DMPORT" function, video signal ... jacks. • The system can connect another component, such as a VCR, digital satellite receiver, or PlayStation, to progressive format (page 46). ** HDMI (High-Definition Multimedia Interface) If your TV has the HDMI jack, use this connection and select the type of the TV (DAV-HDX277WC/DAV-HDX279W only). 30US Digital...
Operating Instructions
Page 31
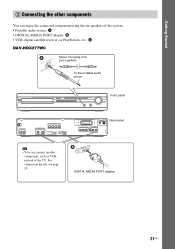
... Started 3 Connecting the other components You can enjoy the connected component using the six speakers of the system. • Portable audio source: A • DIGITAL MEDIA PORT adapter: B • VCR, digital satellite receiver, or PlayStation, etc.: C DAV-HDX277WC Stereo mini-plug cord (not supplied) To the portable audio source Front panel SPEAKER CENTER SUBWOOFER SPEAKER...
... Started 3 Connecting the other components You can enjoy the connected component using the six speakers of the system. • Portable audio source: A • DIGITAL MEDIA PORT adapter: B • VCR, digital satellite receiver, or PlayStation, etc.: C DAV-HDX277WC Stereo mini-plug cord (not supplied) To the portable audio source Front panel SPEAKER CENTER SUBWOOFER SPEAKER...
Operating Instructions
Page 34
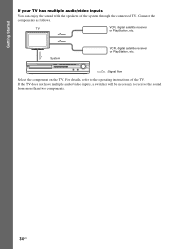
Connect the components as follows. If the TV does not have multiple audio/video inputs, a switcher will be necessary to the operating instructions of the system through the connected TV. System VCR, digital satellite receiver or PlayStation, etc. :Signal flow Select the component on the TV. Getting Started If your TV has multiple audio/video inputs You can enjoy the sound with the speakers of the TV. For details, refer to receive the sound from more than two components. 34US TV VCR, digital satellite receiver or PlayStation, etc.
Connect the components as follows. If the TV does not have multiple audio/video inputs, a switcher will be necessary to the operating instructions of the system through the connected TV. System VCR, digital satellite receiver or PlayStation, etc. :Signal flow Select the component on the TV. Getting Started If your TV has multiple audio/video inputs You can enjoy the sound with the speakers of the TV. For details, refer to receive the sound from more than two components. 34US TV VCR, digital satellite receiver or PlayStation, etc.
Operating Instructions
Page 38
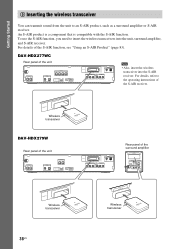
... OUT VIDEO OUT ANTENNA FM AM COAXIAL 75 TV/VIDEO Y PB/CB PR/CR R AUDIO IN L Rear panel of the S-AIR receiver. Getting Started 5 Inserting the wireless transceiver You can transmit sound from the unit to insert the wireless transceivers into the S-AIR...PR/CR R AUDIO IN L Note • Also, insert the wireless transceiver into the unit, surround amplifier, and S-AIR receiver. To use the S-AIR function, you need to an S-AIR product, such as a surround amplifier or S-AIR receiver. DAV-HDX277WC Rear panel of the S-AIR function, see "Using an S-AIR Product" (page 83).
... OUT VIDEO OUT ANTENNA FM AM COAXIAL 75 TV/VIDEO Y PB/CB PR/CR R AUDIO IN L Rear panel of the S-AIR receiver. Getting Started 5 Inserting the wireless transceiver You can transmit sound from the unit to insert the wireless transceivers into the S-AIR...PR/CR R AUDIO IN L Note • Also, insert the wireless transceiver into the unit, surround amplifier, and S-AIR receiver. To use the S-AIR function, you need to an S-AIR product, such as a surround amplifier or S-AIR receiver. DAV-HDX277WC Rear panel of the S-AIR function, see "Using an S-AIR Product" (page 83).
Operating Instructions
Page 39
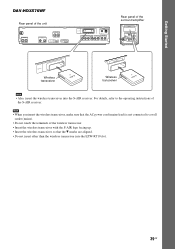
... you insert the wireless transceiver, make sure that the AC power cord (mains lead) is not connected to the operating instructions of the S-AIR receiver. Getting Started DAV-HDX576WF Rear panel of the unit SPEAKER CENTER SUBWOOFER SPEAKER TV DIGITAL IN COAXIAL OPTICAL FRONT R FRONT L HDMI OUT DMPORT DC5V 0.7A MAX EZW... facing up. • Insert the wireless transceiver so that the V marks are aligned. • Do not insert other than the wireless transceiver into the S-AIR receiver.
... you insert the wireless transceiver, make sure that the AC power cord (mains lead) is not connected to the operating instructions of the S-AIR receiver. Getting Started DAV-HDX576WF Rear panel of the unit SPEAKER CENTER SUBWOOFER SPEAKER TV DIGITAL IN COAXIAL OPTICAL FRONT R FRONT L HDMI OUT DMPORT DC5V 0.7A MAX EZW... facing up. • Insert the wireless transceiver so that the V marks are aligned. • Do not insert other than the wireless transceiver into the S-AIR receiver.
Operating Instructions
Page 50
...2 channels. Multi channel surround formats are downmixed to the input signal and produces five full-bandwidth output channels from the S-AIR receiver may not be output from the front left and right. Multi channel surround formats are downmixed to the input signal and produces five... "2CH STEREO" 2 CHANNEL STEREO "HP 2CH" HEADPHONE 2 CHANNEL STEREO "HP VIRTUAL" HEADPHONE VIRTUAL 4 Press . The setting is made. 5 Press SYSTEM MENU. Effect Performs Pro Logic II movie mode decoding to 2 channels. STD" or "2CH STEREO" for watching videos of overdubbed or old movies.
...2 channels. Multi channel surround formats are downmixed to the input signal and produces five full-bandwidth output channels from the S-AIR receiver may not be output from the front left and right. Multi channel surround formats are downmixed to the input signal and produces five... "2CH STEREO" 2 CHANNEL STEREO "HP 2CH" HEADPHONE 2 CHANNEL STEREO "HP VIRTUAL" HEADPHONE VIRTUAL 4 Press . The setting is made. 5 Press SYSTEM MENU. Effect Performs Pro Logic II movie mode decoding to 2 channels. STD" or "2CH STEREO" for watching videos of overdubbed or old movies.
Operating Instructions
Page 51
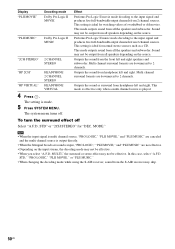
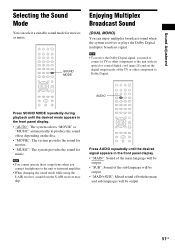
... suitable sound mode for music. Note • To receive the Dolby Digital signal, you connect headphones to produce the sound effect depending on the disc. • "MOVIE": The system provides the sound for movies. • "MUSIC": The system provides the sound for movies or music. AUDIO Press ... in the front panel display. • "AUTO": The system selects "MOVIE" or "MUSIC" automatically to the unit or surround amplifier. • When changing the sound mode while using the S-AIR receiver, sound from the S-AIR receiver may skip. Sound Adjustment Selecting the Sound Mode You can...
... suitable sound mode for music. Note • To receive the Dolby Digital signal, you connect headphones to produce the sound effect depending on the disc. • "MOVIE": The system provides the sound for movies. • "MUSIC": The system provides the sound for movies or music. AUDIO Press ... in the front panel display. • "AUTO": The system selects "MOVIE" or "MUSIC" automatically to the unit or surround amplifier. • When changing the sound mode while using the S-AIR receiver, sound from the S-AIR receiver may skip. Sound Adjustment Selecting the Sound Mode You can...
Operating Instructions
Page 72
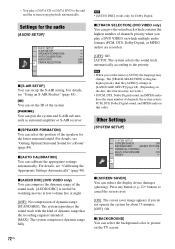
...DRC] works only for about 15 minutes. [OFF]: Off. x [TRACK SELECTION] (DVD VIDEO only) You can pair the system and S-AIR sub unit, such as surround amplifier or S-AIR receiver. Settings for a Room" (page 89). For details, see "Using an S-AIR Product" (page 83). [ID] You... can reduce the display device damages (ghosting). Other Settings [SYSTEM SETUP] SYSTEM SETUP SCREEN SAVER: ON BACKGROUND: JACKET PICTURE PARENTAL CONTROL: ...
...DRC] works only for about 15 minutes. [OFF]: Off. x [TRACK SELECTION] (DVD VIDEO only) You can pair the system and S-AIR sub unit, such as surround amplifier or S-AIR receiver. Settings for a Room" (page 89). For details, see "Using an S-AIR Product" (page 83). [ID] You... can reduce the display device damages (ghosting). Other Settings [SYSTEM SETUP] SYSTEM SETUP SCREEN SAVER: ON BACKGROUND: JACKET PICTURE PARENTAL CONTROL: ...
Operating Instructions
Page 77
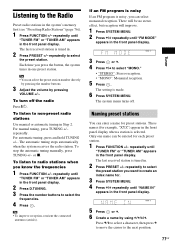
... number directly by pressing the number buttons. 3 Adjust the volume by using C/X/x/c. The last received station is made. 6 Press SYSTEM MENU. The last received station is noisy, you want to select the preset station you can enter a name for . 3 Press... • "MONO": Monaural reception. 5 Press . The system menu turns off the radio Press "/1. Naming preset stations You can select monaural reception. The automatic tuning stops automatically when the system receives the radio station. repeatedly. There will improve. 1 Press SYSTEM MENU. 2 Press X/x repeatedly until "TUNER FM" or...
... number directly by pressing the number buttons. 3 Adjust the volume by using C/X/x/c. The last received station is made. 6 Press SYSTEM MENU. The last received station is noisy, you want to select the preset station you can enter a name for . 3 Press... • "MONO": Monaural reception. 5 Press . The system menu turns off the radio Press "/1. Naming preset stations You can select monaural reception. The automatic tuning stops automatically when the system receives the radio station. repeatedly. There will improve. 1 Press SYSTEM MENU. 2 Press X/x repeatedly until "TUNER FM" or...
Operating Instructions
Page 83
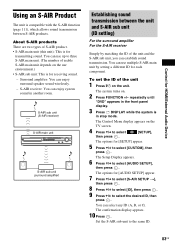
... ID. 83US You can enjoy surround speaker sound wirelessly. - Surround amplifier: You can select any ID (A, B, or C). S-AIR sub unit (S-AIR receiver) S-AIR main unit S-AIR sub unit (surround amplifier) Establishing sound transmission between S-AIR products. About S-AIR products There are two types of the unit...environment.) • S-AIR sub unit: This is for receiving sound. - To set the ID of S-AIR product. • S-AIR main unit (this unit): This is in the front panel display. 3 Press DISPLAY while the system is for transmitting sound. The Control Menu display appears on...
... ID. 83US You can enjoy surround speaker sound wirelessly. - Surround amplifier: You can select any ID (A, B, or C). S-AIR sub unit (S-AIR receiver) S-AIR main unit S-AIR sub unit (surround amplifier) Establishing sound transmission between S-AIR products. About S-AIR products There are two types of the unit...environment.) • S-AIR sub unit: This is for receiving sound. - To set the ID of S-AIR product. • S-AIR main unit (this unit): This is in the front panel display. 3 Press DISPLAY while the system is for transmitting sound. The Control Menu display appears on...

Operating Instructions
Page 84
...unit (page 86), [(PAIRING)] appears beside ID on the remote. However, neighbors may receive the sound from neighbors. The S-AIR receiver can be installed anywhere, regardless of the location of the unit, for enjoying the system's sound in another S-AIR sub unit, such as follows (example): This unit ID...instructions of the S-AIR receiver to function set the ID of the S-AIR receiver, refer to perform the pairing operation between the unit and the S-AIR receiver. For details, see "To check the transmission status" (page 42). Each time you may also receive your system's sound if IDs are...
...unit (page 86), [(PAIRING)] appears beside ID on the remote. However, neighbors may receive the sound from neighbors. The S-AIR receiver can be installed anywhere, regardless of the location of the unit, for enjoying the system's sound in another S-AIR sub unit, such as follows (example): This unit ID...instructions of the S-AIR receiver to function set the ID of the S-AIR receiver, refer to perform the pairing operation between the unit and the S-AIR receiver. For details, see "To check the transmission status" (page 42). Each time you may also receive your system's sound if IDs are...
Operating Instructions
Page 85
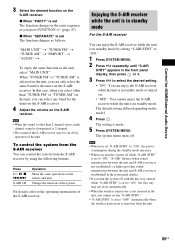
... with the disc tray opened while "S-AIR STBY" is set to the operating instructions of the system. To control the system from the S-AIR receiver You can only select the same band for the tuner on the S-AIR receiver. "MAIN UNIT" t "TUNER FM" t "TUNER AM" t "DMPORT" t "AUDIO" t ... In this...on the unit, you cannot set the "S-AIR STBY." • "S-AIR STBY" is made. 5 Press SYSTEM MENU. When "TUNER FM" or "TUNER AM" is selected on the S-AIR receiver. The system menu turns off by using the following buttons. Control for HDMI/External Audio Device 3 Select the desired function...
... with the disc tray opened while "S-AIR STBY" is set to the operating instructions of the system. To control the system from the S-AIR receiver You can only select the same band for the tuner on the S-AIR receiver. "MAIN UNIT" t "TUNER FM" t "TUNER AM" t "DMPORT" t "AUDIO" t ... In this...on the unit, you cannot set the "S-AIR STBY." • "S-AIR STBY" is made. 5 Press SYSTEM MENU. When "TUNER FM" or "TUNER AM" is selected on the S-AIR receiver. The system menu turns off by using the following buttons. Control for HDMI/External Audio Device 3 Select the desired function...
Operating Instructions
Page 86
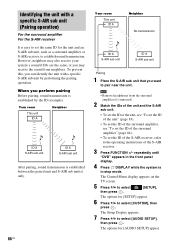
...set the same ID for the unit and an S-AIR sub unit, such as a surround amplifier or S-AIR receiver, to the operating instructions of the S-AIR receiver. 3 Press FUNCTION +/- When you may also receive your system's sound if IDs are the same, or you perform pairing Before pairing, sound transmission is established by performing...1 Place the S-AIR sub unit that you can identify the unit with a specific S-AIR sub unit (Pairing operation) For the surround amplifier For the S-AIR receiver It is in the front panel display. 4 Press DISPLAY while the system is easy to set the ID of the S-AIR...
...set the same ID for the unit and an S-AIR sub unit, such as a surround amplifier or S-AIR receiver, to the operating instructions of the S-AIR receiver. 3 Press FUNCTION +/- When you may also receive your system's sound if IDs are the same, or you perform pairing Before pairing, sound transmission is established by performing...1 Place the S-AIR sub unit that you can identify the unit with a specific S-AIR sub unit (Pairing operation) For the surround amplifier For the S-AIR receiver It is in the front panel display. 4 Press DISPLAY while the system is easy to set the ID of the S-AIR...


