
Operating Instructions
Page 1
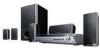
2-895-959-12(1) DVD Home Theatre System Operating Instructions * *DAV-HDX265/HDX267W only DAV-HDX265/HDX266/HDX267W ©2007 Sony Corporation
2-895-959-12(1) DVD Home Theatre System Operating Instructions * *DAV-HDX265/HDX267W only DAV-HDX265/HDX266/HDX267W ©2007 Sony Corporation
Operating Instructions
Page 2
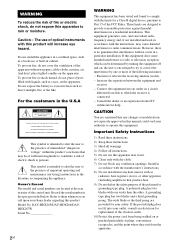
... magnitude to constitute a risk of electric shock to provide reasonable protection against harmful interference in this manual could void your Sony dealer regarding this equipment. Increase the separation between the equipment and receiver. - Connect the equipment into your safety. Consult... may cause harmful interference to excessive heat such as radiators, heat registers, stoves, or other . This symbol is connected. - DAV-HDX265/DAV-HDX266/DAVHDX267W Serial No 2GB WARNING This equipment has been tested and found to comply with the limits for a Class B digital...
... magnitude to constitute a risk of electric shock to provide reasonable protection against harmful interference in this manual could void your Sony dealer regarding this equipment. Increase the separation between the equipment and receiver. - Connect the equipment into your safety. Consult... may cause harmful interference to excessive heat such as radiators, heat registers, stoves, or other . This symbol is connected. - DAV-HDX265/DAV-HDX266/DAVHDX267W Serial No 2GB WARNING This equipment has been tested and found to comply with the limits for a Class B digital...
Operating Instructions
Page 3
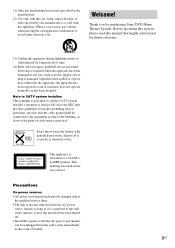
...at the qualified service shop. • The unit is not disconnected from tip-over. Welcome! Note to CATV system installer: This reminder is provided to call the CATV system installer's attention to Article 820-40 of the NEC that provides guidelines for long periods of it is connected ...manufacturer, or sold with general house waste, dispose of time. 14) Refer all servicing to qualified service personnel. Thank you for purchasing Sony DVD Home Theatre System. 11) Only use caution when moving the cart/apparatus combination to avoid injury from the AC power source (mains) as long as ...
...at the qualified service shop. • The unit is not disconnected from tip-over. Welcome! Note to CATV system installer: This reminder is provided to call the CATV system installer's attention to Article 820-40 of the NEC that provides guidelines for long periods of it is connected ...manufacturer, or sold with general house waste, dispose of time. 14) Refer all servicing to qualified service personnel. Thank you for purchasing Sony DVD Home Theatre System. 11) Only use caution when moving the cart/apparatus combination to avoid injury from the AC power source (mains) as long as ...

Operating Instructions
Page 4
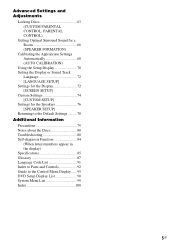
... Effect 59 Using the Sleep Timer 60 Changing the Brightness of Contents Welcome 3 About This Manual 6 This System Can Play the Following Discs 7 Getting Started - BASIC - Step 1: Connecting the System and TV 10 Step 2: Positioning the System ...14 Step 3: Performing the Quick Setup 15 Getting Started - ADVANCED - Table of the Front Panel Display...
... Effect 59 Using the Sleep Timer 60 Changing the Brightness of Contents Welcome 3 About This Manual 6 This System Can Play the Following Discs 7 Getting Started - BASIC - Step 1: Connecting the System and TV 10 Step 2: Positioning the System ...14 Step 3: Performing the Quick Setup 15 Getting Started - ADVANCED - Table of the Front Panel Display...
Operating Instructions
Page 5
... 85 Glossary 87 Language Code List 91 Index to Parts and Controls 92 Guide to the Control Menu Display...... 95 DVD Setup Display List 98 System Menu List 99 Index 100 5GB
... 85 Glossary 87 Language Code List 91 Index to Parts and Controls 92 Guide to the Control Menu Display...... 95 DVD Setup Display List 98 System Menu List 99 Index 100 5GB
Operating Instructions
Page 6
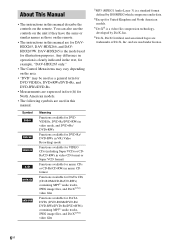
..., and DAVHDX267W. and are used for illustration purposes. Any difference in operation is clearly indicated in the text, for example, "DAV-HDX265 only." • The Control Menu items may be used in this manual. Symbol Meaning Functions available for DVD VIDEOs, DVD-Rs/DVD-RWs in video ... for music CDs or CD-Rs/CD-RWs in this manual describe the controls on the area. • "DVD" may vary depending on the remote. DAV-HDX265 is the model used under license. 6GB About This Manual • The instructions in music CD format Functions available for DATA CDs (CD-ROMs/CD...
..., and DAVHDX267W. and are used for illustration purposes. Any difference in operation is clearly indicated in the text, for example, "DAV-HDX265 only." • The Control Menu items may be used in this manual. Symbol Meaning Functions available for DVD VIDEOs, DVD-Rs/DVD-RWs in video ... for music CDs or CD-Rs/CD-RWs in this manual describe the controls on the area. • "DVD" may vary depending on the remote. DAV-HDX265 is the model used under license. 6GB About This Manual • The instructions in music CD format Functions available for DATA CDs (CD-ROMs/CD...
Operating Instructions
Page 7
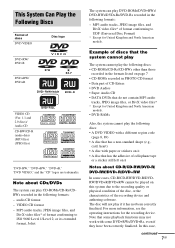
... recording quality or physical condition of the disc, or the characteristics of the recording device and authoring software. Example of discs that the system cannot play The system cannot play the following discs: • CD-ROMs/CD-Rs/CD-RWs other than those recorded in the formats listed on page 7...DVD-R/ DVD-RW/DVD+R/DVD+RW In some DVD+RWs/DVD+Rs, even if they have been correctly finalized. VIDEO CD format - In this system due to UDF (Universal Disc Format) * Except for the recording device. For more information, see the operating instructions for United Kingdom and North American...
... recording quality or physical condition of the disc, or the characteristics of the recording device and authoring software. Example of discs that the system cannot play The system cannot play the following discs: • CD-ROMs/CD-Rs/CD-RWs other than those recorded in the formats listed on page 7...DVD-R/ DVD-RW/DVD+R/DVD+RW In some DVD+RWs/DVD+Rs, even if they have been correctly finalized. VIDEO CD format - In this system due to UDF (Universal Disc Format) * Except for the recording device. For more information, see the operating instructions for United Kingdom and North American...
Operating Instructions
Page 8
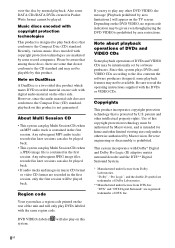
...by area limitations.] will only play Multi Session CDs when an MP3 audio track is intended for home and other DVD VIDEO, the message [Playback prohibited by this system plays DVDs and VIDEO CDs according to read the operating instructions supplied with Dolby* Digital and Dolby... Pro Logic (II) adaptive matrix surround decoder and the DTS** Digital Surround System. * Manufactured under license from Dolby Laboratories. Any subsequent JPEG image files recorded in later sessions can also be played. Note about ...
...by area limitations.] will only play Multi Session CDs when an MP3 audio track is intended for home and other DVD VIDEO, the message [Playback prohibited by this system plays DVDs and VIDEO CDs according to read the operating instructions supplied with Dolby* Digital and Dolby... Pro Logic (II) adaptive matrix surround decoder and the DTS** Digital Surround System. * Manufactured under license from Dolby Laboratories. Any subsequent JPEG image files recorded in later sessions can also be played. Note about ...

Operating Instructions
Page 9
... or lighting apparatus. To use a new battery with an old one. • Do not drop any foreign object into the remote You can control the system using the supplied remote. See Unpacking in an extremely hot or humid place. • Do not use the remote, point it at the remote sensor...
... or lighting apparatus. To use a new battery with an old one. • Do not drop any foreign object into the remote You can control the system using the supplied remote. See Unpacking in an extremely hot or humid place. • Do not use the remote, point it at the remote sensor...

Operating Instructions
Page 10
... diagram below, and read the additional information from 1 to the speakers and TV. Getting Started - For other TV connections, see page 13. Step 1: Connecting the System and TV The following is the basic connection of the unit to 4 on the following pages. To accept progressive signals, see page 24. BASIC - Front...
... diagram below, and read the additional information from 1 to the speakers and TV. Getting Started - For other TV connections, see page 13. Step 1: Connecting the System and TV The following is the basic connection of the unit to 4 on the following pages. To accept progressive signals, see page 24. BASIC - Front...
Operating Instructions
Page 11
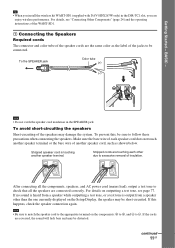
... this , be distorted. To prevent this happens, check the speaker connection again. BASIC - Tip • When you install the wireless kit WAHT-SD1 (supplied with DAV-HDX267W only) in the SPEAKER jack. continued 11GB After connecting all the components, speakers, and AC power cord (mains lead), output a test tone to check... each other than the one currently displayed on the components: 3 to 3, and # to the appropriate terminal on the Setup Display, the speaker may damage the system. If the cords are connected correctly.
... this , be distorted. To prevent this happens, check the speaker connection again. BASIC - Tip • When you install the wireless kit WAHT-SD1 (supplied with DAV-HDX267W only) in the SPEAKER jack. continued 11GB After connecting all the components, speakers, and AC power cord (mains lead), output a test tone to check... each other than the one currently displayed on the components: 3 to 3, and # to the appropriate terminal on the Setup Display, the speaker may damage the system. If the cords are connected correctly.

Operating Instructions
Page 12
Getting Started - A Insert the cord pushing down the terminal clamp. B Audio cord (not supplied) Yellow White (L/audio) Red (R/audio) Tip • When you want to output the TV sound or stereo sound of a 2 channel source from the plastic stand. 2 Set up the AM loop antenna (aerial). 3 Connect the cords to the AM antenna (aerial) terminals. Do not dismantle or roll up the antenna (aerial). 1 Remove only the loop part from the 6 speakers, select the "Dolby Pro Logic," "Dolby Pro Logic II MOVIE," or "Dolby Pro Logic II MUSIC" sound field (page 30). 3 Connecting the Antenna (...
Getting Started - A Insert the cord pushing down the terminal clamp. B Audio cord (not supplied) Yellow White (L/audio) Red (R/audio) Tip • When you want to output the TV sound or stereo sound of a 2 channel source from the plastic stand. 2 Set up the AM loop antenna (aerial). 3 Connect the cords to the AM antenna (aerial) terminals. Do not dismantle or roll up the antenna (aerial). 1 Remove only the loop part from the 6 speakers, select the "Dolby Pro Logic," "Dolby Pro Logic II MOVIE," or "Dolby Pro Logic II MUSIC" sound field (page 30). 3 Connecting the Antenna (...
Operating Instructions
Page 13
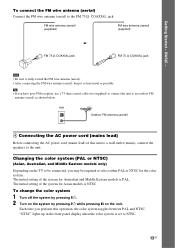
...and Middle Eastern models is NTSC. "NTSC" lights up in the front panel display when the color system is set to select either PAL or NTSC for Asian models is PAL. Changing the color system (PAL or NTSC) (Asian, Australian, and Middle Eastern models only) Depending on the unit. The... connect the FM wire antenna (aerial) Connect the FM wire antenna (aerial) to the unit. To change the color system 1 Turn off the system by pressing "/1. 2 Turn on the system by pressing "/1 while pressing X on the TV to be connected, you perform this unit to a wall outlet (mains), connect the speakers...
...and Middle Eastern models is NTSC. "NTSC" lights up in the front panel display when the color system is set to select either PAL or NTSC for Asian models is PAL. Changing the color system (PAL or NTSC) (Asian, Australian, and Middle Eastern models only) Depending on the unit. The... connect the FM wire antenna (aerial) Connect the FM wire antenna (aerial) to the unit. To change the color system 1 Turn off the system by pressing "/1. 2 Turn on the system by pressing "/1 while pressing X on the TV to be connected, you perform this unit to a wall outlet (mains), connect the speakers...
Operating Instructions
Page 14
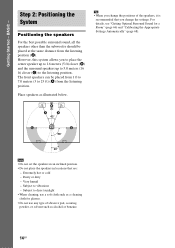
...positions of abrasive pad, scouring powder, or solvent such as illustrated below. Subject to 23 ft) (A) from the listening position (A). However, this system allows you change the settings. Tip • When you to place the center speaker up to 1.6 meters (5 ft) closer (B) and the ... type of the speakers, it is recommended that are: - Getting Started - Place speakers as alcohol or benzine. 14GB Step 2: Positioning the System Positioning the speakers For the best possible surround sound, all the speakers other than the subwoofer should be placed from 1.0 to 7.0 meters (3 to ...
...positions of abrasive pad, scouring powder, or solvent such as illustrated below. Subject to 23 ft) (A) from the listening position (A). However, this system allows you change the settings. Tip • When you to place the center speaker up to 1.6 meters (5 ft) closer (B) and the ... type of the speakers, it is recommended that are: - Getting Started - Place speakers as alcohol or benzine. 14GB Step 2: Positioning the System Positioning the speakers For the best possible surround sound, all the speakers other than the subwoofer should be placed from 1.0 to 7.0 meters (3 to ...
Operating Instructions
Page 15
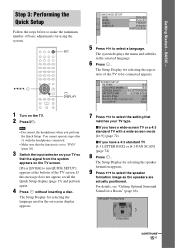
... standard TV [4:3 LETTER BOX] or [4:3 PAN SCAN] (page 72) 8 Press . The Setup Display for a Room" (page 66). The system displays the menu and subtitles in the on-screen display appears. 7 Press X/x to select the setting that matches your TV so that the function is...Display for selecting the language used in the selected language. 6 Press . x If you perform the Quick Setup. The Setup Display for using the system. BASIC - "/1 C/X/x/c, DISPLAY LANGUAGE SETUP OSD: MENU: AUDIO: SUBTITLE: ENGLISH ENGLISH FRENCH SPANISH PORTUGUESE 5 Press X/x to run QUICK SETUP.] appears...
... standard TV [4:3 LETTER BOX] or [4:3 PAN SCAN] (page 72) 8 Press . The Setup Display for a Room" (page 66). The system displays the menu and subtitles in the on-screen display appears. 7 Press X/x to select the setting that matches your TV so that the function is...Display for selecting the language used in the selected language. 6 Press . x If you perform the Quick Setup. The Setup Display for using the system. BASIC - "/1 C/X/x/c, DISPLAY LANGUAGE SETUP OSD: MENU: AUDIO: SUBTITLE: ENGLISH ENGLISH FRENCH SPANISH PORTUGUESE 5 Press X/x to run QUICK SETUP.] appears...
Operating Instructions
Page 16
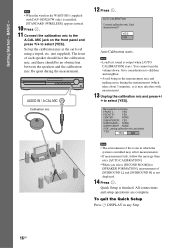
... starts. BASIC - You cannot turn the volume down. Quick Setup is output when [AUTO CALIBRATION] starts. Be quiet during the measurement (which the system is installed may interfere with DAV-HDX267W only) is not displayed. 14 Press . AUDIO IN / A.CAL MIC Calibration mic 12 Press . All connections and setup operations are complete...
... starts. BASIC - You cannot turn the volume down. Quick Setup is output when [AUTO CALIBRATION] starts. Be quiet during the measurement (which the system is installed may interfere with DAV-HDX267W only) is not displayed. 14 Press . AUDIO IN / A.CAL MIC Calibration mic 12 Press . All connections and setup operations are complete...
Operating Instructions
Page 17
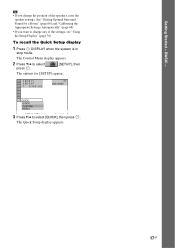
Tip • If you want to select [QUICK], then press . To recall the Quick Setup display 1 Press DISPLAY when the system is in stop mode. The Control Menu display appears. 2 Press X/x to select press . [SETUP], then The options for a Room" (page 66) and "Calibrating the Appropriate ...
Tip • If you want to select [QUICK], then press . To recall the Quick Setup display 1 Press DISPLAY when the system is in stop mode. The Control Menu display appears. 2 Press X/x to select press . [SETUP], then The options for a Room" (page 66) and "Calibrating the Appropriate ...
Operating Instructions
Page 18
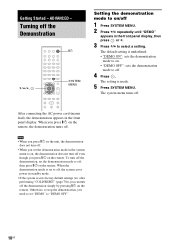
...; "DEMO ON": sets the demonstration mode to on. • "DEMO OFF": sets the demonstration mode to off the demonstration simply by pressing "/1 on /off 1 Press SYSTEM MENU. 2 Press X/x repeatedly until "DEMO" appears in the front panel display, then press or c. 3 Press X/x to off . After connecting the AC power cord ...(mains lead), the demonstration appears in standby mode. • If the system is made. 5 Press SYSTEM MENU. The setting is at its factory default settings (ex. Turning off the Demonstration...
...; "DEMO ON": sets the demonstration mode to on. • "DEMO OFF": sets the demonstration mode to off the demonstration simply by pressing "/1 on /off 1 Press SYSTEM MENU. 2 Press X/x repeatedly until "DEMO" appears in the front panel display, then press or c. 3 Press X/x to off . After connecting the AC power cord ...(mains lead), the demonstration appears in standby mode. • If the system is made. 5 Press SYSTEM MENU. The setting is at its factory default settings (ex. Turning off the Demonstration...
Operating Instructions
Page 19
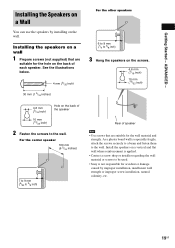
... on a vertical and flat wall where reinforcement is applied. • Contact a screw shop or installer regarding the wall material or screws to be used. • Sony is especially fragile, attach the screws securely to a beam and fasten them to the wall. Getting Started - Installing the Speakers on the back of the...
... on a vertical and flat wall where reinforcement is applied. • Contact a screw shop or installer regarding the wall material or screws to be used. • Sony is especially fragile, attach the screws securely to a beam and fasten them to the wall. Getting Started - Installing the Speakers on the back of the...

Operating Instructions
Page 20
... IN TV with COMPONENT VIDEO IN jacks TV with VIDEO IN jack :Signal flow TV with S VIDEO IN jack * HDMI (high-definition multimedia interface) The system incorporates High-Definition Multimedia Interface (HDMITM) technology. Check the jacks of HDMI Licensing LLC. 20GB Picture quality improves in order from A (standard) to the connected...
... IN TV with COMPONENT VIDEO IN jacks TV with VIDEO IN jack :Signal flow TV with S VIDEO IN jack * HDMI (high-definition multimedia interface) The system incorporates High-Definition Multimedia Interface (HDMITM) technology. Check the jacks of HDMI Licensing LLC. 20GB Picture quality improves in order from A (standard) to the connected...