Operating Instructions
Page 2
.... For installation and connections, see your authority to operate this equipment. Connect the equipment into an outlet on the satellite radio tuner module. These limits are trademarks of Apple Inc., registered in this manual could void your nearest authorized Sony dealer for a Class B digital device, pursuant to Part 15 of the FCC Rules. CAUTION The use of optical instruments with the instructions, may...
.... For installation and connections, see your authority to operate this equipment. Connect the equipment into an outlet on the satellite radio tuner module. These limits are trademarks of Apple Inc., registered in this manual could void your nearest authorized Sony dealer for a Class B digital device, pursuant to Part 15 of the FCC Rules. CAUTION The use of optical instruments with the instructions, may...
Operating Instructions
Page 4
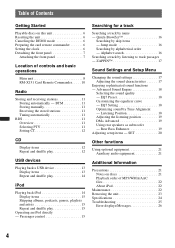
... subwoofer - SET 20 Other functions Using optional equipment 21 Auxiliary audio equipment 21 Additional Information Precautions 21 Notes on this unit 6 Resetting the unit 6 Canceling the DEMO mode 6 Preparing the card remote commander 6 Setting the clock 6 Detaching the front panel 7 Attaching the front panel 7 Location of MP3/WMA/AAC files 22 About iPod 22 Maintenance 22 Removing the unit 23 Specifications 24 Troubleshooting 25 Error displays/Messages 26 4 Rear Bass Enhancer 19 Adjusting setup items - ZAPPIN 17 Sound Settings and Setup Menu Changing...
... subwoofer - SET 20 Other functions Using optional equipment 21 Auxiliary audio equipment 21 Additional Information Precautions 21 Notes on this unit 6 Resetting the unit 6 Canceling the DEMO mode 6 Preparing the card remote commander 6 Setting the clock 6 Detaching the front panel 7 Attaching the front panel 7 Location of MP3/WMA/AAC files 22 About iPod 22 Maintenance 22 Removing the unit 23 Specifications 24 Troubleshooting 25 Error displays/Messages 26 4 Rear Bass Enhancer 19 Adjusting setup items - ZAPPIN 17 Sound Settings and Setup Menu Changing...
Operating Instructions
Page 6
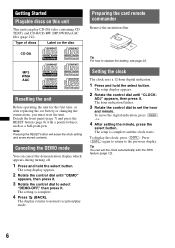
... cancel the demonstration display which appears during turning off. 1 Press and hold the select button. Setting the clock The clock uses a 12-hour digital indication. 1 Press and hold the select button. To display the clock, press (DSPL). MP3 WMA AAC Resetting the unit Before operating the unit for the first time, or after replacing the car battery or changing the connections, you must reset the unit. The hour indication flashes. 3 Rotate the control dial to the...
... cancel the demonstration display which appears during turning off. 1 Press and hold the select button. Setting the clock The clock uses a 12-hour digital indication. 1 Press and hold the select button. To display the clock, press (DSPL). MP3 WMA AAC Resetting the unit Before operating the unit for the first time, or after replacing the car battery or changing the connections, you must reset the unit. The hour indication flashes. 3 Rotate the control dial to the...
Operating Instructions
Page 8
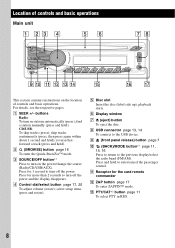
...; mode. find a station manually (press and hold ). reverse/fastforward a track (press and hold ). F Display window G Z (eject) button To eject the disc. I (front panel release) button page 7 J (BACK)/MODE button*1 page 11, 15, 16 Press to return to turn on the location of controls and basic operations. Location of controls and basic operations Main unit This section contains instructions on the power/change the source (Radio/CD/USB/AUX). A SEEK +/- Press for 1 second to the previous display/select the radio band...
...; mode. find a station manually (press and hold ). reverse/fastforward a track (press and hold ). F Display window G Z (eject) button To eject the disc. I (front panel release) button page 7 J (BACK)/MODE button*1 page 11, 15, 16 Press to return to turn on the location of controls and basic operations. Location of controls and basic operations Main unit This section contains instructions on the power/change the source (Radio/CD/USB/AUX). A SEEK +/- Press for 1 second to the previous display/select the radio band...
Operating Instructions
Page 9
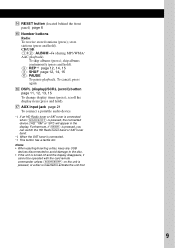
... a disc is connected. *3 This button has a tactile dot. To cancel, press again. Q AUX input jack page 21 To connect a portable audio device. *1 If an HD Radio tuner or SAT tuner is connected: when (SOURCE/OFF) is pressed, the connected device ("HD," "XM" or "SR") will appear in the display. P DSPL (display)/SCRL (scroll) button page 11, 12, 13, 15 To change display items (press); N RESET button (located behind the front panel) page 6 O Number buttons Radio: To receive stored stations...
... a disc is connected. *3 This button has a tactile dot. To cancel, press again. Q AUX input jack page 21 To connect a portable audio device. *1 If an HD Radio tuner or SAT tuner is connected: when (SOURCE/OFF) is pressed, the connected device ("HD," "XM" or "SR") will appear in the display. P DSPL (display)/SCRL (scroll) button page 11, 12, 13, 15 To change display items (press); N RESET button (located behind the front panel) page 6 O Number buttons Radio: To receive stored stations...
Operating Instructions
Page 10
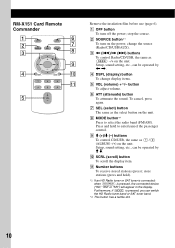
..., if (MODE) is pressed, the connected device ("HD," "XM" or "SR") will appear in the display. H MODE button*1 Press to enter/cancel the passenger control. Setup, sound setting, etc., can switch the HD Radio tuner band or SAT tuner band. *2 This button has a tactile dot. 10 Remove the insulation film before use (page 6). change display items. E VOL (volume) +*2/- button To adjust volume. G SEL (select) button The same as (SEEK) -/+ on the unit. I M (+)/m (-) buttons To control CD/USB, the same...
..., if (MODE) is pressed, the connected device ("HD," "XM" or "SR") will appear in the display. H MODE button*1 Press to enter/cancel the passenger control. Setup, sound setting, etc., can switch the HD Radio tuner band or SAT tuner band. *2 This button has a tactile dot. 10 Remove the insulation film before use (page 6). change display items. E VOL (volume) +*2/- button To adjust volume. G SEL (select) button The same as (SEEK) -/+ on the unit. I M (+)/m (-) buttons To control CD/USB, the same...
Operating Instructions
Page 11
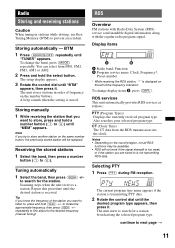
... control dial until the desired station is stored. The unit stores stations in stations while driving, use Best Tuning Memory (BTM) to search for the station. Receiving the stored stations 1 Select the band, then press a number button ((1) to the desired frequency (manual tuning). repeatedly to fine adjust to (6)). Notes • Depending on the country/region, not all RDS functions may be available. • RDS will be replaced. continue to locate the approximate frequency...
... control dial until the desired station is stored. The unit stores stations in stations while driving, use Best Tuning Memory (BTM) to search for the station. Receiving the stored stations 1 Select the band, then press a number button ((1) to the desired frequency (manual tuning). repeatedly to fine adjust to (6)). Notes • Depending on the country/region, not all RDS functions may be available. • RDS will be replaced. continue to locate the approximate frequency...
Operating Instructions
Page 12
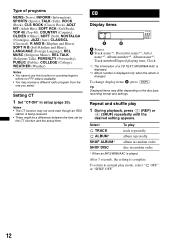
CD Display items A Source B Track name*1, Disc/artist name*1, Artist name*1, Album number*2, Album name*1, Track number/Elapsed playing time, Clock *1 The information of programs NEWS (News), INFORM (Information), SPORTS (Sports), TALK (Talk), ROCK (Rock...setting is changed. Tip Displayed items may not work even though an RDS station is being received. • There might be a difference between the time set by the CT function and the actual time. To return to normal play mode, select " OFF" or "SHUF OFF." 12 Type of a CD TEXT, MP3/WMA/AAC is displayed. *2 Album number is displayed...
CD Display items A Source B Track name*1, Disc/artist name*1, Artist name*1, Album number*2, Album name*1, Track number/Elapsed playing time, Clock *1 The information of programs NEWS (News), INFORM (Information), SPORTS (Sports), TALK (Talk), ROCK (Rock...setting is changed. Tip Displayed items may not work even though an RDS station is being received. • There might be a difference between the time set by the CT function and the actual time. To return to normal play mode, select " OFF" or "SHUF OFF." 12 Type of a CD TEXT, MP3/WMA/AAC is displayed. *2 Album number is displayed...
Operating Instructions
Page 13
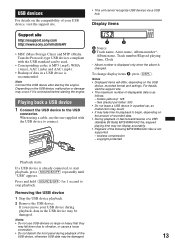
... a USB device is changed. A Source B Track name, Artist name, Album number*, Album name, Track number/Elapsed playing time, Clock * Album number is displayed only when the album is already connected, to stop playback. files (tracks) per folder: 500 • Do not leave a USB device in a parked car, as follows. - If you remove your USB device, visit the support site. • This unit cannot recognize USB devices via a USB hub. Display items Support site http://esupport.sony...
... a USB device is changed. A Source B Track name, Artist name, Album number*, Album name, Track number/Elapsed playing time, Clock * Album number is displayed only when the album is already connected, to stop playback. files (tracks) per folder: 500 • Do not leave a USB device in a parked car, as follows. - If you remove your USB device, visit the support site. • This unit cannot recognize USB devices via a USB hub. Display items Support site http://esupport.sony...
Operating Instructions
Page 14
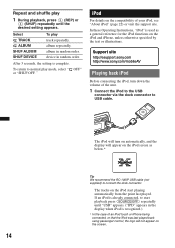
Repeat and shuffle play mode, select " OFF" or "SHUF OFF. device in random order. " iPod For details on the screen. 14 Support site http://esupport.sony.com http://www.sony.com/mobileAV Playing back iPod Before connecting the iPod, turn on automatically, and the display will not appear on the compatibility of the unit. 1 Connect the iPod to the USB connector via the dock connector to normal play 1 During playback, press (3) (REP) or (4) (SHUF...
Repeat and shuffle play mode, select " OFF" or "SHUF OFF. device in random order. " iPod For details on the screen. 14 Support site http://esupport.sony.com http://www.sony.com/mobileAV Playing back iPod Before connecting the iPod, turn on automatically, and the display will not appear on the compatibility of the unit. 1 Connect the iPod to the USB connector via the dock connector to normal play 1 During playback, press (3) (REP) or (4) (SHUF...
Operating Instructions
Page 15
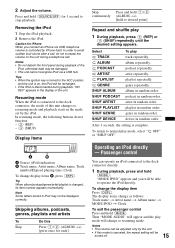
... function. - (3) (REP) - (4) (SHUF) Display items A Source (iPod) indication B Track name, Artist name, Album name, Track number/Elapsed playing time, Clock To change the display item Press (DSPL). The display items change to resuming mode and playback starts in the mode set by iPhone itself. Press and hold to desired point] Repeat and shuffle play mode will be adjusted only by the unit. • If this unit changes to resuming mode. playlist repeatedly. 2 Adjust the volume...
... function. - (3) (REP) - (4) (SHUF) Display items A Source (iPod) indication B Track name, Artist name, Album name, Track number/Elapsed playing time, Clock To change the display item Press (DSPL). The display items change to resuming mode and playback starts in the mode set by iPhone itself. Press and hold to desired point] Repeat and shuffle play mode will be adjusted only by the unit. • If this unit changes to resuming mode. playlist repeatedly. 2 Adjust the volume...
Operating Instructions
Page 17
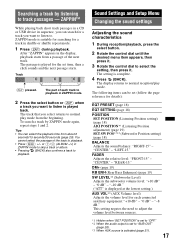
... reception/play mode from the beginning. Tips • You can be set to "OFF." *2 When the audio output is activated (page 21). 17 The setting is displayed at the lowest setting.) AUX VOL*3 (AUX Volume level) Adjusts the volume level for details): EQ7 PRESET (page 18) EQ7 SETTING (page 18) POSITION SET POSITION (Listening Position setting) (page 18) ADJ POSITION*1 (Listening Position adjustment) (page 19) SET SW POS*1*2 (Subwoofer Position setting) (page 18) BALANCE Adjusts the sound balance...
... reception/play mode from the beginning. Tips • You can be set to "OFF." *2 When the audio output is activated (page 21). 17 The setting is displayed at the lowest setting.) AUX VOL*3 (AUX Volume level) Adjusts the volume level for details): EQ7 PRESET (page 18) EQ7 SETTING (page 18) POSITION SET POSITION (Listening Position setting) (page 18) ADJ POSITION*1 (Listening Position adjustment) (page 19) SET SW POS*1*2 (Subwoofer Position setting) (page 18) BALANCE Adjusts the sound balance...
Operating Instructions
Page 18
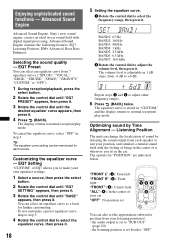
... adjust the volume level, then press it. Listening Position The unit can change the localization of it . the listening position is set You can select an equalizer curve as a basis for each speaker to normal reception/play mode. Advanced Sound Engine Advanced Sound Engine, Sony's new sound engine, creates an ideal in-car sound field with the feeling of being in the center of sound by Time Alignment - EQ7 Preset...
... adjust the volume level, then press it. Listening Position The unit can change the localization of it . the listening position is set You can select an equalizer curve as a basis for each speaker to normal reception/play mode. Advanced Sound Engine Advanced Sound Engine, Sony's new sound engine, creates an ideal in-car sound field with the feeling of being in the center of sound by Time Alignment - EQ7 Preset...

Operating Instructions
Page 19
... the bass sound by restoring high frequencies lost in step 3 above, you can be memorized for "SET SW POS" are indicated below. "CENTER" - The display returns to work as subwoofer - Using rear speakers as a subwoofer if one is not connected. 1 During reception/playback, press the select button. 2 Rotate the control dial until "SET SW POS" appears, then press it . This function allows the rear speakers to normal reception/play mode. 19...
... the bass sound by restoring high frequencies lost in step 3 above, you can be memorized for "SET SW POS" are indicated below. "CENTER" - The display returns to work as subwoofer - Using rear speakers as a subwoofer if one is not connected. 1 During reception/playback, press the select button. 2 Rotate the control dial until "SET SW POS" appears, then press it . This function allows the rear speakers to normal reception/play mode. 19...

Operating Instructions
Page 20
... press it .* The setting is turned off . *2 When FM is received. *3 When the audio output is set to "SUB-OUT" or Rear Bass Enhancer is set to improve poor FM reception: "ON," "OFF." LOUDNESS (Dynamic Loudness) Reinforces bass and treble for clear sound at low volume levels: "ON," "OFF." LPF SLOP*3 (Low Pass Filter Slope) Selects the LPF slope: "1," "2," "3." REAR/SUB*1 Switches the audio output: "SUB-OUT" (subwoofer), "REAR-OUT" (power amplifier). AUX-A*1 (AUX Audio) Activates the AUX source display: "ON," "OFF" (page...
... press it .* The setting is turned off . *2 When FM is received. *3 When the audio output is set to "SUB-OUT" or Rear Bass Enhancer is set to improve poor FM reception: "ON," "OFF." LOUDNESS (Dynamic Loudness) Reinforces bass and treble for clear sound at low volume levels: "ON," "OFF." LPF SLOP*3 (Low Pass Filter Slope) Selects the LPF slope: "1," "2," "3." REAR/SUB*1 Switches the audio output: "SUB-OUT" (subwoofer), "REAR-OUT" (power amplifier). AUX-A*1 (AUX Audio) Activates the AUX source display: "ON," "OFF" (page...
Operating Instructions
Page 21
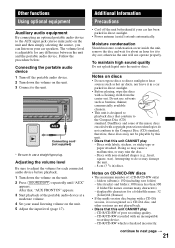
... damage the unit. - 8 cm (3 1/4 in direct sunlight. • Power antenna (aerial) extends automatically. Discs with a cleaning cloth from the center out. Other functions Using optional equipment Auxiliary audio equipment By connecting an optional portable audio device to the AUX input jack (stereo mini jack) on the unit and then simply selecting the source, you can listen on your usual listening volume on the unit. 5 Adjust the input level (page 17). The volume level is finalized...
... damage the unit. - 8 cm (3 1/4 in direct sunlight. • Power antenna (aerial) extends automatically. Discs with a cleaning cloth from the center out. Other functions Using optional equipment Auxiliary audio equipment By connecting an optional portable audio device to the AUX input jack (stereo mini jack) on the unit and then simply selecting the source, you can listen on your usual listening volume on the unit. 5 Adjust the input level (page 17). The volume level is finalized...
Operating Instructions
Page 22
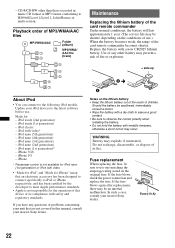
... questions or problems concerning your iPod devices to use one matching the amperage rating stated on the conditions of fire or explosion. + side up About iPod • You can connect to ISO9660 Level 1/Level 2, Joliet/Romeo or multi-session. Fuse (10 A) 22 iPod with a new CR2025 lithium battery. iPhone * Passenger control is not responsible for - If the fuse blows, check the power connection and replace the fuse. iPod nano...
... questions or problems concerning your iPod devices to use one matching the amperage rating stated on the conditions of fire or explosion. + side up About iPod • You can connect to ISO9660 Level 1/Level 2, Joliet/Romeo or multi-session. Fuse (10 A) 22 iPod with a new CR2025 lithium battery. iPhone * Passenger control is not responsible for - If the fuse blows, check the power connection and replace the fuse. iPod nano...
Operating Instructions
Page 24
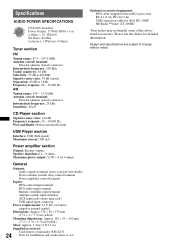
... dB (mono) Separation: 40 dB at 4 ohms) General Outputs: Audio outputs terminal (front, rear/sub switchable) Power antenna (aerial) relay control terminal Power amplifier control terminal Inputs: BUS control input terminal BUS audio input terminal Remote controller input terminal Antenna (aerial) input terminal AUX input jack (stereo mini jack) USB signal input connector Power requirements: 12 V DC car battery (negative ground (earth)) Dimensions: Approx. 178 × 50 × 179 mm (7 1/8 × 2 × 7 1/8 in) (w/h/d) Mounting dimensions: Approx. 182 × 53 × 162...
... dB (mono) Separation: 40 dB at 4 ohms) General Outputs: Audio outputs terminal (front, rear/sub switchable) Power antenna (aerial) relay control terminal Power amplifier control terminal Inputs: BUS control input terminal BUS audio input terminal Remote controller input terminal Antenna (aerial) input terminal AUX input jack (stereo mini jack) USB signal input connector Power requirements: 12 V DC car battery (negative ground (earth)) Dimensions: Approx. 178 × 50 × 179 mm (7 1/8 × 2 × 7 1/8 in) (w/h/d) Mounting dimensions: Approx. 182 × 53 × 162...
Operating Instructions
Page 25
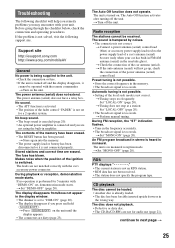
... remote commander. Preset tuning is not possible. • Store the correct frequency in the memory. • The broadcast signal is heard in the rear/side glass). continue to the power supply lead of the power antenna (aerial) control lead. t Turn on the unit until the display appears. • The connectors are not matched correctly with "DEMO-ON" set, demonstration mode starts. Stored stations and correct time are not for a 2-speaker...
... remote commander. Preset tuning is not possible. • Store the correct frequency in the memory. • The broadcast signal is heard in the rear/side glass). continue to the power supply lead of the power antenna (aerial) control lead. t Turn on the unit until the display appears. • The connectors are not matched correctly with "DEMO-ON" set, demonstration mode starts. Stored stations and correct time are not for a 2-speaker...
Operating Instructions
Page 26
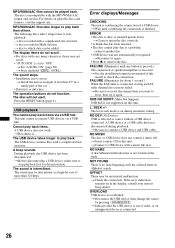
... USB devices via a USB hub. Error displays/Messages CHECKING The unit is no item beginning with a music file in Alphabet search. NOT FOUND There is confirming the connection of speakers/amplifiers is selected as source without a USB device connected. The disc is finished. t Check the connection. MP3/WMA/AAC files take a longer time to check the connection. USB playback You cannot play due to connect a USB device and USB cable. A beep sounds. t Before disconnecting a USB device, make sure to remove the disc...
... USB devices via a USB hub. Error displays/Messages CHECKING The unit is no item beginning with a music file in Alphabet search. NOT FOUND There is confirming the connection of speakers/amplifiers is selected as source without a USB device connected. The disc is finished. t Check the connection. MP3/WMA/AAC files take a longer time to check the connection. USB playback You cannot play due to connect a USB device and USB cable. A beep sounds. t Before disconnecting a USB device, make sure to remove the disc...


