User Manual
Page 1
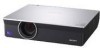
3-211-166-14 (1) Data Projector Operating Instructions VPL-CX100 VPL-CX120/CX125 VPL-CX150/CX155 VPL-CW125 © 2007 Sony Corporation
3-211-166-14 (1) Data Projector Operating Instructions VPL-CX100 VPL-CX120/CX125 VPL-CX150/CX155 VPL-CW125 © 2007 Sony Corporation
User Manual
Page 4
... (Main Unit 13 Top/Front/Side 13 Rear/Side/Bottom 13 Control Panel 15 Connector Panel 16 Remote Commander 17 VPL-CX125/CX155/CW125 ..... 17 VPL-CX100/CX120/CX150 ...... 19 Effective Tools for Your Presentation 32 Controlling the Computer Using a Presentation Tool, RM-PJPK1 ...CW125 only 33 Adjustments and Settings Using a Menu Using a MENU 34 The Picture Menu 36 The Signal Menu 37 About the Preset Memory No. ....38 The Function Menu 39 The Installation Menu 41 The Setup Menu 43 The Information Menu 44 Projecting the Picture Installing the Projector 21 Connecting the Projector...
... (Main Unit 13 Top/Front/Side 13 Rear/Side/Bottom 13 Control Panel 15 Connector Panel 16 Remote Commander 17 VPL-CX125/CX155/CW125 ..... 17 VPL-CX100/CX120/CX150 ...... 19 Effective Tools for Your Presentation 32 Controlling the Computer Using a Presentation Tool, RM-PJPK1 ...CW125 only 33 Adjustments and Settings Using a Menu Using a MENU 34 The Picture Menu 36 The Signal Menu 37 About the Preset Memory No. ....38 The Function Menu 39 The Installation Menu 41 The Setup Menu 43 The Information Menu 44 Projecting the Picture Installing the Projector 21 Connecting the Projector...
User Manual
Page 6
... fall into the lens while the lamp is on the lens, use these holes, or internal heat build-up may impair the performance of the projector, take care with respect to the "Cleaning the Air Filter" on the cabinet. On cleaning Before cleaning Be sure to grasp both sides of ... of your unit is identical with the voltage of your hand or objects near the ventilation holes - If voltage adaptation is required, consult with qualified Sony personnel. • Should any windows that the carpet and wall paper be removed with a cloth lightly dampened with mild detergent solution, followed by the ...
... fall into the lens while the lamp is on the lens, use these holes, or internal heat build-up may impair the performance of the projector, take care with respect to the "Cleaning the Air Filter" on the cabinet. On cleaning Before cleaning Be sure to grasp both sides of ... of your unit is identical with the voltage of your hand or objects near the ventilation holes - If voltage adaptation is required, consult with qualified Sony personnel. • Should any windows that the carpet and wall paper be removed with a cloth lightly dampened with mild detergent solution, followed by the ...
User Manual
Page 7
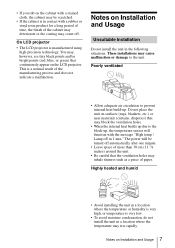
... vinyl resin product for a long period of time, the finish of the cabinet may deteriorate or the coating may come off. On LCD projector • The LCD projector is very low. • To avoid moisture condensation, do not install the unit in contact with the message "High temp.! These ... result of the manufacturing process and does not indicate a malfunction. This is in a location where the temperature may rise rapidly. Notes on the LCD projector. You may, however, see tiny black points and/or bright points (red, blue, or green) that continuously appear on Installation and Usage 7...
... vinyl resin product for a long period of time, the finish of the cabinet may deteriorate or the coating may come off. On LCD projector • The LCD projector is very low. • To avoid moisture condensation, do not install the unit in contact with the message "High temp.! These ... result of the manufacturing process and does not indicate a malfunction. This is in a location where the temperature may rise rapidly. Notes on the LCD projector. You may, however, see tiny black points and/or bright points (red, blue, or green) that continuously appear on Installation and Usage 7...
User Manual
Page 9
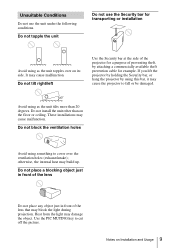
.../left Use the Security bar at the side of the projector for a purpose of the lens that may cause malfunction. It may cause the projector to fall or be damaged. If you lift the projector by holding the Security bar, or hang the projector by attaching a commercially available theft prevention cable for example. These...
.../left Use the Security bar at the side of the projector for a purpose of the lens that may cause malfunction. It may cause the projector to fall or be damaged. If you lift the projector by holding the Security bar, or hang the projector by attaching a commercially available theft prevention cable for example. These...
User Manual
Page 10
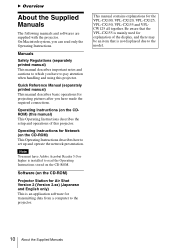
... setup and operations of the display, and there may be an item that the VPL-CX155 is installed to pay attention when handling and using this projector. Operating Instructions (on the CD-ROM) Projector Station for Air Shot Version 2 (Version 2.xx) (Japanese and English only) ...ROM) This Operating Instructions describes how to which you have Adobe Acrobat Reader 5.0 or higher is mainly used for the VPL-CX100, VPL-CX120, VPL-CX125, VPL-CX150, VPL-CX155 and VPLCW125 all together. Quick Reference Manual (separately printed manual) This manual describes basic operations for Network (on ...
... setup and operations of the display, and there may be an item that the VPL-CX155 is installed to pay attention when handling and using this projector. Operating Instructions (on the CD-ROM) Projector Station for Air Shot Version 2 (Version 2.xx) (Japanese and English only) ...ROM) This Operating Instructions describes how to which you have Adobe Acrobat Reader 5.0 or higher is mainly used for the VPL-CX100, VPL-CX120, VPL-CX125, VPL-CX150, VPL-CX155 and VPLCW125 all together. Quick Reference Manual (separately printed manual) This manual describes basic operations for Network (on ...
User Manual
Page 11
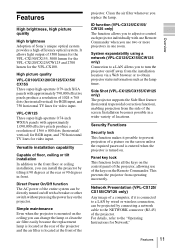
... the screen. VPL-CW125 Three super-high-aperture 0.74-inch WXGA panels with one room. ID function (VPL-CX125/CX155/ CW125 only) The function allows you to prevent projection of 1366 × 800 dots (horizontal/ vertical) for RGB input, and 750 horizontal TV lines for video input. This prevents the projector from the side of Sony's unique...
... the screen. VPL-CW125 Three super-high-aperture 0.74-inch WXGA panels with one room. ID function (VPL-CX125/CX155/ CW125 only) The function allows you to prevent projection of 1366 × 800 dots (horizontal/ vertical) for RGB input, and 750 horizontal TV lines for video input. This prevents the projector from the side of Sony's unique...
User Manual
Page 15
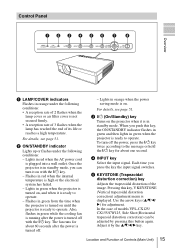
... until the projector is ready to the message or hold the ?/1 key for about 60 seconds after the power is turned off . - c ?/1 (On/Standby) key Turns on with the ?/1 key. Use the arrow keys (v/V/b/ B) for about one second. In the case of models VPL-CX125/ CX155/CW125, Side Shot... (Horizontal trapezoid distortion correction) can turn off the power, press the ?/1 key twice according to operate. Adjust it is in standby mode. For details, see page 51. Once the projector is in standby mode, you can ...
... until the projector is ready to the message or hold the ?/1 key for about 60 seconds after the power is turned off . - c ?/1 (On/Standby) key Turns on with the ?/1 key. Use the arrow keys (v/V/b/ B) for about one second. In the case of models VPL-CX125/ CX155/CW125, Side Shot... (Horizontal trapezoid distortion correction) can turn off the power, press the ?/1 key twice according to operate. Adjust it is in standby mode. For details, see page 51. Once the projector is in standby mode, you can ...
User Manual
Page 17
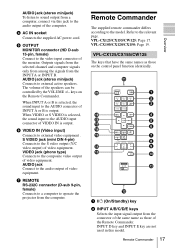
... the INPUT A or INPUT B. AUDIO jack (stereo minijack) Connects to the model. Remote Commander The supplied remote commander differs according to external active speakers. VPL-CX125/CX155/CW125: Page 17. FREEZE ID MODE 1 2 3 1 2 3 4 5 6 7 8 9 0 qa qs a ?/1 (On/Standby) key b INPUT A/B/C/D/E keys ...Remote Commander. f VIDEO IN (Video input) Connects to operate the projector from the computer. g REMOTE RS-232C connector (D-sub 9-pin, female) Connects to a computer to external video equipment . VPL-CX125/CX155/CW125 The keys that have the same names as those on the Remote...
... the INPUT A or INPUT B. AUDIO jack (stereo minijack) Connects to the model. Remote Commander The supplied remote commander differs according to external active speakers. VPL-CX125/CX155/CW125: Page 17. FREEZE ID MODE 1 2 3 1 2 3 4 5 6 7 8 9 0 qa qs a ?/1 (On/Standby) key b INPUT A/B/C/D/E keys ...Remote Commander. f VIDEO IN (Video input) Connects to operate the projector from the computer. g REMOTE RS-232C connector (D-sub 9-pin, female) Connects to a computer to external video equipment . VPL-CX125/CX155/CW125 The keys that have the same names as those on the Remote...
User Manual
Page 18
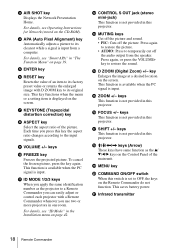
... Press again to restore the picture. • AUDIO: Press to the input signals. n D ZOOM (Digital Zoom) +/- keys This function is not provided in this projector. q SHIFT +/- For details, see "Smart APA" in "The Function Menu" on the screen. i VOLUME +/- key Enlarges the image at a desired location on ...not provided in this key the aspect ratio changes according to temporarily cut off the picture. Each time you use two or more projectors in the Installation menu on the screen. For details, see Operating Instructions for Network (stored on the CD-ROM). keys This ...
... Press again to restore the picture. • AUDIO: Press to the input signals. n D ZOOM (Digital Zoom) +/- keys This function is not provided in this projector. q SHIFT +/- For details, see "Smart APA" in "The Function Menu" on the screen. i VOLUME +/- key Enlarges the image at a desired location on ...not provided in this key the aspect ratio changes according to temporarily cut off the picture. Each time you use two or more projectors in the Installation menu on the screen. For details, see Operating Instructions for Network (stored on the CD-ROM). keys This ...
User Manual
Page 19
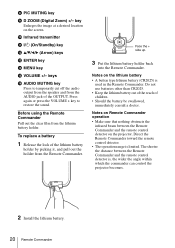
...available when the PC signal is not provided in "The Function Menu" on the projector. This key functions when the menu or a setting item is input from the # side. 2 Replace the lid. VPL-CX100/CX120/CX150 The keys that nothing obstructs the infrared beam between the Remote ...Commander and the projector is, the wider the angle within which the commander can control the projector becomes. Notes on Remote Commander operation • Make sure ...
...available when the PC signal is not provided in "The Function Menu" on the projector. This key functions when the menu or a setting item is input from the # side. 2 Replace the lid. VPL-CX100/CX120/CX150 The keys that nothing obstructs the infrared beam between the Remote ...Commander and the projector is, the wider the angle within which the commander can control the projector becomes. Notes on Remote Commander operation • Make sure ...
User Manual
Page 20
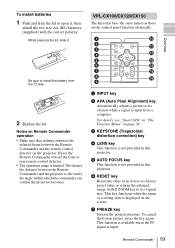
...jack of the OUTPUT. Face the + side up. 3 Put the lithium battery holder back into the Remote Commander. Notes on the projector. The shorter the distance between the Remote Commander and the remote control detector on the lithium battery • A button type lithium battery... (CR2025) is , the wider the angle within which the commander can control the projector becomes. 2 Install the lithium battery. 20 Remote Commander j Infrared transmitter k ?/1 (On/Standby) key l v/V/b/B (Arrow) keys m ENTER key n MENU...
...jack of the OUTPUT. Face the + side up. 3 Put the lithium battery holder back into the Remote Commander. Notes on the projector. The shorter the distance between the Remote Commander and the remote control detector on the lithium battery • A button type lithium battery... (CR2025) is , the wider the angle within which the commander can control the projector becomes. 2 Install the lithium battery. 20 Remote Commander j Infrared transmitter k ?/1 (On/Standby) key l v/V/b/B (Arrow) keys m ENTER key n MENU...
User Manual
Page 21
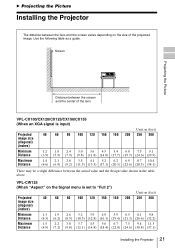
B Projecting the Picture Installing the Projector The distance between the screen and the center of the projected image. VPL-CW125 (When "Aspect" on the size of the lens VPL-CX100/CX120/CX125/CX150/CX155 (When an XGA signal is set... (12.8) (16.1) (19.4) (21.3) (26.6) (32.2) Maximum Distance 1.5 2.2 3.0 3.7 4.5 5.6 6.7 7.5 9.4 11.3 (4.9) (7.2) (9.8) (12.1) (14.8) (18.4) (22.0) (24.6) (30.8) (37.1) Installing the Projector 21 Screen Projecting the Picture Distance between the lens and the screen varies depending on the Signal menu is input) Unit: m (feet) Projected image size...
B Projecting the Picture Installing the Projector The distance between the screen and the center of the projected image. VPL-CW125 (When "Aspect" on the size of the lens VPL-CX100/CX120/CX125/CX150/CX155 (When an XGA signal is set... (12.8) (16.1) (19.4) (21.3) (26.6) (32.2) Maximum Distance 1.5 2.2 3.0 3.7 4.5 5.6 6.7 7.5 9.4 11.3 (4.9) (7.2) (9.8) (12.1) (14.8) (18.4) (22.0) (24.6) (30.8) (37.1) Installing the Projector 21 Screen Projecting the Picture Distance between the lens and the screen varies depending on the Signal menu is input) Unit: m (feet) Projected image size...
User Manual
Page 22
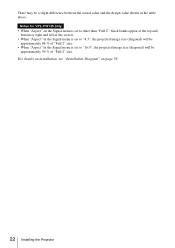
.... • When "Aspect" in the Signal menu is set to "16:9", the projected image size (diagonal) will be approximately 84 % of "Full 2" size. Notes for VPL-CW125 only • When "Aspect" on page 59. 22 Installing the Projector
.... • When "Aspect" in the Signal menu is set to "16:9", the projected image size (diagonal) will be approximately 84 % of "Full 2" size. Notes for VPL-CW125 only • When "Aspect" on page 59. 22 Installing the Projector
User Manual
Page 23
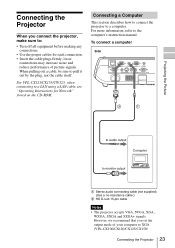
.... • Use the proper cables for Network" stored on the CD-ROM. For VPL-CX125/CX155/CW125, when connecting to a computer. Connecting a Computer This section describes how to connect the projector to a LAN using a LAN cable, see "Operating Instructions for each connection. •...A Stereo audio connecting cable (not supplied) (Use a no-resistance cable.) B HD D-sub 15-pin cable Notes • The projector accepts VGA, SVGA, XGA, WXGA, SXGA and SXGA+ signals. To connect a computer Side NETWORK INPUT C RGB AUDIO INPUT A RGB AUDIO INPUT B MONITOR AUDIO OUTPUT ...
.... • Use the proper cables for Network" stored on the CD-ROM. For VPL-CX125/CX155/CW125, when connecting to a computer. Connecting a Computer This section describes how to connect the projector to a LAN using a LAN cable, see "Operating Instructions for each connection. •...A Stereo audio connecting cable (not supplied) (Use a no-resistance cable.) B HD D-sub 15-pin cable Notes • The projector accepts VGA, SVGA, XGA, WXGA, SXGA and SXGA+ signals. To connect a computer Side NETWORK INPUT C RGB AUDIO INPUT A RGB AUDIO INPUT B MONITOR AUDIO OUTPUT ...
User Manual
Page 24
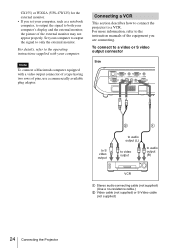
...output connector of a type having two rows of pins, use a commercially available plug adaptor. Connecting a VCR This section describes how to connect the projector to audio output (R) VCR A Stereo audio connecting cable (not supplied) (Use a no-resistance cable.) B Video cable (not supplied) or ...S-Video cable (not supplied) 24 Connecting the Projector For more information, refer to the instruction manuals of the external monitor may not appear properly. CX155) or WXGA (VPL-CW125) for the external monitor. • If you set your computer, such as a ...
...output connector of a type having two rows of pins, use a commercially available plug adaptor. Connecting a VCR This section describes how to connect the projector to audio output (R) VCR A Stereo audio connecting cable (not supplied) (Use a no-resistance cable.) B Video cable (not supplied) or ...S-Video cable (not supplied) 24 Connecting the Projector For more information, refer to the instruction manuals of the external monitor may not appear properly. CX155) or WXGA (VPL-CW125) for the external monitor. • If you set your computer, such as a ...
User Manual
Page 25
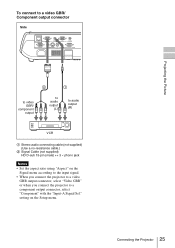
setting on the Signal menu according to the input signal. • When you connect the projector to a video GBR output connector, select "Video GBR" or when you connect the projector to audio output (R) VCR A Stereo audio connecting cable (not supplied) (Use a no-resistance cable.) B Signal Cable (... 15-pin (male) ↔ 3 × phono jack Notes • Set the aspect ratio using "Aspect" on the Setup menu. Connecting the Projector 25 To connect to a video GBR/ Component output connector Side NETWORK INPUT C RGB AUDIO INPUT A RGB AUDIO INPUT B MONITOR AUDIO OUTPUT S VIDEO VIDEO...
setting on the Signal menu according to the input signal. • When you connect the projector to a video GBR output connector, select "Video GBR" or when you connect the projector to audio output (R) VCR A Stereo audio connecting cable (not supplied) (Use a no-resistance cable.) B Signal Cable (... 15-pin (male) ↔ 3 × phono jack Notes • Set the aspect ratio using "Aspect" on the Setup menu. Connecting the Projector 25 To connect to a video GBR/ Component output connector Side NETWORK INPUT C RGB AUDIO INPUT A RGB AUDIO INPUT B MONITOR AUDIO OUTPUT S VIDEO VIDEO...
User Manual
Page 26
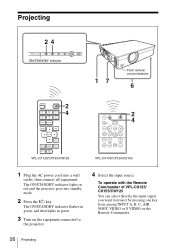
The ON/STANDBY indicator lights in green. 3 Turn on the Remote Commander. 26 Projecting To operate with the Remote Commander of VPL-CX125/ CX155/CW125 You can select directly the input signal you want to project by pressing one key from among INPUT A, B, C, AIR SHOT, VIDEO or S...CX155/CW125 APA INPUT KEY STONE /TILT LENS ENTER AUTO FOCUS RESET MENU FREEZE PIC MUTING D ZOOM AUDIO MUTING VOLUME 2 4 VPL-CX100/CX120/CX150 1 Plug the AC power cord into standby mode. 2 Press the ?/1 key. The ON/STANDBY indicator flashes in green, and then lights in red and the projector goes...
The ON/STANDBY indicator lights in green. 3 Turn on the Remote Commander. 26 Projecting To operate with the Remote Commander of VPL-CX125/ CX155/CW125 You can select directly the input signal you want to project by pressing one key from among INPUT A, B, C, AIR SHOT, VIDEO or S...CX155/CW125 APA INPUT KEY STONE /TILT LENS ENTER AUTO FOCUS RESET MENU FREEZE PIC MUTING D ZOOM AUDIO MUTING VOLUME 2 4 VPL-CX100/CX120/CX150 1 Plug the AC power cord into standby mode. 2 Press the ?/1 key. The ON/STANDBY indicator flashes in green, and then lights in red and the projector goes...
User Manual
Page 27
... If "Auto Input Search" is set to "On," the projector searches for switching the computer to output to the projector varies depending on page 39. 5 Switch the equipment connected to output to the projector. Projecting the Picture * VPL-CX125/CX155/CW125 only or and To input from the connected equipment and displays... of computer. 6 Adjust the upper or lower position of VPL-CX100/CX120/CX150 Each time you press the INPUT key, the input signal switches as follows: all-in-one LCD type, you adjust the tilt of the projector with the Control Panel or the Remote Commander of the picture...
... If "Auto Input Search" is set to "On," the projector searches for switching the computer to output to the projector varies depending on page 39. 5 Switch the equipment connected to output to the projector. Projecting the Picture * VPL-CX125/CX155/CW125 only or and To input from the connected equipment and displays... of computer. 6 Adjust the upper or lower position of VPL-CX100/CX120/CX150 Each time you press the INPUT key, the input signal switches as follows: all-in-one LCD type, you adjust the tilt of the projector with the Control Panel or the Remote Commander of the picture...
User Manual
Page 28
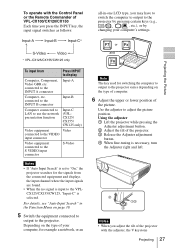
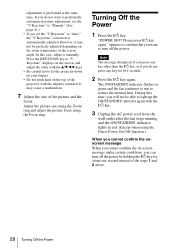
Press the KEYSTONE key to "V Keystone" displays on the top of the projector with the ?/1 key. 3 Unplug the AC power cord from the wall outlet after the fan stops running and the ON/STANDBY indicator lights in green ... conditions, you cannot confirm the on the room temperature or the screen angle. adjustment is automatically adjusted. If you do not want to let the projector down on your fingers. • Do not push hard on the screen, and adjust the value with the v/V/b/B keys. • Be careful not to turn...
Press the KEYSTONE key to "V Keystone" displays on the top of the projector with the ?/1 key. 3 Unplug the AC power cord from the wall outlet after the fan stops running and the ON/STANDBY indicator lights in green ... conditions, you cannot confirm the on the room temperature or the screen angle. adjustment is automatically adjusted. If you do not want to let the projector down on your fingers. • Do not push hard on the screen, and adjust the value with the v/V/b/B keys. • Be careful not to turn...


