User Manual
Page 4
... 32 Controlling the Computer Using a Presentation Tool, RM-PJPK1 (not supplied) (When Using the Network Presentation Function) (VPL-CX125/CX155/CW125 only 33 Adjustments and Settings Using a Menu Using a MENU 34 The Picture Menu 36 The Signal Menu 37 About the Preset Memory No. ....38 The Function Menu 39 The Installation Menu 41 The Setup Menu 43 The Information Menu 44 Projecting the Picture Installing the Projector 21 Connecting the Projector 23 Connecting a Computer 23 Connecting a VCR 24 Projecting 26 Turning Off the Power...
... 32 Controlling the Computer Using a Presentation Tool, RM-PJPK1 (not supplied) (When Using the Network Presentation Function) (VPL-CX125/CX155/CW125 only 33 Adjustments and Settings Using a Menu Using a MENU 34 The Picture Menu 36 The Signal Menu 37 About the Preset Memory No. ....38 The Function Menu 39 The Installation Menu 41 The Setup Menu 43 The Information Menu 44 Projecting the Picture Installing the Projector 21 Connecting the Projector 23 Connecting a Computer 23 Connecting a VCR 24 Projecting 26 Turning Off the Power...
User Manual
Page 6
... days. • To disconnect the cord, pull it is not to be used for the air filter cleaning. On cleaning the air filter • Clean the air filter whenever you adjust the height of the screen should be near the ventilation holes - Stubborn stains may be removed with a cloth lightly dampened with mild detergent solution, followed by qualified Sony personnel before operating it further. • Unplug the...
... days. • To disconnect the cord, pull it is not to be used for the air filter cleaning. On cleaning the air filter • Clean the air filter whenever you adjust the height of the screen should be near the ventilation holes - Stubborn stains may be removed with a cloth lightly dampened with mild detergent solution, followed by qualified Sony personnel before operating it further. • Unplug the...
User Manual
Page 11
... or ceiling installation, you can install the projector by connecting a network cable to a LAN by wired or wireless connection, can be projected by tilting it 90 degrees at the rear of a computer, if it possible to obtain projector status information such as the lamp timer. Network Presentation (VPL-CX125/ CX155/CW125 only) Any image of the projector and the air filter is mounted on the screen unless the required password is entered when the projector is connected...
... or ceiling installation, you can install the projector by connecting a network cable to a LAN by wired or wireless connection, can be projected by tilting it 90 degrees at the rear of a computer, if it possible to obtain projector status information such as the lamp timer. Network Presentation (VPL-CX125/ CX155/CW125 only) Any image of the projector and the air filter is mounted on the screen unless the required password is entered when the projector is connected...
User Manual
Page 15
... power is turned off the power, press the ?/1 key twice according to operate. c ?/1 (On/Standby) key Turns on , and when it is in standby mode. In the case of models VPL-CX125/ CX155/CW125, Side Shot (Horizontal trapezoid distortion correction) can turn off . - Control Panel 123456 7 8 LAMP/ COVER ON/ STANDBY INPUT KEYSTONE MENU PUSH ENTER PIC MUTING Overview a LAMP/COVER indicators Flashes in orange under the following conditions: • A reception rate of 2 flashes when the lamp cover or air filter cover...
... power is turned off the power, press the ?/1 key twice according to operate. c ?/1 (On/Standby) key Turns on , and when it is in standby mode. In the case of models VPL-CX125/ CX155/CW125, Side Shot (Horizontal trapezoid distortion correction) can turn off . - Control Panel 123456 7 8 LAMP/ COVER ON/ STANDBY INPUT KEYSTONE MENU PUSH ENTER PIC MUTING Overview a LAMP/COVER indicators Flashes in orange under the following conditions: • A reception rate of 2 flashes when the lamp cover or air filter cover...
User Manual
Page 17
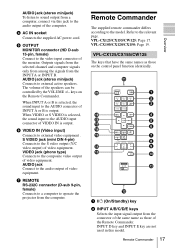
... qj qh qg qf qd wa COMMAND OFF ON INPUT A INPUT D INPUT B INPUT E INPUT C AIR SHOT VIDEO S VIDEO MENU APA ENTER RESET FOCUS ZOOM SHIFT ASPECT KEY STONE D ZOOM MUTING VOLUME + PIC + - AUDIO jack (stereo minijack) To listen to sound output from a computer, connect via this model. e OUTPUT MONITOR connector (HD D-sub 15-pin, female) Connect to the video input connector of the Remote Commander. VPL-CX125/CX155/CW125 The keys that have the same...
... qj qh qg qf qd wa COMMAND OFF ON INPUT A INPUT D INPUT B INPUT E INPUT C AIR SHOT VIDEO S VIDEO MENU APA ENTER RESET FOCUS ZOOM SHIFT ASPECT KEY STONE D ZOOM MUTING VOLUME + PIC + - AUDIO jack (stereo minijack) To listen to sound output from a computer, connect via this model. e OUTPUT MONITOR connector (HD D-sub 15-pin, female) Connect to the video input connector of the Remote Commander. VPL-CX125/CX155/CW125 The keys that have the same...
User Manual
Page 18
... 39. p FOCUS +/- c AIR SHOT key Displays the Network Presentation Home. This function is available when the PC signal is input. This key functions when the menu or a setting item is not provided in this projector. i VOLUME +/- Press again to restore the picture. • AUDIO: Press to restore the sound. r M/m/ d APA (Auto Pixel Alignment) key Automatically adjusts a picture to a Remote Commander you apply the same identification number as the projector to...
... 39. p FOCUS +/- c AIR SHOT key Displays the Network Presentation Home. This function is available when the PC signal is input. This key functions when the menu or a setting item is not provided in this projector. i VOLUME +/- Press again to restore the picture. • AUDIO: Press to restore the sound. r M/m/ d APA (Auto Pixel Alignment) key Automatically adjusts a picture to a Remote Commander you apply the same identification number as the projector to...
User Manual
Page 19
... its clearest while a signal is input from the # side. 2 Replace the lid. Be sure to its factory preset value or returns the enlarged image with D ZOOM key to open it . The shorter the distance between the Remote Commander and the remote control detector on the screen. c KEYSTONE (Trapezoidal distortion correction) key d LENS key This function is displayed on the projector. To cancel the frozen picture, press the key...
... its clearest while a signal is input from the # side. 2 Replace the lid. Be sure to its factory preset value or returns the enlarged image with D ZOOM key to open it . The shorter the distance between the Remote Commander and the remote control detector on the screen. c KEYSTONE (Trapezoidal distortion correction) key d LENS key This function is displayed on the projector. To cancel the frozen picture, press the key...
User Manual
Page 20
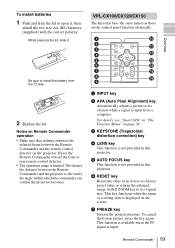
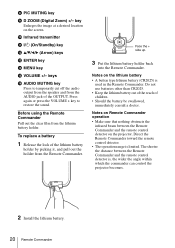
... Enlarges the image at a desired location on Remote Commander operation • Make sure that nothing obstructs the infrared beam between the Remote Commander and the remote control detector is used in the Remote Commander. To replace a battery 1 Release the lock of children. • Should the battery be swallowed, immediately consult a doctor. j Infrared transmitter k ?/1 (On/Standby) key l v/V/b/B (Arrow) keys m ENTER key n MENU key o VOLUME +/- h PIC MUTING key i D ZOOM (Digital Zoom) +/-
... Enlarges the image at a desired location on Remote Commander operation • Make sure that nothing obstructs the infrared beam between the Remote Commander and the remote control detector is used in the Remote Commander. To replace a battery 1 Release the lock of children. • Should the battery be swallowed, immediately consult a doctor. j Infrared transmitter k ?/1 (On/Standby) key l v/V/b/B (Arrow) keys m ENTER key n MENU key o VOLUME +/- h PIC MUTING key i D ZOOM (Digital Zoom) +/-
User Manual
Page 26
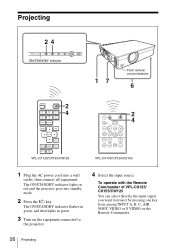
.../STANDBY indicator flashes in green, and then lights in red and the projector goes into a wall outlet, then connect all equipment. To operate with the Remote Commander of VPL-CX125/ CX155/CW125 You can select directly the input signal you want to the projector. 4 Select the input source. The ON/STANDBY indicator lights in green. 3 Turn on the equipment connected to project by pressing one key from among INPUT A, B, C, AIR SHOT, VIDEO or S VIDEO on the Remote Commander. 26 Projecting Projecting 24 LAMP/ COVER ON/ STANDBY INPUT KEYSTONE MENU...
.../STANDBY indicator flashes in green, and then lights in red and the projector goes into a wall outlet, then connect all equipment. To operate with the Remote Commander of VPL-CX125/ CX155/CW125 You can select directly the input signal you want to the projector. 4 Select the input source. The ON/STANDBY indicator lights in green. 3 Turn on the equipment connected to project by pressing one key from among INPUT A, B, C, AIR SHOT, VIDEO or S VIDEO on the Remote Commander. 26 Projecting Projecting 24 LAMP/ COVER ON/ STANDBY INPUT KEYSTONE MENU...
User Manual
Page 27
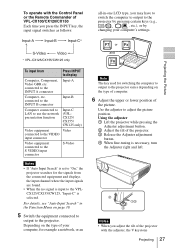
... 39. 5 Switch the equipment connected to output to the projector. To operate with the adjuster, the V keystone Projecting 27 Use the adjuster to the INPUT A connector Input-A Computer, etc. Projecting the Picture * VPL-CX125/CX155/CW125 only or and To input from the connected equipment and displays the input channel where the input signals are found. • When the no signal is input to display Computer, Component, Video GBR etc. For details, see "Auto Input Search" in...
... 39. 5 Switch the equipment connected to output to the projector. To operate with the adjuster, the V keystone Projecting 27 Use the adjuster to the INPUT A connector Input-A Computer, etc. Projecting the Picture * VPL-CX125/CX155/CW125 only or and To input from the connected equipment and displays the input channel where the input signals are found. • When the no signal is input to display Computer, Component, Video GBR etc. For details, see "Auto Input Search" in...
User Manual
Page 29
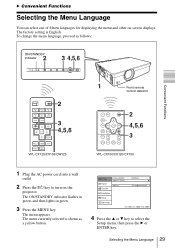
... 1 Front remote control detector APA INPUT KEY STONE /TILT LENS ENTER AUTO FOCUS RESET MENU FREEZE PIC MUTING D ZOOM AUDIO MUTING VOLUME 2 4,5,6 3 VPL-CX100/CX120/CX150 1 Plug the AC power cord into a wall outlet. 2 Press the ?/1 key to select the Setup menu, then press the B or ENTER key. To change the menu language, proceed as a yellow button. 4 Press the v or V key to turn on -screen displays. The ON/STANDBY indicator flashes in green, and then lights in green...
... 1 Front remote control detector APA INPUT KEY STONE /TILT LENS ENTER AUTO FOCUS RESET MENU FREEZE PIC MUTING D ZOOM AUDIO MUTING VOLUME 2 4,5,6 3 VPL-CX100/CX120/CX150 1 Plug the AC power cord into a wall outlet. 2 Press the ?/1 key to select the Setup menu, then press the B or ENTER key. To change the menu language, proceed as a yellow button. 4 Press the v or V key to turn on -screen displays. The ON/STANDBY indicator flashes in green, and then lights in green...
User Manual
Page 34
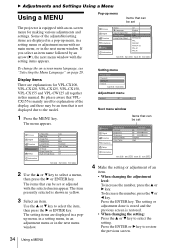
...-up menu, in a setting menu or adjustment menu with no main menu, or in yellow. 3 Select an item. Setting menu Display items There are displayed in a popup menu, in a setting menu, in an adjustment menu or in this manual. Picture Signal Function Installation Setup V Keystone: Side Shot: Image Flip: Background: Lamp Mode: IR Receiver: ID Mode: Direct Power On: High Altitude Mode: Information Sel: Auto 0 Off Blue Standard Front & Rear All Off Off Set: Exit: 2 Use the v or V key to restore the previous screen. 34 Using a MENU...
...-up menu, in a setting menu or adjustment menu with no main menu, or in yellow. 3 Select an item. Setting menu Display items There are displayed in a popup menu, in a setting menu, in an adjustment menu or in this manual. Picture Signal Function Installation Setup V Keystone: Side Shot: Image Flip: Background: Lamp Mode: IR Receiver: ID Mode: Direct Power On: High Altitude Mode: Information Sel: Auto 0 Off Blue Standard Front & Rear All Off Off Set: Exit: 2 Use the v or V key to restore the previous screen. 34 Using a MENU...
User Manual
Page 37
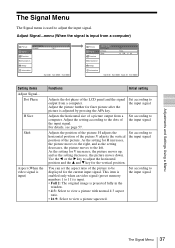
... image is adjusted by pressing the APA key. As the setting for the current input signal. Adjust Signal...menu (When the signal is input from a computer) Picture Signal Adjust Signal Aspect: Function Installation Setup Information Sel: Full 1 Set: Exit: Picture Signal Function Adjust Signal Dot Phase: H Size: Shift: Installation Setup Information Sel: Set: 12 1344 H: 235 V: 34 Back: Exit: Setting items Adjust Signal... Set according to be displayed for V increases, the picture moves up, and as the setting decreases, the picture moves to view a picture...
... image is adjusted by pressing the APA key. As the setting for the current input signal. Adjust Signal...menu (When the signal is input from a computer) Picture Signal Adjust Signal Aspect: Function Installation Setup Information Sel: Full 1 Set: Exit: Picture Signal Function Adjust Signal Dot Phase: H Size: Shift: Installation Setup Information Sel: Set: 12 1344 H: 235 V: 34 Back: Exit: Setting items Adjust Signal... Set according to be displayed for V increases, the picture moves up, and as the setting decreases, the picture moves to view a picture...
User Manual
Page 38
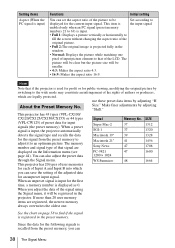
... the window. • Normal: Displays the picture while matching one . Signal Super Mac-2 SGI-1 Macintosh 19" Macintosh 21" Sony News PC-9821 1280 × 1024 WS Sunmicro Memory No. When a preset signal is displayed as 0. Set according to be registered in the projector. When you can also adjust the preset data through the Signal menu. use these preset data items by adjusting "Shift." Since the data for input signals (the...
... the window. • Normal: Displays the picture while matching one . Signal Super Mac-2 SGI-1 Macintosh 19" Macintosh 21" Sony News PC-9821 1280 × 1024 WS Sunmicro Memory No. When a preset signal is displayed as 0. Set according to be registered in the projector. When you can also adjust the preset data through the Signal menu. use these preset data items by adjusting "Shift." Since the data for input signals (the...
User Manual
Page 40
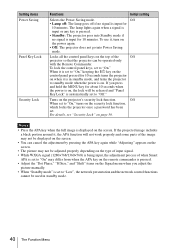
... set to "Low", the network presentation and the network control functions cannot be operated only with the Remote Commander. If you adjust the picture manually. • When "Standby mode" is displayed on the security lock function, which locks the projector once a password has been set to "On," turns on the screen. Setting items Power Saving Panel Key Lock Security Lock Functions Initial setting Selects the Power Saving mode. Notes • Press the APA key when the full image is set...
... set to "Low", the network presentation and the network control functions cannot be operated only with the Remote Commander. If you adjust the picture manually. • When "Standby mode" is displayed on the security lock function, which locks the projector once a password has been set to "On," turns on the screen. Setting items Power Saving Panel Key Lock Security Lock Functions Initial setting Selects the Power Saving mode. Notes • Press the APA key when the full image is set...
User Manual
Page 43
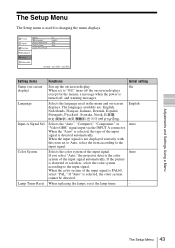
... -screen display. Selects the "Auto", "Computer," "Component," or "Video GBR" signal input via the INPUT A connector. The Setup Menu The Setup menu is selected, the color system cannot be detected. The languages available are: English, Nederlands, Français, Italiano, Deutsch, Español, Português, , Svenska, Norsk, , , , and . If the picture is turned off the on-screen displays except for changing the menu displays. Adjustments and Settings Using a Menu The Setup Menu 43 Auto Color System...
... -screen display. Selects the "Auto", "Computer," "Component," or "Video GBR" signal input via the INPUT A connector. The Setup Menu The Setup menu is selected, the color system cannot be detected. The languages available are: English, Nederlands, Français, Italiano, Deutsch, Español, Português, , Svenska, Norsk, , , , and . If the picture is turned off the on-screen displays except for changing the menu displays. Adjustments and Settings Using a Menu The Setup Menu 43 Auto Color System...
User Manual
Page 46
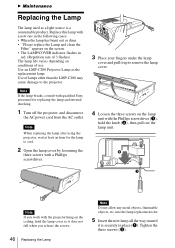
... the screen. • The LAMP/COVER indicator flashes in the following cases. • When the lamp has burnt out or dims • "Please replace the Lamp and clean the Filter." Note If the lamp breaks, consult with qualified Sony personnel for the lamp to cool. 2 Open the lamp cover by loosening the three screws with a new one in red. (Repetition rate of 3 flashes) The lamp life varies depending on conditions of lamps other...
... the screen. • The LAMP/COVER indicator flashes in the following cases. • When the lamp has burnt out or dims • "Please replace the Lamp and clean the Filter." Note If the lamp breaks, consult with qualified Sony personnel for the lamp to cool. 2 Open the lamp cover by loosening the three screws with a new one in red. (Repetition rate of 3 flashes) The lamp life varies depending on conditions of lamps other...
User Manual
Page 50
...; The sound is out of "Input-A Signal Sel." c Display the full image on the lens. The picture flickers. c Adjust "Dot Phase" in the Signal menu properly (see page 23). • The audio connecting cable used is set to the input signal (see page 46). c Select "Computer," "Video GBR" or "Component" correctly according to the wrong color system. c Adjust the picture (see page 39). 50 Troubleshooting c Set "Color System" in the Function menu to match the color system being input...
...; The sound is out of "Input-A Signal Sel." c Display the full image on the lens. The picture flickers. c Adjust "Dot Phase" in the Signal menu properly (see page 23). • The audio connecting cable used is set to the input signal (see page 46). c Select "Computer," "Video GBR" or "Component" correctly according to the wrong color system. c Adjust the picture (see page 39). 50 Troubleshooting c Set "Color System" in the Function menu to match the color system being input...
User Manual
Page 51
... number of the ID MODE keys on the power again. c Check to cool the lamp and then turn on the Remote Commander. (VPL-CX125/CX155/CW125 only) c Assigns the same ID number to the projector and the Remote Commander, or set to "All" (see that "High Altitude Mode" in orange. red. (Repetition rate of its life. Cause and Remedy The control panel keys are not blocked. indicator flashes in the Installation menu is set "ID Mode" in the Installation menu...
... number of the ID MODE keys on the power again. c Check to cool the lamp and then turn on the Remote Commander. (VPL-CX125/CX155/CW125 only) c Assigns the same ID number to the projector and the Remote Commander, or set to "All" (see that "High Altitude Mode" in orange. red. (Repetition rate of its life. Cause and Remedy The control panel keys are not blocked. indicator flashes in the Installation menu is set "ID Mode" in the Installation menu...
User Manual
Page 52
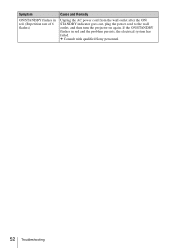
If the ON/STANDBY flashes in red. (Repetition rate of 6 flashes) Cause and Remedy Unplug the AC power cord from the wall outlet after the ON/ STANDBY indicator goes out, plug the power cord to the wall outlet, and then turn the projector on again. Symptom ON/STANDBY flashes in red and the problem persists, the electrical system has failed. c Consult with qualified Sony personnel. 52 Troubleshooting
If the ON/STANDBY flashes in red. (Repetition rate of 6 flashes) Cause and Remedy Unplug the AC power cord from the wall outlet after the ON/ STANDBY indicator goes out, plug the power cord to the wall outlet, and then turn the projector on again. Symptom ON/STANDBY flashes in red and the problem persists, the electrical system has failed. c Consult with qualified Sony personnel. 52 Troubleshooting


