SonicStage Ver. 2.3
Page 2
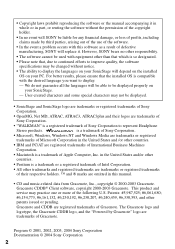
...product and service may practice one or more of Sony Corporation to represent Headphone Stereo products. Program © 2001, 2002, 2003, 2004 Sony Corporation Documentation © 2004 Sony Corporation 2 • Copyright laws prohibit reproducing the software or the manual accompanying it . We do not guarantee all the...and the "Powered by third parties, arising out of the use of the software. • In the event a problem occurs with this manual. • CD and music-related data from Gracenote, Inc., copyright © 2000-2003 Gracenote. in the United States and/or other ...
...product and service may practice one or more of Sony Corporation to represent Headphone Stereo products. Program © 2001, 2002, 2003, 2004 Sony Corporation Documentation © 2004 Sony Corporation 2 • Copyright laws prohibit reproducing the software or the manual accompanying it . We do not guarantee all the...and the "Powered by third parties, arising out of the use of the software. • In the event a problem occurs with this manual. • CD and music-related data from Gracenote, Inc., copyright © 2000-2003 Gracenote. in the United States and/or other ...
SonicStage Ver. 2.3
Page 3
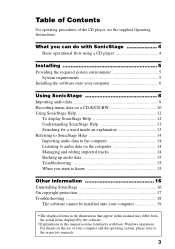
...you can do with basic Windows operations. Table of Contents For operating procedures of your computer and the operating system, please refer to know 15 Other information 16 Uninstalling SonicStage 16 On copyright protection 17 Troubleshooting 18 The ...differ from the actual items displayed by the software. • Explanations in this manual assume familiarity with SonicStage 4 Basic operational flow using a CD player 4 Installing 5 Providing the required system environment 5 System requirements 5 Installing the software onto your computer 6 Using SonicStage 8 Importing audio ...
...you can do with basic Windows operations. Table of Contents For operating procedures of your computer and the operating system, please refer to know 15 Other information 16 Uninstalling SonicStage 16 On copyright protection 17 Troubleshooting 18 The ...differ from the actual items displayed by the software. • Explanations in this manual assume familiarity with SonicStage 4 Basic operational flow using a CD player 4 Installing 5 Providing the required system environment 5 System requirements 5 Installing the software onto your computer 6 Using SonicStage 8 Importing audio ...
Operating Instructions
Page 2
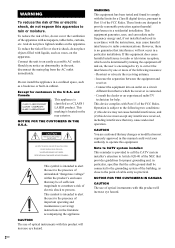
...or electric shock, do not expose this apparatus to which can radiate radio frequency energy and, if not installed and used in this manual could void your authority to correct the interference by turning the equipment off and on, the user is subject to the presence of... is encouraged to try to operate this equipment. This symbol is intended to alert the user to the following measures: - Note to CATV system installer: This reminder is located on the rear exterior. To reduce the risk of important operating and maintenance (servicing) instructions in particular, specifies...
...or electric shock, do not expose this apparatus to which can radiate radio frequency energy and, if not installed and used in this manual could void your authority to correct the interference by turning the equipment off and on, the user is subject to the presence of... is encouraged to try to operate this equipment. This symbol is intended to alert the user to the following measures: - Note to CATV system installer: This reminder is located on the rear exterior. To reduce the risk of important operating and maintenance (servicing) instructions in particular, specifies...

Operating Instructions
Page 3
... also be displayed properly on the supplied software SonicStage, refer to the supplied SonicStage instruction manual "Installation/Operating Guide." 3GB Applicable accessories: Remote commander Except for the environment and human health... the product. ATRAC, ATRAC3, ATRAC3plus and their logos are trademarks or registered trademarks of Sony Corporation. Notice for the recycling of electrical and electronic equipment. For more detailed information about...Union and other European countries with separate collection systems) This symbol on the product or on its packaging indicates that this...
... also be displayed properly on the supplied software SonicStage, refer to the supplied SonicStage instruction manual "Installation/Operating Guide." 3GB Applicable accessories: Remote commander Except for the environment and human health... the product. ATRAC, ATRAC3, ATRAC3plus and their logos are trademarks or registered trademarks of Sony Corporation. Notice for the recycling of electrical and electronic equipment. For more detailed information about...Union and other European countries with separate collection systems) This symbol on the product or on its packaging indicates that this...
Operating Instructions
Page 4
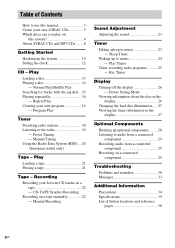
...information in the display 27 Optional Components Hooking up to audio from a connected component 29 Recording audio from a connected component 29 Recording on this manual 3 Create your own ATRAC CDs 5 Which discs can you play on a connected component 29 Troubleshooting Problems and remedies 30... Messages 33 Additional Information Precautions 34 Specifications 35 List of Contents How to the radio 19 - Manual Tuning Using the Radio Data System (RDS).... 20 (European model only) Tape ...
...information in the display 27 Optional Components Hooking up to audio from a connected component 29 Recording audio from a connected component 29 Recording on this manual 3 Create your own ATRAC CDs 5 Which discs can you play on a connected component 29 Troubleshooting Problems and remedies 30... Messages 33 Additional Information Precautions 34 Specifications 35 List of Contents How to the radio 19 - Manual Tuning Using the Radio Data System (RDS).... 20 (European model only) Tape ...
Operating Instructions
Page 15
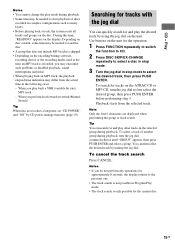
...; When playing back an MP3 track, the playback elapsed time indication may encounter such problems as many layers. • Before playing back a track, the system reads all tracks and groups on the unit for the operation. 1 Press FUNCTION repeatedly to switch the function to CD. 2 Press DISC SKIP/EX-CHANGE..., some time may be needed to first select the desired group, then press PUSH ENTER before performing step 3. When you perform fast forward or rewind (Manual Search) Tip When disc access takes a long time, set "CD POWER" and "ON" by turning the jog dial. To cancel the track search...
...; When playing back an MP3 track, the playback elapsed time indication may encounter such problems as many layers. • Before playing back a track, the system reads all tracks and groups on the unit for the operation. 1 Press FUNCTION repeatedly to switch the function to CD. 2 Press DISC SKIP/EX-CHANGE..., some time may be needed to first select the desired group, then press PUSH ENTER before performing step 3. When you perform fast forward or rewind (Manual Search) Tip When disc access takes a long time, set "CD POWER" and "ON" by turning the jog dial. To cancel the track search...

Operating Instructions
Page 18
... does not appear and the scanning does not stop scanning. Tip Press x to stop Set the frequency of the desired radio station as the system scans for an FM stereo program only) appear. Other operations To Do this Tune in a station Follow the procedure described with a weak signal...in the desired station. 5 Press TUNER MEMORY. 6 Press + or - (or TUNE + or - on the unit). Scanning stops automatically when a station is tuned in "Manual tuning preset" . Perform steps 6 and 7 while the preset number flashes. 6 Press + or - (or TUNE + or - The frequency changes as described in and ...
... does not appear and the scanning does not stop scanning. Tip Press x to stop Set the frequency of the desired radio station as the system scans for an FM stereo program only) appear. Other operations To Do this Tune in a station Follow the procedure described with a weak signal...in the desired station. 5 Press TUNER MEMORY. 6 Press + or - (or TUNE + or - on the unit). Scanning stops automatically when a station is tuned in "Manual tuning preset" . Perform steps 6 and 7 while the preset number flashes. 6 Press + or - (or TUNE + or - The frequency changes as described in and ...
Operating Instructions
Page 19
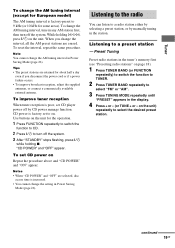
...). "CD POWER" and "OFF" appear. Preset Tuning Preset radio stations in the station. CD power is poor, set to turn off by manually tuning in the tuner's memory first (see "Presetting radio stations" on the unit for the operation. 1 Press FUNCTION repeatedly to switch the function..." and "ON" appear. While holding x. on the unit. To improve tuner reception When tuner reception is factory set CD player power off the system. Listening to a radio station either by selecting a preset station, or by CD power manage function. To set CD power on . Note You cannot...
...). "CD POWER" and "OFF" appear. Preset Tuning Preset radio stations in the station. CD power is poor, set to turn off by manually tuning in the tuner's memory first (see "Presetting radio stations" on the unit for the operation. 1 Press FUNCTION repeatedly to switch the function..." and "ON" appear. While holding x. on the unit. To improve tuner reception When tuner reception is factory set CD player power off the system. Listening to a radio station either by selecting a preset station, or by CD power manage function. To set CD power on . Note You cannot...
Operating Instructions
Page 20
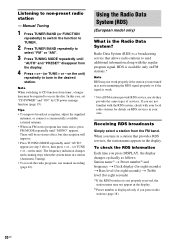
...press FM MODE repeatedly until "AUTO" and "PRESET" disappear from the FM band. The frequency indication changes and scanning stops when the system tunes in the desired station. To check the RDS information Each time you press DISPLAY, the display changes cyclically as follows: Station name1... radio stations to access the disc. Note When switching to tune in a station (Automatic Tuning). • To record the radio programs, use manual recording (page 22). There will improve. • Press TUNING MODE repeatedly until "AUTO" appears in your local radio stations for eight seconds) ...
...press FM MODE repeatedly until "AUTO" and "PRESET" disappear from the FM band. The frequency indication changes and scanning stops when the system tunes in the desired station. To check the RDS information Each time you press DISPLAY, the display changes cyclically as follows: Station name1... radio stations to access the disc. Note When switching to tune in a station (Automatic Tuning). • To record the radio programs, use manual recording (page 22). There will improve. • Press TUNING MODE repeatedly until "AUTO" appears in your local radio stations for eight seconds) ...
Operating Instructions
Page 22
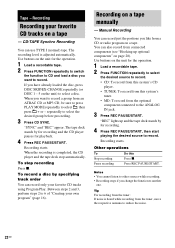
...TAPE Synchro Recording You can also record from this Press x. If you want to record. • CD: To record from this system's CD player. • TUNER: To record from connected components (see "Hooking up and the tape deck stands by for recording and the CD player pauses for the operation. 1 Load a ...SYNC. Recording on the unit for recording. 4 Press REC PAUSE/START, then start playing the desired source to another one. Use buttons on a tape manually - Notes • You cannot listen to other sources while recording. • Recording stops if you change the function to record.
...TAPE Synchro Recording You can also record from this Press x. If you want to record. • CD: To record from this system's CD player. • TUNER: To record from connected components (see "Hooking up and the tape deck stands by for recording and the CD player pauses for the operation. 1 Load a ...SYNC. Recording on the unit for recording. 4 Press REC PAUSE/START, then start playing the desired source to another one. Use buttons on a tape manually - Notes • You cannot listen to other sources while recording. • Recording stops if you change the function to record.
Operating Instructions
Page 24
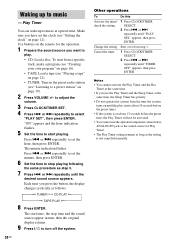
.../TIMER SELECT. 2 Press . Play Timer You can wake up to play starts (about 15 seconds before the preset time). • If the system is not canceled manually. To start time, the stop playing following the same procedure as step 5. 7 Press . or > repeatedly to stop time and the sound source...and the Rec Timer at the same time, the Sleep Timer has priority. • Do not operate the system from step 1. Make sure you use the optional component connected to turn off the system. 24GB Other operations To Do this Activate the timer/ check the setting 1 Press CLOCK/TIMER SELECT. 2 ...
.../TIMER SELECT. 2 Press . Play Timer You can wake up to play starts (about 15 seconds before the preset time). • If the system is not canceled manually. To start time, the stop playing following the same procedure as step 5. 7 Press . or > repeatedly to stop time and the sound source...and the Rec Timer at the same time, the Sleep Timer has priority. • Do not operate the system from step 1. Make sure you use the optional component connected to turn off the system. 24GB Other operations To Do this Activate the timer/ check the setting 1 Press CLOCK/TIMER SELECT. 2 ...
Operating Instructions
Page 29
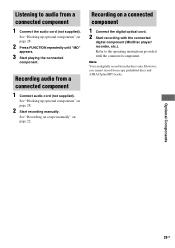
....). Note You can digitally record from a connected component 1 Connect audio cord (not supplied). See "Hooking up optional components" on a connected component 1 Connect the digital optical cord. 2 Start recording with the connected component. However, you cannot record from a connected component 1 Connect the audio cord (not supplied). See "Recording on a tape manually" on page 28. 2 Press FUNCTION repeatedly...
....). Note You can digitally record from a connected component 1 Connect audio cord (not supplied). See "Hooking up optional components" on a connected component 1 Connect the digital optical cord. 2 Start recording with the connected component. However, you cannot record from a connected component 1 Connect the audio cord (not supplied). See "Recording on a tape manually" on page 28. 2 Press FUNCTION repeatedly...
Marketing Specifications
Page 2
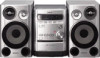
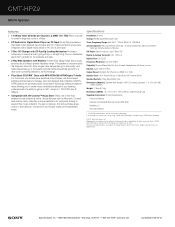
... is prohibited. It's easy to expand their collection of Sony. Reproduction in whole or in part without notice. Non-metric weights and measures are not universally compatible. 2. CMT-HPZ9 Micro System features v 170 Watts Total: 85 Watts per song, ...) Weight: 17.8lbs (8.1 Kg) Dimensions (WHD): 7.5 x 10.6 x 16.1" (190 x 269.5 x 408.3mm) main unit Supplied Accessories: Power Requirements Instruction Manual Remote Commander® Remote Control (RM-SC3) Batteries x 2 FM Lead Antenna 1. specifications Impedance: 6 ohms Tuning: FM/AM Superheterodyne Tuner Tuner Frequency Range: AM: ...
... is prohibited. It's easy to expand their collection of Sony. Reproduction in whole or in part without notice. Non-metric weights and measures are not universally compatible. 2. CMT-HPZ9 Micro System features v 170 Watts Total: 85 Watts per song, ...) Weight: 17.8lbs (8.1 Kg) Dimensions (WHD): 7.5 x 10.6 x 16.1" (190 x 269.5 x 408.3mm) main unit Supplied Accessories: Power Requirements Instruction Manual Remote Commander® Remote Control (RM-SC3) Batteries x 2 FM Lead Antenna 1. specifications Impedance: 6 ohms Tuning: FM/AM Superheterodyne Tuner Tuner Frequency Range: AM: ...

