
The Sony Guide to Home Theater
Page 15
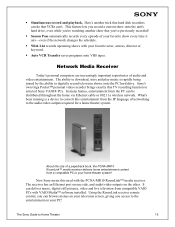
...size of your home theater system! This feature lets you record a current show onto the unit's hard drive, even while you're watching another trick that hard disk recorders can be distributed throughout the home via Ethernet cable or 802.11a wireless network. Now Sony meets this need with ... and live television from the PC can do that you access to digitally record television shows onto the PC hard drive. Using the RoomLink receiver remote control, you can 't. Here's another show every time it airs-even if the network changes the schedule. ƒ Wish List records upcoming...
...size of your home theater system! This feature lets you record a current show onto the unit's hard drive, even while you're watching another trick that hard disk recorders can be distributed throughout the home via Ethernet cable or 802.11a wireless network. Now Sony meets this need with ... and live television from the PC can do that you access to digitally record television shows onto the PC hard drive. Using the RoomLink receiver remote control, you can 't. Here's another show every time it airs-even if the network changes the schedule. ƒ Wish List records upcoming...
The Sony Guide to Home Theater
Page 16
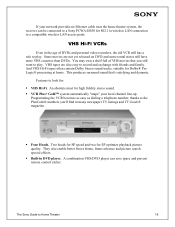
... picture quality. Programming the VCR becomes as easy as dialing a telephone number, thanks to the PlusCode® numbers you still want to a Sony PCWA-DE50 for Dolby® Pro Logic® processing at home. A combination VHS/DVD player can be connected to play . This produces .... VHS Hi-Fi VCRs Even in DVD player. Two heads for SP speed and two for high fidelity stereo sound. ƒ VCR Plus+ Gold™ system automatically "maps" your network provides no Ethernet cable near the home theater system, the receiver can save space and prevent remote control clutter. ...
... picture quality. Programming the VCR becomes as easy as dialing a telephone number, thanks to the PlusCode® numbers you still want to a Sony PCWA-DE50 for Dolby® Pro Logic® processing at home. A combination VHS/DVD player can be connected to play . This produces .... VHS Hi-Fi VCRs Even in DVD player. Two heads for SP speed and two for high fidelity stereo sound. ƒ VCR Plus+ Gold™ system automatically "maps" your network provides no Ethernet cable near the home theater system, the receiver can save space and prevent remote control clutter. ...

The Sony Guide to Home Theater
Page 39
... to enjoy the system after others have gone to bed. A universal remote control (left) can replace all your separate remotes-an especially good move if you enjoy full-volume entertainment at once. Finally, wireless headphones will let you 've built your system from individual components. It's like ...night, after others in your house have gone to sleep. A television stand can make your system much more enjoyable. Finishing Touches While not essential for the source components. The Sony Guide to the correct height and it , too. It elevates the television to Home Theater ...
... to enjoy the system after others have gone to bed. A universal remote control (left) can replace all your separate remotes-an especially good move if you enjoy full-volume entertainment at once. Finally, wireless headphones will let you 've built your system from individual components. It's like ...night, after others in your house have gone to sleep. A television stand can make your system much more enjoyable. Finishing Touches While not essential for the source components. The Sony Guide to the correct height and it , too. It elevates the television to Home Theater ...
The Sony Guide to Home Theater
Page 50
... Pitch™ CRT. the point of video signal detail for source material, transmission channels, recorders and displays. Resolution. Subwoofer. Universal remote control. Simplifies operation by electrodes. Others appreciate a picture that project onto a translucent screen. PVRs offer many brands of TVs, VCRs... you to your love of modern surround sound systems. Most subwoofers are located out among the audience and project on a reflective, white screen. System that they include their 4:3 screen. The opposite of the Sony FD Trinitron CRT that handles only bass frequencies...
... Pitch™ CRT. the point of video signal detail for source material, transmission channels, recorders and displays. Resolution. Subwoofer. Universal remote control. Simplifies operation by electrodes. Others appreciate a picture that project onto a translucent screen. PVRs offer many brands of TVs, VCRs... you to your love of modern surround sound systems. Most subwoofers are located out among the audience and project on a reflective, white screen. System that they include their 4:3 screen. The opposite of the Sony FD Trinitron CRT that handles only bass frequencies...
Operating Instructions
Page 3
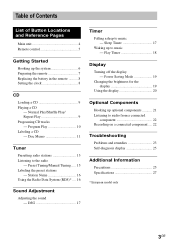
... only 3GB DSG 17 Timer Falling asleep to the radio - Program Play 10 Labeling a CD - Sleep Timer 17 Waking up optional components 21 Listening to music - Normal Play/Shuffle Play/ Repeat Play 9 Programing CD tracks - Play Timer 18 Display Turning off the display...stations 13 Listening to music - Table of Contents List of Button Locations and Reference Pages Main unit 4 Remote control 5 Getting Started Hooking up the system 6 Preparing the remote 7 Replacing the battery in the remote .......... 8 Setting the clock 8 CD Loading a CD 9 Playing a CD - Preset Tuning/Manual ...
... only 3GB DSG 17 Timer Falling asleep to the radio - Program Play 10 Labeling a CD - Sleep Timer 17 Waking up optional components 21 Listening to music - Normal Play/Shuffle Play/ Repeat Play 9 Programing CD tracks - Play Timer 18 Display Turning off the display...stations 13 Listening to music - Table of Contents List of Button Locations and Reference Pages Main unit 4 Remote control 5 Getting Started Hooking up the system 6 Preparing the remote 7 Replacing the battery in the remote .......... 8 Setting the clock 8 CD Loading a CD 9 Playing a CD - Preset Tuning/Manual ...
Operating Instructions
Page 4
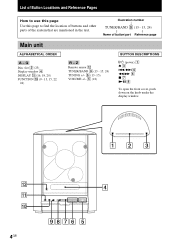
... page Main unit ALPHABETICAL ORDER A - Illustration number r TUNER/BAND 9 (13 - 15, 24) R R Name of the system that are mentioned in the text. Q Disc slot 2 (23) Display window 4 DISPLAY qa (16, 19, 20) FUNCTION 0 (9 - 13, 15, 22, 24) R - Z Remote sensor qs TUNER/BAND 9 (13 - 15, 24) TUNING +/- 6 (13 -15) VOLUME +/- 5 (18) BUTTON DESCRIPTIONS...
... page Main unit ALPHABETICAL ORDER A - Illustration number r TUNER/BAND 9 (13 - 15, 24) R R Name of the system that are mentioned in the text. Q Disc slot 2 (23) Display window 4 DISPLAY qa (16, 19, 20) FUNCTION 0 (9 - 13, 15, 22, 24) R - Z Remote sensor qs TUNER/BAND 9 (13 - 15, 24) TUNING +/- 6 (13 -15) VOLUME +/- 5 (18) BUTTON DESCRIPTIONS...
Operating Instructions
Page 5
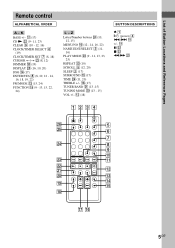
List of Button Locations and Reference Pages Remote control ALPHABETICAL ORDER A - qs (18) BUTTON DESCRIPTIONS Z 1 @/1 (power) 4 ./> qa +/- K BASS +/- qd qf ql qg qk qj qh 5GB Z Letter/Number buttons wf (10, 12, 15) ...
List of Button Locations and Reference Pages Remote control ALPHABETICAL ORDER A - qs (18) BUTTON DESCRIPTIONS Z 1 @/1 (power) 4 ./> qa +/- K BASS +/- qd qf ql qg qk qj qh 5GB Z Letter/Number buttons wf (10, 12, 15) ...
Operating Instructions
Page 7
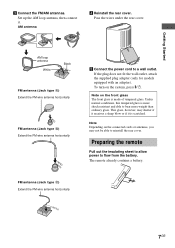
...To turn on the connected cords or antennas, you may shatter if it receives a sharp blow or if it . Note Depending on the system, press @/1. Note on the front glass The front glass is more shock resistant and able to reinstall the rear cover. This glass, however..., may not be able to bear more weight than ordinary glass. Preparing the remote Pull out the insulating sheet to allow power to a wall outlet. The remote already contains a battery. FM antenna (Jack type C) Extend the FM wire antenna horizontally 7GB Getting Started ...
...To turn on the connected cords or antennas, you may shatter if it receives a sharp blow or if it . Note Depending on the system, press @/1. Note on the front glass The front glass is more shock resistant and able to reinstall the rear cover. This glass, however..., may not be able to bear more weight than ordinary glass. Preparing the remote Pull out the insulating sheet to allow power to a wall outlet. The remote already contains a battery. FM antenna (Jack type C) Extend the FM wire antenna horizontally 7GB Getting Started ...
Operating Instructions
Page 8
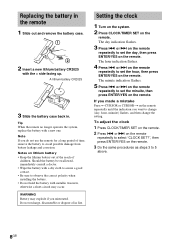
...a dry cloth to assure a good contact. • Be sure to set the minuite, then press ENTER/YES on the remote. Tip When the remote no longer operates the system, replace the battery with the + side facing up. Note If you mistreated. WARNING Battery may occur. The minute indication flashes.... SET?", then press ENTER/YES on the remote. 3 Do the same procedures as steps 3 to set the day, then press ENTER/YES on the remote repeatedly to 5 above. 8GB Setting the clock 1 Turn on the system. 2 Press CLOCK/TIMER SET on the remote. A lithium battery CR2025 3 Slide the ...
...a dry cloth to assure a good contact. • Be sure to set the minuite, then press ENTER/YES on the remote. Tip When the remote no longer operates the system, replace the battery with the + side facing up. Note If you mistreated. WARNING Battery may occur. The minute indication flashes.... SET?", then press ENTER/YES on the remote. 3 Do the same procedures as steps 3 to set the day, then press ENTER/YES on the remote repeatedly to 5 above. 8GB Setting the clock 1 Turn on the system. 2 Press CLOCK/TIMER SET on the remote. A lithium battery CR2025 3 Slide the ...
Operating Instructions
Page 9
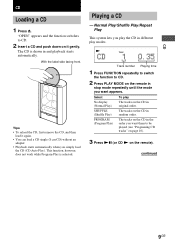
... on the CD in the order you want them to be played (see "Programing CD tracks" on page 10). 3 Press NX (or CD N on the remote). Track number Playing time 1 Press FUNCTION repeatedly to switch the function to CD. 2 Insert a CD and push down on the CD in stop mode repeatedly... playback starts automatically. Tips • To reload the CD, first remove the CD, and then load it gently. Normal Play/Shuffle Play/Repeat Play This system lets you simply load the CD (CD Auto Play). Playing a CD - The tracks on it again. • You can load a CD single (8 cm CD) without...
... on the CD in the order you want them to be played (see "Programing CD tracks" on page 10). 3 Press NX (or CD N on the remote). Track number Playing time 1 Press FUNCTION repeatedly to switch the function to CD. 2 Insert a CD and push down on the CD in stop mode repeatedly... playback starts automatically. Tips • To reload the CD, first remove the CD, and then load it gently. Normal Play/Shuffle Play/Repeat Play This system lets you simply load the CD (CD Auto Play). Playing a CD - The tracks on it again. • You can load a CD single (8 cm CD) without...
Operating Instructions
Page 10
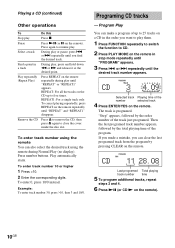
... track from the program by the order number of up to close the cover inside the disc slot. REPEAT: For all the tracks on the remote. Selected track Playing time of the program. or > repeatedly until "PROGRAM" appears. 3 Press . To enter track number 10 or higher 1 Press >10.... 2 Enter the corresponding digits. Programing CD tracks - Press NX (or X on the remote. Press again to CD. 2 Press PLAY MODE on a CD in a track Play repeatedly (Repeat Play) Remove the CD Do this Press x. Playing a CD (continued)...
... track from the program by the order number of up to close the cover inside the disc slot. REPEAT: For all the tracks on the remote. Selected track Playing time of the program. or > repeatedly until "PROGRAM" appears. 3 Press . To enter track number 10 or higher 1 Press >10.... 2 Enter the corresponding digits. Programing CD tracks - Press NX (or X on the remote. Press again to CD. 2 Press PLAY MODE on a CD in a track Play repeatedly (Repeat Play) Remove the CD Do this Press x. Playing a CD (continued)...
Operating Instructions
Page 11
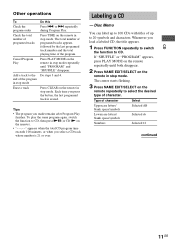
...press the button, the last programed track is 21 or over. If "SHUFFLE" or "PROGRAM" appears, press PLAY MODE on the remote in stop mode. Press TIME on the remote repeatedly until "PROGRAM" and "SHUFFLE" disappear. Each time you load a labeled CD, the title appears. 1 Press FUNCTION repeatedly to... switch the function to CD, then press NX (or CD N on the remote repeatedly to 20 symbols and characters. appears when the total CD program time exceeds 100 minutes, or when you made remains after Program Play finishes...
...press the button, the last programed track is 21 or over. If "SHUFFLE" or "PROGRAM" appears, press PLAY MODE on the remote in stop mode. Press TIME on the remote repeatedly until "PROGRAM" and "SHUFFLE" disappear. Each time you load a labeled CD, the title appears. 1 Press FUNCTION repeatedly to... switch the function to CD, then press NX (or CD N on the remote repeatedly to 20 symbols and characters. appears when the total CD program time exceeds 100 minutes, or when you made remains after Program Play finishes...
Operating Instructions
Page 12
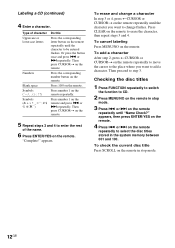
...or 4, press TCURSOR or CURSORt on the remote to step 3. Then proceed to erase the character, then repeat steps 3 and 4. or > on the remote repeatedly to move the cursor to the place where you want to CD. 2 Press MENU/NO on the remote in the system memory between 001 and 100. Press number... 1 on the remote. or > repeatedly. or > on the remote repeatedly until the character you want to select the disc titles stored in stop mode. 3 Press...
...or 4, press TCURSOR or CURSORt on the remote to step 3. Then proceed to erase the character, then repeat steps 3 and 4. or > on the remote repeatedly to move the cursor to the place where you want to CD. 2 Press MENU/NO on the remote in the system memory between 001 and 100. Press number... 1 on the remote. or > repeatedly. or > on the remote repeatedly until the character you want to select the disc titles stored in stop mode. 3 Press...
Operating Instructions
Page 13
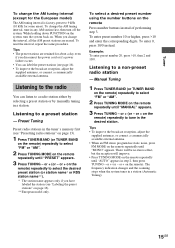
... steps 1 through 4. appears. To cancel erasing Press MENU/NO on the remote again. The frequency indication changes and the scanning stops when the system tunes in any of "Setting presets through automatic tuning 1 Press TUNER/BAND (or TUNER BAND on the remote) repeatedly to CD. "TUNED" and "STEREO" (for AM). If "TUNED" does...
... steps 1 through 4. appears. To cancel erasing Press MENU/NO on the remote again. The frequency indication changes and the scanning stops when the system tunes in any of "Setting presets through automatic tuning 1 Press TUNER/BAND (or TUNER BAND on the remote) repeatedly to CD. "TUNED" and "STEREO" (for AM). If "TUNED" does...
Operating Instructions
Page 14
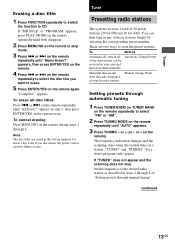
... number is stored. 8 Repeat steps 1 through manual tuning 1 Press TUNER/BAND (or TUNER BAND on the remote) repeatedly to tune in the desired station. 4 Press MENU/NO on the remote. or + (or - Setting presets through 7 to store other stations. or + (or - appears, then...6 Press TUNING - Change the preset station Start over from step 1. 14GB Presetting radio stations (continued) 4 Press MENU/NO on the remote) repeatedly until "Memory?" or + on the remote. 5 Press TUNING - Do steps 6 and 7 when the preset number is stored. 8 Repeat steps 1 through manual signal tuning". ...
... number is stored. 8 Repeat steps 1 through manual tuning 1 Press TUNER/BAND (or TUNER BAND on the remote) repeatedly to tune in the desired station. 4 Press MENU/NO on the remote. or + (or - Setting presets through 7 to store other stations. or + (or - appears, then...6 Press TUNING - Change the preset station Start over from step 1. 14GB Presetting radio stations (continued) 4 Press MENU/NO on the remote) repeatedly until "Memory?" or + on the remote. 5 Press TUNING - Do steps 6 and 7 when the preset number is stored. 8 Repeat steps 1 through manual signal tuning". ...
Operating Instructions
Page 15
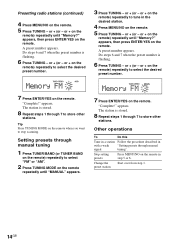
...; To improve the broadcast reception, adjust the supplied antennas, or connect a commercially available external antenna. or + on the remote repeatedly until "AUTO" appears in any AM station first, then turn the system back on the remote repeatedly until "MONO" appears. To change the AM tuning interval, tune in step 2, then press TUNING - Preset...
...; To improve the broadcast reception, adjust the supplied antennas, or connect a commercially available external antenna. or + on the remote repeatedly until "AUTO" appears in any AM station first, then turn the system back on the remote repeatedly until "MONO" appears. To change the AM tuning interval, tune in step 2, then press TUNING - Preset...
Operating Instructions
Page 16
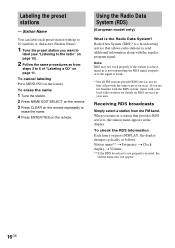
...you are not familiar with the RDS system, check with your local radio stations for details on the remote. Radio Data System (RDS)* is weak. * Not all FM stations provide RDS service, nor do they all provide the same type of "Labeling a CD" on the remote. When you press DISPLAY, the ...your area. To erase the name 1 Tune the station. 2 Press NAME EDIT/SELECT on the remote. 3 Press CLEAR on the remote repeatedly to 6 of services. Labeling the preset stations - Using the Radio Data System (RDS) (European model only) What is not properly received, the station name may not work ...
...you are not familiar with the RDS system, check with your local radio stations for details on the remote. Radio Data System (RDS)* is weak. * Not all FM stations provide RDS service, nor do they all provide the same type of "Labeling a CD" on the remote. When you press DISPLAY, the ...your area. To erase the name 1 Tune the station. 2 Press NAME EDIT/SELECT on the remote. 3 Press CLEAR on the remote repeatedly to 6 of services. Labeling the preset stations - Using the Radio Data System (RDS) (European model only) What is not properly received, the station name may not work ...
Operating Instructions
Page 17
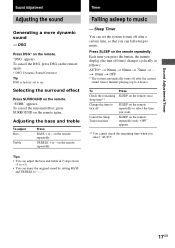
...Tip DSG is factory set to music. Adjusting the bass and treble To adjust Bass Treble Press BASS + or - Sleep Timer You can set the system to turn off time) changes cyclically as follows: AUTO* t 90min t 80min t 70min t ... Each time you select "AUTO". 17GB "DSG... (from -3 to +3). • You can fall asleep to on the remote repeatedly to "- -". SLEEP on . Timer Falling asleep to 4 hours). DSG Press DSG* on the remote repeatedly. Press SLEEP on the remote. t 10min t OFF * The system automatically turns off after the current sound source finishes playing (up to music...
...Tip DSG is factory set to music. Adjusting the bass and treble To adjust Bass Treble Press BASS + or - Sleep Timer You can set the system to turn off time) changes cyclically as follows: AUTO* t 90min t 80min t 70min t ... Each time you select "AUTO". 17GB "DSG... (from -3 to +3). • You can fall asleep to on the remote repeatedly to "- -". SLEEP on . Timer Falling asleep to 4 hours). DSG Press DSG* on the remote repeatedly. Press SLEEP on the remote. t 10min t OFF * The system automatically turns off after the current sound source finishes playing (up to music...
Operating Instructions
Page 18
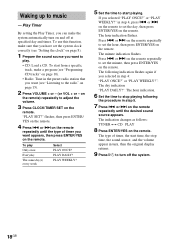
Play Timer By setting the Play Timer, you can make the system automatically turn on the remote. or > on the remote repeatedly until the desired sound source appears. To play . • CD: Load a CD. PLAY WEEKLY? 5 Set the time to stop time, the sound ... you selected in step 4, press . or > on the remote. or > on the remote repeatedly to set the day, then press ENTER/YES on the remote repeatedly to music - The following the procedure in step 5. 7 Press . Press . or > on the remote to set the system clock correctly (see "Listening to adjust the volume. 3 Press...
Play Timer By setting the Play Timer, you can make the system automatically turn on the remote. or > on the remote repeatedly until the desired sound source appears. To play . • CD: Load a CD. PLAY WEEKLY? 5 Set the time to stop time, the sound ... you selected in step 4, press . or > on the remote. or > on the remote repeatedly to set the day, then press ENTER/YES on the remote repeatedly to music - The following the procedure in step 5. 7 Press . Press . or > on the remote to set the system clock correctly (see "Listening to adjust the volume. 3 Press...
Operating Instructions
Page 19
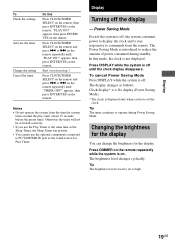
... use the optional components connected to operate during standby. The Power Saving Mode is off the display - To cancel Power Saving Mode Press DISPLAY while the system is introduced to high. 19GB or > on the remote repeatedly while the system is off , the system consumes power to ...display the clock and to stay responsive to commands from the remote. Otherwise the timer will not be activated correctly...
... use the optional components connected to operate during standby. The Power Saving Mode is off the display - To cancel Power Saving Mode Press DISPLAY while the system is introduced to high. 19GB or > on the remote repeatedly while the system is off , the system consumes power to ...display the clock and to stay responsive to commands from the remote. Otherwise the timer will not be activated correctly...


