
Operating Instructions
Page 3
... tracks - DSG 15 Adjusting the sub woofer 15 Timer Falling asleep to the radio - Sleep Timer 16 Waking up the optional components ..... 17 Additional Information Precautions 18 Troubleshooting 19 Messages 21 Specifications 21 3 Program Play 12 Using the CD display 13 Tuner Presetting... radio stations 13 Listening to music - Table of Contents Parts Identification Main unit 4 Sub Woofer 5 Remote Control 6 Getting Started Hooking up the system 7 Replacing the battery in the remote ........ 10 Setting the time 10 CD Loading a CD 11 Playing a CD -
... tracks - DSG 15 Adjusting the sub woofer 15 Timer Falling asleep to the radio - Sleep Timer 16 Waking up the optional components ..... 17 Additional Information Precautions 18 Troubleshooting 19 Messages 21 Specifications 21 3 Program Play 12 Using the CD display 13 Tuner Presetting... radio stations 13 Listening to music - Table of Contents Parts Identification Main unit 4 Sub Woofer 5 Remote Control 6 Getting Started Hooking up the system 7 Replacing the battery in the remote ........ 10 Setting the time 10 CD Loading a CD 11 Playing a CD -

Operating Instructions
Page 4
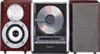
Parts Identification The items are arranged in parentheses ( ) for details. Refer to the pages indicated in alphabetical order. Main unit Display window 0 FUNCTION 7 (11, 17) OPEN/CLOSE Z 1 (11) Remote sensor 9 TUNER/BAND 6 (13) TUNING +/- 3 (13) VOL +/- 2 BUTTON DESCRIPTIONS m/M 3 ./> 3 x 4 NX 5 ?/1 8 4
Parts Identification The items are arranged in parentheses ( ) for details. Refer to the pages indicated in alphabetical order. Main unit Display window 0 FUNCTION 7 (11, 17) OPEN/CLOSE Z 1 (11) Remote sensor 9 TUNER/BAND 6 (13) TUNING +/- 3 (13) VOL +/- 2 BUTTON DESCRIPTIONS m/M 3 ./> 3 x 4 NX 5 ?/1 8 4
Operating Instructions
Page 6
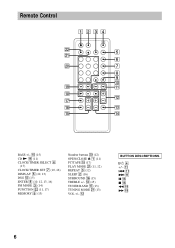
qs BUTTON DESCRIPTIONS @/1 4 +/- qa . Remote Control 12 34 ws 5 wa 6 w; 7 8 9 0 ql qa qk qs qj qh qd qg qf BASS +/- qf (15) TUNER BAND qj (13) TUNING MODE wa (13) VOL +/- qg (15) CD N qk (11) CLOCK/TIMER SELECT 6 (17) CLOCK/TIMER SET 7 (10, 16) DISPLAY 5 (10, 13) DSG qd (15) ENTER 8 (10, 12, 13, 16) FM MODE 3 (14) FUNCTION ws (11, 17) MEMORY 9 (13) Number buttons w; (12) OPEN/CLOSE Z 1 (11) PC/TAPE q; (17) PLAY MODE wa (11, 12) REPEAT 3 (12) SLEEP 2 (16) SURROUND qh (15) TREBLE +/- qa > qa X qk x qk m ql M ql 6
qs BUTTON DESCRIPTIONS @/1 4 +/- qa . Remote Control 12 34 ws 5 wa 6 w; 7 8 9 0 ql qa qk qs qj qh qd qg qf BASS +/- qf (15) TUNER BAND qj (13) TUNING MODE wa (13) VOL +/- qg (15) CD N qk (11) CLOCK/TIMER SELECT 6 (17) CLOCK/TIMER SET 7 (10, 16) DISPLAY 5 (10, 13) DSG qd (15) ENTER 8 (10, 12, 13, 16) FM MODE 3 (14) FUNCTION ws (11, 17) MEMORY 9 (13) Number buttons w; (12) OPEN/CLOSE Z 1 (11) PC/TAPE q; (17) PLAY MODE wa (11, 12) REPEAT 3 (12) SLEEP 2 (16) SURROUND qh (15) TREBLE +/- qa > qa X qk x qk m ql M ql 6

Operating Instructions
Page 9
...power to occur. This is placed in your room. The remote already contains a battery. Put the wires through the hole at the bottom of the rear cover. 6 Connect the power cords of the room. To connect optional components See "Optional Components" on a solid floor where the resonance is unlikely to ...flow from away the wall. • If the woofer is due to bear more shock resistant and able to the influence of the standing wave of system and the sub woofer to ...
...power to occur. This is placed in your room. The remote already contains a battery. Put the wires through the hole at the bottom of the rear cover. 6 Connect the power cords of the room. To connect optional components See "Optional Components" on a solid floor where the resonance is unlikely to ...flow from away the wall. • If the woofer is due to bear more shock resistant and able to the influence of the standing wave of system and the sub woofer to ...

Operating Instructions
Page 10
... not recharge, disassemble or dispose of explosion if battery is incorrectly replaced. Setting the time 1 Turn on the system. 2 Press CLOCK/TIMER SET on the remote. or > repeatedly to change the time, start over from battery leakage. • Keep the lithium battery out of ... Proceed to avoid possible damage from step 1. The hour indication flashes. 5 Press . The clock starts working. Tip When the remote no longer operates the system, replace the battery with the same or equivalent type recommend by the manufacturer. Should the battery be swallowed, immediately consult a doctor....
... not recharge, disassemble or dispose of explosion if battery is incorrectly replaced. Setting the time 1 Turn on the system. 2 Press CLOCK/TIMER SET on the remote. or > repeatedly to change the time, start over from battery leakage. • Keep the lithium battery out of ... Proceed to avoid possible damage from step 1. The hour indication flashes. 5 Press . The clock starts working. Tip When the remote no longer operates the system, replace the battery with the same or equivalent type recommend by the manufacturer. Should the battery be swallowed, immediately consult a doctor....

Operating Instructions
Page 11
... in random order. PGM (Program Play) All the tracks in the order you want appears in the display. Normal Play/Shuffle Play/Repeat Play This system lets you play the CD in different play No display (Normal Play) All the tracks in original order. continued 3 Touch OPEN/CLOSE Z (or press... OPEN/ CLOSE Z on the remote). Select To play modes. SHUF (Shuffle Play) All the tracks in the disc tray. Note Do not touch the playing side of the CD with...
... in random order. PGM (Program Play) All the tracks in the order you want appears in the display. Normal Play/Shuffle Play/Repeat Play This system lets you play the CD in different play No display (Normal Play) All the tracks in original order. continued 3 Touch OPEN/CLOSE Z (or press... OPEN/ CLOSE Z on the remote). Select To play modes. SHUF (Shuffle Play) All the tracks in the disc tray. Note Do not touch the playing side of the CD with...
Operating Instructions
Page 12
...Playing time of the last programed track are displayed. 5 To program additional tracks, repeat steps 3 and 4. 6 Press NX (or CD N on the remote during Shuffle Play and Program Play. Press again to resume play and release it at the desired point. Keep pressing m or M during play . Press ... repeatedly (Repeat Play) Do this Press x. Notes • Do not forcibly press the disc down with bare hands or press OPEN/ CLOSE Z on the remote repeatedly until "PGM" and "SHUF" disappear. or > repeatedly until "REP" or "REP 1" disappears. * You cannot repeat only one track during play...
...Playing time of the last programed track are displayed. 5 To program additional tracks, repeat steps 3 and 4. 6 Press NX (or CD N on the remote during Shuffle Play and Program Play. Press again to resume play and release it at the desired point. Keep pressing m or M during play . Press ... repeatedly (Repeat Play) Do this Press x. Notes • Do not forcibly press the disc down with bare hands or press OPEN/ CLOSE Z on the remote repeatedly until "PGM" and "SHUF" disappear. or > repeatedly until "REP" or "REP 1" disappears. * You cannot repeat only one track during play...

Operating Instructions
Page 13
...disc title* t Artist name* t Clock * If a CD that has no title is not operated for a stereo program) appear. 4 Press MEMORY on the remote). The frequency indication changes and the scanning stops when the system tunes in a station. Proceed to select "FM" or "AM". 2 Press TUNING MODE on the... remote. The station is flashing. or + on the remote. or > to store other stations. When the CD contains more than 20 tracks, CD TEXT is loaded...
...disc title* t Artist name* t Clock * If a CD that has no title is not operated for a stereo program) appear. 4 Press MEMORY on the remote). The frequency indication changes and the scanning stops when the system tunes in a station. Proceed to select "FM" or "AM". 2 Press TUNING MODE on the... remote. The station is flashing. or + on the remote. or > to store other stations. When the CD contains more than 20 tracks, CD TEXT is loaded...
Operating Instructions
Page 14
... program has static noise, press FM MODE on the remote repeatedly until "AUTO" appears in any AM station first, then turn the system back on the remote. or + (or - To cancel Automatic Tuning Press TUNING MODE on the remote). "MANUAL" appears. To reset the interval, repeat the... or + (or - or + on the remote. or + on the remote repeatedly in the station manually and continue from step 1. While holding TUNING + on the system, turn off the system. Listening to select "FM" or "AM". 2 Press TUNING MODE on the remote) repeatedly to the radio - Presetting radio stations (...
... program has static noise, press FM MODE on the remote repeatedly until "AUTO" appears in any AM station first, then turn the system back on the remote. or + (or - To cancel Automatic Tuning Press TUNING MODE on the remote). "MANUAL" appears. To reset the interval, repeat the... or + (or - or + on the remote. or + on the remote repeatedly in the station manually and continue from step 1. While holding TUNING + on the system, turn off the system. Listening to select "FM" or "AM". 2 Press TUNING MODE on the remote) repeatedly to the radio - Presetting radio stations (...
Operating Instructions
Page 15
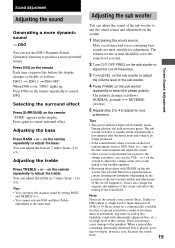
...of the sub woofer to +3). Sound Adjustment Adjusting the sound Generating a more powerful sound. Press DSG on the system. 1 Start playing the sound source. Selecting the surround effect Press SURROUND on the remote. Adjusting the treble Press TREBLE + or - It may provide better bass reproduction in 7 steps (from -3 to... linked to 0. • You cannot activate DSG and Bass/Treble adjustment at the same time. The sub woofer switches to this system. Press DSG on the remote. Note Never set to the same level as usual. 2 Turn CUT OFF FREQ on the sub woofer to adjust the cut -...
...of the sub woofer to +3). Sound Adjustment Adjusting the sound Generating a more powerful sound. Press DSG on the system. 1 Start playing the sound source. Selecting the surround effect Press SURROUND on the remote. Adjusting the treble Press TREBLE + or - It may provide better bass reproduction in 7 steps (from -3 to... linked to 0. • You cannot activate DSG and Bass/Treble adjustment at the same time. The sub woofer switches to this system. Press DSG on the remote. Note Never set to the same level as usual. 2 Turn CUT OFF FREQ on the sub woofer to adjust the cut -...

Operating Instructions
Page 16
... page 14). • Tape: Make the same setting on the timer of the component connected to set the minute, then press ENTER on page 12). • Radio: Tune in step 5. t 10MIN t OFF * The system automatically turns off in 100 minutes. The sound source indication flashes. 16 remaining time ... the time you can wake up to start from a specific track, make a program (see "Programing CD tracks" on the remote. Note When the Sleep Timer is TUNER, the system turns off after a certain time, so that you want to music at a preset time. To start playing. The hour indication...
... page 14). • Tape: Make the same setting on the timer of the component connected to set the minute, then press ENTER on page 12). • Radio: Tune in step 5. t 10MIN t OFF * The system automatically turns off in 100 minutes. The sound source indication flashes. 16 remaining time ... the time you can wake up to start from a specific track, make a program (see "Programing CD tracks" on the remote. Note When the Sleep Timer is TUNER, the system turns off after a certain time, so that you want to music at a preset time. To start playing. The hour indication...

Operating Instructions
Page 17
...not be activated. • Do not operate the system from step 1. Press CLOCK/TIMER SELECT on the remote repeatedly until "DAILY" appears. To connect optional components, remove the small rear cover first. Start over from the time the system turns on until the play starts (about 30 ...SELECT on the remote). Notes • If the system is on the remote. To the audio input jacks of an optional component To the audio output jacks of an optional component PHONES jack To the digital input jack of a digital component To Make a digital recording to a digital component Make an analog...
...not be activated. • Do not operate the system from step 1. Press CLOCK/TIMER SELECT on the remote repeatedly until "DAILY" appears. To connect optional components, remove the small rear cover first. Start over from the time the system turns on until the play starts (about 30 ...SELECT on the remote). Notes • If the system is on the remote. To the audio input jacks of an optional component To the audio output jacks of an optional component PHONES jack To the digital input jack of a digital component To Make a digital recording to a digital component Make an analog...
Operating Instructions
Page 18
...The nameplate is located on top of the system. • Do not place the system in an inclined position. • Do not place the system in locations where it is: - On safety • The glass over the display window on for remote and timer functions. This glass, however, may... shatter if it receives a sharp blow or if it any questions or problems concerning your system, please consult your nearest Sony dealer. Subject to vibrations - To avoid burning yourself, do not...
...The nameplate is located on top of the system. • Do not place the system in an inclined position. • Do not place the system in locations where it is: - On safety • The glass over the display window on for remote and timer functions. This glass, however, may... shatter if it receives a sharp blow or if it any questions or problems concerning your system, please consult your nearest Sony dealer. Subject to vibrations - To avoid burning yourself, do not...

Operating Instructions
Page 19
... them on separate stands. • When you have any problem persist, consult your nearest Sony dealer. The timer does not function. • Press CLOCK/TIMER SELECT on the remote to skip. continued 19 Should any problem using this system, use the following checklist. CD Player The CD tray does not lower. • Place...
... them on separate stands. • When you have any problem persist, consult your nearest Sony dealer. The timer does not function. • Press CLOCK/TIMER SELECT on the remote to skip. continued 19 Should any problem using this system, use the following checklist. CD Player The CD tray does not lower. • Place...
Operating Instructions
Page 22
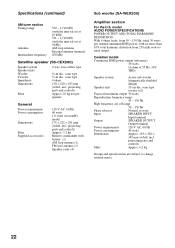
...Continuous RMS power output (reference): 30 watts (4 ohms at 9 kHz) AM loop antenna External antenna terminals 450 kHz Satellite speaker (SS-CEX200) Speaker system Speaker units Woofer: Tweeter: Impedance Dimensions Mass 2-way, bass-reflex type 9 cm dia., cone type 5 cm dia., cone type 4 ohms 130 &#...215; 220 × 183 mm (w/h/d, incl. projecting parts and controls) Approx. 3.2 kg Remote commander with battery (1) AM loop antenna (1) FM wire antenna (1) Speaker cords (4) Sub woofer (SA-WEX200) Amplifier section For the U.S. rated 30 watts per...
...Continuous RMS power output (reference): 30 watts (4 ohms at 9 kHz) AM loop antenna External antenna terminals 450 kHz Satellite speaker (SS-CEX200) Speaker system Speaker units Woofer: Tweeter: Impedance Dimensions Mass 2-way, bass-reflex type 9 cm dia., cone type 5 cm dia., cone type 4 ohms 130 &#...215; 220 × 183 mm (w/h/d, incl. projecting parts and controls) Approx. 3.2 kg Remote commander with battery (1) AM loop antenna (1) FM wire antenna (1) Speaker cords (4) Sub woofer (SA-WEX200) Amplifier section For the U.S. rated 30 watts per...


