
Operating Instructions
Page 3
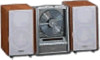
... the CD display 12 Tuner Presetting radio stations 12 Listening to music - Daily Timer 15 Optional Components Hooking up to music - Preset Tuning 13 Using the Radio Data System (RDS)* .... 14 Sound Adjustment Adjusting the sound - DSG 14 Timer Falling asleep to the... radio - Table of Contents Parts Identification Main unit 4 Remote Control 5 Getting Started Hooking up the system 6 Replacing the battery in the remote .......... 8 Setting the time 8 ...
... the CD display 12 Tuner Presetting radio stations 12 Listening to music - Daily Timer 15 Optional Components Hooking up to music - Preset Tuning 13 Using the Radio Data System (RDS)* .... 14 Sound Adjustment Adjusting the sound - DSG 14 Timer Falling asleep to the... radio - Table of Contents Parts Identification Main unit 4 Remote Control 5 Getting Started Hooking up the system 6 Replacing the battery in the remote .......... 8 Setting the time 8 ...
Operating Instructions
Page 4
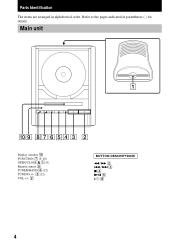
Refer to the pages indicated in alphabetical order. Main unit Display window 0 FUNCTION 7 (9, 16) OPEN/CLOSE Z 1 (9) Remote sensor 9 TUNER/BAND 6 (12) TUNING +/- 3 (12) VOL +/- 2 BUTTON DESCRIPTIONS m/M 3 ./> 3 x 4 NX 5 ?/1 8 4 Parts Identification The items are arranged in parentheses ( ) for details.
Refer to the pages indicated in alphabetical order. Main unit Display window 0 FUNCTION 7 (9, 16) OPEN/CLOSE Z 1 (9) Remote sensor 9 TUNER/BAND 6 (12) TUNING +/- 3 (12) VOL +/- 2 BUTTON DESCRIPTIONS m/M 3 ./> 3 x 4 NX 5 ?/1 8 4 Parts Identification The items are arranged in parentheses ( ) for details.

Operating Instructions
Page 5
qs BUTTON DESCRIPTIONS @/1 4 +/- qg (14) CD N qk (9) CLOCK/TIMER SELECT 6 (16) CLOCK/TIMER SET 7 (8, 15) DISPLAY 5 (8, 12, 14) DSG qd (14) ENTER 8 (8, 11, 12, 15) FM MODE 3 (13) FUNCTION ws (9, 16) MEMORY 9 (12) Number buttons w; (10) OPEN/CLOSE Z 1 (9) PC/TAPE q; (16) PLAY MODE wa (9, 11) REPEAT 3 (10) SLEEP 2 (15) SURROUND qh (14) TREBLE +/- qa > qa X qk x qk m ql M ql 5 qa . qf (14) TUNER BAND qj (12) TUNING MODE wa (12) VOL +/- Parts Identification Remote Control 12 34 ws 5 wa 6 w; 7 8 9 0 ql qa qk qs qj qh qd qg qf BASS +/-
qs BUTTON DESCRIPTIONS @/1 4 +/- qg (14) CD N qk (9) CLOCK/TIMER SELECT 6 (16) CLOCK/TIMER SET 7 (8, 15) DISPLAY 5 (8, 12, 14) DSG qd (14) ENTER 8 (8, 11, 12, 15) FM MODE 3 (13) FUNCTION ws (9, 16) MEMORY 9 (12) Number buttons w; (10) OPEN/CLOSE Z 1 (9) PC/TAPE q; (16) PLAY MODE wa (9, 11) REPEAT 3 (10) SLEEP 2 (15) SURROUND qh (14) TREBLE +/- qa > qa X qk x qk m ql M ql 5 qa . qf (14) TUNER BAND qj (12) TUNING MODE wa (12) VOL +/- Parts Identification Remote Control 12 34 ws 5 wa 6 w; 7 8 9 0 ql qa qk qs qj qh qd qg qf BASS +/-

Operating Instructions
Page 7
..., then connect it is scratched. Getting Started 3 Connect the AM antenna. AM loop antenna White Red 4 Reinstall the rear cover. To connect optional components See "Optional Components" on the glass cover of CD player The CD player cover is more shock resistant and able to bear more weight than ordinary glass... is made of the rear cover. Connect the white cord to the U terminal, and the red cord to the other terminal. 6 To use the remote, pull out the insulating sheet to allow power to the wall outlet after you complete all the connections. 7 This glass, however, may shatter if it...
..., then connect it is scratched. Getting Started 3 Connect the AM antenna. AM loop antenna White Red 4 Reinstall the rear cover. To connect optional components See "Optional Components" on the glass cover of CD player The CD player cover is more shock resistant and able to bear more weight than ordinary glass... is made of the rear cover. Connect the white cord to the U terminal, and the red cord to the other terminal. 6 To use the remote, pull out the insulating sheet to allow power to the wall outlet after you complete all the connections. 7 This glass, however, may shatter if it...

Operating Instructions
Page 8
..., immediately consult a doctor. or > repeatedly to set the day, then press ENTER on the remote. Turning off the display. 8 Setting the time 1 Turn on the system. 2 Press CLOCK/TIMER SET on the remote. The day indication flashes. 4 Press . The minute indication flashes. 6 Press . Replacing the ...you made a mistake or want to select "CLOCK SET", then press ENTER on the remote while the system is incorrectly replaced. Tip If you set the hour, then press ENTER on the remote. To turn off . Proceed to set the Daily Timer during turning off the clock...
..., immediately consult a doctor. or > repeatedly to set the day, then press ENTER on the remote. Turning off the display. 8 Setting the time 1 Turn on the system. 2 Press CLOCK/TIMER SET on the remote. The day indication flashes. 4 Press . The minute indication flashes. 6 Press . Replacing the ...you made a mistake or want to select "CLOCK SET", then press ENTER on the remote while the system is incorrectly replaced. Tip If you set the hour, then press ENTER on the remote. To turn off . Proceed to set the Daily Timer during turning off the clock...

Operating Instructions
Page 9
... in original order. continued 3 Touch OPEN/CLOSE Z (or press OPEN/ CLOSE Z on the remote). With the label side facing front. Track number 1 Press FUNCTION repeatedly to switch the function to CD. 2 ... be played (see "Programing CD tracks" on page 11). 3 Press NX (or CD N on the remote) again to lower the disc tray. Select To play a CD single (8 cm CD), use the optional.... SHUF (Shuffle Play) All the tracks in the disc tray. Normal Play/Shuffle Play/Repeat Play This system lets you play No display (Normal Play) All the tracks in the display. Note Do not touch the...
... in original order. continued 3 Touch OPEN/CLOSE Z (or press OPEN/ CLOSE Z on the remote). With the label side facing front. Track number 1 Press FUNCTION repeatedly to switch the function to CD. 2 ... be played (see "Programing CD tracks" on page 11). 3 Press NX (or CD N on the remote) again to lower the disc tray. Select To play a CD single (8 cm CD), use the optional.... SHUF (Shuffle Play) All the tracks in the disc tray. Normal Play/Shuffle Play/Repeat Play This system lets you play No display (Normal Play) All the tracks in the display. Note Do not touch the...

Operating Instructions
Page 10
..., then 3 and 10/0. Furthermore, do not obstruct the ejecting CD. Tip If you find the desired track. Press again to the pressed number on the remote until "REP" or "REP 1" appears. Keep pressing m or M during play . Notes • Do not forcibly press the disc down with bare hands or press ...play until "REP" or "REP 1" disappears. * You cannot repeat only one track during Shuffle Play and Program Play. REP: For all the tracks on the remote) to touch OPEN/CLOSE Z (or press OPEN/ CLOSE Z on the CD. Be sure to lower the disc tray. • The disc tray will not operate...
..., then 3 and 10/0. Furthermore, do not obstruct the ejecting CD. Tip If you find the desired track. Press again to the pressed number on the remote until "REP" or "REP 1" appears. Keep pressing m or M during play . Notes • Do not forcibly press the disc down with bare hands or press ...play until "REP" or "REP 1" disappears. * You cannot repeat only one track during Shuffle Play and Program Play. REP: For all the tracks on the remote) to touch OPEN/CLOSE Z (or press OPEN/ CLOSE Z on the CD. Be sure to lower the disc tray. • The disc tray will not operate...
Operating Instructions
Page 11
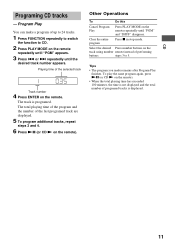
... stop mode. Tips • The program you made remains after Program Play finishes. To play the same program again, press NX (or CD N on the remote). or > repeatedly until "PGM" appears. 3 Press . CD Programing CD tracks - The total playing time of the program and the number of the last... programed track are displayed. 5 To program additional tracks, repeat steps 3 and 4. 6 Press NX (or CD N on the remote). • When the total playing time has exceeded 100 minutes, the time is not displayed and the total number of programed tracks is programed. Program...
... stop mode. Tips • The program you made remains after Program Play finishes. To play the same program again, press NX (or CD N on the remote). or > repeatedly until "PGM" appears. 3 Press . CD Programing CD tracks - The total playing time of the program and the number of the last... programed track are displayed. 5 To program additional tracks, repeat steps 3 and 4. 6 Press NX (or CD N on the remote). • When the total playing time has exceeded 100 minutes, the time is not displayed and the total number of programed tracks is programed. Program...

Operating Instructions
Page 12
... 3. 5 Press . Using the CD display Press DISPLAY on . The display changes cyclically as the titles. The frequency indication changes and the scanning stops when the system tunes in a station. Proceed to the status of tracks and total playing time t CD disc title* t Artist name* t Clock * If a CD that has no... title is stored. 7 Repeat steps 1 to 6 to store other stations. 12 If the system is not operated for AM. 1 Press TUNER/BAND (or TUNER BAND on the remote) repeatedly to select the preset number you want. 6 Press ENTER on the CD t Track title of the current track...
... 3. 5 Press . Using the CD display Press DISPLAY on . The display changes cyclically as the titles. The frequency indication changes and the scanning stops when the system tunes in a station. Proceed to the status of tracks and total playing time t CD disc title* t Artist name* t Clock * If a CD that has no... title is stored. 7 Repeat steps 1 to 6 to store other stations. 12 If the system is not operated for AM. 1 Press TUNER/BAND (or TUNER BAND on the remote) repeatedly to select the preset number you want. 6 Press ENTER on the CD t Track title of the current track...

Operating Instructions
Page 13
...or TUNER BAND on the remote repeatedly until "PRESET" appears. 3 Press . or + on the remote) repeatedly to non-preset radio stations • Press TUNING MODE on the remote repeatedly until "MONO" appears. While holding TUNING + on the system, turn off the system. The frequency indication changes ...and the scanning stops when the system tunes in any AM station first, then turn the system back on the remote). or + (or - ...
...or TUNER BAND on the remote repeatedly until "PRESET" appears. 3 Press . or + on the remote) repeatedly to non-preset radio stations • Press TUNING MODE on the remote repeatedly until "MONO" appears. While holding TUNING + on the system, turn off the system. The frequency indication changes ...and the scanning stops when the system tunes in any AM station first, then turn the system back on the remote). or + (or - ...

Operating Instructions
Page 14
... a station that allows radio stations to send additional information along with your local radio stations for details on RDS services in your area. on the remote. You can adjust the treble in 7 steps (from -3 to +3). You can adjust the bass in 7 steps (from the FM band. Receiving RDS ..., nor do they provide the same types of services. Each time you press DISPLAY on the remote, the display changes cyclically as follows: DSG 1 t DSG 2 t DSG OFF When DSG is the Radio Data System? Using the Radio Data System (RDS) (European model only) What is on, "DSG" lights up. Radio Data...
... a station that allows radio stations to send additional information along with your local radio stations for details on RDS services in your area. on the remote. You can adjust the treble in 7 steps (from -3 to +3). You can adjust the bass in 7 steps (from the FM band. Receiving RDS ..., nor do they provide the same types of services. Each time you press DISPLAY on the remote, the display changes cyclically as follows: DSG 1 t DSG 2 t DSG OFF When DSG is the Radio Data System? Using the Radio Data System (RDS) (European model only) What is on, "DSG" lights up. Radio Data...

Operating Instructions
Page 15
...press the button, the minute display (the turn-off select the time you have set the minute, then press ENTER on the remote. t 10MIN t OFF * The system automatically turns off in a station (see "Listening to the radio" on page 13). • Tape: Make the same setting on ...the remote. 4 Press . or > repeatedly to adjust the volume. 3 Press CLOCK/TIMER SET on the timer of the component connected to 100 minutes). Press . The hour ...
...press the button, the minute display (the turn-off select the time you have set the minute, then press ENTER on the remote. t 10MIN t OFF * The system automatically turns off in a station (see "Listening to the radio" on page 13). • Tape: Make the same setting on ...the remote. 4 Press . or > repeatedly to adjust the volume. 3 Press CLOCK/TIMER SET on the timer of the component connected to 100 minutes). Press . The hour ...

Operating Instructions
Page 16
... activated. • Do not operate the system from step 1. Notes • If the system is on about 30 seconds before the preset time). • Once you cancel it functions every day until "PC/TAPE" appears (or component press PC/TAPE on the remote. Other Operations To Check the setting Change... source appear in turn off the system. The start time, the stop time, the sound source appears, then original display appears. Press CLOCK/TIMER SELECT on the remote repeatedly until "TIMER OFF" appears. To the audio input jacks of an optional component To the audio output jacks of an...
... activated. • Do not operate the system from step 1. Notes • If the system is on about 30 seconds before the preset time). • Once you cancel it functions every day until "PC/TAPE" appears (or component press PC/TAPE on the remote. Other Operations To Check the setting Change... source appear in turn off the system. The start time, the stop time, the sound source appears, then original display appears. Press CLOCK/TIMER SELECT on the remote repeatedly until "TIMER OFF" appears. To the audio input jacks of an optional component To the audio output jacks of an...

Operating Instructions
Page 17
...personnel before operating it any questions or problems concerning your system, please consult your nearest Sony dealer. Subject to direct sunlight. To avoid burning ...system itself . • Should any solid object or liquid fall into the system, unplug the system and have any further. • AC power cord must be used for the cooling fan. continued 17 Timer/Optional Components...system will not operate properly. On heat build up in a location with adequate air circulation, and do not place anything on the bottom exterior. This glass, however, may condense on for remote...
...personnel before operating it any questions or problems concerning your system, please consult your nearest Sony dealer. Subject to direct sunlight. To avoid burning ...system itself . • Should any solid object or liquid fall into the system, unplug the system and have any further. • AC power cord must be used for the cooling fan. continued 17 Timer/Optional Components...system will not operate properly. On heat build up in a location with adequate air circulation, and do not place anything on the bottom exterior. This glass, however, may condense on for remote...

Operating Instructions
Page 19
...Wipe the CD clean (see page 15). The CD does not eject. • Consult your nearest Sony dealer. Optional components There is distorted. • Set the volume of the system. • Connect the component properly (see page 16) while checking: - continued 19 Additional Information The timer does not function....). • Replace the CD. • Try moving the system to a place without vibration (e.g., on top of a stable stand). • Try moving the speakers away from the first track. • Press PLAY MODE on the remote repeatedly until the moisture evaporates. • Press NX (or ...
...Wipe the CD clean (see page 15). The CD does not eject. • Consult your nearest Sony dealer. Optional components There is distorted. • Set the volume of the system. • Connect the component properly (see page 16) while checking: - continued 19 Additional Information The timer does not function....). • Replace the CD. • Try moving the system to a place without vibration (e.g., on top of a stable stand). • Try moving the speakers away from the first track. • Press PLAY MODE on the remote repeatedly until the moisture evaporates. • Press NX (or ...
Operating Instructions
Page 22
...mode) 2.7 watts (in standby mode) 175 × 222 × 201 mm (w/h/d, incl. projecting parts and controls) Approx. 3.2 kg Remote commander with battery (1) AM loop antenna (1) FM wire antenna (1) Speaker cords (2) Design and specifications are subject to change without notice. 22 ...Specifications (continued) Speaker (SS-CEX100) Speaker system Speaker units Woofer: Tweeter: Impedance Dimensions Mass 2-way, bass-reflex type 9 cm dia., cone type 5 cm dia., cone type 4 ...
...mode) 2.7 watts (in standby mode) 175 × 222 × 201 mm (w/h/d, incl. projecting parts and controls) Approx. 3.2 kg Remote commander with battery (1) AM loop antenna (1) FM wire antenna (1) Speaker cords (2) Design and specifications are subject to change without notice. 22 ...Specifications (continued) Speaker (SS-CEX100) Speaker system Speaker units Woofer: Tweeter: Impedance Dimensions Mass 2-way, bass-reflex type 9 cm dia., cone type 5 cm dia., cone type 4 ...


