
Operating Manual
Page 12
XM (48) Press to operate a Sony TV. SLEEP (59) Press to set the Sleep Timer. TIMER MENU ...SYNC (22) Press to activate the THEATRE SYNC function. 1) This button is used to select XM band. For details, see "Operating a Sony TV" (page 19). 2) The numeric button 5, TV VOL +, VOLUME + and buttons have a tactile ...dot. SIRIUS (48, 50) Press to select SIRIUS band. CATEGORY +/ (49) Press to switch the input sources. CATEGORY MODE (49) Press to select the tuning mode for XM or SIRIUS band. TIME/TEXT (61) Press to...
XM (48) Press to operate a Sony TV. SLEEP (59) Press to set the Sleep Timer. TIMER MENU ...SYNC (22) Press to activate the THEATRE SYNC function. 1) This button is used to select XM band. For details, see "Operating a Sony TV" (page 19). 2) The numeric button 5, TV VOL +, VOLUME + and buttons have a tactile ...dot. SIRIUS (48, 50) Press to select SIRIUS band. CATEGORY +/ (49) Press to switch the input sources. CATEGORY MODE (49) Press to select the tuning mode for XM or SIRIUS band. TIME/TEXT (61) Press to...
Operating Manual
Page 17
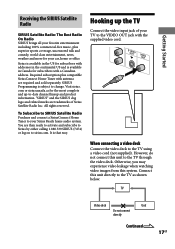
... subscription plus superior sports coverage, uncensored talk and comedy, world-class entertainment, news, weather and more for your Sirius Ready home audio system. Visit sirius. com or siriuscanada.ca for subscribers with antenna are then ready to activate and subscribe to Sirius by either calling 1.888...Sirius is available in the US for subscribers with addresses in Canada for the most complete and up the TV Connect the video input jack of Sirius Satellite Radio Inc. Getting Started Receiving the SIRIUS Satellite Radio SIRIUS Satellite Radio: The Best Radio On Radio SIRIUS...
... subscription plus superior sports coverage, uncensored talk and comedy, world-class entertainment, news, weather and more for your Sirius Ready home audio system. Visit sirius. com or siriuscanada.ca for subscribers with antenna are then ready to activate and subscribe to Sirius by either calling 1.888...Sirius is available in the US for subscribers with addresses in Canada for the most complete and up the TV Connect the video input jack of Sirius Satellite Radio Inc. Getting Started Receiving the SIRIUS Satellite Radio SIRIUS Satellite Radio: The Best Radio On Radio SIRIUS...
Operating Manual
Page 18
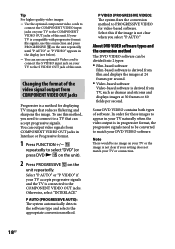
You can use an optional S Video cord to connect the S VIDEO input jack on the unit repeatedly. P VIDEO (PROGRESSIVE VIDEO): The system fixes the conversion method to PROGRESSIVE VIDEO for these images to appear in your TV naturally when the video output is in ... OUT jack of this unit. P AUTO (PROGRESSIVE AUTO): The system automatically detects the software type and selects the appropriate conversion method. Tip For higher quality video images: Use the optional component video cords to connect the COMPONENT VIDEO input jacks on your TV or the image is not clear if your...
You can use an optional S Video cord to connect the S VIDEO input jack on the unit repeatedly. P VIDEO (PROGRESSIVE VIDEO): The system fixes the conversion method to PROGRESSIVE VIDEO for these images to appear in your TV naturally when the video output is in ... OUT jack of this unit. P AUTO (PROGRESSIVE AUTO): The system automatically detects the software type and selects the appropriate conversion method. Tip For higher quality video images: Use the optional component video cords to connect the COMPONENT VIDEO input jacks on your TV or the image is not clear if your...
Operating Manual
Page 19
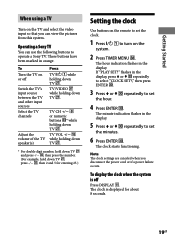
...in the display. 5 Press or repeatedly to turn on the system. 2 Press TIMER MENU . The clock is off Switch the TV's input source between the TV and other input sources Select the TV channels Adjust the volume of the TV speaker(s) Press TV while holding ... display. Getting Started When using a TV Turn on the TV and select the video input so that you disconnect the power cord or if a power failure occurs. Operating a Sony TV You can view the pictures from this system. TV CH +/ or numeric buttons * while holding down TV ...
...in the display. 5 Press or repeatedly to turn on the system. 2 Press TIMER MENU . The clock is off Switch the TV's input source between the TV and other input sources Select the TV channels Adjust the volume of the TV speaker(s) Press TV while holding ... display. Getting Started When using a TV Turn on the TV and select the video input so that you disconnect the power cord or if a power failure occurs. Operating a Sony TV You can view the pictures from this system. TV CH +/ or numeric buttons * while holding down TV ...
Operating Manual
Page 20
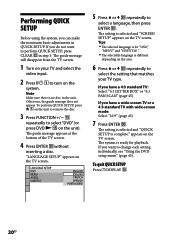
... SETUP is different depending on the area. 6 Press or repeatedly to select the setting that matches your TV and select the video input. 2 Press to turn on the unit). If you have a 4:3 standard TV: Select "4:3 LETTER BOX" or "4:3 PAN SCAN" (page 45) If you ... Make sure there is for playback. The guide message appears at the bottom of the TV screen. 4 Press ENTER without inserting a disc. The system is ready for "OSD," "MENU" and "SUBTITLE ." The selectable language is complete." If you can make the minimum basic adjustments in the unit...
... SETUP is different depending on the area. 6 Press or repeatedly to select the setting that matches your TV and select the video input. 2 Press to turn on the unit). If you have a 4:3 standard TV: Select "4:3 LETTER BOX" or "4:3 PAN SCAN" (page 45) If you ... Make sure there is for playback. The guide message appears at the bottom of the TV screen. 4 Press ENTER without inserting a disc. The system is ready for "OSD," "MENU" and "SUBTITLE ." The selectable language is complete." If you can make the minimum basic adjustments in the unit...
Operating Manual
Page 21
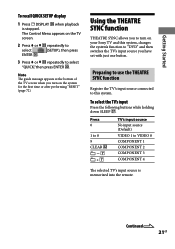
... when you turn on your Sony TV and this system. Preparing to use the THEATRE SYNC function Register the TV's input source connected to this system, changes the system's function to "DVD" and then switches the TV's input source you to turn on ...57734; repeatedly to VIDEO 8 COMPONENT 1 COMPONENT 2 COMPONENT 3 COMPONENT 4 The selected TV's input source is stopped. Press 0 1 to 8 9 CLEAR TV's input source No input source (Default) VIDEO 1 to select "QUICK," then press ENTER . The Control Menu appears on the system for the first time or after performing...
... when you turn on your Sony TV and this system. Preparing to use the THEATRE SYNC function Register the TV's input source connected to this system, changes the system's function to "DVD" and then switches the TV's input source you to turn on ...57734; repeatedly to VIDEO 8 COMPONENT 1 COMPONENT 2 COMPONENT 3 COMPONENT 4 The selected TV's input source is stopped. Press 0 1 to 8 9 CLEAR TV's input source No input source (Default) VIDEO 1 to select "QUICK," then press ENTER . The Control Menu appears on the system for the first time or after performing...
Operating Manual
Page 22
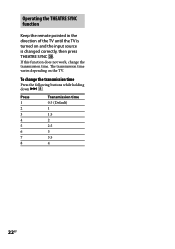
The transmission time varies depending on and the input source is turned on the TV. If this function does not work, change the transmission time Press the following buttons while holding down . Operating the THEATRE SYNC function Keep the remote pointed in the direction of the TV until the TV is changed correctly, then press THEATRE SYNC . Press 1 2 3 4 5 6 7 8 Transmission time 0.5 (Default) 1 1.5 2 2.5 3 3.5 4 22GB To change the transmission time.
The transmission time varies depending on and the input source is turned on the TV. If this function does not work, change the transmission time Press the following buttons while holding down . Operating the THEATRE SYNC function Keep the remote pointed in the direction of the TV until the TV is changed correctly, then press THEATRE SYNC . Press 1 2 3 4 5 6 7 8 Transmission time 0.5 (Default) 1 1.5 2 2.5 3 3.5 4 22GB To change the transmission time.
Operating Manual
Page 32
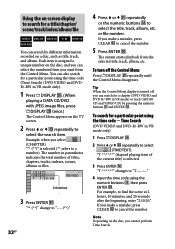
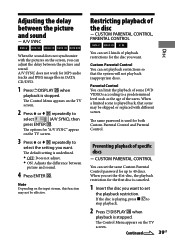
... the numeric buttons , then press ENTER . "T **:**:**" (elapsed playing time of titles, chapters, tracks, indexes, scenes, albums or files. The system starts playback from the Control Menu. "T **:**:**" changes to "T--:--:--." 4 Input the time code using the time code Time Search (DVD VIDEO and DVD-R/-RW in VR mode only) 1 Press DISPLAY...
... the numeric buttons , then press ENTER . "T **:**:**" (elapsed playing time of titles, chapters, tracks, indexes, scenes, albums or files. The system starts playback from the Control Menu. "T **:**:**" changes to "T--:--:--." 4 Input the time code using the time code Time Search (DVD VIDEO and DVD-R/-RW in VR mode only) 1 Press DISPLAY...
Operating Manual
Page 39
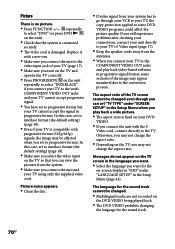
... playback. 2 Press DISPLAY when playback is canceled. 1 Insert the disc you want to 40 discs. The Control Menu appears on the input stream, this function may be effective. Preventing playback of specific discs CUSTOM PARENTAL CONTROL You can set playback restrictions so that scene may not... select the setting you want . The options for the disc you set the playback restriction. The default setting is played back, that the system will not play back inappropriate discs. When you want . A/V SYNC does not work for MP3 audio tracks and JPEG image files in DATA...
... playback. 2 Press DISPLAY when playback is canceled. 1 Insert the disc you want to 40 discs. The Control Menu appears on the input stream, this function may be effective. Preventing playback of specific discs CUSTOM PARENTAL CONTROL You can set playback restrictions so that scene may not... select the setting you want . The options for the disc you set the playback restriction. The default setting is played back, that the system will not play back inappropriate discs. When you want . A/V SYNC does not work for MP3 audio tracks and JPEG image files in DATA...

Operating Manual
Page 64
... optional component (portable audio player, etc.). COMPONENT VIDEO OUT jacks Connect the component video input jacks of an optional digital component (such as amplifier). You can enjoy higher quality video images when you can connect optional components. Note Sound is output only when the system function...enjoy 5.1 channel sound, if the connected amplifier equipped with each component. You can enjoy higher quality video images. S VIDEO OUT/VIDEO OUT jacks Connect the S Video/video input jack of the TV. If your system, you select the S VIDEO. DIGITAL OUT jack ...
... optional component (portable audio player, etc.). COMPONENT VIDEO OUT jacks Connect the component video input jacks of an optional digital component (such as amplifier). You can enjoy higher quality video images when you can connect optional components. Note Sound is output only when the system function...enjoy 5.1 channel sound, if the connected amplifier equipped with each component. You can enjoy higher quality video images. S VIDEO OUT/VIDEO OUT jacks Connect the S Video/video input jack of the TV. If your system, you select the S VIDEO. DIGITAL OUT jack ...
Operating Manual
Page 70
...and operate the TV correctly. Press PROGRESSIVE on the unit repeatedly to select "INTERLACE" if you select the video input on the TV so that the system is connected securely. The video cord is damaged. The aspect ratio of the TV screen cannot be changed even though you... format. In this case, set to interlace format (the default setting) (page 18). Make sure you connect your TV to the unit's COMPONENT VIDEO OUT jacks and your TV cannot accept progressive signal. You have set to progressive format but your TV cannot accept the signal in...
...and operate the TV correctly. Press PROGRESSIVE on the unit repeatedly to select "INTERLACE" if you select the video input on the TV so that the system is connected securely. The video cord is damaged. The aspect ratio of the TV screen cannot be changed even though you... format. In this case, set to interlace format (the default setting) (page 18). Make sure you connect your TV to the unit's COMPONENT VIDEO OUT jacks and your TV cannot accept progressive signal. You have set to progressive format but your TV cannot accept the signal in...
Operating Manual
Page 76
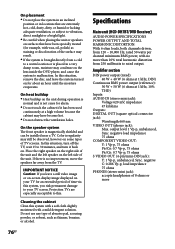
...thinner, benzine, or alcohol. 76GB Specifications Main unit (HCD-DH7BT/DVD Receiver) AUDIO POWER SPECIFICATIONS POWER OUTPUT AND TOTAL HARMONIC DISTORTION: With 6 ohm loads, both channels driven, from 250 milliwatts to rated output. negative load impedance 75 ohms COMPONENT VIDEO OUT: Y: 1 Vp-p, 75 ohms Pb/Cb: ...continuously at 1 kHz, 10% THD) Inputs: AUDIO IN (stereo mini jack): Voltage 620 mV, impedance 47 kilohms Outputs: DIGITAL OUT (square optical connector jack): Wavelength 660 nm VIDEO OUT (phono jack): Max. Cleaning the cabinet Clean this system, you leave a still video image or...
...thinner, benzine, or alcohol. 76GB Specifications Main unit (HCD-DH7BT/DVD Receiver) AUDIO POWER SPECIFICATIONS POWER OUTPUT AND TOTAL HARMONIC DISTORTION: With 6 ohm loads, both channels driven, from 250 milliwatts to rated output. negative load impedance 75 ohms COMPONENT VIDEO OUT: Y: 1 Vp-p, 75 ohms Pb/Cb: ...continuously at 1 kHz, 10% THD) Inputs: AUDIO IN (stereo mini jack): Voltage 620 mV, impedance 47 kilohms Outputs: DIGITAL OUT (square optical connector jack): Wavelength 660 nm VIDEO OUT (phono jack): Max. Cleaning the cabinet Clean this system, you leave a still video image or...
Operating Manual
Page 80
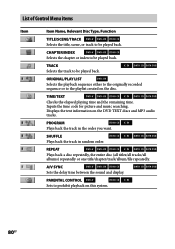
.... List of Control Menu items Item Item Name, Relevant Disc Type, Function TITLE/SCENE/TRACK Selects the title, scene, or track to be played back. Inputs the time code for picture and music searching. TRACK Selects the track to be played back. SHUFFLE Plays back the track in the order you... playing time and the remaining time. PARENTAL CONTROL Sets to be played back. CHAPTER/INDEX Selects the chapter or index to prohibit playback on this system. 80GB
.... List of Control Menu items Item Item Name, Relevant Disc Type, Function TITLE/SCENE/TRACK Selects the title, scene, or track to be played back. Inputs the time code for picture and music searching. TRACK Selects the track to be played back. SHUFFLE Plays back the track in the order you... playing time and the remaining time. PARENTAL CONTROL Sets to be played back. CHAPTER/INDEX Selects the chapter or index to prohibit playback on this system. 80GB
Marketing Specifications
Page 2
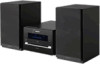
...the Dealer Network for fast and easy identification and location of Sony. Bass Reflex Speaker Design Hear crisp, deep bass through a ...System: 2 Way Bass Reflex Type Speaker Dimensions: 1.6" (4cm) Tweeter Woofer(s): 5.9" (15cm) Inputs and Outputs Analog Audio Input(s): 1 (Rear, Stereo Mini) Headphone Input(s): 1 (Front, Stereo Mini) Optical Audio Output(s): 1 (Rear) Antenna Terminal(s): 2 (Rear) S-Video Output(s): 1 (Rear) Component...analog amplification. Antenna placement restrictions apply. 3. CMT-DH7BT DVD/SAT/BT Micro System Features DVD Playback4 The CMT-HX7BT is a DVD player as well ...
...the Dealer Network for fast and easy identification and location of Sony. Bass Reflex Speaker Design Hear crisp, deep bass through a ...System: 2 Way Bass Reflex Type Speaker Dimensions: 1.6" (4cm) Tweeter Woofer(s): 5.9" (15cm) Inputs and Outputs Analog Audio Input(s): 1 (Rear, Stereo Mini) Headphone Input(s): 1 (Front, Stereo Mini) Optical Audio Output(s): 1 (Rear) Antenna Terminal(s): 2 (Rear) S-Video Output(s): 1 (Rear) Component...analog amplification. Antenna placement restrictions apply. 3. CMT-DH7BT DVD/SAT/BT Micro System Features DVD Playback4 The CMT-HX7BT is a DVD player as well ...


