Specifications
Page 2
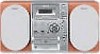
...ohms General • Power Requirements: AC120V, 60Hz Accessories Supplied Accessories • Instruction Manual • Remote Commander® Remote Control RM-S171 • Batteries: AA x 2 • AM Loop Antenna • FM...Sony. Weight: 5.5 lbs. ©2002 Sony Electronics Inc. The second method of Digital Theater Systems, Inc. dts is a registered trademark of storing preset stations involves manual searching. All rights reserved. All other trademarks and logos are trademarks of time. Weight: 12.3 lbs. • Front Speaker: Approx. Product Information CMT-CP101 Micro System...
...ohms General • Power Requirements: AC120V, 60Hz Accessories Supplied Accessories • Instruction Manual • Remote Commander® Remote Control RM-S171 • Batteries: AA x 2 • AM Loop Antenna • FM...Sony. Weight: 5.5 lbs. ©2002 Sony Electronics Inc. The second method of Digital Theater Systems, Inc. dts is a registered trademark of storing preset stations involves manual searching. All rights reserved. All other trademarks and logos are trademarks of time. Weight: 12.3 lbs. • Front Speaker: Approx. Product Information CMT-CP101 Micro System...
Primary User Manual
Page 3
...Display Using the display 16 Other Features Falling asleep to a tape -- Sleep Timer 16 Waking up the system 6 Inserting two size-AA (R6) batteries into the remote control 7 Setting the clock 7 CD Loading the CD 8 Playing the CD -- Table of Contents List...Data System (RDS)* .... 11 Tape Loading a tape 12 Playing a tape 12 Recording to music - Normal Play/Shuffle Play/Repeat Play .... 8 Programming the CD tracks -- Daily Timer 16 Optional Components Hooking up optional components ........ 18 Listening to audio from a connected component 18 Recording on a connected component ...
...Display Using the display 16 Other Features Falling asleep to a tape -- Sleep Timer 16 Waking up the system 6 Inserting two size-AA (R6) batteries into the remote control 7 Setting the clock 7 CD Loading the CD 8 Playing the CD -- Table of Contents List...Data System (RDS)* .... 11 Tape Loading a tape 12 Playing a tape 12 Recording to music - Normal Play/Shuffle Play/Repeat Play .... 8 Programming the CD tracks -- Daily Timer 16 Optional Components Hooking up optional components ........ 18 Listening to audio from a connected component 18 Recording on a connected component ...
Primary User Manual
Page 4
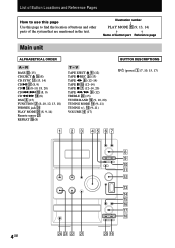
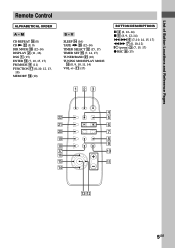
..., 14) R R Name of the system that are mentioned in the text. R BASS wd (15) CD EJECT Z qg (8) CD SYNC qa (13, 14) CD u qj (8, 9) CD x qh (8-10, 18, 20) CD ./> qk (8, 9) CD m/M qk (8) DSG 3 (15) FUNCTION 2 (8-10, 12, 13, 18) PHONES jack wf PLAY MODE w; (8, 9, 14) Remote sensor wa REPEAT ql (8) T - ql...
..., 14) R R Name of the system that are mentioned in the text. R BASS wd (15) CD EJECT Z qg (8) CD SYNC qa (13, 14) CD u qj (8, 9) CD x qh (8-10, 18, 20) CD ./> qk (8, 9) CD m/M qk (8) DSG 3 (15) FUNCTION 2 (8-10, 12, 13, 18) PHONES jack wf PLAY MODE w; (8, 9, 14) Remote sensor wa REPEAT ql (8) T - ql...
Primary User Manual
Page 5
..., 17) TIMER SET qg (7, 14, 17) TUNER/BAND wa (10) TUNING MODE/PLAY MODE q; (8, 9, 10, 11, 14) VOL +/- List of Button Locations and Reference Pages Remote Control ALPHABETICAL ORDER A - M CD REPEAT qk (8) CD N ws (8, 9) DIR MODE ql (12-14) DISPLAY 2 (11, 16) DSG 1 (15) ENTER qd (7, 10, 15, 17) FM MODE...
..., 17) TIMER SET qg (7, 14, 17) TUNER/BAND wa (10) TUNING MODE/PLAY MODE q; (8, 9, 10, 11, 14) VOL +/- List of Button Locations and Reference Pages Remote Control ALPHABETICAL ORDER A - M CD REPEAT qk (8) CD N ws (8, 9) DIR MODE ql (12-14) DISPLAY 2 (11, 16) DSG 1 (15) ENTER qd (7, 10, 15, 17) FM MODE...
Primary User Manual
Page 7
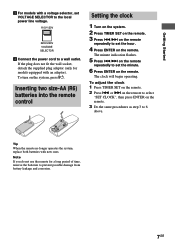
... voltage. 110V-120V 220V-240V VOLTAGE SELECTOR 4 Connect the power cord to set the hour. 4 Press ENTER on the remote. To adjust the clock 1 Press TIMER SET on the system, press @/1. If the plug does not fit the wall socket, detach the supplied plug adaptor (only for a long period... of time, remove the batteries to 6 above. Note If you do not use the remote for models equipped with new ones. Tip When the remote no longer operates the system, replace both batteries with an adaptor). Getting Started 3 For models with a voltage selector, set the minute. 6 ...
... voltage. 110V-120V 220V-240V VOLTAGE SELECTOR 4 Connect the power cord to set the hour. 4 Press ENTER on the remote. To adjust the clock 1 Press TIMER SET on the system, press @/1. If the plug does not fit the wall socket, detach the supplied plug adaptor (only for a long period... of time, remove the batteries to 6 above. Note If you do not use the remote for models equipped with new ones. Tip When the remote no longer operates the system, replace both batteries with an adaptor). Getting Started 3 For models with a voltage selector, set the minute. 6 ...
Primary User Manual
Page 8
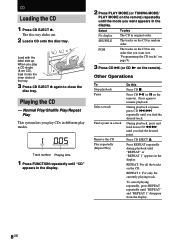
... "Programming the CD tracks" on page 9). 3 Press CD u (or CD N on the remote) repeatedly until you play The CD in random order. Playing the CD -- Normal Play/Shuffle Play/Repeat Play This system lets you play CDs in different play modes. 1 005 Track number Playing time 1 Press FUNCTION .... During playback, press and hold down CD m/M until "REPEAT" and "REPEAT 1" disappear from the display. 8GB REPEAT: For all the tracks on the remote). a CD single (8 cm CD), load it onto the inner circle of the tray. 3 Press CD EJECT Z again to resume playback. The tracks on...
... "Programming the CD tracks" on page 9). 3 Press CD u (or CD N on the remote) repeatedly until you play The CD in random order. Playing the CD -- Normal Play/Shuffle Play/Repeat Play This system lets you play CDs in different play modes. 1 005 Track number Playing time 1 Press FUNCTION .... During playback, press and hold down CD m/M until "REPEAT" and "REPEAT 1" disappear from the display. 8GB REPEAT: For all the tracks on the remote). a CD single (8 cm CD), load it onto the inner circle of the tray. 3 Press CD EJECT Z again to resume playback. The tracks on...
Primary User Manual
Page 9
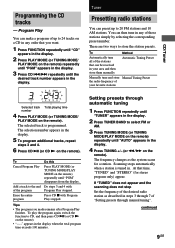
... PGM 3 243 Selected track Total playing time number 4 Press PLAY MODE (or TUNING MODE/ PLAY MODE on the remote). You can make a program of the desired radio station as the system scans for stereo program only) appear. If "TUNED" does not appear and the scanning does not stop Set the frequency... of up to select FM or AM. 3 Press TUNING MODE (or TUNING MODE/PLAY MODE on the remote) repeatedly until "AUTO" appears in...
... PGM 3 243 Selected track Total playing time number 4 Press PLAY MODE (or TUNING MODE/ PLAY MODE on the remote). You can make a program of the desired radio station as the system scans for stereo program only) appear. If "TUNED" does not appear and the scanning does not stop Set the frequency... of up to select FM or AM. 3 Press TUNING MODE (or TUNING MODE/PLAY MODE on the remote) repeatedly until "AUTO" appears in...

Primary User Manual
Page 10
... TUNED MHz Preset number Frequency 6 Press ./> on the remote repeatedly to select the preset number that you want. 7 Press ENTER on the remote. Setting presets through 7 to tune in any AM station first, then turn off the system. preset number To change the Start over from the display.... 4 Press TUNING +/- (or m/M on the remote) repeatedly to preset other stations. The station is stored to preset other stations. Other ...
... TUNED MHz Preset number Frequency 6 Press ./> on the remote repeatedly to select the preset number that you want. 7 Press ENTER on the remote. Setting presets through 7 to tune in any AM station first, then turn off the system. preset number To change the Start over from the display.... 4 Press TUNING +/- (or m/M on the remote) repeatedly to preset other stations. The station is stored to preset other stations. Other ...
Primary User Manual
Page 11
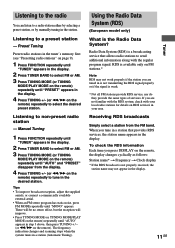
...: Station name* t Frequency t Clock display * If the RDS broadcast is available only on the remote) repeatedly until "MONO" appears. When you are not familiar with the RDS system, check with the regular program signal. Manual Tuning 1 Press FUNCTION repeatedly until "TUNER" appears in ...preset station - Listening to non-preset radio station - The frequency indication changes and scanning stops when the system tunes in the display. 4 Press TUNING +/- (or m/M on the remote) repeatedly until "AUTO" appears in the desired station. RDS is not properly received, the station name ...
...: Station name* t Frequency t Clock display * If the RDS broadcast is available only on the remote) repeatedly until "MONO" appears. When you are not familiar with the RDS system, check with the regular program signal. Manual Tuning 1 Press FUNCTION repeatedly until "TUNER" appears in ...preset station - Listening to non-preset radio station - The frequency indication changes and scanning stops when the system tunes in the display. 4 Press TUNING +/- (or m/M on the remote) repeatedly until "AUTO" appears in the desired station. RDS is not properly received, the station name ...
Primary User Manual
Page 12
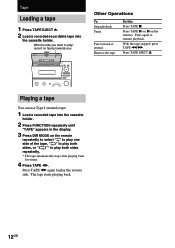
... the side you Other Operations To Stop playback Pause Fast-forward or rewind Remove the tape Do this Press TAPE x. Press TAPE X (or X on the remote repeatedly to select " " to play one side of the tape, " " to play the reverse side. Press TAPE EJECT Z. Press TAPE Y again to play both sides... 1 Press TAPE EJECT Z. 2 Load a recorded/recordable tape into the cassette holder. 2 Press FUNCTION repeatedly until "TAPE" appears in the display. 3 Press DIR MODE on the remote).
... the side you Other Operations To Stop playback Pause Fast-forward or rewind Remove the tape Do this Press TAPE x. Press TAPE X (or X on the remote repeatedly to select " " to play one side of the tape, " " to play the reverse side. Press TAPE EJECT Z. Press TAPE Y again to play both sides... 1 Press TAPE EJECT Z. 2 Load a recorded/recordable tape into the cassette holder. 2 Press FUNCTION repeatedly until "TAPE" appears in the display. 3 Press DIR MODE on the remote).
Primary User Manual
Page 13
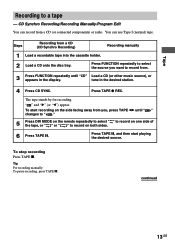
Tape Recording to record from a CD (or connected components) or radio. Press FUNCTION repeatedly to select the source you , press TAPE Y until "CD" Load a CD (or other music source), or appears in the desired ... TAPE X, and then start recording on both sides. 6 Press TAPE X. You can record from . 3 Press FUNCTION repeatedly until " " changes to " ." 5 Press DIR MODE on the remote repeatedly to select " " to record on one side of the tape, or " " or " " to record on the side facing away from a CD (CD Synchro Recording...
Tape Recording to record from a CD (or connected components) or radio. Press FUNCTION repeatedly to select the source you , press TAPE Y until "CD" Load a CD (or other music source), or appears in the desired ... TAPE X, and then start recording on both sides. 6 Press TAPE X. You can record from . 3 Press FUNCTION repeatedly until " " changes to " ." 5 Press DIR MODE on the remote repeatedly to select " " to record on one side of the tape, or " " or " " to record on the side facing away from a CD (CD Synchro Recording...
Primary User Manual
Page 14
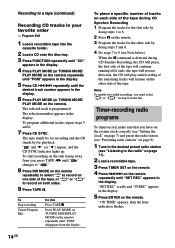
... station (see Note below). Note To enable two-sided recording, you have set the system clock correctly (see "Setting the clock" on page 7) and preset the radio station (see "Presetting radio stations" on the remote). To start recording on the side facing away from the display. Recording to 6. 2... Press X on the other side by for the other side of the remaining tracks will resume on the remote. 3 Program the tracks for playback. To Stop recording Cancel Program Edit Do this Press TAPE x. " " and "B" (or "b") appear, and the ...
... station (see Note below). Note To enable two-sided recording, you have set the system clock correctly (see "Setting the clock" on page 7) and preset the radio station (see "Presetting radio stations" on the remote). To start recording on the side facing away from the display. Recording to 6. 2... Press X on the other side by for the other side of the remaining tracks will resume on the remote. 3 Program the tracks for playback. To Stop recording Cancel Program Edit Do this Press TAPE x. " " and "B" (or "b") appear, and the ...
Primary User Manual
Page 15
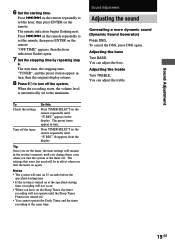
... starting time. • If the system is turned on at the specified starting time. To cancel the DSG, press DSG again. Adjusting the bass Turn BASS. You can adjust the bass. You can adjust the treble. To Check the settings Turn off . Press ./> on the remote repeatedly to set the hour, then...; When you have set the Sleep Timer, the timer recording will remain in the system's memory until you change them, even when you turn the system or the timer off the timer Do this Press TIMER SELECT on the remote repeatedly until "c REC" appears in turn. Tip Once you set the timer, the...
... starting time. • If the system is turned on at the specified starting time. To cancel the DSG, press DSG again. Adjusting the bass Turn BASS. You can adjust the bass. You can adjust the treble. To Check the settings Turn off . Press ./> on the remote repeatedly to set the hour, then...; When you have set the Sleep Timer, the timer recording will remain in the system's memory until you change them, even when you turn the system or the timer off the timer Do this Press TIMER SELECT on the remote repeatedly until "c REC" appears in turn. Tip Once you set the timer, the...
Primary User Manual
Page 16
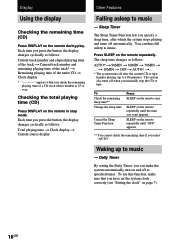
...sleep time, after the current CD or tape finishes playing (up to music. t 10MIN t OFF t AUTO* t ... * The system turns off at specified times. SLEEP on the remote repeatedly until "OFF" appears. ** You cannot check the remaining time if you can thus fall asleep to music - Daily Timer By... Daily Timer, you select "AUTO". Display Using the display Checking the remaining time (CD) Press DISPLAY on the remote repeatedly. To use this function, make the system automatically turn on page 7). 16GB To Check the remaining sleep time** Change the sleep time Cancel the Sleep Timer ...
...sleep time, after the current CD or tape finishes playing (up to music. t 10MIN t OFF t AUTO* t ... * The system turns off at specified times. SLEEP on the remote repeatedly until "OFF" appears. ** You cannot check the remaining time if you can thus fall asleep to music - Daily Timer By... Daily Timer, you select "AUTO". Display Using the display Checking the remaining time (CD) Press DISPLAY on the remote repeatedly. To use this function, make the system automatically turn on page 7). 16GB To Check the remaining sleep time** Change the sleep time Cancel the Sleep Timer ...
Primary User Manual
Page 17
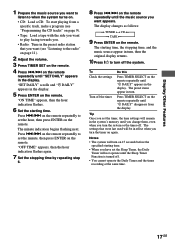
...time. • When you want (see "Programming the CD tracks" on the remote repeatedly until "c DAILY" disappears from the display. Press TIMER SELECT on the remote. Notes • The system will turn the system or the timer off. Display/Other Features 1 Prepare the music source you have ... to the radio" on page 11). 2 Adjust the volume. 3 Press TIMER SET on the remote. 4 Press ./> on the remote repeatedly until you change them, even when you want to listen to when the system turns on the remote. The display changes as follows: t TUNER y CD T t TAPE T 9 Press ENTER on...
...time. • When you want (see "Programming the CD tracks" on the remote repeatedly until "c DAILY" disappears from the display. Press TIMER SELECT on the remote. Notes • The system will turn the system or the timer off. Display/Other Features 1 Prepare the music source you have ... to the radio" on page 11). 2 Adjust the volume. 3 Press TIMER SET on the remote. 4 Press ./> on the remote repeatedly until you change them, even when you want to listen to when the system turns on the remote. The display changes as follows: t TUNER y CD T t TAPE T 9 Press ENTER on...
Primary User Manual
Page 19
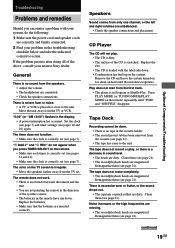
.... Demagnetize them (see pages 14 and 16) again. Optional Components/Troubleshooting Troubleshooting Problems and remedies Should you press TIMER SELECT on the remote. • Make sure each timer is correctly set (see pages...clock (see page 7) and timer settings (see page 21). Remove the CD and leave the system turned on for about an hour until "PGM" and "SHUFFLE" disappear. There is no tape...occurred. There is severe hum or noise. • A TV or VCR is loaded with your nearest Sony dealer. Move the unit away from only one channel, or the left and right volumes are dirty. "0:...
.... Demagnetize them (see pages 14 and 16) again. Optional Components/Troubleshooting Troubleshooting Problems and remedies Should you press TIMER SELECT on the remote. • Make sure each timer is correctly set (see pages...clock (see page 7) and timer settings (see page 21). Remove the CD and leave the system turned on for about an hour until "PGM" and "SHUFFLE" disappear. There is no tape...occurred. There is severe hum or noise. • A TV or VCR is loaded with your nearest Sony dealer. Move the unit away from only one channel, or the left and right volumes are dirty. "0:...
Primary User Manual
Page 20
...8226; The signal strength is detached from the stand. • Keep the antennas as far away from the speaker cords as possible. Resetting the system With the system turned on the disc tray. Connect an external antenna. • Make sure that the antenna is no CD on , press TAPE x, CD ...x and TUNER BAND at the same time. PROTECT • Consult your nearest Sony dealer. 20GB All previous settings are cleared and must be received in stereo. • Press FM MODE on the remote until "STEREO" appears in the display during operations. A stereo FM program cannot be set again...
...8226; The signal strength is detached from the stand. • Keep the antennas as far away from the speaker cords as possible. Resetting the system With the system turned on the disc tray. Connect an external antenna. • Make sure that the antenna is no CD on , press TAPE x, CD ...x and TUNER BAND at the same time. PROTECT • Consult your nearest Sony dealer. 20GB All previous settings are cleared and must be received in stereo. • Press FM MODE on the remote until "STEREO" appears in the display during operations. A stereo FM program cannot be set again...

Primary User Manual
Page 23
projecting parts and controls Mass Approx. 5.6 kg Supplied accessories Remote commander (1) AM loop antenna (1) FM wire antenna (1) Batteries (2) Design and specifications are subject to change without notice. 23GB Additional Information Speakers Speaker system Speaker units Rated impedance Dimensions (w/h/d) Mass Two-way, bass reflex system 11 cm dia., cone type woofer 2.5 cm dia., semi-dometype...
projecting parts and controls Mass Approx. 5.6 kg Supplied accessories Remote commander (1) AM loop antenna (1) FM wire antenna (1) Batteries (2) Design and specifications are subject to change without notice. 23GB Additional Information Speakers Speaker system Speaker units Rated impedance Dimensions (w/h/d) Mass Two-way, bass reflex system 11 cm dia., cone type woofer 2.5 cm dia., semi-dometype...


