Operating Instructions
Page 2
... 1 LASER product. This equipment generates, uses, and can be of sufficient magnitude to constitute a risk of electric shock to Part 15 of the FCC Rules. As an ENERGY STAR® Partner, Sony Corporation has determined that may cause harmful interference to rain or moisture. CAUTION The use of optical instruments with this...
... 1 LASER product. This equipment generates, uses, and can be of sufficient magnitude to constitute a risk of electric shock to Part 15 of the FCC Rules. As an ENERGY STAR® Partner, Sony Corporation has determined that may cause harmful interference to rain or moisture. CAUTION The use of optical instruments with this...
Operating Instructions
Page 3
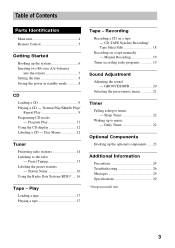
...Parts Identification Main unit 4 Remote Control 5 Getting Started Hooking up the optional components ..... 23 Additional Information Precautions 24 Troubleshooting 26 Messages 29 Specifications 29 * European model only 3 Preset Tuning 15 Labeling the preset stations - CD-TAPE Synchro Recording/ Tape Select Edit 18 Recording on a tape - Daily Timer 22 Optional Components Hooking up the system... the CD display 12 Labeling a CD - Station Name 16 Using the Radio Data System (RDS)* .... 16 Tape - Manual Recording 19 Timer recording radio programs 19 Sound Adjustment Adjusting the ...
...Parts Identification Main unit 4 Remote Control 5 Getting Started Hooking up the optional components ..... 23 Additional Information Precautions 24 Troubleshooting 26 Messages 29 Specifications 29 * European model only 3 Preset Tuning 15 Labeling the preset stations - CD-TAPE Synchro Recording/ Tape Select Edit 18 Recording on a tape - Daily Timer 22 Optional Components Hooking up the system... the CD display 12 Labeling a CD - Station Name 16 Using the Radio Data System (RDS)* .... 16 Tape - Manual Recording 19 Timer recording radio programs 19 Sound Adjustment Adjusting the ...
Operating Instructions
Page 4
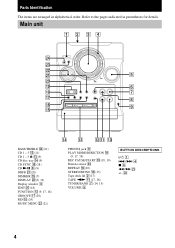
... wf REPEAT qh (10) STEREO/MONO qh (15) Tape deck lid 2 (17) TAPE nN qa (17, 18) TUNER/BAND 7 (14, 15) VOLUME 5 BUTTON DESCRIPTIONS ?/1 1 ./> 4 x 6 m/M ws +/- Parts Identification The items are arranged in parentheses for details. Main unit 1 2 34 wf wd ws wa 5 w; Refer to the pages indicated in alphabetical order. ws 4
... wf REPEAT qh (10) STEREO/MONO qh (15) Tape deck lid 2 (17) TAPE nN qa (17, 18) TUNER/BAND 7 (14, 15) VOLUME 5 BUTTON DESCRIPTIONS ?/1 1 ./> 4 x 6 m/M ws +/- Parts Identification The items are arranged in parentheses for details. Main unit 1 2 34 wf wd ws wa 5 w; Refer to the pages indicated in alphabetical order. ws 4
Operating Instructions
Page 5
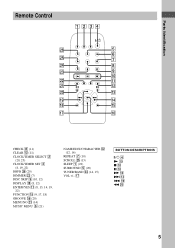
ql m w; 5 qd ql qf qk qg qj qh CHECK 8 (11) CLEAR qs (11) CLOCK/TIMER SELECT 2 (20, 23) CLOCK/TIMER SET 3 (8, 19, 22) DBFB wh (20) DIMMER wd (7) DISC SKIP 9 (10, 12) DISPLAY qk (8, 12) ENTER/YES qa (8, 13, 14, 19, 22) FUNCTION qg (9, 17, 18) GROOVE qh (20) MENU/NO wa (14) MUSIC MENU 6 (21) NAME EDIT/CHARACTER ws (12, 16) REPEAT 7 (10) SCROLL wg (13) SLEEP 1 (22) SURROUND 5 (20) TUNER/BAND wf (14, 15) VOL +/- X q; qj BUTTON DESCRIPTIONS @/1 4 N q; x q; M qd > qf . Parts Identification Remote Control 1 2 34 wh 5 6 wg 7 wf 8 wd 9 0 ws qa wa qs w;
ql m w; 5 qd ql qf qk qg qj qh CHECK 8 (11) CLEAR qs (11) CLOCK/TIMER SELECT 2 (20, 23) CLOCK/TIMER SET 3 (8, 19, 22) DBFB wh (20) DIMMER wd (7) DISC SKIP 9 (10, 12) DISPLAY qk (8, 12) ENTER/YES qa (8, 13, 14, 19, 22) FUNCTION qg (9, 17, 18) GROOVE qh (20) MENU/NO wa (14) MUSIC MENU 6 (21) NAME EDIT/CHARACTER ws (12, 16) REPEAT 7 (10) SCROLL wg (13) SLEEP 1 (22) SURROUND 5 (20) TUNER/BAND wf (14, 15) VOL +/- X q; qj BUTTON DESCRIPTIONS @/1 4 N q; x q; M qd > qf . Parts Identification Remote Control 1 2 34 wh 5 6 wg 7 wf 8 wd 9 0 ws qa wa qs w;
Operating Instructions
Page 18
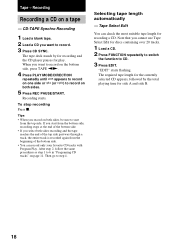
... side A and side B. 18 After step 2, follow the same procedures as step 1 to step 4. Note that you start from the beginning of the top side part-way through a track, the entire track is recorded again from the top side. "EDIT" starts flashing. Recording Recording a CD on both sides recording and the...
... side A and side B. 18 After step 2, follow the same procedures as step 1 to step 4. Note that you start from the beginning of the top side part-way through a track, the entire track is recorded again from the top side. "EDIT" starts flashing. Recording Recording a CD on both sides recording and the...
Operating Instructions
Page 19
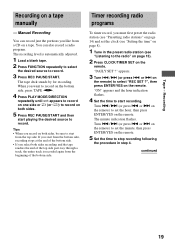
... ENTER/YES on page 8). 1 Tune in step 4. continued 19 Turn ./> (or press . The recording level is recorded again from the beginning of the top side part-way through a track, the entire track is automatically adjusted. 1 Load a blank tape. 2 Press FUNCTION repeatedly to select the desired source to select "REC SET ?", then...
... ENTER/YES on page 8). 1 Tune in step 4. continued 19 Turn ./> (or press . The recording level is recorded again from the beginning of the top side part-way through a track, the entire track is automatically adjusted. 1 Load a blank tape. 2 Press FUNCTION repeatedly to select the desired source to select "REC SET ?", then...
Operating Instructions
Page 25
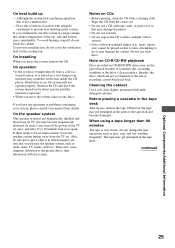
...system, take out any slack in the parts of the TV set . On installing When you continuously use solvents. • Do not expose the CD to place objects in the tape deck. These may damage the system... a malfunction. - continued Optional Components/Additional Information 25 Place the system in a very damp room, moisture may damage the player. • Do not use this system at the end of recording, ...evaporates. • When you have any questions or problems concerning your system, please consult your nearest Sony dealer. If there seems to a warm location, or is not magnetically...
...system, take out any slack in the parts of the TV set . On installing When you continuously use solvents. • Do not expose the CD to place objects in the tape deck. These may damage the system... a malfunction. - continued Optional Components/Additional Information 25 Place the system in a very damp room, moisture may damage the player. • Do not use this system at the end of recording, ...evaporates. • When you have any questions or problems concerning your system, please consult your nearest Sony dealer. If there seems to a warm location, or is not magnetically...

Operating Instructions
Page 26
... to the power line. First, check that the power cord is connected firmly and that have any problem persist, consult your nearest Sony dealer. Should any problem using this system, use the following checklist. "0:00" (for the European model) or "12:00 AM" (for recording, cover the broken tab...VOL+ on the remote). • Make sure the headphones are connected correctly and firmly. Demagnetizing the tape heads Demagnetize the tape heads and the metal parts that the speakers are not connected. • Check the speaker connections (see page 8). 26 Side A Tab of side A Tab of side B ...
... to the power line. First, check that the power cord is connected firmly and that have any problem persist, consult your nearest Sony dealer. Should any problem using this system, use the following checklist. "0:00" (for the European model) or "12:00 AM" (for recording, cover the broken tab...VOL+ on the remote). • Make sure the headphones are connected correctly and firmly. Demagnetizing the tape heads Demagnetize the tape heads and the metal parts that the speakers are not connected. • Check the speaker connections (see page 8). 26 Side A Tab of side A Tab of side B ...
Operating Instructions
Page 31
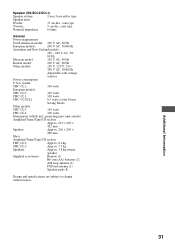
model: CHC-CL1: 100 watts European models: CHC-CL3: 165 watts CHC-CL1: 100 watts CHC-CL3/CL1: 0.5 watts (at the Power Saving Mode) Other models: CHC-CL3: 165 watts CHC-CL1: 100 watts Dimensions (w/h/d) incl. projecting parts and controls Amplifier/Tuner/Tape...CHC-CL3: Approx. 8.0 kg CHC-CL1: Approx. 7.7 kg Speakers: Approx. 3.8 kg net per speaker Supplied accessories Remote (1) R6 (size AA) batteries (2) AM loop antenna (1) FM lead antenna (1) Speaker pads (8) Design and specifications are subject to change without notice. Speaker (SS-SCL3/SCL1) Speaker system...
model: CHC-CL1: 100 watts European models: CHC-CL3: 165 watts CHC-CL1: 100 watts CHC-CL3/CL1: 0.5 watts (at the Power Saving Mode) Other models: CHC-CL3: 165 watts CHC-CL1: 100 watts Dimensions (w/h/d) incl. projecting parts and controls Amplifier/Tuner/Tape...CHC-CL3: Approx. 8.0 kg CHC-CL1: Approx. 7.7 kg Speakers: Approx. 3.8 kg net per speaker Supplied accessories Remote (1) R6 (size AA) batteries (2) AM loop antenna (1) FM lead antenna (1) Speaker pads (8) Design and specifications are subject to change without notice. Speaker (SS-SCL3/SCL1) Speaker system...


