Operating Instructions
Page 2
Be sure to install this unit in the dashboard of the following measures: - For installation and connections, see your authority to operate this product will control a Sony HD RadioTM tuner (sold separately). However, there is no guarantee that interference will control a satellite radio tuner module (sold separately). If this product will not occur in accordance with the instructions, may apply, See www.dtsc.ca...
Be sure to install this unit in the dashboard of the following measures: - For installation and connections, see your authority to operate this product will control a Sony HD RadioTM tuner (sold separately). However, there is no guarantee that interference will control a satellite radio tuner module (sold separately). If this product will not occur in accordance with the instructions, may apply, See www.dtsc.ca...
Operating Instructions
Page 4
... play 17 Operating an iPod directly - ZAPPIN 12 Radio Storing and receiving stations 12 Storing automatically - EQ3 18 Adjusting setup items - SET 18 Using optional equipment 19 Auxiliary audio equipment 19 Additional Information Precautions 20 Notes on this unit 6 Resetting the unit 6 Canceling the DEMO mode 6 Preparing the card remote commander 6 Setting the clock 6 Detaching the front panel 7 Attaching the front panel 7 Location of MP3/WMA/AAC files 20 About iPod 20 Maintenance 21 Removing the unit 22 Specifications 22 Troubleshooting 23 Error displays...
... play 17 Operating an iPod directly - ZAPPIN 12 Radio Storing and receiving stations 12 Storing automatically - EQ3 18 Adjusting setup items - SET 18 Using optional equipment 19 Auxiliary audio equipment 19 Additional Information Precautions 20 Notes on this unit 6 Resetting the unit 6 Canceling the DEMO mode 6 Preparing the card remote commander 6 Setting the clock 6 Detaching the front panel 7 Attaching the front panel 7 Location of MP3/WMA/AAC files 20 About iPod 20 Maintenance 21 Removing the unit 22 Specifications 22 Troubleshooting 23 Error displays...
Operating Instructions
Page 5
Support site If you have any questions or for the latest support information on this product, please visit the web site below: http://esupport.sony.com http://www.xplodsony.com/ Provides information on: • Models and manufacturers of compatible digital audio players • Supported MP3/WMA/AAC files 5
Support site If you have any questions or for the latest support information on this product, please visit the web site below: http://esupport.sony.com http://www.xplodsony.com/ Provides information on: • Models and manufacturers of compatible digital audio players • Supported MP3/WMA/AAC files 5
Operating Instructions
Page 6
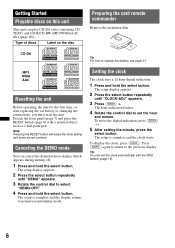
... pen. MP3 WMA AAC Resetting the unit Before operating the unit for the first time, or after replacing the car battery or changing the connections, you must reset the unit. To display the clock, press (DSPL). Detach the front panel (page 7) and press the RESET button (page 8) with the RDS feature (page 13). 6 The hour indication flashes. 4 Rotate the control dial to the previous display. The setup is complete and the clock starts. The setup display appears...
... pen. MP3 WMA AAC Resetting the unit Before operating the unit for the first time, or after replacing the car battery or changing the connections, you must reset the unit. To display the clock, press (DSPL). Detach the front panel (page 7) and press the RESET button (page 8) with the RDS feature (page 13). 6 The hour indication flashes. 4 Rotate the control dial to the previous display. The setup is complete and the clock starts. The setup display appears...
Operating Instructions
Page 8
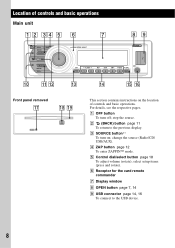
... the card remote commander G Display window H OPEN button page 7, 14 I USB connector page 14, 16 To connect to the previous display. A OFF button To turn on the location of controls and basic operations Main unit 1 2 34 5 6 7 OFF SEEK ZAP SOURCE 89 OPEN MODE SEEK q; E Control dial/select button page 18 To adjust volume (rotate); For details, see the respective pages. change the source (Radio/CD/ USB/AUX). B (BACK) button page 11 To return to the USB device. 8 qa qs...
... the card remote commander G Display window H OPEN button page 7, 14 I USB connector page 14, 16 To connect to the previous display. A OFF button To turn on the location of controls and basic operations Main unit 1 2 34 5 6 7 OFF SEEK ZAP SOURCE 89 OPEN MODE SEEK q; E Control dial/select button page 18 To adjust volume (rotate); For details, see the respective pages. change the source (Radio/CD/ USB/AUX). B (BACK) button page 11 To return to the USB device. 8 qa qs...
Operating Instructions
Page 9
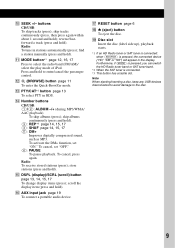
... pause playback. Radio: To tune in RDS. find a station manually (press and hold ). Radio: To receive stored stations (press); Note When ejecting/inserting a disc, keep any USB devices disconnected to avoid damage to select the radio band (FM/AM)/ select the play mode of iPod. O DSPL (display)/SCRL (scroll) button page 13, 14, 15, 17 To change display items (press); Q RESET button page 6 R Z (eject) button To eject the disc. buttons CD/USB: To skip tracks (press); N Number buttons CD/USB: (1)/(2): ALBUM -/+ (during MP3/WMA/ AAC playback) To...
... pause playback. Radio: To tune in RDS. find a station manually (press and hold ). Radio: To receive stored stations (press); Note When ejecting/inserting a disc, keep any USB devices disconnected to avoid damage to select the radio band (FM/AM)/ select the play mode of iPod. O DSPL (display)/SCRL (scroll) button page 13, 14, 15, 17 To change display items (press); Q RESET button page 6 R Z (eject) button To eject the disc. buttons CD/USB: To skip tracks (press); N Number buttons CD/USB: (1)/(2): ALBUM -/+ (during MP3/WMA/ AAC playback) To...

Operating Instructions
Page 10
... the display. C buttons To control radio/CD/USB, the same as the select button on the unit. stop the source. F ATT (attenuate) button To attenuate the sound. Press and hold ). *1 If an HD Radio tuner or SAT tuner is connected: when (SOURCE) is turned off ; K Number buttons To receive stored stations (press); store stations (press and hold to select the radio band (FM/AM)/ select the play mode of iPod. A OFF button To turn on; Setup, sound setting, etc., can be operated by M m. J SCRL (scroll) button To...
... the display. C buttons To control radio/CD/USB, the same as the select button on the unit. stop the source. F ATT (attenuate) button To attenuate the sound. Press and hold ). *1 If an HD Radio tuner or SAT tuner is connected: when (SOURCE) is turned off ; K Number buttons To receive stored stations (press); store stations (press and hold to select the radio band (FM/AM)/ select the play mode of iPod. A OFF button To turn on; Setup, sound setting, etc., can be operated by M m. J SCRL (scroll) button To...
Operating Instructions
Page 12
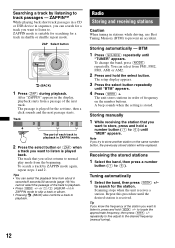
... press a number button ((1) to locate the approximate frequency, then press (SEEK) +/- Storing automatically - Track 1 2 3 4 ZAP The part of the station you want to listen to playback. repeatedly to fine adjust to prevent an accident. Radio Storing and receiving stations Caution When tuning in stations while driving, use Best Tuning Memory (BTM) to the desired frequency (manual tuning). 12 A beep sounds when the setting is stored. Searching a track by ZAPPIN mode again, repeat...
... press a number button ((1) to locate the approximate frequency, then press (SEEK) +/- Storing automatically - Track 1 2 3 4 ZAP The part of the station you want to listen to playback. repeatedly to fine adjust to prevent an accident. Radio Storing and receiving stations Caution When tuning in stations while driving, use Best Tuning Memory (BTM) to the desired frequency (manual tuning). 12 A beep sounds when the setting is stored. Searching a track by ZAPPIN mode again, repeat...
Operating Instructions
Page 13
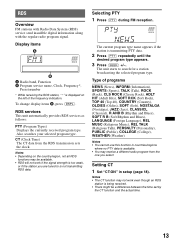
... station you select. RDS Overview FM stations with Radio Data System (RDS) service send inaudible digital information along with the regular radio program signal. Display items A Radio band, Function B Program service name, Clock, Frequency*, Preset number * While receiving the RDS station, " *" is transmitting PTY data. 2 Press (PTY) repeatedly until the desired program type appears. 3 Press (SEEK) +/-. To change display items B, press (DSPL). CT (Clock Time) The CT data from the one you are tuned...
... station you select. RDS Overview FM stations with Radio Data System (RDS) service send inaudible digital information along with the regular radio program signal. Display items A Radio band, Function B Program service name, Clock, Frequency*, Preset number * While receiving the RDS station, " *" is transmitting PTY data. 2 Press (PTY) repeatedly until the desired program type appears. 3 Press (SEEK) +/-. To change display items B, press (DSPL). CT (Clock Time) The CT data from the one you are tuned...
Operating Instructions
Page 14
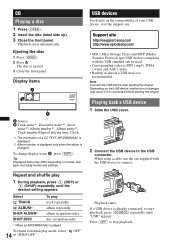
... Transfer Protocol) type USB devices compliant with the USB device to connect. album in random order. * When an MP3/WMA/AAC is changed. To return to start playback, press (SOURCE) repeatedly until the desired setting appears. Depending on model, disc type, recording format and settings. Display items USB devices For details on the compatibility of a CD TEXT, MP3/WMA/AAC is displayed. *2 Album number is displayed only when the album is played. disc in random order. Playback...
... Transfer Protocol) type USB devices compliant with the USB device to connect. album in random order. * When an MP3/WMA/AAC is changed. To return to start playback, press (SOURCE) repeatedly until the desired setting appears. Depending on model, disc type, recording format and settings. Display items USB devices For details on the compatibility of a CD TEXT, MP3/WMA/AAC is displayed. *2 Album number is displayed only when the album is played. disc in random order. Playback...
Operating Instructions
Page 15
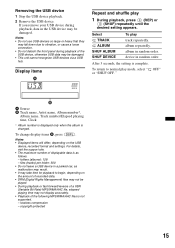
... is changed. For details, visit the support site. • The maximum number of the USB device, otherwise USB data may be played. • During playback or fast-forward/reverse of a VBR (Variable Bit Rate) MP3/WMA/AAC file, elapsed playing time may not display accurately. • Playback of the following MP3/WMA/AAC files is complete. copyright-protected 15 folders (albums): 128 - Removing the USB device 1 Stop the USB device playback. 2 Remove the USB device.
... is changed. For details, visit the support site. • The maximum number of the USB device, otherwise USB data may be played. • During playback or fast-forward/reverse of a VBR (Variable Bit Rate) MP3/WMA/AAC file, elapsed playing time may not display accurately. • Playback of the following MP3/WMA/AAC files is complete. copyright-protected 15 folders (albums): 128 - Removing the USB device 1 Stop the USB device playback. 2 Remove the USB device.
Operating Instructions
Page 16
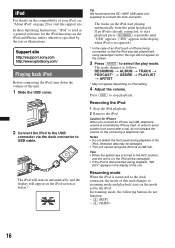
... detach the front panel during playback of this unit changes to the USB connector via USB, telephone volume is disconnected during a telephone call , do not function. - (3) (REP) - (4) (SHUF) 16 Support site http://esupport.sony.com http://www.xplodsony.com/ Playing back iPod Before connecting the iPod, turn on iPod setting. 4 Adjust the volume. The mode changes as below.* . > Tip We recommend the RC-100IP USB cable (not supplied) to select the play mode. In order to...
... detach the front panel during playback of this unit changes to the USB connector via USB, telephone volume is disconnected during a telephone call , do not function. - (3) (REP) - (4) (SHUF) 16 Support site http://esupport.sony.com http://www.xplodsony.com/ Playing back iPod Before connecting the iPod, turn on iPod setting. 4 Adjust the volume. The mode changes as below.* . > Tip We recommend the RC-100IP USB cable (not supplied) to select the play mode. In order to...
Operating Instructions
Page 17
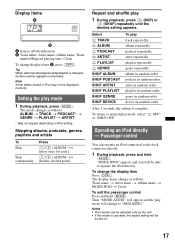
...] (1)/(2) (ALBUM -/+) [hold to the dock connector directly. 1 During playback, press and hold (MODE). Passenger control You can be adjusted only by the unit. • If this mode is canceled, the repeat setting will be displayed correctly. To change display items B, press (DSPL). podcast repeatedly. Notes • The volume can operate an iPod connected to desired point] Repeat and shuffle play mode, select " OFF" or "SHUF OFF." album in...
...] (1)/(2) (ALBUM -/+) [hold to the dock connector directly. 1 During playback, press and hold (MODE). Passenger control You can be adjusted only by the unit. • If this mode is canceled, the repeat setting will be displayed correctly. To change display items B, press (DSPL). podcast repeatedly. Notes • The volume can operate an iPod connected to desired point] Repeat and shuffle play mode, select " OFF" or "SHUF OFF." album in...

Operating Instructions
Page 18
... select button. The setting is complete and the display returns to normal reception/play mode. Adjusting setup items - Other functions Changing the sound settings Adjusting the sound characteristics 1 Press the select button repeatedly until the desired item appears. 2 Rotate the control dial to adjust the equalizer curve. "-8 dB." Repeat steps 3 and 4 to adjust the selected item. 3 Press (BACK). SUB*2 (Subwoofer volume) Adjusts the subwoofer volume. "0 dB" - The following items can be set (follow the page reference for each connected auxiliary...
... select button. The setting is complete and the display returns to normal reception/play mode. Adjusting setup items - Other functions Changing the sound settings Adjusting the sound characteristics 1 Press the select button repeatedly until the desired item appears. 2 Rotate the control dial to adjust the equalizer curve. "-8 dB." Repeat steps 3 and 4 to adjust the selected item. 3 Press (BACK). SUB*2 (Subwoofer volume) Adjusts the subwoofer volume. "0 dB" - The following items can be set (follow the page reference for each connected auxiliary...
Operating Instructions
Page 19
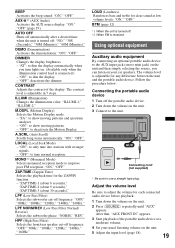
... clear sound at a moderate volume. 4 Set your car speakers. LOCAL (Local Seek Mode) - BEEP Activates the beep sound: "ON," "OFF." AUX-A*1 (AUX Audio) Activates the AUX source display: "ON," "OFF" (page 19). DIMMER Changes the display brightness. - "AT": to improve poor FM reception: "ON," "OFF." "OFF": deactivate the dimmer. M.DSPL (Motion Display) Selects the Motion Display mode. - "ON": to the unit. ZAP.TIME (Zappin Time) Selects the playback time for each connected audio device before playback. 1 Turn down the volume on the unit. 5 Adjust the input level...
... clear sound at a moderate volume. 4 Set your car speakers. LOCAL (Local Seek Mode) - BEEP Activates the beep sound: "ON," "OFF." AUX-A*1 (AUX Audio) Activates the AUX source display: "ON," "OFF" (page 19). DIMMER Changes the display brightness. - "AT": to improve poor FM reception: "ON," "OFF." "OFF": deactivate the dimmer. M.DSPL (Motion Display) Selects the Motion Display mode. - "ON": to the unit. ZAP.TIME (Zappin Time) Selects the playback time for each connected audio device before playback. 1 Turn down the volume on the unit. 5 Adjust the input level...
Operating Instructions
Page 20
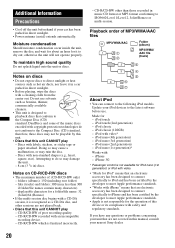
... MP3/WMA/AAC Folder (album) MP3/WMA/ AAC file (track) Notes on CD-R/CD-RW discs • The maximum number of poor recording quality. - If you have any questions or problems concerning your unit that this unit CANNOT play - Moisture condensation Should moisture condensation occur inside the unit, remove the disc and wait for about an hour for iPod" means that an electronic accessory has been designed to connect specifically...
... MP3/WMA/AAC Folder (album) MP3/WMA/ AAC file (track) Notes on CD-R/CD-RW discs • The maximum number of poor recording quality. - If you have any questions or problems concerning your unit that this unit CANNOT play - Moisture condensation Should moisture condensation occur inside the unit, remove the disc and wait for about an hour for iPod" means that an electronic accessory has been designed to connect specifically...

Operating Instructions
Page 22
.../rear) Subwoofer output terminal (mono) Power antenna (aerial) relay control terminal Power amplifier control terminal Inputs: BUS control input terminal BUS audio input terminal Remote controller input terminal Antenna (aerial) input terminal Telephone ATT control terminal Illumination control terminal AUX input jack (stereo mini jack) USB signal input connector Tone controls: Low: ±10 dB at 60 Hz (XPLOD) Mid: ±10 dB at 1 kHz (XPLOD) High: ±10 dB at 10 kHz (XPLOD) Power requirements: 12 V DC car battery (negative ground (earth)) Removing the unit 1 Remove the protection collar...
.../rear) Subwoofer output terminal (mono) Power antenna (aerial) relay control terminal Power amplifier control terminal Inputs: BUS control input terminal BUS audio input terminal Remote controller input terminal Antenna (aerial) input terminal Telephone ATT control terminal Illumination control terminal AUX input jack (stereo mini jack) USB signal input connector Tone controls: Low: ±10 dB at 60 Hz (XPLOD) Mid: ±10 dB at 1 kHz (XPLOD) High: ±10 dB at 10 kHz (XPLOD) Power requirements: 12 V DC car battery (negative ground (earth)) Removing the unit 1 Remove the protection collar...
Operating Instructions
Page 23
... 5 minutes with "DEMO-ON" set "DIMMER-ON" (page 19). • The display disappears if you may not handle some of the fader control "FAD" is set , demonstration mode starts. No sound. • The ATT function is activated, or the Telephone ATT function (when the interface cable of a car telephone is connected to change without notice. • Halogenated flame retardants are not used in the certain printed wiring boards. •...
... 5 minutes with "DEMO-ON" set "DIMMER-ON" (page 19). • The display disappears if you may not handle some of the fader control "FAD" is set , demonstration mode starts. No sound. • The ATT function is activated, or the Telephone ATT function (when the interface cable of a car telephone is connected to change without notice. • Halogenated flame retardants are not used in the certain printed wiring boards. •...
Operating Instructions
Page 24
.... A USB device does not work. This unit cannot recognize USB devices via a USB hub. The USB device takes longer to "OFF." The sound may not have a desirable effect. t If the auto antenna (aerial) will not eject. Preset tuning is not possible. • Setting of the car antenna (aerial). Automatic tuning is not possible. • Store the correct frequency in monaural. MP3/WMA/AAC files take a longer time to which data can be played back. a disc recorded...
.... A USB device does not work. This unit cannot recognize USB devices via a USB hub. The USB device takes longer to "OFF." The sound may not have a desirable effect. t If the auto antenna (aerial) will not eject. Preset tuning is not possible. • Setting of the car antenna (aerial). Automatic tuning is not possible. • Store the correct frequency in monaural. MP3/WMA/AAC files take a longer time to which data can be played back. a disc recorded...
Operating Instructions
Page 25
... radio channel into a preset failed. t Clean or insert the disc correctly. • A blank disc has been inserted. • The disc cannot play due to connect a USB device and USB cable. t Be sure to receive the channel that you cannot go any button is pressed.) The connection of order, or an unsupported device is connected. OVERLOAD USB device is not supported. t Disconnect the USB device, then change the source by pressing (SOURCE). t See the installation/connections manual of a USB device. SEEK +/- NO MUSIC...
... radio channel into a preset failed. t Clean or insert the disc correctly. • A blank disc has been inserted. • The disc cannot play due to connect a USB device and USB cable. t Be sure to receive the channel that you cannot go any button is pressed.) The connection of order, or an unsupported device is connected. OVERLOAD USB device is not supported. t Disconnect the USB device, then change the source by pressing (SOURCE). t See the installation/connections manual of a USB device. SEEK +/- NO MUSIC...


