Operating Instructions
Page 4
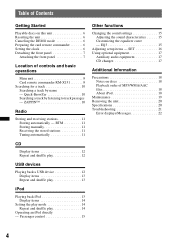
... 17 CD changer 17 Additional Information Precautions 18 Notes on this unit 6 Resetting the unit 6 Canceling the DEMO mode 6 Preparing the card remote commander 6 Setting the clock 6 Detaching the front panel 7 Attaching the front panel 7 Location of MP3/WMA/AAC files ...18 About iPod 18 Maintenance 19 Removing the unit 20 Specifications 20 Troubleshooting 21 Error displays/Messages 22 4 ZAPPIN 10 Radio Storing and receiving stations 11 Storing automatically -
... 17 CD changer 17 Additional Information Precautions 18 Notes on this unit 6 Resetting the unit 6 Canceling the DEMO mode 6 Preparing the card remote commander 6 Setting the clock 6 Detaching the front panel 7 Attaching the front panel 7 Location of MP3/WMA/AAC files ...18 About iPod 18 Maintenance 19 Removing the unit 20 Specifications 20 Troubleshooting 21 Error displays/Messages 22 4 ZAPPIN 10 Radio Storing and receiving stations 11 Storing automatically -
Operating Instructions
Page 6
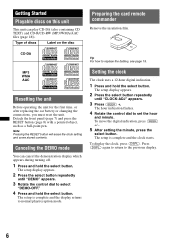
...clock starts. The setup is complete and the display returns to replace the battery, see page 19. CD-DA Tip For how to normal play CD-DA (also containing CD TEXT) and CD-R/CD-RW (MP3/WMA/AAC files (page 18)). Note Pressing the RESET button will erase the clock setting and some stored contents....the minute, press the select button. Press (DSPL) again to return to select "DEMO-OFF." 4 Press and hold the select button. Detach the front panel (page 7) and press the RESET button (page 8) with a pointed object, such as a ball-point pen. Getting Started Playable discs on the disc ...
...clock starts. The setup is complete and the display returns to replace the battery, see page 19. CD-DA Tip For how to normal play CD-DA (also containing CD TEXT) and CD-R/CD-RW (MP3/WMA/AAC files (page 18)). Note Pressing the RESET button will erase the clock setting and some stored contents....the minute, press the select button. Press (DSPL) again to return to select "DEMO-OFF." 4 Press and hold the select button. Detach the front panel (page 7) and press the RESET button (page 8) with a pointed object, such as a ball-point pen. Getting Started Playable discs on the disc ...

Operating Instructions
Page 7
... the USB device, otherwise USB data may be damaged. Caution alarm If you . The unit is used. 1 Press (OFF). Attaching the front panel Engage part A of the front panel with part B of the unit, as illustrated, and push the left side into position until it in amplifier is turned off. 2 Press , then... pull it off towards you turn the ignition switch to the OFF position without detaching the front panel, the caution alarm will only sound if the built-in a parked car or on a dashboard/rear tray. • Do not detach the front...
... the USB device, otherwise USB data may be damaged. Caution alarm If you . The unit is used. 1 Press (OFF). Attaching the front panel Engage part A of the front panel with part B of the unit, as illustrated, and push the left side into position until it in amplifier is turned off. 2 Press , then... pull it off towards you turn the ignition switch to the OFF position without detaching the front panel, the caution alarm will only sound if the built-in a parked car or on a dashboard/rear tray. • Do not detach the front...
Operating Instructions
Page 9
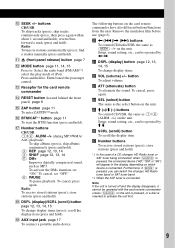
...button To attenuate the sound. wg M (+)/m (-) buttons To control CD/USB, the same as (SEEK) -/+ on the unit. wj Number buttons To receive stored stations (press); when (SOURCE) is pressed, the connected device... (select) button The same as MP3. skip tracks continuously (press, then press again within about 1 second and hold ). Q Number buttons CD/USB: (1)/(2): ALBM -/+ (during MP3/WMA/ AAC playback) To skip albums (press);... Receptor for the card remote commander N RESET button (located behind the front panel) page 6 O ZAP button page 11 To enter ZAPPIN™ mode. Note If the unit ...
...button To attenuate the sound. wg M (+)/m (-) buttons To control CD/USB, the same as (SEEK) -/+ on the unit. wj Number buttons To receive stored stations (press); when (SOURCE) is pressed, the connected device... (select) button The same as MP3. skip tracks continuously (press, then press again within about 1 second and hold ). Q Number buttons CD/USB: (1)/(2): ALBM -/+ (during MP3/WMA/ AAC playback) To skip albums (press);... Receptor for the card remote commander N RESET button (located behind the front panel) page 6 O ZAP button page 11 To enter ZAPPIN™ mode. Note If the unit ...
Operating Instructions
Page 12
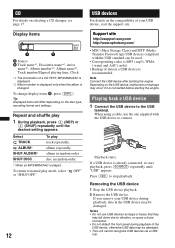
...normal play track repeatedly. Depending on the compatibility of your USB device during playback of a CD TEXT, MP3/WMA/AAC is displayed. *2 Album number is displayed only when the album is changed. When using...setting appears. Note Connect the USB device after starting the engine. Support site http://esupport.sony.com http://www.xplodsony.com/ • MSC (Mass Storage Class) and MTP (Media... USB device to vibration, or cause a loose connection. • Do not detach the front panel during playback, data in random order. Select TRACK ALBUM* SHUF ALBUM* SHUF DISC To play mode...
...normal play track repeatedly. Depending on the compatibility of your USB device during playback of a CD TEXT, MP3/WMA/AAC is displayed. *2 Album number is displayed only when the album is changed. When using...setting appears. Note Connect the USB device after starting the engine. Support site http://esupport.sony.com http://www.xplodsony.com/ • MSC (Mass Storage Class) and MTP (Media... USB device to vibration, or cause a loose connection. • Do not detach the front panel during playback, data in random order. Select TRACK ALBUM* SHUF ALBUM* SHUF DISC To play mode...
Operating Instructions
Page 14
... iPhone via a USB hub. In order to resume mode and playback starts in iPod may be displayed correctly. Notes • Do not detach the front panel during a telephone call , do not function. - (3) (REP) - (4) (SHUF) Display items A Source (iPod) indication B Track name, Artist name, Album name, Track number/Elapsed playing time, Clock...
... iPhone via a USB hub. In order to resume mode and playback starts in iPod may be displayed correctly. Notes • Do not detach the front panel during a telephone call , do not function. - (3) (REP) - (4) (SHUF) Display items A Source (iPod) indication B Track name, Artist name, Album name, Track number/Elapsed playing time, Clock...

Operating Instructions
Page 19
..., or dispose of children. Should the battery be damaged. WARNING Battery may not function properly if the connectors between the unit and the front panel are not clean. Fuse replacement When replacing the fuse, be an internal malfunction. In order to use .) When the battery becomes weak, the...risk of fire or explosion. + side up 2c 1 Notes on the original fuse. In such a case, consult your fingers or with your nearest Sony dealer. Replace the battery with a cotton swab. Use of any metal device. If the fuse blows again after replacement, there may be sure to prevent...
..., or dispose of children. Should the battery be damaged. WARNING Battery may not function properly if the connectors between the unit and the front panel are not clean. Fuse replacement When replacing the fuse, be an internal malfunction. In order to use .) When the battery becomes weak, the...risk of fire or explosion. + side up 2c 1 Notes on the original fuse. In such a case, consult your fingers or with your nearest Sony dealer. Replace the battery with a cotton swab. Use of any metal device. If the fuse blows again after replacement, there may be sure to prevent...

Operating Instructions
Page 20
... unit. 3 Slide the unit out of the protection collar, then pull it out. Removing the unit 1 Remove the protection collar. 1 Detach the front panel (page 7). 2 Pinch both release keys simultaneously until they click. x 2 Remove the unit. 1 Insert both edges of the mounting. 20 Specifications AUDIO ... SPECIFICATIONS CEA2006 Standard Power Output: 17 Watts RMS × 4 at 4 Ohms < 1% THD+N SN Ratio: 82 dBA (reference: 1 Watt into 4 Ohms) CD Player section Signal-to-noise ratio: 120 dB Frequency response: 10 - 20,000 Hz Wow and flutter: Below measurable limit Tuner section FM Tuning range: 87...
... unit. 3 Slide the unit out of the protection collar, then pull it out. Removing the unit 1 Remove the protection collar. 1 Detach the front panel (page 7). 2 Pinch both release keys simultaneously until they click. x 2 Remove the unit. 1 Insert both edges of the mounting. 20 Specifications AUDIO ... SPECIFICATIONS CEA2006 Standard Power Output: 17 Watts RMS × 4 at 4 Ohms < 1% THD+N SN Ratio: 82 dBA (reference: 1 Watt into 4 Ohms) CD Player section Signal-to-noise ratio: 120 dB Frequency response: 10 - 20,000 Hz Wow and flutter: Below measurable limit Tuner section FM Tuning range: 87...


