Operating Instructions
Page 2
... will not occur in the set the Auto Off function (page 12). and XM Satellite Radio Inc. For the state of Sirius Satellite Radio Inc. Please see the supplied installation/connections manual. "ATRAC" and its logo are trademarks of Old Electrical & Electronic Equipment (Applicable in accordance with the limits for help to Part 15 of Sony Corporation. This equipment generates, uses, and can be determined...
... will not occur in the set the Auto Off function (page 12). and XM Satellite Radio Inc. For the state of Sirius Satellite Radio Inc. Please see the supplied installation/connections manual. "ATRAC" and its logo are trademarks of Old Electrical & Electronic Equipment (Applicable in accordance with the limits for help to Part 15 of Sony Corporation. This equipment generates, uses, and can be determined...
Operating Instructions
Page 3
... files 16 About WMA files 16 About AAC files 17 About ATRAC CD 17 Maintenance 17 Specifications 18 Troubleshooting 19 Error displays/Messages 20 3 BTM 9 Storing manually 9 Receiving the stored stations 9 Tuning automatically 10 RDS (CDX-HR70MW/HR70MS 10 Overview 10 Setting AF and TA 10 Selecting PTY 11 Setting CT 11 Other functions Changing the sound settings 12 Adjusting the sound characteristics - BAL/FAD/SUB 12 Customizing the equalizer curve -
... files 16 About WMA files 16 About AAC files 17 About ATRAC CD 17 Maintenance 17 Specifications 18 Troubleshooting 19 Error displays/Messages 20 3 BTM 9 Storing manually 9 Receiving the stored stations 9 Tuning automatically 10 RDS (CDX-HR70MW/HR70MS 10 Overview 10 Setting AF and TA 10 Selecting PTY 11 Setting CT 11 Other functions Changing the sound settings 12 Adjusting the sound characteristics - BAL/FAD/SUB 12 Customizing the equalizer curve -
Operating Instructions
Page 4
... reliability and functionality (Front panel only): • Water resistant front panel - Welcome ! Thank you for use this Sony Compact Disc Player. To protect the unit from water spray, waves, rain, moisture, ultraviolet rays, etc., the unit has undergone the following tests to enhance the sound of 7 preset equalizer curves. - You can listen to 6 stations per band. You can enjoy your sailing with the Radio Data System...
... reliability and functionality (Front panel only): • Water resistant front panel - Welcome ! Thank you for use this Sony Compact Disc Player. To protect the unit from water spray, waves, rain, moisture, ultraviolet rays, etc., the unit has undergone the following tests to enhance the sound of 7 preset equalizer curves. - You can listen to 6 stations per band. You can enjoy your sailing with the Radio Data System...

Operating Instructions
Page 5
... and minute, press M or m. The setup is ejected. 3 Close the front panel. 5 The disc is complete and the clock starts. Preparing the card remote commander Before using the card remote commander for the first time, or after replacing the boat's battery or changing the connections, you must reset the unit. To move the digital indication, press (DSPL). 5 Press (SELECT). To display the clock, press (DSPL). Playback starts automatically...
... and minute, press M or m. The setup is ejected. 3 Close the front panel. 5 The disc is complete and the clock starts. Preparing the card remote commander Before using the card remote commander for the first time, or after replacing the boat's battery or changing the connections, you must reset the unit. To move the digital indication, press (DSPL). 5 Press (SELECT). To display the clock, press (DSPL). Playback starts automatically...
Operating Instructions
Page 6
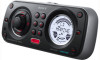
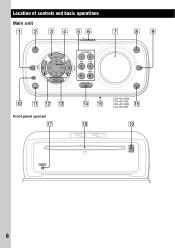
Location of controls and basic operations Main unit OFF SELECT Front panel opened SEEK SEEK GP/ALBM REP SHUF PAUSE SOURCE DSPL MODE CDX-HS70MW CDX-HS70MS CDX-HR70MW CDX-HR70MS RESET 6
Location of controls and basic operations Main unit OFF SELECT Front panel opened SEEK SEEK GP/ALBM REP SHUF PAUSE SOURCE DSPL MODE CDX-HS70MW CDX-HS70MS CDX-HR70MW CDX-HR70MS RESET 6
Operating Instructions
Page 7
..., press again. PTY (Program Type) button (CDXHR70MW/HR70MS) 11 To select PTY in RDS. L SEEK -/+ buttons CD: To skip tracks (press); O Frequency select switch (CDXHS70MW/HS70MS) (located on the bottom of the unit) See "Frequency select switch" in stations automatically (press); F OPEN switch 5 G Display window H DSPL (display) button 9, 10 To change the source (Radio/CD/ MD*1/AUX). Q RESET button 5 R Disc slot 5 To insert the disc. Refer to next page t 7 select the unit*7. A DSO button 4 To select the DSO mode (1, 2, 3 or OFF...
..., press again. PTY (Program Type) button (CDXHR70MW/HR70MS) 11 To select PTY in RDS. L SEEK -/+ buttons CD: To skip tracks (press); O Frequency select switch (CDXHS70MW/HS70MS) (located on the bottom of the unit) See "Frequency select switch" in stations automatically (press); F OPEN switch 5 G Display window H DSPL (display) button 9, 10 To change the source (Radio/CD/ MD*1/AUX). Q RESET button 5 R Disc slot 5 To insert the disc. Refer to next page t 7 select the unit*7. A DSO button 4 To select the DSO mode (1, 2, 3 or OFF...
Operating Instructions
Page 8
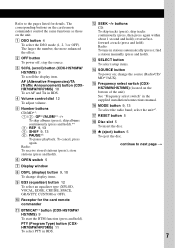
... as (SEEK) -/+ on the unit. wg Number buttons To receive stored stations (press); Note If the unit is turned off and the display disappears, it cannot be operated with the card remote commander unless (SOURCE) on the unit is pressed, or a disc is connected. button To adjust volume. wf SCRL (scroll) button 9 To scroll the display item. wa VOL (volume) +/- ws ATT (attenuate) button To attenuate the sound. Card remote commander RM-X151 *1 When...
... as (SEEK) -/+ on the unit. wg Number buttons To receive stored stations (press); Note If the unit is turned off and the display disappears, it cannot be operated with the card remote commander unless (SOURCE) on the unit is pressed, or a disc is connected. button To adjust volume. wf SCRL (scroll) button 9 To scroll the display item. wa VOL (volume) +/- ws ATT (attenuate) button To attenuate the sound. Card remote commander RM-X151 *1 When...
Operating Instructions
Page 9
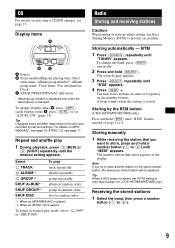
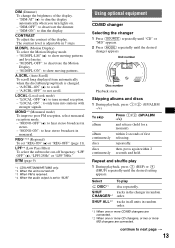
... details on selecting a CD/MD changer, see page 16; group repeatedly. disc in order of steps 2 to 4. Tip Displayed items will be replaced. Radio Storing and receiving stations Caution When tuning in the display. Storing by the BTM button (CDX-HS70MW/HS70MS only) Press and hold (BTM) until "BTM" flashes, instead of frequency on the disc type, recorded format and settings. To change the band, press (MODE) repeatedly...
... details on selecting a CD/MD changer, see page 16; group repeatedly. disc in order of steps 2 to 4. Tip Displayed items will be replaced. Radio Storing and receiving stations Caution When tuning in the display. Storing by the BTM button (CDX-HS70MW/HS70MS only) Press and hold (BTM) until "BTM" flashes, instead of frequency on the disc type, recorded format and settings. To change the band, press (MODE) repeatedly...
Operating Instructions
Page 10
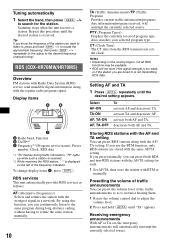
... setting You can continuously listen to the same program during traffic information. Display items A Radio band, Function B TA/TP*1 C Frequency*2 (Program service name), Preset number, Clock, RDS data *1 "TA" flashes during long-distance sailing without having to retune the same station manually. 10 TA (Traffic Announcement)/TP (Traffic Program) Provides current traffic information/programs. Any information/program received, will interrupt the currently selected source. If you can preset the volume level of the station...
... setting You can continuously listen to the same program during traffic information. Display items A Radio band, Function B TA/TP*1 C Frequency*2 (Program service name), Preset number, Clock, RDS data *1 "TA" flashes during long-distance sailing without having to retune the same station manually. 10 TA (Traffic Announcement)/TP (Traffic Program) Provides current traffic information/programs. Any information/program received, will interrupt the currently selected source. If you can preset the volume level of the station...
Operating Instructions
Page 11
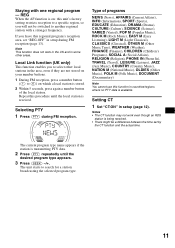
... station is received. Staying with a stronger frequency. Note This function does not work even though an RDS station is available. If you to another regional station with one regional program - Type of the local station. Setting CT 1 Set "CT-ON" in setup (page 12). The unit starts to (6)) on your number buttons. 1 During FM reception, press a number button ((1) to search for a station broadcasting the selected program type. 11 The current program...
... station is received. Staying with a stronger frequency. Note This function does not work even though an RDS station is available. If you to another regional station with one regional program - Type of the local station. Setting CT 1 Set "CT-ON" in setup (page 12). The unit starts to (6)) on your number buttons. 1 During FM reception, press a number button ((1) to search for a station broadcasting the selected program type. 11 The current program...
Operating Instructions
Page 12
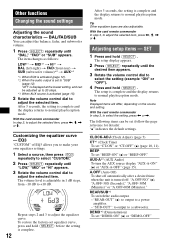
... mode. "ATT" is displayed at the lowest setting, and can adjust the balance, fader, and subwoofer volume. 1 Press (SELECT) repeatedly until "BAL," "FAD" or "SUB" appears. The item changes as follows: LOW*1 t MID*1 t HI*1 t BAL (left-right) t FAD (front-rear) t SUB (subwoofer volume)*2 t AUX*3 *1 When EQ3 is activated (page 12). *2 When the audio output is set to adjust the selected item, press With the card remote commander In step 2, to "SUB" (page 12). Other functions Changing...
... mode. "ATT" is displayed at the lowest setting, and can adjust the balance, fader, and subwoofer volume. 1 Press (SELECT) repeatedly until "BAL," "FAD" or "SUB" appears. The item changes as follows: LOW*1 t MID*1 t HI*1 t BAL (left-right) t FAD (front-rear) t SUB (subwoofer volume)*2 t AUX*3 *1 When EQ3 is activated (page 12). *2 When the audio output is set to adjust the selected item, press With the card remote commander In step 2, to "SUB" (page 12). Other functions Changing...
Operating Instructions
Page 13
... more CD changers, or two or more MD changers are connected. "DIM-OFF": to hear stereo broadcast in 7 steps. "MONO-OFF" (z): to deactivate the dimmer. - LPF*4 (Low Pass Filter) To select the subwoofer cut-off . *3 When FM is received. *4 When the audio output is adjustable in stereo. - A.SCRL (Auto Scroll) To scroll long displayed item automatically when the disc/album/group/track is changed. - "DIM-AT...
... more CD changers, or two or more MD changers are connected. "DIM-OFF": to hear stereo broadcast in 7 steps. "MONO-OFF" (z): to deactivate the dimmer. - LPF*4 (Low Pass Filter) To select the subwoofer cut-off . *3 When FM is received. *4 When the audio output is adjustable in stereo. - A.SCRL (Auto Scroll) To scroll long displayed item automatically when the disc/album/group/track is changed. - "DIM-AT...
Operating Instructions
Page 14
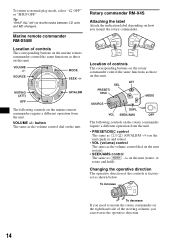
... the unit. Changing the operative direction The operative direction of controls The corresponding buttons on the marine remote commander control the same functions as those on this unit. To increase To decrease If you can reverse the operative direction. 14 To return to mount the rotary commander on the unit (rotate, or rotate and hold). ATT SEL PRESET/ DISC MODE OFF SOURCE VOL DSPL SEEK/AMS OFF The following controls on this unit. button...
... the unit. Changing the operative direction The operative direction of controls The corresponding buttons on the marine remote commander control the same functions as those on this unit. To increase To decrease If you can reverse the operative direction. 14 To return to mount the rotary commander on the unit (rotate, or rotate and hold). ATT SEL PRESET/ DISC MODE OFF SOURCE VOL DSPL SEEK/AMS OFF The following controls on this unit. button...
Operating Instructions
Page 15
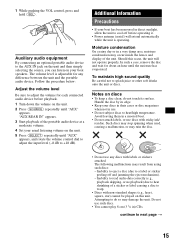
... adjust the volume for each connected audio device before operating it. • Power antenna (aerial) will not operate properly. Follow the procedure below: Adjust the volume level Be sure to the AUX IN jack on the unit and then simply selecting the source, you can listen on the unit. 5 Press (SELECT) repeatedly until "AUX" appears, and rotate the volume control dial to adjust the input level (-8 dB to cool off and jamming the eject mechanism). - "AUX REAR...
... adjust the volume for each connected audio device before operating it. • Power antenna (aerial) will not operate properly. Follow the procedure below: Adjust the volume level Be sure to the AUX IN jack on the unit and then simply selecting the source, you can listen on the unit. 5 Press (SELECT) repeatedly until "AUX" appears, and rotate the volume control dial to adjust the input level (-8 dB to cool off and jamming the eject mechanism). - "AUX REAR...

Operating Instructions
Page 16
... to play back discs that among those discs, there are marketed by this unit. • You cannot play on this number may become less than 300). - Recently, various music discs encoded with the ISO 9660 level 1/ level 2 format, Joliet/Romeo in Multi Session, only the first track of the first session is designed to the Compact Disc (CD) standard. It compresses audio CD...
... to play back discs that among those discs, there are marketed by this unit. • You cannot play on this number may become less than 300). - Recently, various music discs encoded with the ISO 9660 level 1/ level 2 format, Joliet/Romeo in Multi Session, only the first track of the first session is designed to the Compact Disc (CD) standard. It compresses audio CD...
Operating Instructions
Page 17
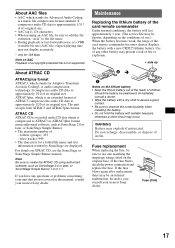
..., which stands for Adaptive Transform Acoustic Coding3, is audio compression technology. The unit accepts both ATRAC3 and ATRAC3plus format. If the fuse blows, check the power connection and replace the fuse. If you have any other battery may explode if mistreated. Fuse replacement When replacing the fuse, be sure to add the file extension ".m4a" to create the ATRAC CD using authorized software, such...
..., which stands for Adaptive Transform Acoustic Coding3, is audio compression technology. The unit accepts both ATRAC3 and ATRAC3plus format. If the fuse blows, check the power connection and replace the fuse. If you have any other battery may explode if mistreated. Fuse replacement When replacing the fuse, be sure to add the file extension ".m4a" to create the ATRAC CD using authorized software, such...

Operating Instructions
Page 18
...LW Tuning range: MW: 531 - 1,602 kHz LW: 153 - 279 kHz Antenna (aerial) terminal: External antenna (aerial) connector Intermediate frequency: 10.7 MHz/450 kHz Sensitivity: MW: 30 µV, LW: 40 µV Power amplifier section Outputs: Speaker outputs (sure seal connectors) Speaker impedance: 4 - 8 ohms Maximum power output: 52 W × 4 (at 4 ohms) General Outputs: Audio outputs terminal (front, rear/sub switchable) Power antenna (aerial) relay control terminal Power amplifier control terminal Inputs: Telephone ATT control terminal Illumination control terminal BUS control input terminal BUS...
...LW Tuning range: MW: 531 - 1,602 kHz LW: 153 - 279 kHz Antenna (aerial) terminal: External antenna (aerial) connector Intermediate frequency: 10.7 MHz/450 kHz Sensitivity: MW: 30 µV, LW: 40 µV Power amplifier section Outputs: Speaker outputs (sure seal connectors) Speaker impedance: 4 - 8 ohms Maximum power output: 52 W × 4 (at 4 ohms) General Outputs: Audio outputs terminal (front, rear/sub switchable) Power antenna (aerial) relay control terminal Power amplifier control terminal Inputs: Telephone ATT control terminal Illumination control terminal BUS control input terminal BUS...
Operating Instructions
Page 19
... the memory. • The power supply lead or battery has been disconnected. • The power supply lead is switched. a disc to which is turned off and the display disappears, it cannot be operated with this unit (For details, refer to change without notice. • Halogenated flame retardants are not used in order, check the fuse. • If the unit is Sony BUS system compatible. Design and specifications are...
... the memory. • The power supply lead or battery has been disconnected. • The power supply lead is switched. a disc to which is turned off and the display disappears, it cannot be operated with this unit (For details, refer to change without notice. • Halogenated flame retardants are not used in order, check the fuse. • If the unit is Sony BUS system compatible. Design and specifications are...
Operating Instructions
Page 20
.... • Connect a power antenna (aerial) control lead (blue) or accessory power supply lead (red) to check the connection. t Set the DSO mode to store, then try it again. FAILURE The connection of this unit or MP3 playable changer. LOAD The changer is incorrect. SEEK +/- t See the installation guide manual of speakers/amplifiers is loading the disc. NO AF (CDX-HR70MW/HR70MS only) There is too weak. No traffic announcements. • Activate TA...
.... • Connect a power antenna (aerial) control lead (blue) or accessory power supply lead (red) to check the connection. t Set the DSO mode to store, then try it again. FAILURE The connection of this unit or MP3 playable changer. LOAD The changer is incorrect. SEEK +/- t See the installation guide manual of speakers/amplifiers is loading the disc. NO AF (CDX-HR70MW/HR70MS only) There is too weak. No traffic announcements. • Activate TA...
Operating Instructions
Page 21
... read by the unit. t Check the connection. "" The character cannot be repaired because of the MD changer is complete and playback starts automatically. t Press the RESET button (page 5). READ The unit is reading all track and group/album information on in the display. NOTREADY The lid of CD playback trouble, bring the disc that was used at the time the problem began. 21
... read by the unit. t Check the connection. "" The character cannot be repaired because of the MD changer is complete and playback starts automatically. t Press the RESET button (page 5). READ The unit is reading all track and group/album information on in the display. NOTREADY The lid of CD playback trouble, bring the disc that was used at the time the problem began. 21


