
Operating Instructions
Page 15
... the effect. Balance To adjust the balance between the front and rear speakers: "F10" - Repeat steps 5 to 8 to normal play /reception mode. "0" (z) - "-8 dB" *1 When CD/USB source is activated. *2 When AUX source is complete. After 3 seconds, the setting is complete and the display returns to adjust other frequency ranges. 9 Push... 7 Rotate the multi way encoder to +10 dB. 8 Press the multi way encoder. Customizing the equalizer curve - EQ3 parametric To select an equalizer type: "Xplod," "Vocal," "Edge," "Cruise," "Space," "Gravity," "Custom" or "off " (page 4).
... the effect. Balance To adjust the balance between the front and rear speakers: "F10" - Repeat steps 5 to 8 to normal play /reception mode. "0" (z) - "-8 dB" *1 When CD/USB source is activated. *2 When AUX source is complete. After 3 seconds, the setting is complete and the display returns to adjust other frequency ranges. 9 Push... 7 Rotate the multi way encoder to +10 dB. 8 Press the multi way encoder. Customizing the equalizer curve - EQ3 parametric To select an equalizer type: "Xplod," "Vocal," "Edge," "Cruise," "Space," "Gravity," "Custom" or "off " (page 4).
Operating Instructions
Page 22
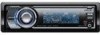
...20 kHz with an RCA pin cord): RC-61 (1 m), RC-62 (2 m) CD changer (10 discs): CDX-757MX CD changer (6 discs): CDX-T69 Source selector: XA-C40 AUX-IN selector: XA-300 Interface adaptor for iPod: XA-120IP HD Radio™ tuner: XT-100HD CEA2006 Standard Power Output: 17 Watts RMS × ...4 at 10 kHz (XPLOD) Power requirements: 12 V DC car battery (negative ground (earth)) ...
...20 kHz with an RCA pin cord): RC-61 (1 m), RC-62 (2 m) CD changer (10 discs): CDX-757MX CD changer (6 discs): CDX-T69 Source selector: XA-C40 AUX-IN selector: XA-300 Interface adaptor for iPod: XA-120IP HD Radio™ tuner: XT-100HD CEA2006 Standard Power Output: 17 Watts RMS × ...4 at 10 kHz (XPLOD) Power requirements: 12 V DC car battery (negative ground (earth)) ...

Operating Instructions
Page 25
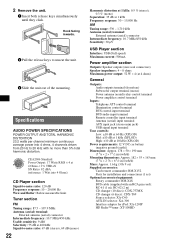
... A blank disc has been inserted. • The disc cannot play because of some problem. NO Magazine The disc magazine is not written in the CD/MD changer. t Insert the magazine in the track. Not Supported The connected USB device is complete and playback starts automatically. Offset There may take the... USB HUB is not written in the MP3 file. Depending on this product, please visit the web site below: http://esupport.sony.com http://www.sony.com/xplod 25 Support site If you have reached the beginning or the end of speakers/amplifiers is loading the disc. Load The changer ...
... A blank disc has been inserted. • The disc cannot play because of some problem. NO Magazine The disc magazine is not written in the CD/MD changer. t Insert the magazine in the track. Not Supported The connected USB device is complete and playback starts automatically. Offset There may take the... USB HUB is not written in the MP3 file. Depending on this product, please visit the web site below: http://esupport.sony.com http://www.sony.com/xplod 25 Support site If you have reached the beginning or the end of speakers/amplifiers is loading the disc. Load The changer ...
Operating Instructions
Page 56
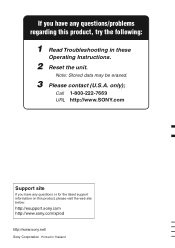
If you have any questions or for the latest support information on this product, try the following: 1 Read Troubleshooting in Thailand Note: Stored data may be erased. 3 Please contact (U.S.A. Call 1-800-222-7669 URL http://www.SONY.com Support site If you have any questions/problems regarding this product, please visit the web site below: http://esupport.sony.com http://www.sony.com/xplod http://www.sony.net/ Sony Corporation Printed in these Operating Instructions. 2 Reset the unit. only);
If you have any questions or for the latest support information on this product, try the following: 1 Read Troubleshooting in Thailand Note: Stored data may be erased. 3 Please contact (U.S.A. Call 1-800-222-7669 URL http://www.SONY.com Support site If you have any questions/problems regarding this product, please visit the web site below: http://esupport.sony.com http://www.sony.com/xplod http://www.sony.net/ Sony Corporation Printed in these Operating Instructions. 2 Reset the unit. only);


