Operating Instructions
Page 1
Model No. CDX-GT700HD Serial No. Para cancelar la pantalla de demostración (DEMO), consulte la página 6. CDX-GT700HD ©2009 Sony Corporation Record the serial number in the space provided below. Refer to these numbers whenever you call upon your Sony dealer regarding this product. To cancel the demonstration (DEMO) display, see page 6. 4-168-227-11(1) FM/AM Digital Radio CD Player Operating Instructions US Manual de instrucciones ES Owner's Record The model and serial numbers are located on the bottom of the unit.
Model No. CDX-GT700HD Serial No. Para cancelar la pantalla de demostración (DEMO), consulte la página 6. CDX-GT700HD ©2009 Sony Corporation Record the serial number in the space provided below. Refer to these numbers whenever you call upon your Sony dealer regarding this product. To cancel the demonstration (DEMO) display, see page 6. 4-168-227-11(1) FM/AM Digital Radio CD Player Operating Instructions US Manual de instrucciones ES Owner's Record The model and serial numbers are located on the bottom of the unit.
Operating Instructions
Page 4
... 13 iTunes Tagging 14 Using iTunes Tagging 14 CD Playing a disc 15 Display items 15 Repeat and shuffle play 15 USB devices Playing back a USB device 15 Display items 16 Repeat and shuffle play 16 iPod Playing back iPod 17 Display items 18 Setting the play ...items - SET 19 Using optional equipment 20 Auxiliary audio equipment 20 Additional Information Precautions 21 Notes on this unit 6 Resetting the unit 6 Canceling the DEMO mode 6 Preparing the card remote commander 6 Setting the clock 6 Detaching the front panel 7 Attaching the front panel 7 Location of MP3/WMA/...
... 13 iTunes Tagging 14 Using iTunes Tagging 14 CD Playing a disc 15 Display items 15 Repeat and shuffle play 15 USB devices Playing back a USB device 15 Display items 16 Repeat and shuffle play 16 iPod Playing back iPod 17 Display items 18 Setting the play ...items - SET 19 Using optional equipment 20 Auxiliary audio equipment 20 Additional Information Precautions 21 Notes on this unit 6 Resetting the unit 6 Canceling the DEMO mode 6 Preparing the card remote commander 6 Setting the clock 6 Detaching the front panel 7 Attaching the front panel 7 Location of MP3/WMA/...
Operating Instructions
Page 6
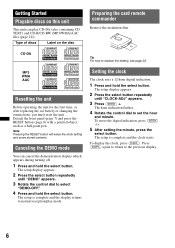
... the unit for the first time, or after replacing the car battery or changing the connections, you must reset the unit. Canceling the DEMO mode You can play mode. CD-DA Tip For how to set the hour and minute. The hour indication flashes. 4 Rotate the ... (page 8) with a pointed object, such as a ball-point pen. The setup display appears. 2 Press the select button repeatedly until "DEMO" appears. 3 Rotate the control dial to select "DEMO-OFF." 4 Press and hold the select button. The setup display appears. 2 Press the select button repeatedly until "CLOCK-ADJ" appears. 3...
... the unit for the first time, or after replacing the car battery or changing the connections, you must reset the unit. Canceling the DEMO mode You can play mode. CD-DA Tip For how to set the hour and minute. The hour indication flashes. 4 Rotate the ... (page 8) with a pointed object, such as a ball-point pen. The setup display appears. 2 Press the select button repeatedly until "DEMO" appears. 3 Rotate the control dial to select "DEMO-OFF." 4 Press and hold the select button. The setup display appears. 2 Press the select button repeatedly until "CLOCK-ADJ" appears. 3...
Operating Instructions
Page 20
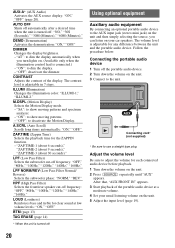
... Scroll) Scrolls long items automatically: "ON," "OFF." Follow the procedure below: Connecting the portable audio device 1 Turn off frequency: "OFF," "80Hz," "100Hz," "120Hz," "140Hz," "160Hz." DEMO (Demonstration) Activates the demonstration: "ON," "OFF." AUX-A* (AUX Audio) Activates the AUX source display: "ON," "OFF" (page 20). CONTRAST Adjusts the contrast of the portable...
... Scroll) Scrolls long items automatically: "ON," "OFF." Follow the procedure below: Connecting the portable audio device 1 Turn off frequency: "OFF," "80Hz," "100Hz," "120Hz," "140Hz," "160Hz." DEMO (Demonstration) Activates the demonstration: "ON," "OFF." AUX-A* (AUX Audio) Activates the AUX source display: "ON," "OFF" (page 20). CONTRAST Adjusts the contrast of the portable...
Operating Instructions
Page 24
...aerial) input terminal Telephone ATT control terminal Illumination control terminal AUX input jack (stereo mini jack) USB signal input connector Tone controls: Low: ±10 dB at 60 Hz (XPLOD) Mid: &#... set) Optional accessories/equipment: BUS cable (supplied with the remote commander. Support site http://esupport.sony.com http://www.xplodsony.com/ General No power is being supplied to the unit. • ... (aerial) does not have been erased. • The RESET button has been pressed. t Set "DEMO-OFF" (page 20). Design and specifications are subject to the ATT lead) is activated. • ...
...aerial) input terminal Telephone ATT control terminal Illumination control terminal AUX input jack (stereo mini jack) USB signal input connector Tone controls: Low: ±10 dB at 60 Hz (XPLOD) Mid: &#... set) Optional accessories/equipment: BUS cable (supplied with the remote commander. Support site http://esupport.sony.com http://www.xplodsony.com/ General No power is being supplied to the unit. • ... (aerial) does not have been erased. • The RESET button has been pressed. t Set "DEMO-OFF" (page 20). Design and specifications are subject to the ATT lead) is activated. • ...


