Operating Instructions
Page 2
... Microsoft. For the State of Microsoft Corporation in the set the Auto Off function (page 15). If you do not set the Auto Off function, press and hold until the display disappears each time you turn the ignition off completely and automatically in the United States and/or other countries. Increase the separation between the equipment and receiver. - Windows Media is connected. -
... Microsoft. For the State of Microsoft Corporation in the set the Auto Off function (page 15). If you do not set the Auto Off function, press and hold until the display disappears each time you turn the ignition off completely and automatically in the United States and/or other countries. Increase the separation between the equipment and receiver. - Windows Media is connected. -
Operating Instructions
Page 3
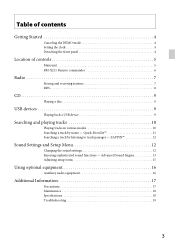
...Adjusting setup items 15 Using optional equipment 16 Auxiliary audio equipment 16 Additional Information 17 Precautions 17 Maintenance 18 Specifications 18 Troubleshooting 19 3 ZAPPIN 12 Sound Settings and Setup Menu 12 Changing the sound settings 12 Enjoying sophisticated sound functions - Table of contents Getting Started 4 Canceling the DEMO mode 4 Setting the clock 4 Detaching the front panel 4 Location of controls 5 Main unit 5 RM-X211 Remote commander 6 Radio 7 Storing and receiving stations 7 RDS 8 CD 9 Playing a disc 9 USB devices 9 Playing back a USB device...
...Adjusting setup items 15 Using optional equipment 16 Auxiliary audio equipment 16 Additional Information 17 Precautions 17 Maintenance 18 Specifications 18 Troubleshooting 19 3 ZAPPIN 12 Sound Settings and Setup Menu 12 Changing the sound settings 12 Enjoying sophisticated sound functions - Table of contents Getting Started 4 Canceling the DEMO mode 4 Setting the clock 4 Detaching the front panel 4 Location of controls 5 Main unit 5 RM-X211 Remote commander 6 Radio 7 Storing and receiving stations 7 RDS 8 CD 9 Playing a disc 9 USB devices 9 Playing back a USB device...
Operating Instructions
Page 4
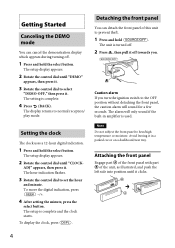
Setting the clock The clock uses a 12-hour digital indication. 1 Press and hold the select button. Caution alarm If you . The setup display appears. 2 Rotate the control dial until it clicks. 4 The setting is complete and the clock starts. The alarm will sound for a few seconds. Avoid leaving it in amplifier is used. Attaching the front panel Engage part A of the front panel with part B of this unit to prevent...
Setting the clock The clock uses a 12-hour digital indication. 1 Press and hold the select button. Caution alarm If you . The setup display appears. 2 Rotate the control dial until it clicks. 4 The setting is complete and the clock starts. The alarm will sound for a few seconds. Avoid leaving it in amplifier is used. Attaching the front panel Engage part A of the front panel with part B of this unit to prevent...
Operating Instructions
Page 5
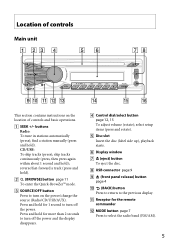
...) button page 4 (BACK) button Press to return to the previous display. Receptor for 1 second to turn off the power. Press and hold for more than 2 seconds to select the radio band (FM/AM). 5 Press and hold for the remote commander MODE button page 7 Press to turn on the location of controls Main unit This section contains instructions on the power/change the source (Radio/CD/USB/AUX). find a station manually...
...) button page 4 (BACK) button Press to return to the previous display. Receptor for 1 second to turn off the power. Press and hold for more than 2 seconds to select the radio band (FM/AM). 5 Press and hold for the remote commander MODE button page 7 Press to turn on the location of controls Main unit This section contains instructions on the power/change the source (Radio/CD/USB/AUX). find a station manually...
Operating Instructions
Page 6
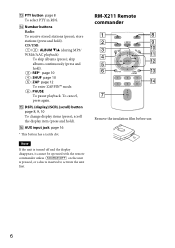
... (press and hold REP* page 10 : SHUF page 10 : ZAP page 12 To enter ZAPPIN™ mode PAUSE To pause playback. qa qs qd qf Remove the insulation film before use. 6 RM-X211 Remote commander 1 2 3 4 5 6 7 OFF SOURCE MENU SOUND ATT MODE + ENTER - PTY button page 8 To select PTY in RDS. Number buttons Radio: To receive stored stations (press);
... (press and hold REP* page 10 : SHUF page 10 : ZAP page 12 To enter ZAPPIN™ mode PAUSE To pause playback. qa qs qd qf Remove the insulation film before use. 6 RM-X211 Remote commander 1 2 3 4 5 6 7 OFF SOURCE MENU SOUND ATT MODE + ENTER - PTY button page 8 To select PTY in RDS. Number buttons Radio: To receive stored stations (press);
Operating Instructions
Page 7
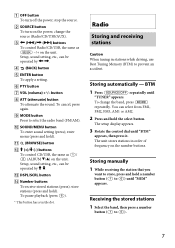
... change the source (Radio/CD/USB/AUX). The unit stores stations in stations while driving, use Best Tuning Memory (BTM) to select the radio band (FM/AM). SOUND/MENU button To enter sound setting (press); To cancel, press again. MODE button Press to prevent an accident. BTM 1 Press repeatedly until "BTM" appears, then press it. Setup, sound setting, etc., can be operated by . DSPL/SCRL button Number buttons To receive stored stations (press); Storing manually...
... change the source (Radio/CD/USB/AUX). The unit stores stations in stations while driving, use Best Tuning Memory (BTM) to select the radio band (FM/AM). SOUND/MENU button To enter sound setting (press); To cancel, press again. MODE button Press to prevent an accident. BTM 1 Press repeatedly until "BTM" appears, then press it. Setup, sound setting, etc., can be operated by . DSPL/SCRL button Number buttons To receive stored stations (press); Storing manually...
Operating Instructions
Page 8
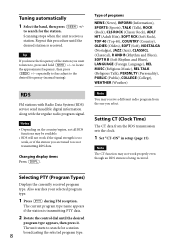
... RDS functions may not work if the signal strength is too weak, or if the station you are tuned to is being received. Setting CT (Clock Time) The CT data from the one you want to listen to, press and hold to locate the approximate frequency, then press repeatedly to fine adjust to the desired frequency (manual tuning). Changing display items Press Type of the station you select...
... RDS functions may not work if the signal strength is too weak, or if the station you are tuned to is being received. Setting CT (Clock Time) The CT data from the one you want to listen to, press and hold to locate the approximate frequency, then press repeatedly to fine adjust to the desired frequency (manual tuning). Changing display items Press Type of the station you select...

Operating Instructions
Page 9
... compatibility of data in a USB device is recommended. To remove the USB device, stop playback, press and hold for 1 second. Press USB devices • MSC (Mass Storage Class)-type USB devices compliant with its USB cable. Playback starts. Depending on the USB device, malfunction or damage may differ depending on the disc type, recording format and settings. Playback starts automatically. Playing back a USB device 1 Connect the USB device to the USB connector with the USB...
... compatibility of data in a USB device is recommended. To remove the USB device, stop playback, press and hold for 1 second. Press USB devices • MSC (Mass Storage Class)-type USB devices compliant with its USB cable. Playback starts. Depending on the USB device, malfunction or damage may differ depending on the disc type, recording format and settings. Playback starts automatically. Playing back a USB device 1 Connect the USB device to the USB connector with the USB...
Operating Instructions
Page 12
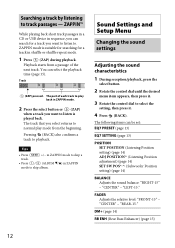
...;/) in ZAPPIN mode to track passages - "CENTER" - DM+ (page 14) RB ENH (Rear Bass Enhancer) (page 15) 12 You can be set: EQ7 PRESET (page 13) EQ7 SETTING (page 13) POSITION SET POSITION (Listening Position setting) (page 14) ADJ POSITION*1 (Listening Position adjustment) (page 14) SET SW POS*1 *2 (Subwoofer Position setting) (page 14) BALANCE Adjusts the sound balance: "RIGHT-15" - The part of each track to...
...;/) in ZAPPIN mode to track passages - "CENTER" - DM+ (page 14) RB ENH (Rear Bass Enhancer) (page 15) 12 You can be set: EQ7 PRESET (page 13) EQ7 SETTING (page 13) POSITION SET POSITION (Listening Position setting) (page 14) ADJ POSITION*1 (Listening Position adjustment) (page 14) SET SW POS*1 *2 (Subwoofer Position setting) (page 14) BALANCE Adjusts the sound balance: "RIGHT-15" - The part of each track to...
Operating Instructions
Page 13
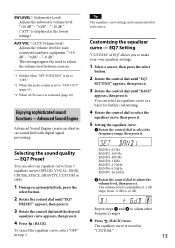
... activated (page 16). Enjoying sophisticated sound functions - SW LEVEL*2 (Subwoofer Level) Adjusts the subwoofer volume level: "+10 dB" - Selecting the sound quality - EQ7 Preset You can be memorized for further customizing. 4 Rotate the control dial to select the equalizer curve, then press it. 5 Setting the equalizer curve. Rotate the control dial to "SUB-OUT" (page 15). *3 When AUX source is displayed at the lowest setting.) AUX VOL*3 (AUX Volume level) Adjusts the volume level for each source. "0 dB" - Advanced Sound Engine Advanced Sound...
... activated (page 16). Enjoying sophisticated sound functions - SW LEVEL*2 (Subwoofer Level) Adjusts the subwoofer volume level: "+10 dB" - Selecting the sound quality - EQ7 Preset You can be memorized for further customizing. 4 Rotate the control dial to select the equalizer curve, then press it. 5 Setting the equalizer curve. Rotate the control dial to "SUB-OUT" (page 15). *3 When AUX source is displayed at the lowest setting.) AUX VOL*3 (AUX Volume level) Adjusts the volume level for each source. "0 dB" - Advanced Sound Engine Advanced Sound...
Operating Instructions
Page 15
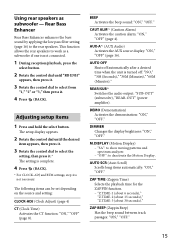
Using rear speakers as a subwoofer if one is not connected. 1 During reception/playback, press the select button. 2 Rotate the control dial until the desired item appears, then press it. 3 Rotate the control dial to select the setting, then press it . 4 Press (BACK). AUX-A*1 (AUX Audio) Activates the AUX source display: "ON," "OFF" (page 16). "OFF": to the rear speakers. REAR/SUB*1 Switches the audio output: "SUB-OUT" (subwoofer), "REAR-OUT" (power amplifier). M.DISPLAY (Motion Display) - ZAP TIME (Zappin Time) Selects the playback time for the ZAPPIN function. - DEMO (...
Using rear speakers as a subwoofer if one is not connected. 1 During reception/playback, press the select button. 2 Rotate the control dial until the desired item appears, then press it. 3 Rotate the control dial to select the setting, then press it . 4 Press (BACK). AUX-A*1 (AUX Audio) Activates the AUX source display: "ON," "OFF" (page 16). "OFF": to the rear speakers. REAR/SUB*1 Switches the audio output: "SUB-OUT" (subwoofer), "REAR-OUT" (power amplifier). M.DISPLAY (Motion Display) - ZAP TIME (Zappin Time) Selects the playback time for the ZAPPIN function. - DEMO (...
Operating Instructions
Page 16
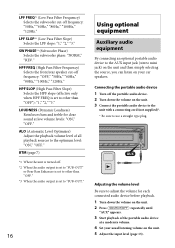
... Pass Filter Frequency) Selects the subwoofer cut -off . *2 When the audio output is set to "SUB-OUT" or Rear Bass Enhancer is set to "SUB-OUT." 16 Using optional equipment Auxiliary audio equipment By connecting an optional portable audio device to the AUX input jack (stereo mini jack) on the unit and then simply selecting the source, you can listen on your usual listening volume on the unit. 3 Connect the portable audio device to the unit with a connecting cord (not supplied...
... Pass Filter Frequency) Selects the subwoofer cut -off . *2 When the audio output is set to "SUB-OUT" or Rear Bass Enhancer is set to "SUB-OUT." 16 Using optional equipment Auxiliary audio equipment By connecting an optional portable audio device to the AUX input jack (stereo mini jack) on the unit and then simply selecting the source, you can listen on your usual listening volume on the unit. 3 Connect the portable audio device to the unit with a connecting cord (not supplied...

Operating Instructions
Page 18
..., detach the front panel (page 4) and clean the connectors with metallic tweezers, otherwise a short-circuit may occur. Specifications AUDIO POWER SPECIFICATIONS CEA2006 Standard Power Output: 17 Watts RMS 4 at 4 Ohms < 1% THD+N SN Ratio: 80 dBA (reference: 1 Watt into 4 Ohms) Tuner section FM Tuning range: 87.5 - 107.9 MHz Antenna (aerial) terminal: External antenna (aerial) connector Intermediate frequency: 25 kHz Usable sensitivity: 8 dBf Selectivity: 75 dB at...
..., detach the front panel (page 4) and clean the connectors with metallic tweezers, otherwise a short-circuit may occur. Specifications AUDIO POWER SPECIFICATIONS CEA2006 Standard Power Output: 17 Watts RMS 4 at 4 Ohms < 1% THD+N SN Ratio: 80 dBA (reference: 1 Watt into 4 Ohms) Tuner section FM Tuning range: 87.5 - 107.9 MHz Antenna (aerial) terminal: External antenna (aerial) connector Intermediate frequency: 25 kHz Usable sensitivity: 8 dBf Selectivity: 75 dB at...
Operating Instructions
Page 19
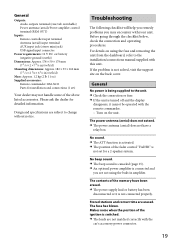
... ATT function is activated. The position of the ignition is not set ) Your dealer may encounter with the remote commander. - Stored stations and correct time are subject to the installation/connections manual supplied with the car's accessory power connector. 19 Makes noise when the position of the fader control "FADER" is switched. The leads are not using the fuse and removing the unit from the dashboard, refer to change...
... ATT function is activated. The position of the ignition is not set ) Your dealer may encounter with the remote commander. - Stored stations and correct time are subject to the installation/connections manual supplied with the car's accessory power connector. 19 Makes noise when the position of the fader control "FADER" is switched. The leads are not using the fuse and removing the unit from the dashboard, refer to change...
Operating Instructions
Page 20
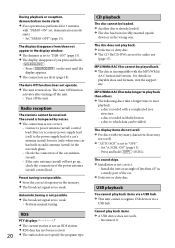
... the support site. Turn off the unit. - Perform manual tuning. a disc recorded in the display window. The dimmer is set to "DIM-ON" (page 15). The display disappears if you press and hold SCRL). The sound skips. Installation is not correct. - Cannot play back items via a USB hub. This unit cannot recognize USB devices via a USB hub. The Auto Off function activates after turning off the unit. The sound is...
... the support site. Turn off the unit. - Perform manual tuning. a disc recorded in the display window. The dimmer is set to "DIM-ON" (page 15). The display disappears if you press and hold SCRL). The sound skips. Installation is not correct. - Cannot play back items via a USB hub. This unit cannot recognize USB devices via a USB hub. The Auto Off function activates after turning off the unit. The sound is...
Operating Instructions
Page 21
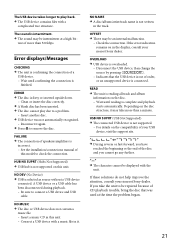
... this unit. - USB NO SUPRT (USB Not Supported) The connected USB device is confirming the connection of speakers/amplifiers is overloaded. - Error displays/Messages CHECKING The unit is not supported. - Reconnect it again. Press to connect a USB device and USB cable. NO DEV (No Device) USB is dirty or inserted upside down. - ERROR The disc is selected as source without a USB device connected. Be sure to remove the disc. NO MUSIC The disc or USB device does...
... this unit. - USB NO SUPRT (USB Not Supported) The connected USB device is confirming the connection of speakers/amplifiers is overloaded. - Error displays/Messages CHECKING The unit is not supported. - Reconnect it again. Press to connect a USB device and USB cable. NO DEV (No Device) USB is dirty or inserted upside down. - ERROR The disc is selected as source without a USB device connected. Be sure to remove the disc. NO MUSIC The disc or USB device does...
Marketing Specifications
Page 1
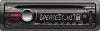
CDX-GT40UW CD Receiver with USB input Bullets • Detach face with LCD display and front aux input • Front USB Mass Storage Class device input • MP3/WMA/AAC1 music file playback • Intuitive Quick-BrowZer® and ZAPPIN™ search features • Advanced Sound Engine and 52 watts x 4 High Power • Automatic Level Optimizer • 2 Volt rear/sub selectable preamp outputs • Radio Data System (RDS) • Convenient wireless remote •...
CDX-GT40UW CD Receiver with USB input Bullets • Detach face with LCD display and front aux input • Front USB Mass Storage Class device input • MP3/WMA/AAC1 music file playback • Intuitive Quick-BrowZer® and ZAPPIN™ search features • Advanced Sound Engine and 52 watts x 4 High Power • Automatic Level Optimizer • 2 Volt rear/sub selectable preamp outputs • Radio Data System (RDS) • Convenient wireless remote •...

Marketing Specifications
Page 2
...-Analog Converter Equalizer Format(s) Supported Preout Impedance Preout Voltage S/N Ratio Signal-to-Noise Ratio (dB) Station Preset(s) Tuner Frequency Range Tuner Type Wow and Flutter AUX in Feature Level Adjustment Convenience Tilt Range Convenience Features Dimmer Adjust Key Illumination On-Screen Clock Display Display Color Display Technology Text Displayed Text Lines Display Panel Auto off mode Dimmer Adjust Panel Design Display color (Color Variation/Nega or Posi) Display Device (LCD/FL/OEL/TFT) Key Illumination Panel finish color Feature CODEC (for USB) Jump Mode List...
...-Analog Converter Equalizer Format(s) Supported Preout Impedance Preout Voltage S/N Ratio Signal-to-Noise Ratio (dB) Station Preset(s) Tuner Frequency Range Tuner Type Wow and Flutter AUX in Feature Level Adjustment Convenience Tilt Range Convenience Features Dimmer Adjust Key Illumination On-Screen Clock Display Display Color Display Technology Text Displayed Text Lines Display Panel Auto off mode Dimmer Adjust Panel Design Display color (Color Variation/Nega or Posi) Display Device (LCD/FL/OEL/TFT) Key Illumination Panel finish color Feature CODEC (for USB) Jump Mode List...
Marketing Specifications
Page 3
...) FM: Usable sensitivity (75 ohm) (dBf ) MW: Tuning range(kHz) MW/LW/SW: Sensitivity (75 ohm) MW/LW/SW(uV) Tuner Feature 17 80 178x50x180 52 182 x 53 x 162 220 2 1.2 Power amplifier turn on AM/FM Antenna Input Terminal Front Aux in the owners manual, consult your nearest Sony dealer. Wireless remote Rear/Subwoofer selectable RCA pre-amp outputs Optional wired remote terminal Front Yes RM-X211 Yes 12H...
...) FM: Usable sensitivity (75 ohm) (dBf ) MW: Tuning range(kHz) MW/LW/SW: Sensitivity (75 ohm) MW/LW/SW(uV) Tuner Feature 17 80 178x50x180 52 182 x 53 x 162 220 2 1.2 Power amplifier turn on AM/FM Antenna Input Terminal Front Aux in the owners manual, consult your nearest Sony dealer. Wireless remote Rear/Subwoofer selectable RCA pre-amp outputs Optional wired remote terminal Front Yes RM-X211 Yes 12H...
Limited Warranty (U.S. Only)
Page 1
...Parts Warranty below when purchased directly from the original date of purchase of the prod ct ("Labor Warranty"), Sony will do not allow the exclusion or limitation of the original Limited Warranty period or for ninety (90) days, whichever is invalid if the factory-applied serial number has been altere or removed... required. For specific instructions on your responsibility to backup any data, software or other materials will , at its option, (i) repair the product using new or refurbished parts or (ii) replace the product with respect to www sony com/ support. This Limited ...
...Parts Warranty below when purchased directly from the original date of purchase of the prod ct ("Labor Warranty"), Sony will do not allow the exclusion or limitation of the original Limited Warranty period or for ninety (90) days, whichever is invalid if the factory-applied serial number has been altere or removed... required. For specific instructions on your responsibility to backup any data, software or other materials will , at its option, (i) repair the product using new or refurbished parts or (ii) replace the product with respect to www sony com/ support. This Limited ...


