Operating Instructions
Page 1
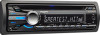
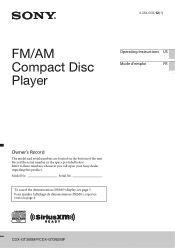
Refer to these numbers whenever you call upon your Sony dealer regarding this product. Pour annuler l'affichage de démonstration (DEMO), reportezvous à la page 4. To cancel the demonstration (DEMO) display, see page 5. Serial No. Record the serial number in the space provided below. CDX-GT360MP/CDX-GT260MP Model No. 4-284-509-12(1) FM/AM Compact Disc Player Operating Instructions US Mode d'emploi FR Owner's Record The model and serial numbers are located on the bottom of the unit.
Refer to these numbers whenever you call upon your Sony dealer regarding this product. Pour annuler l'affichage de démonstration (DEMO), reportezvous à la page 4. To cancel the demonstration (DEMO) display, see page 5. Serial No. Record the serial number in the space provided below. CDX-GT360MP/CDX-GT260MP Model No. 4-284-509-12(1) FM/AM Compact Disc Player Operating Instructions US Mode d'emploi FR Owner's Record The model and serial numbers are located on the bottom of the unit.
Operating Instructions
Page 4
Table of contents Getting Started 5 Canceling the DEMO mode 5 Setting the clock 5 Detaching the front panel 5 Location of controls 6 Main unit 6 RM-X201 Remote commander 6 Radio 8 Storing and receiving stations 8 RDS 9 CD 10 Playing a disc 10 Playing tracks in various modes 10 Sound Settings and Setup Menu 11 Changing the sound settings 11 Adjusting setup items 12 Using optional equipment 13 Auxiliary audio equipment 13 SiriusXM tuner (CDX-GT360MP only 13 Additional Information 14 Precautions 14 Maintenance 16 Specifications 16 Troubleshooting 17 4
Table of contents Getting Started 5 Canceling the DEMO mode 5 Setting the clock 5 Detaching the front panel 5 Location of controls 6 Main unit 6 RM-X201 Remote commander 6 Radio 8 Storing and receiving stations 8 RDS 9 CD 10 Playing a disc 10 Playing tracks in various modes 10 Sound Settings and Setup Menu 11 Changing the sound settings 11 Adjusting setup items 12 Using optional equipment 13 Auxiliary audio equipment 13 SiriusXM tuner (CDX-GT360MP only 13 Additional Information 14 Precautions 14 Maintenance 16 Specifications 16 Troubleshooting 17 4
Operating Instructions
Page 5
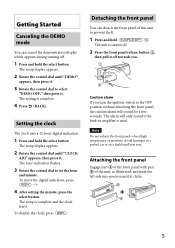
... a 12-hour digital indication. 1 Press and hold the select button. The alarm will sound for a few seconds. Getting Started Canceling the DEMO mode You can detach the front panel of the unit, as illustrated, and push the left side into position until "CLOCK- Attaching the front panel...appears during turning off towards you. 1 2 Caution alarm If you turn the ignition switch to select "DEMO-OFF," then press it . The setup display appears. 2 Rotate the control dial until "DEMO" appears, then press it. 3 Rotate the control dial to the OFF position without detaching the front ...
... a 12-hour digital indication. 1 Press and hold the select button. The alarm will sound for a few seconds. Getting Started Canceling the DEMO mode You can detach the front panel of the unit, as illustrated, and push the left side into position until "CLOCK- Attaching the front panel...appears during turning off towards you. 1 2 Caution alarm If you turn the ignition switch to select "DEMO-OFF," then press it . The setup display appears. 2 Rotate the control dial until "DEMO" appears, then press it. 3 Rotate the control dial to the OFF position without detaching the front ...
Operating Instructions
Page 18
...The connectors are not for 5 minutes with a complicated tree structure. - a disc recorded in the rear/side glass). - During playback or reception, demonstration mode starts. If no operation is performed for audio use (page 15). The Auto Off function activates after turning off the unit. Connect a power antenna... memory. The broadcast signal is set to which data can be added. MP3/WMA files cannot be received. a disc recorded with "DEMO-ON" set to start playback. - The display items do not scroll. For discs with the MP3/WMA format and version (page 15...
...The connectors are not for 5 minutes with a complicated tree structure. - a disc recorded in the rear/side glass). - During playback or reception, demonstration mode starts. If no operation is performed for audio use (page 15). The Auto Off function activates after turning off the unit. Connect a power antenna... memory. The broadcast signal is set to which data can be added. MP3/WMA files cannot be received. a disc recorded with "DEMO-ON" set to start playback. - The display items do not scroll. For discs with the MP3/WMA format and version (page 15...


