
Limited Warranty (U.S. Only)
Page 1
... any repair, replacement part or replacement product for the time periods and as fuses or batteries). A dated purchase receipt is still in material or workmanship for the remainder of protection to any other materials you must deliver the product, freight prepaid, in Japan It does not cover technical assistance for ninety (90) days, whichever is your unit. For specific instructions on...
... any repair, replacement part or replacement product for the time periods and as fuses or batteries). A dated purchase receipt is still in material or workmanship for the remainder of protection to any other materials you must deliver the product, freight prepaid, in Japan It does not cover technical assistance for ninety (90) days, whichever is your unit. For specific instructions on...

Operating Instructions
Page 1
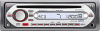
To cancel the demonstration (DEMO) display, see page 7. CDX-GT10M Serial No. CDX-GT10M © 2006 Sony Corporation 2-678-972-11 (1) FM/AM Compact Disc Player Operating Instructions US Mode d'emploi FR Owner's Record The model and serial numbers are located on the bottom of the unit. Record the serial number in the space provided below. Pour annuler l'affichage de démonstration (DEMO), reportez-vous à la page 8. Refer to these numbers whenever you call upon your Sony dealer regarding this product. Model No.
To cancel the demonstration (DEMO) display, see page 7. CDX-GT10M Serial No. CDX-GT10M © 2006 Sony Corporation 2-678-972-11 (1) FM/AM Compact Disc Player Operating Instructions US Mode d'emploi FR Owner's Record The model and serial numbers are located on the bottom of the unit. Record the serial number in the space provided below. Pour annuler l'affichage de démonstration (DEMO), reportez-vous à la page 8. Refer to these numbers whenever you call upon your Sony dealer regarding this product. Model No.

Operating Instructions
Page 2
... this Sony Compact Disc Player. You can select an equalizer curve for 7 music types. • Auxiliary equipment connection An AUX input jack on the front of the unit allows connection of optical instruments with the instructions, may cause harmful interference to Part 15 of the chassis. 2 For installation and connections, see the supplied installation/connections manual. This equipment generates, uses, and can radiate radio frequency energy and, if not installed and used in this manual could...
... this Sony Compact Disc Player. You can select an equalizer curve for 7 music types. • Auxiliary equipment connection An AUX input jack on the front of the unit allows connection of optical instruments with the instructions, may cause harmful interference to Part 15 of the chassis. 2 For installation and connections, see the supplied installation/connections manual. This equipment generates, uses, and can radiate radio frequency energy and, if not installed and used in this manual could...

Operating Instructions
Page 3
... discs 8 Maintenance 9 Removing the unit 9 Specifications 10 Troubleshooting 10 Error displays/Messages 11 3 BAL/FAD/SUB 6 Customizing the equalizer curve - BTM 6 Storing manually 6 Receiving the stored stations 6 Tuning automatically 6 Other functions Changing the sound settings 6 Adjusting the sound characteristics - EQ3 6 Adjusting setup items - Table of Contents Getting Started Resetting the unit 4 Setting the clock 4 Detaching the front panel 4 Attaching the front panel 4 Location of controls and basic operations Main unit 5 Radio Storing and receiving stations...
... discs 8 Maintenance 9 Removing the unit 9 Specifications 10 Troubleshooting 10 Error displays/Messages 11 3 BAL/FAD/SUB 6 Customizing the equalizer curve - BTM 6 Storing manually 6 Receiving the stored stations 6 Tuning automatically 6 Other functions Changing the sound settings 6 Adjusting the sound characteristics - EQ3 6 Adjusting setup items - Table of Contents Getting Started Resetting the unit 4 Setting the clock 4 Detaching the front panel 4 Attaching the front panel 4 Location of controls and basic operations Main unit 5 Radio Storing and receiving stations...

Operating Instructions
Page 4
... first time, or after replacing the car battery or changing the connections, you . The setup display appears. 2 Press the select button repeatedly until it in amplifier is complete and the clock starts. Notes • Do not drop or put anything on a dashboard/rear tray. Detaching the front panel You can detach the front panel of the unit, as a ball-point pen. The alarm will erase the clock setting...
... first time, or after replacing the car battery or changing the connections, you . The setup display appears. 2 Press the select button repeatedly until it in amplifier is complete and the clock starts. Notes • Do not drop or put anything on a dashboard/rear tray. Detaching the front panel You can detach the front panel of the unit, as a ball-point pen. The alarm will erase the clock setting...

Operating Instructions
Page 5
G DSPL (display)/DIM (dimmer) button 4 To change the source (Radio/CD/ AUX). change the display brightness (press and hold ). find a station manually (press and hold ). change display items (press); Radio: To receive stored stations (press); K BTM button 6 To start the BTM function (press and hold ). select setup items (press and rotate). Radio: To tune in random order. Q AUX input jack 7 To connect a portable audio device. 5 A OFF button To power off; J SOURCE button To power on the bottom of controls and basic operations Main unit CDX-GT10M Refer to...
G DSPL (display)/DIM (dimmer) button 4 To change the source (Radio/CD/ AUX). change the display brightness (press and hold ). find a station manually (press and hold ). change display items (press); Radio: To receive stored stations (press); K BTM button 6 To start the BTM function (press and hold ). select setup items (press and rotate). Radio: To tune in random order. Q AUX input jack 7 To connect a portable audio device. 5 A OFF button To power off; J SOURCE button To power on the bottom of controls and basic operations Main unit CDX-GT10M Refer to...

Operating Instructions
Page 6
... for the station. BAL/FAD/SUB You can be replaced. The volume level is adjustable in the display. The unit stores stations in stations while driving, use Best Tuning Memory (BTM) to prevent an accident. Radio Storing and receiving stations Caution When tuning in order of frequency on the same number button, the previous stored station will be adjusted up to 20 steps. *3 When AUX source is activated (page 7). 2 Rotate the volume control dial to adjust the selected item. BTM...
... for the station. BAL/FAD/SUB You can be replaced. The volume level is adjustable in the display. The unit stores stations in stations while driving, use Best Tuning Memory (BTM) to prevent an accident. Radio Storing and receiving stations Caution When tuning in order of frequency on the same number button, the previous stored station will be adjusted up to 20 steps. *3 When AUX source is activated (page 7). 2 Rotate the volume control dial to adjust the selected item. BTM...

Operating Instructions
Page 7
.... DIM (Dimmer) To change the brightness of the portable audio device at a moderate volume. 4 Set your car speakers. "SUB-OUT" (z): to output to use a straight type plug. AUX AUX Connecting cord* (not supplied) * Be sure to a subwoofer. - Note Displayed items will differ, depending on the unit. 2 Press (SOURCE) repeatedly until the desired item appears. 3 Rotate the volume control dial to a power amplifier. SUB/REAR*1 To switch the audio output. - Adjusting setup items - SET 1 Press and hold the select button. CLOCK-ADJ (Clock Adjust) (page 4) BEEP To set "DEMO-ON...
.... DIM (Dimmer) To change the brightness of the portable audio device at a moderate volume. 4 Set your car speakers. "SUB-OUT" (z): to output to use a straight type plug. AUX AUX Connecting cord* (not supplied) * Be sure to a subwoofer. - Note Displayed items will differ, depending on the unit. 2 Press (SOURCE) repeatedly until the desired item appears. 3 Rotate the volume control dial to a power amplifier. SUB/REAR*1 To switch the audio output. - Adjusting setup items - SET 1 Press and hold the select button. CLOCK-ADJ (Clock Adjust) (page 4) BEEP To set "DEMO-ON...

Operating Instructions
Page 8
... disc) may not play on this unit. • You cannot play a CD-R/a CD-RW that is a two sided disc product which mates DVD recorded material on one side with digital audio material on discs • To keep a disc ...operating it. • Power antenna will not operate properly. Inability to eject a disc (due to the Compact Disc (CD) standard, playback on this product. Should this product is not guaranteed. • Do not use such discs. • You cannot play back discs that do not conform to the CD standard and may damage the unit. Do not use any discs with copyright protection...
... disc) may not play on this unit. • You cannot play a CD-R/a CD-RW that is a two sided disc product which mates DVD recorded material on one side with digital audio material on discs • To keep a disc ...operating it. • Power antenna will not operate properly. Inability to eject a disc (due to the Compact Disc (CD) standard, playback on this product. Should this product is not guaranteed. • Do not use such discs. • You cannot play back discs that do not conform to the CD standard and may damage the unit. Do not use any discs with copyright protection...
Operating Instructions
Page 9
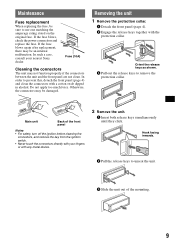
... or with any metal device. 2 Remove the unit. 1 Insert both release keys simultaneously until they click. Maintenance Fuse replacement When replacing the fuse, be an internal malfunction. Otherwise, the connectors may not function properly if the connectors between the unit and the front panel are not clean. Hook facing inwards. 2 Pull the release keys to remove the protection collar. If the fuse blows, check the power connection and replace the fuse.
... or with any metal device. 2 Remove the unit. 1 Insert both release keys simultaneously until they click. Maintenance Fuse replacement When replacing the fuse, be an internal malfunction. Otherwise, the connectors may not function properly if the connectors between the unit and the front panel are not clean. Hook facing inwards. 2 Pull the release keys to remove the protection collar. If the fuse blows, check the power connection and replace the fuse.

Operating Instructions
Page 10
... 10 kHz step) AM tuning interval: 9kHz/10kHz switchable Antenna terminal: External antenna connector Intermediate frequency: 10.7 MHz/450 kHz Sensitivity: 30 µV Power amplifier section Outputs: Speaker outputs (sure seal connectors) Speaker impedance: 4 - 8 ohms Maximum power output: 52 W × 4 (at 4 ohms) General Outputs: Audio outputs terminal (sub/rear switchable) Power antenna relay control terminal Power amplifier control terminal Inputs: Antenna input terminal AUX input jack (stereo mini jack) Tone controls: Low: ±10 dB at 60 Hz (XPLOD) Mid: ±10 dB...
... 10 kHz step) AM tuning interval: 9kHz/10kHz switchable Antenna terminal: External antenna connector Intermediate frequency: 10.7 MHz/450 kHz Sensitivity: 30 µV Power amplifier section Outputs: Speaker outputs (sure seal connectors) Speaker impedance: 4 - 8 ohms Maximum power output: 52 W × 4 (at 4 ohms) General Outputs: Audio outputs terminal (sub/rear switchable) Power antenna relay control terminal Power amplifier control terminal Inputs: Antenna input terminal AUX input jack (stereo mini jack) Tone controls: Low: ±10 dB at 60 Hz (XPLOD) Mid: ±10 dB...

Operating Instructions
Page 11
... installation/connections manual to be operated because of the local seek mode is too weak. L.SEEK +/- RESET The unit cannot be repaired because of CD playback trouble, bring the disc that was used at a station: Press (SENS) repeatedly until "MONO-OFF" appears. If these solutions do not function. If you have reached the beginning or the end of the power antenna control lead. • Check the frequency...
... installation/connections manual to be operated because of the local seek mode is too weak. L.SEEK +/- RESET The unit cannot be repaired because of CD playback trouble, bring the disc that was used at a station: Press (SENS) repeatedly until "MONO-OFF" appears. If these solutions do not function. If you have reached the beginning or the end of the power antenna control lead. • Check the frequency...

Operating Instructions
Page 24
Call 1-800-222-7669 URL http://www.SONY.com Sony Corporation Printed in these Operating Instructions. 2 Reset the unit. only); If you have any questions/problems regarding this product, try the following: 1 Read Troubleshooting in Thailand Note: Stored data may be erased. 3 Please contact (U.S.A.
Call 1-800-222-7669 URL http://www.SONY.com Sony Corporation Printed in these Operating Instructions. 2 Reset the unit. only); If you have any questions/problems regarding this product, try the following: 1 Read Troubleshooting in Thailand Note: Stored data may be erased. 3 Please contact (U.S.A.

Marketing Specifications
Page 1
Key Features Detachable Faceplate 52W x 4 High Power Rear/Sub Selectable Preout w/LPF Front Panel Auxilary Input for MP3 players Conformal circuit board coating Detachable Faceplate 52W x 4 High Power Rear/Sub Selectable Preout w/LPF Front Panel Aux In Conformal circuit board coating UV Resistant Paint CDX-GT10M Head Unit Specifications Dimensions Weight: N/A Measurements: N/A UPC Code: 027242692534
Key Features Detachable Faceplate 52W x 4 High Power Rear/Sub Selectable Preout w/LPF Front Panel Auxilary Input for MP3 players Conformal circuit board coating Detachable Faceplate 52W x 4 High Power Rear/Sub Selectable Preout w/LPF Front Panel Aux In Conformal circuit board coating UV Resistant Paint CDX-GT10M Head Unit Specifications Dimensions Weight: N/A Measurements: N/A UPC Code: 027242692534

Marketing Specifications
Page 2
Features and specifications are approximate Sony Electronics Inc. • 16530 Via Esprillo • San Diego, CA 92127 • 1-800-222-7669 • www.sony.com Last Updated: 04/03/2007 All other trademarks are property of Sony. CDX-GT10M Head Unit Please visit the Dealer Network for more information at www.sony.com/dn ©2006 Sony Electronics Inc. Non-metric weights and measures are subject to change without written permission is a trademark of their respective owners. Reproduction in whole or in part without notice. Sony is prohibited.
Features and specifications are approximate Sony Electronics Inc. • 16530 Via Esprillo • San Diego, CA 92127 • 1-800-222-7669 • www.sony.com Last Updated: 04/03/2007 All other trademarks are property of Sony. CDX-GT10M Head Unit Please visit the Dealer Network for more information at www.sony.com/dn ©2006 Sony Electronics Inc. Non-metric weights and measures are subject to change without written permission is a trademark of their respective owners. Reproduction in whole or in part without notice. Sony is prohibited.


