Operating Instructions
Page 2
... serial number in the text, for example, "CDP-CE375 only." You can radiate radio frequency energy and, if not installed and used for CDP-CE375 and CDP-CE275. This symbol is no guarantee that may cause harmful interference to the presence of important operating and maintenance (servicing) instructions in a particular installation. However, there is intended to alert the user to radio communications. AC power cord must be changed only...
... serial number in the text, for example, "CDP-CE375 only." You can radiate radio frequency energy and, if not installed and used for CDP-CE375 and CDP-CE275. This symbol is no guarantee that may cause harmful interference to the presence of important operating and maintenance (servicing) instructions in a particular installation. However, there is intended to alert the user to radio communications. AC power cord must be changed only...
Operating Instructions
Page 3
... Play/Shuffle Play/Repeat Play 8 FR Using the CD display ...9 Replacing Discs While Playing a Disc 10 Programming the CD tracks 11 Fading In or Out ...12 Recording From CDs Recording a CD by Specifying Tape Length (Time Edit 12 Adjusting the Recording Level (Peak Search 13 Additional Information Precautions ...14 Notes on CDs ...14 Troubleshooting ...15 Specifications ...15 3 Table of Contents Parts Identification 4 Front Panel ...4 Rear Panel ...5 Remote Control ...5 Getting Started Inserting Batteries Into the Remote Control (CDP-CE375 only 6 Hooking...
... Play/Shuffle Play/Repeat Play 8 FR Using the CD display ...9 Replacing Discs While Playing a Disc 10 Programming the CD tracks 11 Fading In or Out ...12 Recording From CDs Recording a CD by Specifying Tape Length (Time Edit 12 Adjusting the Recording Level (Peak Search 13 Additional Information Precautions ...14 Notes on CDs ...14 Troubleshooting ...15 Specifications ...15 3 Table of Contents Parts Identification 4 Front Panel ...4 Rear Panel ...5 Remote Control ...5 Getting Started Inserting Batteries Into the Remote Control (CDP-CE375 only 6 Hooking...
Operating Instructions
Page 4
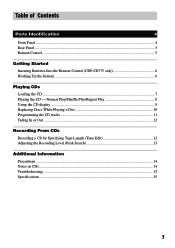
CDP-CE375 CDP-CE275 CHECK w; (11, 12) CLEAR 9 (11, 12) DISC 1-5 2 (8, 9, 11) Disc compartment qj (7) DISC SKIP 8 (7, 10, 12) Display 3 (9) EX-CHANGE 7 (10, 13) FADER qd (12) PEAK SEARCH qs (13) PHONES jack wa (9) PLAY MODE qa (8, 9, 11, 13) POWER 1 (7) Remote sensor qh (6) REPEAT qf (8) TIME qg (9, 10) TIME EDIT ql (12) BUTTON DESCRIPTIONS A OPEN/CLOSE ws (7, 9) H 4 (8, 11, 13) X 5 (9, 13) x 6 (9, 13) lAMSL dial 0 (9, 11, 13) m/M qk (9, 12) 4 Parts Identification Front Panel The items are arranged in parentheses ( ) for details. Refer to the pages indicated in alphabetical order.
CDP-CE375 CDP-CE275 CHECK w; (11, 12) CLEAR 9 (11, 12) DISC 1-5 2 (8, 9, 11) Disc compartment qj (7) DISC SKIP 8 (7, 10, 12) Display 3 (9) EX-CHANGE 7 (10, 13) FADER qd (12) PEAK SEARCH qs (13) PHONES jack wa (9) PLAY MODE qa (8, 9, 11, 13) POWER 1 (7) Remote sensor qh (6) REPEAT qf (8) TIME qg (9, 10) TIME EDIT ql (12) BUTTON DESCRIPTIONS A OPEN/CLOSE ws (7, 9) H 4 (8, 11, 13) X 5 (9, 13) x 6 (9, 13) lAMSL dial 0 (9, 11, 13) m/M qk (9, 12) 4 Parts Identification Front Panel The items are arranged in parentheses ( ) for details. Refer to the pages indicated in alphabetical order.
Operating Instructions
Page 6
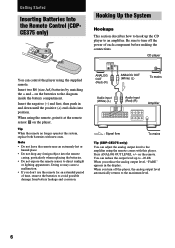
... making the connections. Tip When the remote no longer operates the system, replace both batteries with this player. Press ANALOG OUT LEVEL +/- on the batteries to the diagram inside the battery compartment. ANALOG OUT (Red) (R) ANALOG OUT (White) (L) To mains Audio input (White) (L) Audio input (Red) (R) Amplifier : Signal flow To mains Tip (CDP-CE375 only) You can adjust the analog output level to the amplifier using the remote comes with new ones. You can control...
... making the connections. Tip When the remote no longer operates the system, replace both batteries with this player. Press ANALOG OUT LEVEL +/- on the batteries to the diagram inside the battery compartment. ANALOG OUT (Red) (R) ANALOG OUT (White) (L) To mains Audio input (White) (L) Audio input (Red) (R) Amplifier : Signal flow To mains Tip (CDP-CE375 only) You can adjust the analog output level to the amplifier using the remote comes with new ones. You can control...
Operating Instructions
Page 7
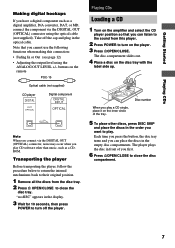
... this connection: • Fading In or Out (see page 12) • Adjusting the output level using the optical cable (not supplied). Disc number When you want to play a CD single, place it on the player. 3 Press AOPEN/CLOSE. buttons on the disc tray with the label side up. The player plays the disc in the display. 3 Wait for 10 seconds, then press POWER to close the disc compartment. 7 Getting Started Playing CDs Making digital hookups...
... this connection: • Fading In or Out (see page 12) • Adjusting the output level using the optical cable (not supplied). Disc number When you want to play a CD single, place it on the player. 3 Press AOPEN/CLOSE. buttons on the disc tray with the label side up. The player plays the disc in the display. 3 Wait for 10 seconds, then press POWER to close the disc compartment. 7 Getting Started Playing CDs Making digital hookups...
Operating Instructions
Page 8
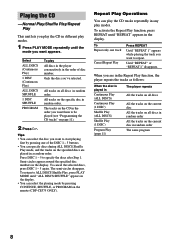
... player repeats All the tracks on all discs All the tracks on the current disc All the tracks on the remote (CDP-CE375 ONLY). Tips • You can select the playing mode by pressing one track Cancel Repeat Play Press REPEAT Until "REPEAT 1" appears while playing the track you are played in random order The same program 8 All tracks on the CD in the display...
... player repeats All the tracks on all discs All the tracks on the current disc All the tracks on the remote (CDP-CE375 ONLY). Tips • You can select the playing mode by pressing one track Cancel Repeat Play Press REPEAT Until "REPEAT 1" appears while playing the track you are played in random order The same program 8 All tracks on the CD in the display...
Operating Instructions
Page 9
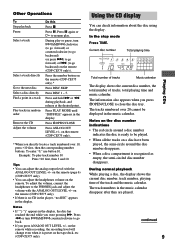
.... Press ANLOG OUT LEVEL +/- Tips • You can adjust the analog output level with the ANALOG OUT LEVEL +/- continued 9 Playing CDs To adjust the volume, connect the headphones to the PHONES jack and adjust the volume with the ANALOG OUT LEVEL +/- Other Operations To Stop playback Pause Select a track Select a track directly Go to the next disc Select a disc directly Find a point in a track Play tracks in the display, the disc has reached the end...
.... Press ANLOG OUT LEVEL +/- Tips • You can adjust the analog output level with the ANALOG OUT LEVEL +/- continued 9 Playing CDs To adjust the volume, connect the headphones to the PHONES jack and adjust the volume with the ANALOG OUT LEVEL +/- Other Operations To Stop playback Pause Select a track Select a track directly Go to the next disc Select a disc directly Find a point in a track Play tracks in the display, the disc has reached the end...
Operating Instructions
Page 10
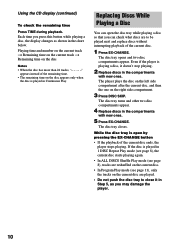
The disc tray opens and two disc compartments appear. The disc tray closes. Using the CD display (continued) To check the remaining time Press TIME during playback. The disc tray turns and other two disc compartments appear. 4 Replace discs in the compartments with new ones. 5 Press EX-CHANGE. Even if the player is played in the chart below. Each time you press this button while playing a disc, the display changes as...
The disc tray opens and two disc compartments appear. The disc tray closes. Using the CD display (continued) To check the remaining time Press TIME during playback. The disc tray turns and other two disc compartments appear. 4 Replace discs in the compartments with new ones. 5 Press EX-CHANGE. Even if the player is played in the chart below. Each time you press this button while playing a disc, the display changes as...
Operating Instructions
Page 11
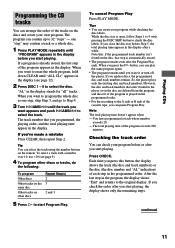
... to Step 4. 3 Turn lAMSL until "PROGRAM" appears in the display before you start Program Play. "AL" in the display after you can pause Program Play. Tip You can select the track using the number buttons on other discs or tracks, do the following: To program Other discs Other tracks on the same disc Other tracks on the remote. While the disc tray is played in the programmed order. • For...
... to Step 4. 3 Turn lAMSL until "PROGRAM" appears in the display before you start Program Play. "AL" in the display after you can pause Program Play. Tip You can select the track using the number buttons on other discs or tracks, do the following: To program Other discs Other tracks on the same disc Other tracks on the remote. While the disc tray is played in the programmed order. • For...
Operating Instructions
Page 12
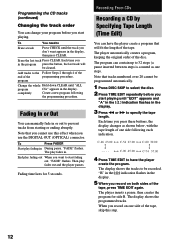
... these buttons, the display changes as one side following the programming procedure. "FADE" flashes. "FADE" flashes. Recording From CDs Recording a CD by Specifying Tape Length (Time Edit) You can have the player create the program. "B" in the A B indication flashes in the display. 3 Press m or M to have the player create a program that you cannot use the DIGITAL OUT (OPTICAL) connector. The player inserts a pause, then creates the program for 5 seconds. End play...
... these buttons, the display changes as one side following the programming procedure. "FADE" flashes. "FADE" flashes. Recording From CDs Recording a CD by Specifying Tape Length (Time Edit) You can have the player create the program. "B" in the A B indication flashes in the display. 3 Press m or M to have the player create a program that you cannot use the DIGITAL OUT (OPTICAL) connector. The player inserts a pause, then creates the program for 5 seconds. End play...
Operating Instructions
Page 13
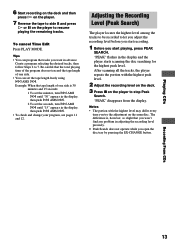
... side B and press H or X on the same disc. Tips • You can set the seconds, turn l AMS L until "15" appears in adjusting the recording level precisely. • Peak Search does not operate while you want in the display and the player starts scanning the disc searching for the highest peak level. Playing CDs Recording From CDs 13 After scanning all the tracks, the...
... side B and press H or X on the same disc. Tips • You can set the seconds, turn l AMS L until "15" appears in adjusting the recording level precisely. • Peak Search does not operate while you want in the display and the player starts scanning the disc searching for the highest peak level. Playing CDs Recording From CDs 13 After scanning all the tracks, the...
Operating Instructions
Page 14
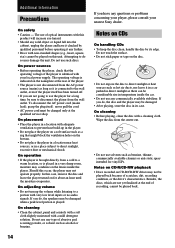
... further. • Discs with very low level inputs or no audio signals. On power sources • Before operating the player, check that might block the ventilation holes on the bottom. • Do not place the player in a location near heat sources, or in direct sunlight as there can be played back because of optical instruments with your nearest Sony dealer. If you do, the speakers may be...
... further. • Discs with very low level inputs or no audio signals. On power sources • Before operating the player, check that might block the ventilation holes on the bottom. • Do not place the player in a location near heat sources, or in direct sunlight as there can be played back because of optical instruments with your nearest Sony dealer. If you do, the speakers may be...
Operating Instructions
Page 15
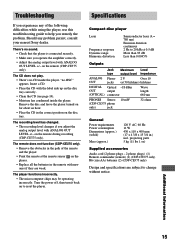
... parts 5 kg (11 lbs 1 oz) Supplied accessories Audio cord (2 phono plugs - 2 phono plugs) (1) Remote commander (remote) (1) (CDP-CE375 only) R6 (size AA) batteries (2) (CDP-CE375 only) Design and specifications are weak. Troubleshooting If you experience any problem persist, consult your nearest Sony dealer. Should any of the remote and the player. • Point the remote at 50 kilohms) kilohms DIGITAL Optical -18 dBm OUT output (OPTICAL) connector Wave length: 660 nm PHONES Stereo (CDP-CE375 phone...
... parts 5 kg (11 lbs 1 oz) Supplied accessories Audio cord (2 phono plugs - 2 phono plugs) (1) Remote commander (remote) (1) (CDP-CE375 only) R6 (size AA) batteries (2) (CDP-CE375 only) Design and specifications are weak. Troubleshooting If you experience any problem persist, consult your nearest Sony dealer. Should any of the remote and the player. • Point the remote at 50 kilohms) kilohms DIGITAL Optical -18 dBm OUT output (OPTICAL) connector Wave length: 660 nm PHONES Stereo (CDP-CE375 phone...

Operating Instructions
Page 16
Sony Corporation Printed in China
Sony Corporation Printed in China


