Operating Instructions
Page 32
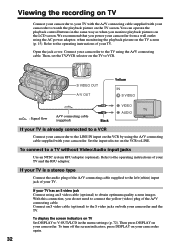
...indicators on TV Set DISPLAY to V-OUT/LCD in the same way as when you monitor playback pictures on the LCD screen. If your TV is already connected to a VCR Connect your camcorder to the LINE IN input on the VCR by using an S video cable (optional) to obtain optimum quality screen ...images. Connect an S video cable (optional) to the S video jacks on both your TV. Viewing ...
...indicators on TV Set DISPLAY to V-OUT/LCD in the same way as when you monitor playback pictures on the LCD screen. If your TV is already connected to a VCR Connect your camcorder to the LINE IN input on the VCR by using an S video cable (optional) to obtain optimum quality screen ...images. Connect an S video cable (optional) to the S video jacks on both your TV. Viewing ...

Operating Instructions
Page 49
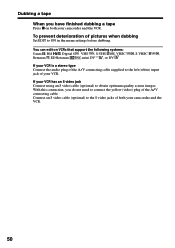
... DISPLAY on your camcorder. (5) Start recording on your camcorder - Dubbing a tape Using the A/V connecting cable Connect your camcorder to record over) into the VCR, and insert the recorded tape into your VCR for more information. DISPLAY on the Remote Commander (CCD-TRV107/TRV408 only) ...camcorder. Refer to the operating instructions of your VCR for more information. (3) Set the POWER switch to PLAYER. (4) Play back the recorded tape on the VCR. S VIDEO OUT A / V OUT Yellow IN S VIDEO : Signal flow A/V connecting cable (supplied) Black VIDEO AUDIO 49 Set DISPLAY to LCD...
... DISPLAY on your camcorder. (5) Start recording on your camcorder - Dubbing a tape Using the A/V connecting cable Connect your camcorder to record over) into the VCR, and insert the recorded tape into your VCR for more information. DISPLAY on the Remote Commander (CCD-TRV107/TRV408 only) ...camcorder. Refer to the operating instructions of your VCR for more information. (3) Set the POWER switch to PLAYER. (4) Play back the recorded tape on the VCR. S VIDEO OUT A / V OUT Yellow IN S VIDEO : Signal flow A/V connecting cable (supplied) Black VIDEO AUDIO 49 Set DISPLAY to LCD...
Operating Instructions
Page 50
If your VCR has an S video jack Connect using an S video cable (optional) to the S video jacks of both your camcorder and the VCR. 50 Connect an S video cable (optional) to obtain optimum quality screen images. You can edit on both your camcorder and the VCR. To prevent deterioration ... VCR is a stereo type Connect the audio plug of the A/V connecting cable supplied to ON in the menu settings before dubbing. With this connection, you have finished dubbing a tape Press x on VCRs that support the following systems: 8 mm , Hi8 , Digital 8 , VHS , S-VHS , VHSC , S-VHSC , ...
If your VCR has an S video jack Connect using an S video cable (optional) to the S video jacks of both your camcorder and the VCR. 50 Connect an S video cable (optional) to obtain optimum quality screen images. You can edit on both your camcorder and the VCR. To prevent deterioration ... VCR is a stereo type Connect the audio plug of the A/V connecting cable supplied to ON in the menu settings before dubbing. With this connection, you have finished dubbing a tape Press x on VCRs that support the following systems: 8 mm , Hi8 , Digital 8 , VHS , S-VHS , VHSC , S-VHSC , ...

Operating Instructions
Page 51
...video cable (optional) to obtain optimum quality screen images. Using the Easy Dubbing function Step 1 Connecting the VCR (p. 51). You can edit on VCRs that support the following systems: 8 mm , Hi8 , Digital 8 , VHS , S-VHS , VHSC , S-VHSC , Betamax , ED Betamax , mini DV , or DV If your VCR has an S video jack Connect using your camcorder... and the VCR. 51 You can select one of the A/V connecting cable. Select...
...video cable (optional) to obtain optimum quality screen images. Using the Easy Dubbing function Step 1 Connecting the VCR (p. 51). You can edit on VCRs that support the following systems: 8 mm , Hi8 , Digital 8 , VHS , S-VHS , VHSC , S-VHSC , Betamax , ED Betamax , mini DV , or DV If your VCR has an S video jack Connect using your camcorder... and the VCR. 51 You can select one of the A/V connecting cable. Select...
Operating Instructions
Page 59
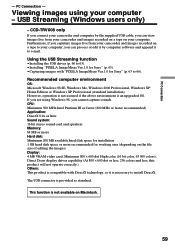
...process or edit it by the supplied USB cable, you cannot capture sounds. Recommended computer ...CCD-TRV608 only If you connect your computer. PC Connection - Using the USB Streaming function •Installing the USB driver (p. 60 to 63). •Installing "PIXELA ImageMixer Ver.1.0 for Sony" (p. 63). •Capturing images with DirectX technology, so it to e-mail. Furthermore, if you caputure images live from your camcorder...is not available on the file size of editing the images) Display: 4 MB VRAM video card, Minimum 800 × 600 dot High color (16 bit color, 65 000...
...process or edit it by the supplied USB cable, you cannot capture sounds. Recommended computer ...CCD-TRV608 only If you connect your computer. PC Connection - Using the USB Streaming function •Installing the USB driver (p. 60 to 63). •Installing "PIXELA ImageMixer Ver.1.0 for Sony" (p. 63). •Capturing images with DirectX technology, so it to e-mail. Furthermore, if you caputure images live from your camcorder...is not available on the file size of editing the images) Display: 4 MB VRAM video card, Minimum 800 × 600 dot High color (16 bit color, 65 000...
Operating Instructions
Page 63
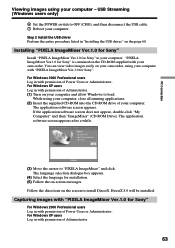
...selection dialogue box appears. (4) Select the language for Sony" is contained on your camcorder. Capturing images with "PIXELA ImageMixer Ver.1.0 for Sony" For Windows 2000 Professional users Log in with your...camcorder, using your computer, close all running applications. (2) Insert the supplied CD-ROM into the CD-ROM drive of your computer - The application software screen appears. You can view video...procedure listed in with "PIXELA ImageMixer Ver.1.0 for Sony" to OFF (CHG), and then disconnect the USB cable. 7 Reboot your computer. USB Streaming (Windows users only) 6...
...selection dialogue box appears. (4) Select the language for Sony" is contained on your camcorder. Capturing images with "PIXELA ImageMixer Ver.1.0 for Sony" For Windows 2000 Professional users Log in with your...camcorder, using your computer, close all running applications. (2) Insert the supplied CD-ROM into the CD-ROM drive of your computer - The application software screen appears. You can view video...procedure listed in with "PIXELA ImageMixer Ver.1.0 for Sony" to OFF (CHG), and then disconnect the USB cable. 7 Reboot your computer. USB Streaming (Windows users only) 6...
Operating Instructions
Page 98
Index A, B AC power adaptor 15 Adjusting viewfinder .......... 23 A/V connecting cable 32, 49, 55 BACK LIGHT 25 Battery pack 11 BEEP 72 ... G, H Fade in/out 35 FADER 35 FOCUS 41 Grip strap 95 Heads 85 Hi8 system 80 I, J, K, L "InfoLITHIUM" battery ..... 81 Infrared rays emitter 26 LCD screen 20 LP mode 70 M, N Manual focus 41 Menu settings 67 Mirror mode...scan 31 Slow playback 31 Standard 8 mm system ....... 80 SteadyShot 68 STRIPE 35 Superimposing the date and time 27 S VIDEO OUT jack ... 32, 49, 51 T, U, V Tape counter indicator ........ 24 TBC 69 Telephoto 22 Title 42 ...
Index A, B AC power adaptor 15 Adjusting viewfinder .......... 23 A/V connecting cable 32, 49, 55 BACK LIGHT 25 Battery pack 11 BEEP 72 ... G, H Fade in/out 35 FADER 35 FOCUS 41 Grip strap 95 Heads 85 Hi8 system 80 I, J, K, L "InfoLITHIUM" battery ..... 81 Infrared rays emitter 26 LCD screen 20 LP mode 70 M, N Manual focus 41 Menu settings 67 Mirror mode...scan 31 Slow playback 31 Standard 8 mm system ....... 80 SteadyShot 68 STRIPE 35 Superimposing the date and time 27 S VIDEO OUT jack ... 32, 49, 51 T, U, V Tape counter indicator ........ 24 TBC 69 Telephoto 22 Title 42 ...

