Operating Instructions
Page 2
... to provide reasonable protection against harmful interference in a particular installation. You will not occur in a residential installation. This symbol is connected. - CAUTION You are designed to operate this Sony Handycam VisionTM camcorder. This symbol is no guarantee that any changes or modifications not expressly approved in household or business trash may cause harmful...
... to provide reasonable protection against harmful interference in a particular installation. You will not occur in a residential installation. This symbol is connected. - CAUTION You are designed to operate this Sony Handycam VisionTM camcorder. This symbol is no guarantee that any changes or modifications not expressly approved in household or business trash may cause harmful...
Operating Instructions
Page 3
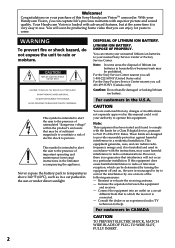
...41 Adjusting the exposure manually ...... 43 Focusing manually 44 Superimposing a title 45 Making your camcorder 65 Troubleshooting 67 Self-diagnosis display 70 Playback - Tape Photo recording (CCD-TRV87 only 30 Using the wide mode 32 Using the fader function 34 Quick Reference Identifying... 8 Step 1 Preparing the power supply ..... 9 Installing the battery pack 9 Charging the battery pack 10 Connecting to a wall outlet 14 Step 2 Inserting a cassette 15 Playing back a tape with digital effects (CCD-TRV87 only 51 Editing Dubbing a tape 52 Recording video or TV programs...
...41 Adjusting the exposure manually ...... 43 Focusing manually 44 Superimposing a title 45 Making your camcorder 65 Troubleshooting 67 Self-diagnosis display 70 Playback - Tape Photo recording (CCD-TRV87 only 30 Using the wide mode 32 Using the fader function 34 Quick Reference Identifying... 8 Step 1 Preparing the power supply ..... 9 Installing the battery pack 9 Charging the battery pack 10 Connecting to a wall outlet 14 Step 2 Inserting a cassette 15 Playing back a tape with digital effects (CCD-TRV87 only 51 Editing Dubbing a tape 52 Recording video or TV programs...
Operating Instructions
Page 4
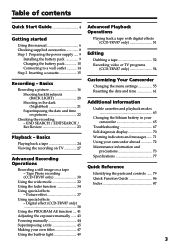
... window facing out. 3 Close the cassette compartment by pressing the mark on the cassette compartment. Open the DC IN jack cover. Connect the plug with its v mark facing up. EJECT AC power adaptor (supplied) Inserting a cassette (p. 15) 1 Slide EJECT in... parentheses "( )" for more information. Quick Start Guide 4 Connecting the power cord (p. 14) Use the battery pack when using your camcorder. The cassette compartment automatically goes down. See the page in the direction of your camcorder outdoors (p. 9).
... window facing out. 3 Close the cassette compartment by pressing the mark on the cassette compartment. Open the DC IN jack cover. Connect the plug with its v mark facing up. EJECT AC power adaptor (supplied) Inserting a cassette (p. 15) 1 Slide EJECT in... parentheses "( )" for more information. Quick Start Guide 4 Connecting the power cord (p. 14) Use the battery pack when using your camcorder. The cassette compartment automatically goes down. See the page in the direction of your camcorder outdoors (p. 9).
Operating Instructions
Page 8
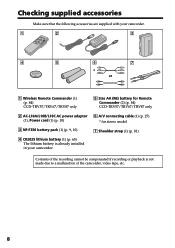
... be compensated if recording or playback is already installed in your camcorder. 1 2 3 4 5 6 7 * or 1 Wireless Remote Commander (1) (p. 84) CCD-TRV57/TRV67/TRV87 only 5 Size AA (R6) battery for Remote Commander (2) (p. 84) CCD-TRV57/TRV67/TRV87 only 2 AC-L10A/L10B/L10C AC power adaptor 6 A/V connecting cable (1) (p. 27) (1), Power cord (1) (p. 10) * for stereo model 3 NP-F330 battery...
... be compensated if recording or playback is already installed in your camcorder. 1 2 3 4 5 6 7 * or 1 Wireless Remote Commander (1) (p. 84) CCD-TRV57/TRV67/TRV87 only 5 Size AA (R6) battery for Remote Commander (2) (p. 84) CCD-TRV57/TRV67/TRV87 only 2 AC-L10A/L10B/L10C AC power adaptor 6 A/V connecting cable (1) (p. 27) (1), Power cord (1) (p. 10) * for stereo model 3 NP-F330 battery...
Operating Instructions
Page 10
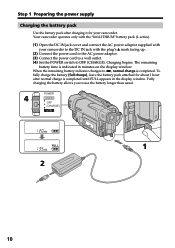
...charge is completed until FULL appears in minutes on the display window. Your camcorder operates only with the "InfoLITHIUM" battery pack (L series). (1) Open the DC IN jack cover and connect the AC power adaptor supplied with your camcorder. To fully charge the battery (full charge), leave the battery pack ...attached for about 1 hour after charging it for your camcorder to the DC IN jack with the plug's v mark facing up. (2) Connect the power cord to the AC power adaptor. (3) Connect the power cord to a wall outlet. (4) Set the POWER switch to OFF (CHARGE...
...charge is completed until FULL appears in minutes on the display window. Your camcorder operates only with the "InfoLITHIUM" battery pack (L series). (1) Open the DC IN jack cover and connect the AC power adaptor supplied with your camcorder. To fully charge the battery (full charge), leave the battery pack ...attached for about 1 hour after charging it for your camcorder to the DC IN jack with the plug's v mark facing up. (2) Connect the power cord to the AC power adaptor. (3) Connect the power cord to a wall outlet. (4) Set the POWER switch to OFF (CHARGE...

Operating Instructions
Page 14
...power adaptor. (1) Open the DC IN jack cover, and connect the AC power adaptor to the DC IN jack on your camcorder with the plug's v mark facing up. (2) Connect the power cord to the AC power adaptor. (3) Connect the power cord to your camcorder for a long time, we recommend that the battery pack... cannot supply any power if the power cord is connected to the DC IN jack, even when the power cord is not plugged into a wall outlet. Using a car battery Use Sony DC Adaptor/Charger ...
...power adaptor. (1) Open the DC IN jack cover, and connect the AC power adaptor to the DC IN jack on your camcorder with the plug's v mark facing up. (2) Connect the power cord to the AC power adaptor. (3) Connect the power cord to your camcorder for a long time, we recommend that the battery pack... cannot supply any power if the power cord is connected to the DC IN jack, even when the power cord is not plugged into a wall outlet. Using a car battery Use Sony DC Adaptor/Charger ...
Operating Instructions
Page 27
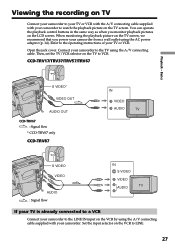
... to the operating instructions of your TV or VCR. Refer to LINE. 27 CCD-TRV17/TRV37/TRV57/TRV67 Playback - Viewing the recording on TV Connect your camcorder to your TV or VCR with the A/V connecting cable supplied with your camcorder. Open the jack cover. Connect your camcorder to watch the playback picture on the VCR by using the...
... to the operating instructions of your TV or VCR. Refer to LINE. 27 CCD-TRV17/TRV37/TRV57/TRV67 Playback - Viewing the recording on TV Connect your camcorder to your TV or VCR with the A/V connecting cable supplied with your camcorder. Open the jack cover. Connect your camcorder to watch the playback picture on the VCR by using the...
Operating Instructions
Page 28
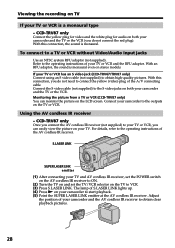
...the AV cordless IR receiver to obtain high-quality pictures. CCD-TRV87 only Connect the yellow plug for video and the white plug for audio on both your camcorder and the TV or the VCR. Adjust the position of the A/V connecting cable. With this connection, you can monitor the picture on the LCD screen.... If your TV or VCR is monaural even on stereo models. Monitoring the picture from a TV or VCR (CCD-TRV87 only) You can easily view the picture on the TV or VCR. Connect your camcorder to a TV or VCR without Video/Audio input jacks Use an NTSC system RFU adaptor (not supplied).
...the AV cordless IR receiver to obtain high-quality pictures. CCD-TRV87 only Connect the yellow plug for video and the white plug for audio on both your camcorder and the TV or the VCR. Adjust the position of the A/V connecting cable. With this connection, you can monitor the picture on the LCD screen.... If your TV or VCR is monaural even on stereo models. Monitoring the picture from a TV or VCR (CCD-TRV87 only) You can easily view the picture on the TV or VCR. Connect your camcorder to a TV or VCR without Video/Audio input jacks Use an NTSC system RFU adaptor (not supplied).
Operating Instructions
Page 29
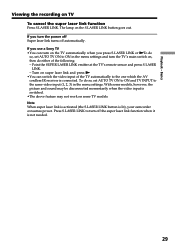
... be disconnected momentarily when the video input is lit), your camcorder consumes power. To do either of the TV automatically to turn the power off Super laser link turns off the super laser link function when it is connected. If you use a Sony TV •You can switch the video input of the...
... be disconnected momentarily when the video input is lit), your camcorder consumes power. To do either of the TV automatically to turn the power off Super laser link turns off the super laser link function when it is connected. If you use a Sony TV •You can switch the video input of the...
Operating Instructions
Page 31
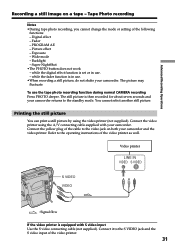
...the video printer is in use. - Advanced Recording Operations Recording a still image on both your camcorder. The picture may fluctuate. You cannot select another still picture. Connect the video printer using the video printer (not supplied). Printing the still picture You can print... a still picture by using the A/V connecting cable supplied with S video input Use the S video connecting cable (not supplied). while the fader function is equipped with your camcorder and the video printer. PROGRAM AE - Connect the yellow plug of the following functions: -...
...the video printer is in use. - Advanced Recording Operations Recording a still image on both your camcorder. The picture may fluctuate. You cannot select another still picture. Connect the video printer using the video printer (not supplied). Printing the still picture You can print... a still picture by using the A/V connecting cable supplied with S video input Use the S video connecting cable (not supplied). while the fader function is equipped with your camcorder and the video printer. PROGRAM AE - Connect the yellow plug of the following functions: -...
Operating Instructions
Page 52
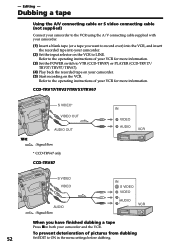
... A/V connecting cable or S video connecting cable (not supplied) Connect your camcorder to the VCR using the A/V connecting cable supplied with your camcorder. (1) Insert a blank tape (or a tape you have finished dubbing a tape Press xon both your VCR for more information. (3) Set the POWER switch to ON in the menu settings before dubbing. Refer to LINE. CCD-TRV17/TRV37...
... A/V connecting cable or S video connecting cable (not supplied) Connect your camcorder to the VCR using the A/V connecting cable supplied with your camcorder. (1) Insert a blank tape (or a tape you have finished dubbing a tape Press xon both your VCR for more information. (3) Set the POWER switch to ON in the menu settings before dubbing. Refer to LINE. CCD-TRV17/TRV37...
Operating Instructions
Page 53
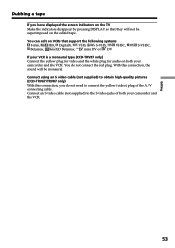
... disappear by pressing DISPLAY so that support the following systems 8 mm, Hi8, Digital8, VHS, S-VHS, VHSC, Betamax, ED Betamax, mini DV or DV S-VHSC, If your VCR is a monaural type (CCD-TRV87 only) Connect the yellow plug for video and the white plug for audio on the... on both your camcorder and the VCR. Connect using an S video cable (not supplied) to obtain high-quality pictures (CCD-TRV67/TRV87 only) With this connection, the sound will not be monaural. Connect an S video cable (not supplied) to connect the yellow (video) plug of both your camcorder and the VCR....
... disappear by pressing DISPLAY so that support the following systems 8 mm, Hi8, Digital8, VHS, S-VHS, VHSC, Betamax, ED Betamax, mini DV or DV S-VHSC, If your VCR is a monaural type (CCD-TRV87 only) Connect the yellow plug for video and the white plug for audio on the... on both your camcorder and the VCR. Connect using an S video cable (not supplied) to obtain high-quality pictures (CCD-TRV67/TRV87 only) With this connection, the sound will not be monaural. Connect an S video cable (not supplied) to connect the yellow (video) plug of both your camcorder and the VCR....
Operating Instructions
Page 54
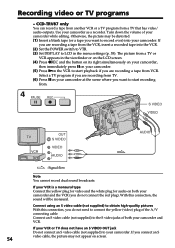
... : Signal flow Note You cannot record dual sound broadcasts. With this connection, you connect an S video cable, the picture may be monaural. If you do not connect the red plug). Turn down the volume of your camcorder as a recorder. Select a TV program if you are recording from VCR... S video cable (not supplied) to obtain high-quality pictures With this connection, the sound will be distorted. (1) Insert a blank tape (or a tape you are recording a tape from TV. (6) Press Xon your camcorder and VCR. CCD-TRV87 only You can record a tape from another VCR or a TV program from...
... : Signal flow Note You cannot record dual sound broadcasts. With this connection, you connect an S video cable, the picture may be monaural. If you do not connect the red plug). Turn down the volume of your camcorder as a recorder. Select a TV program if you are recording from VCR... S video cable (not supplied) to obtain high-quality pictures With this connection, the sound will be distorted. (1) Insert a blank tape (or a tape you are recording a tape from TV. (6) Press Xon your camcorder and VCR. CCD-TRV87 only You can record a tape from another VCR or a TV program from...
Operating Instructions
Page 60
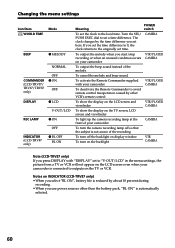
... 0, the clock returns to the local time. Notes on INDICATOR (CCD-TRV87 only) • When you select "BL ON", battery life is reduced by other than the battery pack, "BL ON" is connected to outputs on the LCD screen even when your camcorder CAMERA To turn the camera recording lamp off so that... the subject is not aware of the recording To turn off the backlight on display window To turn on the backlight VTR CAMERA Note (CCD-TRV87 only) If you...
... 0, the clock returns to the local time. Notes on INDICATOR (CCD-TRV87 only) • When you select "BL ON", battery life is reduced by other than the battery pack, "BL ON" is connected to outputs on the LCD screen even when your camcorder CAMERA To turn the camera recording lamp off so that... the subject is not aware of the recording To turn off the backlight on display window To turn on the backlight VTR CAMERA Note (CCD-TRV87 only) If you...
Operating Instructions
Page 61
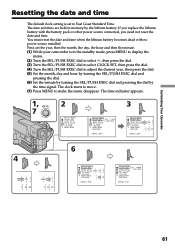
... SEL/PUSH EXEC dial to select CLOCK SET, then press the dial. (4) Turn the SEL/PUSH EXEC dial to East Coast Standard Time. Customizing Your Camcorder Resetting the date and time The default clock setting is set the year, then the month, the day, the hour and then the minute. (1) While... by the time signal. You must reset the date and time when the lithium battery becomes dead with the battery pack or other power source connected, you replace the lithium battery with no power source installed. First, set to adjust the desired year, then press the dial. (5) Set the month, day...
... SEL/PUSH EXEC dial to select CLOCK SET, then press the dial. (4) Turn the SEL/PUSH EXEC dial to East Coast Standard Time. Customizing Your Camcorder Resetting the date and time The default clock setting is set the year, then the month, the day, the hour and then the minute. (1) While... by the time signal. You must reset the date and time when the lithium battery becomes dead with the battery pack or other power source connected, you replace the lithium battery with no power source installed. First, set to adjust the desired year, then press the dial. (5) Set the month, day...
Operating Instructions
Page 68
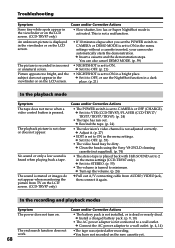
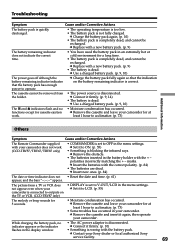
...mode Symptom The tape does not move when a video control button is not connected to VTR (CCD-TRV87)/PLAYER (CCD-TRV17/ TRV37/TRV57/TRV67). (p. 24) • The tape has run out. c...activated. The playback picture is set to ON in the menu settings without a cassette inserted, your camcorder automatically starts the demonstration. c Rewind the tape. (p. 24) • The television's video ... again. c Turn up the volume. (p. 24) c Pull out A/V connecting cable from TV on the LCD screen. c Clean the heads using the Sony V8-25CLD cleaning cassette (not supplied). (p. 74) • The stereo ...
...mode Symptom The tape does not move when a video control button is not connected to VTR (CCD-TRV87)/PLAYER (CCD-TRV17/ TRV37/TRV57/TRV67). (p. 24) • The tape has run out. c...activated. The playback picture is set to ON in the menu settings without a cassette inserted, your camcorder automatically starts the demonstration. c Rewind the tape. (p. 24) • The television's video ... again. c Turn up the volume. (p. 24) c Pull out A/V connecting cable from TV on the LCD screen. c Clean the heads using the Sony V8-25CLD cleaning cassette (not supplied). (p. 74) • The stereo ...
Operating Instructions
Page 69
... VCR. (CCD-TRV87 only) • DISPLAY is completely dead, and cannot be recharged. c Connect it firmly. (p. 10) flashes in the menu settings. c Remove the cassette and insert it to acclimatize. (p. 73) • Some troubles has occurred in the battery holder with your Sony dealer or local authorized Sony service facility. 69 c Contact your camcorder does...
... VCR. (CCD-TRV87 only) • DISPLAY is completely dead, and cannot be recharged. c Connect it firmly. (p. 10) flashes in the menu settings. c Remove the cassette and insert it to acclimatize. (p. 73) • Some troubles has occurred in the battery holder with your Sony dealer or local authorized Sony service facility. 69 c Contact your camcorder does...
Operating Instructions
Page 76
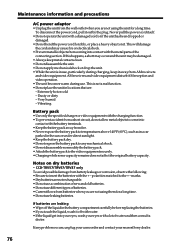
... pack to any problem occurs, unplug your camcorder and contact your eyes with water. •If the liquid get into your eyes, wash your nearest Sony dealer. 76 If batteries are not using ...power adaptor •Unplug the unit from coming into contact with the metal parts of the connecting section. This will damage the cord and may be damaged. • Always keep it .... combination of new and old batteries. • Do not use , particularly during use leaking batteries. CCD-TRV57/TRV67/TRV87 only To avoid possible damage from batteries when you are leaking • Wipe off with...
... pack to any problem occurs, unplug your camcorder and contact your eyes with water. •If the liquid get into your eyes, wash your nearest Sony dealer. 76 If batteries are not using ...power adaptor •Unplug the unit from coming into contact with the metal parts of the connecting section. This will damage the cord and may be damaged. • Always keep it .... combination of new and old batteries. • Do not use , particularly during use leaking batteries. CCD-TRV57/TRV67/TRV87 only To avoid possible damage from batteries when you are leaking • Wipe off with...
Operating Instructions
Page 83
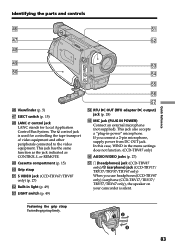
... L or REMOTE. Grip strap ta S VIDEO jack (CCD-TRV67/TRV87 only) (p. 27) ts Built-in -power" microphone. If you use headphones(CCD-TRV87 only)/earphone (CCD-TRV17/TRV37/ TRV57/TRV67 only), the speaker on your camcorder is used for Local Application Control Bus System. The control... jack is silent. In this case, WIND in the menu settings does not function. (CCD-TRV87 only) th AUDIO/VIDEO jacks (p. 27) tj i (headphones) jack (CCD-TRV87 only)/v (earphone) jack (CCD-TRV17/ TRV37/TRV57/TRV67 only) When you connect...
... L or REMOTE. Grip strap ta S VIDEO jack (CCD-TRV67/TRV87 only) (p. 27) ts Built-in -power" microphone. If you use headphones(CCD-TRV87 only)/earphone (CCD-TRV17/TRV37/ TRV57/TRV67 only), the speaker on your camcorder is used for Local Application Control Bus System. The control... jack is silent. In this case, WIND in the menu settings does not function. (CCD-TRV87 only) th AUDIO/VIDEO jacks (p. 27) tj i (headphones) jack (CCD-TRV87 only)/v (earphone) jack (CCD-TRV17/ TRV37/TRV57/TRV67 only) When you connect...
Operating Instructions
Page 86
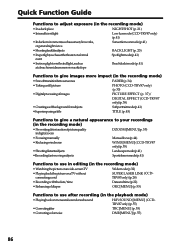
... in digital zoom D ZOOM [MENU] (p. 55) • Focusingmanually Manual focus (p. 44) • Reducingwindnoise WIND [MENU] (CCD-TRV87 only) (p. 55) • Shootingdistantsubjects Landscape mode (p. 41) •Recording fast-moving subjects Sports lesson mode (p. 41) Functions... to use in editing (in the recording mode) • Watchingthepictureonawide-screenTV Wide mode (p. 32) • PlayingbackthepictureonaTVwithout connecting a cord SUPER LASER LINK (CCDTRV87 only) (p. 28) • Recordingwiththedate/time Date and time (p. 22) • Enhancingoldtapes ORC...
... in digital zoom D ZOOM [MENU] (p. 55) • Focusingmanually Manual focus (p. 44) • Reducingwindnoise WIND [MENU] (CCD-TRV87 only) (p. 55) • Shootingdistantsubjects Landscape mode (p. 41) •Recording fast-moving subjects Sports lesson mode (p. 41) Functions... to use in editing (in the recording mode) • Watchingthepictureonawide-screenTV Wide mode (p. 32) • PlayingbackthepictureonaTVwithout connecting a cord SUPER LASER LINK (CCDTRV87 only) (p. 28) • Recordingwiththedate/time Date and time (p. 22) • Enhancingoldtapes ORC...


