Operating Instructions
Page 3
...uses, and can be used in this manual could void your authority to radio communications. If this equipment does cause harmful interference to Part 15 of the following two conditions.: (1) This device may not cause harmful interference, and (2) this product, you have any changes ... a residential installation. Note: This equipment has been tested and found to comply with Part15 of Conformity Trade Name: SONY Model No.: CCD-TRV608 Responsible Party: Sony Electronics lnc. Connect the equipment into an outlet on , the user is subject to which can radiate radio frequency energy...
...uses, and can be used in this manual could void your authority to radio communications. If this equipment does cause harmful interference to Part 15 of the following two conditions.: (1) This device may not cause harmful interference, and (2) this product, you have any changes ... a residential installation. Note: This equipment has been tested and found to comply with Part15 of Conformity Trade Name: SONY Model No.: CCD-TRV608 Responsible Party: Sony Electronics lnc. Connect the equipment into an outlet on , the user is subject to which can radiate radio frequency energy...
Operating Instructions
Page 5
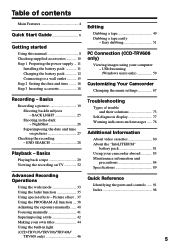
... a tape 49 Dubbing a tape easily - USB Streaming (Windows users only 59 Customizing Your Camcorder Changing the menu settings 67 Recording - BACK LIGHT 25 Shooting in light (CCD-TRV107/TRV308/TRV408/ TRV608 only 46 5 Basics Playing back a tape 29 Viewing the recording on pictures ...the "InfoLITHIUM" battery pack 81 Using your camcorder abroad 83 Maintenance information and precautions 84 Specifications 89 Advanced Recording Operations Using the wide mode 33 Using the fader function 35 Quick Reference Identifying the parts and controls ...... 91 Index 98 Using ...
... a tape 49 Dubbing a tape easily - USB Streaming (Windows users only 59 Customizing Your Camcorder Changing the menu settings 67 Recording - BACK LIGHT 25 Shooting in light (CCD-TRV107/TRV308/TRV408/ TRV608 only 46 5 Basics Playing back a tape 29 Viewing the recording on pictures ...the "InfoLITHIUM" battery pack 81 Using your camcorder abroad 83 Maintenance information and precautions 84 Specifications 89 Advanced Recording Operations Using the wide mode 33 Using the fader function 35 Quick Reference Identifying the parts and controls ...... 91 Index 98 Using ...

Operating Instructions
Page 13
...not installed properly. - Until your camcorder calculates the actual remaining battery time ...Note Prevent metallic objects from coming into contact with the metal parts of the DC plug of between 10°C to 30... pack at 25°C (77°F) Recording time CCD-TRV107/TRV108/TRV308/TRV408 Battery pack Recording with the viewfinder Continuous* Typical**... NP-FM30 (supplied) 165 90 NP-FM50 265 145 NP-FM70 540 295 NP-QM71 640 350 NP-FM90 820 450 NP-FM91/QM91 955 525 Recording with the LCD...
...not installed properly. - Until your camcorder calculates the actual remaining battery time ...Note Prevent metallic objects from coming into contact with the metal parts of the DC plug of between 10°C to 30... pack at 25°C (77°F) Recording time CCD-TRV107/TRV108/TRV308/TRV408 Battery pack Recording with the viewfinder Continuous* Typical**... NP-FM30 (supplied) 165 90 NP-FM50 265 145 NP-FM70 540 295 NP-QM71 640 350 NP-FM90 820 450 NP-FM91/QM91 955 525 Recording with the LCD...
Operating Instructions
Page 18
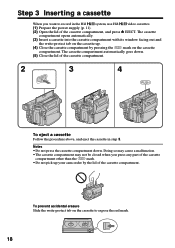
.... 2 3 4 EJECT To eject a cassette Follow the procedure above, and eject the cassette in the Hi8 system, use Hi8 video cassettes. (1) Prepare the power supply (p. 11). (2) Open the lid of the cassette compartment, and... with its window facing out and the write-protect tab on the cassette up your camcorder by pressing the mark on the cassette to record in step 3. The cassette compartment ...protect tab on the cassette compartment. Step 3 Inserting a cassette When you press any part of the cassette compartment other than the mark. •Do not pick up . (4) Close...
.... 2 3 4 EJECT To eject a cassette Follow the procedure above, and eject the cassette in the Hi8 system, use Hi8 video cassettes. (1) Prepare the power supply (p. 11). (2) Open the lid of the cassette compartment, and... with its window facing out and the write-protect tab on the cassette up your camcorder by pressing the mark on the cassette to record in step 3. The cassette compartment ...protect tab on the cassette compartment. Step 3 Inserting a cassette When you press any part of the cassette compartment other than the mark. •Do not pick up . (4) Close...
Operating Instructions
Page 45
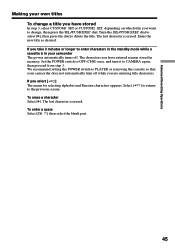
...memory. Select [ to the previous screen. ] to delete the title. Set the POWER switch to PLAYER or removing the cassette so that your camcorder The power automatically turns off while you have stored In step 3, select CUSTOM1 SET or CUSTOM2 SET, depending on which title you take 5 ... 1. We recommend setting the POWER switch to OFF (CHG) once, and turn off . To enter a space Select [Z& ?!], then select the blank part. The characters you are entering title characters. Turn the SEL/PUSH EXEC dial to select [C], then press the dial to return To erase a character Select...
...memory. Select [ to the previous screen. ] to delete the title. Set the POWER switch to PLAYER or removing the cassette so that your camcorder The power automatically turns off while you have stored In step 3, select CUSTOM1 SET or CUSTOM2 SET, depending on which title you take 5 ... 1. We recommend setting the POWER switch to OFF (CHG) once, and turn off . To enter a space Select [Z& ?!], then select the blank part. The characters you are entering title characters. Turn the SEL/PUSH EXEC dial to select [C], then press the dial to return To erase a character Select...
Operating Instructions
Page 87
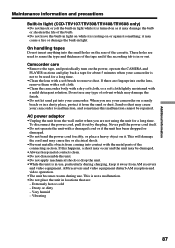
...operate the CAMERA and PLAYER sections and play back a tape for about 5 minutes when your camcorder. Do not use your camcorder to be damaged. •Always keep it out by the plug. When you are fingerprints ... are not using the unit for a long time. •Clean the lens with the metal parts of the tape and if the recording tab is in or out. AC power adaptor •...dust may be used to remove dust. Additional Information Maintenance information and precautions Built-in light (CCD-TRV107/TRV308/TRV408/TRV608 only) •Do not knock or jolt the built-in light while it is ...
...operate the CAMERA and PLAYER sections and play back a tape for about 5 minutes when your camcorder. Do not use your camcorder to be damaged. •Always keep it out by the plug. When you are fingerprints ... are not using the unit for a long time. •Clean the lens with the metal parts of the tape and if the recording tab is in or out. AC power adaptor •...dust may be used to remove dust. Additional Information Maintenance information and precautions Built-in light (CCD-TRV107/TRV308/TRV408/TRV608 only) •Do not knock or jolt the built-in light while it is ...
Operating Instructions
Page 89
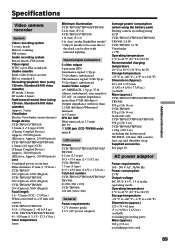
...Hi8 video cassette) Approx. 5 min. Viewfinder Electric Viewfinder (monochrome) Image device CCD-TRV107/TRV108: 3.0 mm (1 / 6 type) CCD (Charge Coupled Device) Approx. 270 000 pixels (Effective: Approx. 250 000 pixels) CCD-TRV308/TRV408/TRV608: 4.5mm (1/4 type) CCD... (when using the battery pack) During camera recording using LCD CCD-TRV107/TRV108/TRV308/ TRV408: 2.6 W CCD-TRV608: 3.1 W Viewfinder 1.9 W Operating temperature 0 &#...parts Mass (approx.) 280 g (9.8 oz) excluding power cord 89 Standard 8/Hi8 video cassette) SP mode: 2 hours LP mode: 4 hours Fastforward/rewind time (using 120 min. Hi8...
...Hi8 video cassette) Approx. 5 min. Viewfinder Electric Viewfinder (monochrome) Image device CCD-TRV107/TRV108: 3.0 mm (1 / 6 type) CCD (Charge Coupled Device) Approx. 270 000 pixels (Effective: Approx. 250 000 pixels) CCD-TRV308/TRV408/TRV608: 4.5mm (1/4 type) CCD... (when using the battery pack) During camera recording using LCD CCD-TRV107/TRV108/TRV308/ TRV408: 2.6 W CCD-TRV608: 3.1 W Viewfinder 1.9 W Operating temperature 0 &#...parts Mass (approx.) 280 g (9.8 oz) excluding power cord 89 Standard 8/Hi8 video cassette) SP mode: 2 hours LP mode: 4 hours Fastforward/rewind time (using 120 min. Hi8...
Operating Instructions
Page 91
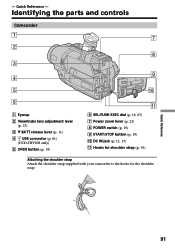
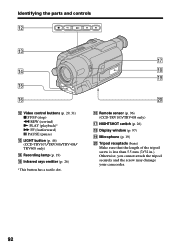
- Identifying the parts and controls Camcorder 1 7 2 8 3 9 4 5 q; 6 1 Eyecup 2 Viewfinder lens adjustment lever (p. 23) 3 V BATT release lever (p. 11) 4 USB connector (p. 61) (CCD-TRV608 only) 5 OPEN button (p. 19) qa 6 SEL/PUSH EXEC dial (p. 16, 67) 7 Power zoom lever (p. 22) 8 POWER switch (p. 19) 9 START/STOP button (p. 19) 0 DC IN jack (p. 12, 15) qa Hooks for shoulder strap (p. 91) Attaching the shoulder strap Attach the shoulder strap supplied with your camcorder to the hooks for the shoulder strap. Quick Reference - Quick Reference 91
- Identifying the parts and controls Camcorder 1 7 2 8 3 9 4 5 q; 6 1 Eyecup 2 Viewfinder lens adjustment lever (p. 23) 3 V BATT release lever (p. 11) 4 USB connector (p. 61) (CCD-TRV608 only) 5 OPEN button (p. 19) qa 6 SEL/PUSH EXEC dial (p. 16, 67) 7 Power zoom lever (p. 22) 8 POWER switch (p. 19) 9 START/STOP button (p. 19) 0 DC IN jack (p. 12, 15) qa Hooks for shoulder strap (p. 91) Attaching the shoulder strap Attach the shoulder strap supplied with your camcorder to the hooks for the shoulder strap. Quick Reference - Quick Reference 91
Operating Instructions
Page 92
...32 in.). qh Remote sensor (p. 96) (CCD-TRV107/TRV408 only) qj NIGHTSHOT switch (p. 26) qk Display window (p. 97) ql Microphone (p. 19) w; Otherwise, you cannot attach the tripod securely and the screw may damage your camcorder. 92 Identifying the parts and controls qs qd qf qg qh qs Video... control buttons (p. 29, 31) x STOP (stop) m REW (rewind) N PLAY (playback)* M FF (fastforward) X PAUSE (pause) qd LIGHT button (p. 46) (CCD-TRV107/TRV308/TRV408/ TRV608 only) qf Recording lamp ...
...32 in.). qh Remote sensor (p. 96) (CCD-TRV107/TRV408 only) qj NIGHTSHOT switch (p. 26) qk Display window (p. 97) ql Microphone (p. 19) w; Otherwise, you cannot attach the tripod securely and the screw may damage your camcorder. 92 Identifying the parts and controls qs qd qf qg qh qs Video... control buttons (p. 29, 31) x STOP (stop) m REW (rewind) N PLAY (playback)* M FF (fastforward) X PAUSE (pause) qd LIGHT button (p. 46) (CCD-TRV107/TRV308/TRV408/ TRV608 only) qf Recording lamp ...
Operating Instructions
Page 93
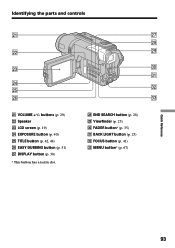
ea es ed wk END SEARCH button (p. 28) wl Viewfinder (p. 23) e; FADER button* (p. 35) ea BACK LIGHT button (p. 25) es FOCUS button (p. 41) ed MENU button* (p. 67) Quick Reference 93 wj wk wl e; Identifying the parts and controls wa ws wd wf wg wh wa VOLUME +*/- buttons (p. 29) ws Speaker wd LCD screen (p. 19) wf EXPOSURE button (p. 40) wg TITLE button (p. 42, 44) wh EASY DUBBING button (p. 51) wj DISPLAY button (p. 30) * This button has a tactile dot.
ea es ed wk END SEARCH button (p. 28) wl Viewfinder (p. 23) e; FADER button* (p. 35) ea BACK LIGHT button (p. 25) es FOCUS button (p. 41) ed MENU button* (p. 67) Quick Reference 93 wj wk wl e; Identifying the parts and controls wa ws wd wf wg wh wa VOLUME +*/- buttons (p. 29) ws Speaker wd LCD screen (p. 19) wf EXPOSURE button (p. 40) wg TITLE button (p. 42, 44) wh EASY DUBBING button (p. 51) wj DISPLAY button (p. 30) * This button has a tactile dot.
Operating Instructions
Page 94
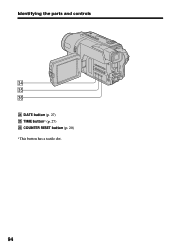
Identifying the parts and controls ef eg eh ef DATE button (p. 27) eg TIME button* (p. 27) eh COUNTER RESET button (p. 20) * This button has a tactile dot. 94
Identifying the parts and controls ef eg eh ef DATE button (p. 27) eg TIME button* (p. 27) eh COUNTER RESET button (p. 20) * This button has a tactile dot. 94
Operating Instructions
Page 95
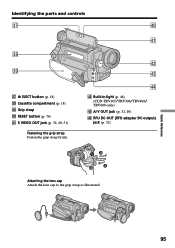
Identifying the parts and controls ej r; ra rs rd rf rs Built-in light (p. 46) (CCD-TRV107/TRV308/TRV408/ TRV608 only) rd A/V OUT jack (p. 32, 49) rf RFU DC OUT (RFU adaptor DC output) jack (p. 32) Attaching the lens cap Attach the lens cap to the grip strap as illustrated. Quick Reference 95 RESET button (p. 76) ra S VIDEO OUT jack (p. 32, 49, 51) Fastening the grip strap Fasten the grip strap firmly. ek el ej Z EJECT button (p. 18) ek Cassette compartment (p. 18) el Grip strap r;
Identifying the parts and controls ej r; ra rs rd rf rs Built-in light (p. 46) (CCD-TRV107/TRV308/TRV408/ TRV608 only) rd A/V OUT jack (p. 32, 49) rf RFU DC OUT (RFU adaptor DC output) jack (p. 32) Attaching the lens cap Attach the lens cap to the grip strap as illustrated. Quick Reference 95 RESET button (p. 76) ra S VIDEO OUT jack (p. 32, 49, 51) Fastening the grip strap Fasten the grip strap firmly. ek el ej Z EJECT button (p. 18) ek Cassette compartment (p. 18) el Grip strap r;
Operating Instructions
Page 96
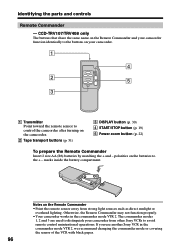
...parts and controls Remote Commander - marks inside the battery compartment. The commander modes 1, 2 and 3 are used to distinguish your camcorder. 1 4 2 5 3 1 Transmitter Point toward the remote sensor to control the camcorder after turning on your camcorder...black paper. 96 CCD-TRV107/TRV408 only The buttons that share the same name on the Remote Commander and your camcorder function identically to ... other Sony VCRs to avoid remote control unintentional operations. If you use another Sony VCR in the commander mode VTR 2. Notes on the batteries to the buttons on the camcorder. ...
...parts and controls Remote Commander - marks inside the battery compartment. The commander modes 1, 2 and 3 are used to distinguish your camcorder. 1 4 2 5 3 1 Transmitter Point toward the remote sensor to control the camcorder after turning on your camcorder...black paper. 96 CCD-TRV107/TRV408 only The buttons that share the same name on the Remote Commander and your camcorder function identically to ... other Sony VCRs to avoid remote control unintentional operations. If you use another Sony VCR in the commander mode VTR 2. Notes on the batteries to the buttons on the camcorder. ...

Operating Instructions
Page 97
...9 0 wa qa ws qs qd Display window 2 wd FULL 3 AM PM wf Quick Reference 1 Recording mode indicator (p. 70)/ Mirror mode indicator (p. 20) 2 Hi8 format indication (p. 24) 3 Remaining battery time indicator (p. 24) 4 Zoom indicator (p. 22)/ Exposure indicator (p. 40) 5 Fader indicator (p. 35) 6 Wide mode indicator... or TIME indicator (p. 16, 27)/ Self-diagnosis display indicator (p. 77) *1) CCD-TRV308/TRV408/TRV608 only *2) CCD-TRV107/TRV308/TRV408/ TRV608 only 97 Identifying the parts and controls Operation indicators LCD screen and Viewfinder 1 qf 2 3 4 40min W T 5 M .
...9 0 wa qa ws qs qd Display window 2 wd FULL 3 AM PM wf Quick Reference 1 Recording mode indicator (p. 70)/ Mirror mode indicator (p. 20) 2 Hi8 format indication (p. 24) 3 Remaining battery time indicator (p. 24) 4 Zoom indicator (p. 22)/ Exposure indicator (p. 40) 5 Fader indicator (p. 35) 6 Wide mode indicator... or TIME indicator (p. 16, 27)/ Self-diagnosis display indicator (p. 77) *1) CCD-TRV308/TRV408/TRV608 only *2) CCD-TRV107/TRV308/TRV408/ TRV608 only 97 Identifying the parts and controls Operation indicators LCD screen and Viewfinder 1 qf 2 3 4 40min W T 5 M .


